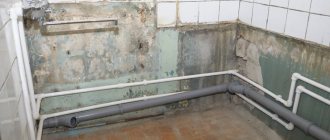
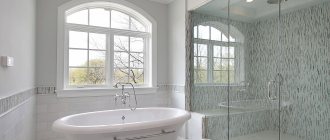
The bathroom is a room with a special microclimate. Due to the constant use of hot and cold water, as well as the active formation of steam, quite high humidity is observed in it.
If you have started a major renovation, remember: before finishing the bathroom, you need to take a set of measures to protect the floor and walls from moisture. Poor waterproofing of the bathroom is fraught with unpleasant consequences, from the appearance of fungus or destruction of expensive ceramic tiles to the occurrence of fire hazards - short circuit of electrical wiring due to water ingress.
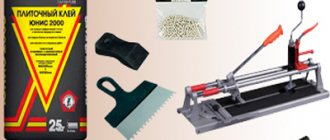
Bathroom waterproofing: types of materials
As a rule, special materials are used as internal waterproofing, which, depending on the application technology, are divided into two types:
- Pasting. Film roll materials based on bitumen, which are attached to the base by fusing or gluing (self-adhesive). Currently, roll materials for bathroom waterproofing are not very popular due to a number of disadvantages: the complexity of the technological process (the base must be as dry and even as possible), the unpleasant smell of bitumen, which does not disappear from the room for a long time, as well as the ability to raise the floor level by up to 5 cm (this is not suitable for bathrooms of a certain layout).
- Coatings. A more modern and convenient type of protective coating. Coating waterproofing for the bathroom is presented in completely ready-to-use or dry mixtures that simply need to be diluted with water. Bitumen-polymer or bitumen-rubber mastic is applied to the surface using a tool. After complete drying, finishing work is carried out.
Due to its consistency, the waterproofing material can be applied without problems to both horizontal and vertical surfaces, creating a durable monolithic coating in problem areas (joint of walls, joint of wall and floor, threshold).
Which waterproofing for tiles should I choose?
What is better to use as waterproofing in the bathroom? In this case, it is necessary to consider all popular product options, their technical characteristics, advantages and disadvantages. Let's take a closer look at the popular options.
Coating waterproofing
This material is made on the basis of bitumen or liquid rubber with the addition of additional synthetic components. The solution is applied to a previously prepared base in the bathroom using a wide paint brush. Particular care must be taken to saturate the area around the shower tray. Moisture constantly accumulates here, some of the water flows onto the floor as a result of leaks on the corrugated tube.
Coating waterproofing is an ideal option for rooms with a total area of no more than 10 m2
.
The compositions in question are supplied to hardware stores in the form of solutions, powders and pastes. The liquid mixture can be one-component, ready-to-use or two-component. In the latter case, before applying the solution to the surface, it is necessary to thoroughly mix the components.
Coating waterproofing is divided into the following types:
- The ready-to-use bitumen-polymer composition has excellent insulating properties, stretches well, does not contain toxic substances, and is resistant to sudden temperature changes. The solution is used to impregnate the base in the bathroom before laying the leveling cement-sand screed.
- Liquid rubber or bitumen-latex waterproofing is laid in a layer of 3-5 millimeters using a paint brush. The composition protects the base layer well from moisture penetration, does not emit an unpleasant odor, and is resistant to sudden temperature changes.
- Cement-polymer waterproofing from the construction company Ceresit is used to seal damaged areas of the floor covering during repair work. This composition can be used to insulate floors or walls.
- Acrylic enamel is also used as waterproofing - this is the most budget-friendly and affordable way to improve the properties of a bathroom. The composition is applied in layers in three or four approaches. The main disadvantage of paint is the appearance of cracks some time after it is applied to the surface.
Expert opinion
Anton Makarov
Expert of our site. She has been selling and installing floor coverings for over 7 years. Can give really valuable advice.
Ask a Question
Liquid glass can also be used as a reliable coating waterproofing for the bathroom. The composition is supplied to hardware stores in a ready-to-use form and contains potassium or sodium sulfate, which provide the solution with a long period of operation. Liquid glass is a plastic composition that spreads evenly over the base and fills all cracks and voids. In addition, the liquid has antiseptic properties and prevents the appearance of fungus and mold.
Pasted waterproofing
Pasted waterproofing
Such waterproofing materials are provided in roll products made from fiberglass or glass fabric with additional impregnation with bitumen or natural rubber. Depending on the method of attachment to the base, the adhesive waterproofing can be welded or self-adhesive. The first type is laid using a gas burner. When using the second option, hot or cold bitumen mastic is used.
We recommend: Everything about the correct grouting of joints between tiles.
The materials are laid with a slight overlap and can be used as waterproofing even on a wooden floor. The main advantages of roll waterproofing are considered to be low cost, ease of installation and high level of durability.
Interesting article on the topic: Waterproofing under tiles in the bathroom: is it necessary and what is it?
Painting waterproofing
This insulation is performed in several layers of a special liquid solution. This material must be applied evenly over the entire area of the room. The main advantages of paint-based waterproofing are considered to be affordable cost and good anti-corrosion properties. The downside of this material is its lack of durability.
What places require the mandatory use of waterproofing?
First of all, you should take care of protecting areas exposed to direct contact with water: the sink apron, shower areas, bathtubs, and toilets. Liquid waterproofing under tiles is also an integral element of high-quality floor repairs. Mastic must be applied to the entire area, since this part of the bathroom is most vulnerable to moisture. A reliable protective layer will help to avoid problems with neighbors below in the event of unexpected flooding, will provide optimal conditions for laying ceramic tiles and will be the key to comfort and coziness in the house.
Useful video about DIY bathroom waterproofing
Viewed times: 909
Great article 1
Author's rating
Author of the article
Oleg Grishin
Flooring specialist with 10 years of experience. Oleg has something to share with our readers
Articles written
103
- Even more interesting:
- Waterproofing under tiles in the bathroom: is it necessary and what is it?
- How to choose floor tiles for the kitchen?
- How to properly grout tile joints?
Waterproofing the floor in the bathroom: materials and stages of work
- Preparation. The base is cleaned of dirt and dust, and it is advisable to use a vacuum cleaner. The cement screed is tapped with a hammer to check for cracks and areas of separation from the floor. If there are any, the screed is removed without regret and a new one is installed.
- Primer. The prepared surface is thoroughly dust-free using two layers of liquid soil.
- Application of the composition. The first layer of liquid waterproofing should be applied to the corner joints of the walls and floor. After complete drying, the corners are glued with rubber tape. Next, the entire floor area is covered with the composition using a wide brush, paint roller or sprayer, ensuring continuous application.
At the same time, along with the floor, partial waterproofing of the bathroom walls is required to a height of 20 to 50 cm. Sewerage and water supply pipes with rubber seals pre-installed on them should also be coated with mastic with a grip of up to 10 cm. Each layer of coating is 1-3 mm thick. should be dried within 24 hours.
After the last layer has completely dried, final priming, installation of heated floors and final decorative finishing can be carried out using materials for laying tiles.
Types of waterproofing
The variety of moisture-protecting materials is quite large. It is difficult to say unequivocally what is better for waterproofing a bathroom or shower: you need to take into account many subtleties and nuances. However, everyone can find a waterproof material that suits their needs and wallet size. There are several main ways to waterproof a bathroom:
- Coloring. Bituminous and polymer-based mastics are applied to the walls and floors with a brush or roller. The result is a flat surface with no joints or seams. If you try hard, you can achieve almost perfect smoothness. In order for this type of waterproofing to be sufficiently reliable, it is necessary to apply mastic in several layers.
- Coating. In this case, a special mixture is prepared from a solution of sand, cement and special additives for waterproofing, which is applied to the surface with a spatula or trowel. Often the same mixture is used instead of a concrete floor screed, since it can also be laid in a fairly thick layer, which allows you to hide all the bumps and irregularities.
- Pasting. With this option, roll or sheet materials are used. They can be built-up or self-adhesive: they are heated with a torch or the protective layer is removed from the adhesive base and the material is pressed to the surface. Externally, such waterproofing resembles roofing materials: roofing felt, bikrost, etc. Bitumen or fiberglass is used as a base. As a result, after pasting, the floor in combination with the lower part of the walls resembles a trough.
- Filling. A solution is prepared from a special mixture, which includes materials such as liquid glass or concrete with additives that make it waterproof. Then the resulting waterproofing is poured and sealed over the bathroom floor. The result is a monolithic layer, without seams or joints.
- The use of waterproofing compounds that penetrate into the material and change its structure. They are applied with a spray or brush, as a result of which the treated material acquires moisture-repellent properties.
USEFUL INFORMATION: Do-it-yourself floor repair, quickly and inexpensively
- Spraying. In this case, a special moisture-resistant composition based on polymers or rubber is sprayed onto the walls and floor. Some time after application, it hardens and turns into a dense film that reliably protects against moisture penetration.
Each of the presented waterproofing methods has its own characteristics, which are suitable or not suitable for certain operating conditions. Their characteristics will affect the possibility of use in a particular case, so it is worth taking a closer look at each of the methods of waterproofing a bathroom under tiles. Then it will be easier to decide what is better in this or that case.
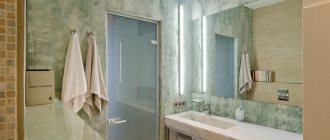
Why do you need internal waterproofing of walls?
Even with a good ventilation system, condensation forms on the walls, which, penetrating into the seams of the tiles, subjects its appearance and durability to serious tests. The coating gradually becomes brittle and collapses. In addition, dark spots appear on the tiles and in the joints between the tiles - fungus and mold.
These bacteria are extremely harmful to human health due to the active release of large numbers of spores into the environment. Entering the body through the respiratory tract, their waste products can lead to various allergic reactions, asthma, migraines and even cancer.
In addition, black mold is very tenacious and difficult to remove mechanically. After superficial cleaning (including with powerful chlorine-containing compounds), it sprouts again and again. The only correct solution is to install reliable waterproofing of the walls. Moisture-proof materials for laying tiles can prevent the problem from occurring itself, extending the life of the coating for a long time and preserving the health of all family members.
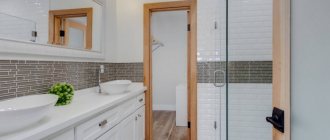
Stages of waterproofing walls in the bathroom
- Preparation. The walls are thoroughly cleaned of dust, remnants of old finishing materials and dried. The joint between the bathroom and the wall is degreased with a special liquid and sealed using a thin line of silicone mastic, which is then smoothed with a spatula or simply a finger dipped in a soapy solution. Self-adhesive cord can be used instead of silicone sealant, but it provides less reliable protection.
- Primer. The surface of the walls is treated several times with a deep penetration antifungal primer.
- Applying bathroom waterproofing under tiles. It is carried out by analogy with the floor: the composition is applied with a brush, roller or spray, thoroughly drying each layer for at least 24 hours. Particular attention is paid to the corners of the bathroom.
After 24 hours from the moment of applying the last layer, the walls are carefully primed again, then a final finishing with ceramic tiles is carried out.
Laying waterproofing
Before waterproofing the bathroom, you need to carefully prepare the room: clean it of dust and debris, remove plumbing fixtures and furniture. Grease and oil stains are removed with special means.
Installation on walls
Waterproofing bathroom walls begins with removing the old coating down to the concrete. Then you should complete the following steps:
- The walls and ceiling in the bathroom are checked for evenness using a level. If there are significant deviations from the level, they must be leveled with plaster.
- Walls, ceilings, all corners are treated with antiseptic.
- The waterproofing solution is prepared in strict accordance with the instructions, avoiding the addition of any additional components.
- Application of waterproofing in the bathroom should be carried out on walls that have been previously moistened with water for better adhesion to the mastic.
- Waterproofing is applied to the walls using vertical or horizontal movements with a wide brush that fits tightly to the surface.
- The walls in the bathroom are covered with a second layer of waterproofing.
The junction of the bathtub and the wall must be thoroughly sealed. Due to difficult access to them, sealing cords or tapes should be used, which must be laid in the seam between the bathtub and the wall.
After finishing the finishing work, to ensure high-quality waterproofing, it is necessary to seal the seams between the tiles with silicone or polyurethane.
On the floor
Waterproofing a bathroom floor under tiles, similar to wall treatment, begins with removing the old coating down to the concrete. If the floor is uneven, you need to fill it level. Next, perform the following steps:
- Apply the primer mixture to the floor surface using a roller. All hard-to-reach places (corners, pipe outlets, etc.) are treated with a thick solution using a brush. After drying, another layer is applied.
- Next, you can begin directly installing waterproofing in the bathroom. The treatment is done with a wide brush, starting from corners, joints between walls and floors, and pipe exit points.
- While the mastic has not dried, sealing tape is laid on the treated joints. At the same time, you need to ensure that it is without seams, wrinkles, or folds. The joints must be overlapped with a width of 5-7 mm and must be coated with mastic. In the same way, you need to process the corners of each wall to a height of 15-20 cm.
- Another layer of polymer waterproofing is laid on top of the tape.
- Bathroom waterproofing under the tiles on the floor is laid in a uniform thick layer, of which there should be two or three. Each of them must dry before laying the next one.
After 24 hours, you can begin tiling the floor. After finishing the finishing work, it is necessary to treat the seams between the tiles with silicone sealant.
In addition to coating mastic, you can use impregnating compounds, for example, treat the floor with liquid glass. It penetrates into concrete, strengthening it and imparting water-repellent properties. In order for the composition to crystallize faster, it is necessary to moisten the previous one with water between applying each layer.