Types of fountain without using a pump
The fountain, which does not require electricity for normal operation, was first invented by Heron of Alexandria, even before the beginning of our era. And this scheme is actively used to this day.
In total, two variations of fountains are known today, the design of which does not require a pump. Both consist of three containers, which are placed at different heights.
These options differ in how the design itself works:
- in the first fountain, the liquid moves by manually filling the uppermost container and systematically moving it to the lower containers through a tube. The operating time of this fountain depends, first of all, on the volume of the uppermost container;
- in the second fountain, the liquid moves thanks to a water mill. But even in this case, the upper container is filled manually.
The main disadvantage of the technology is the need to plan the drainage of fluid from the lower vessels or manual transfer from the lower containers to the upper ones. But it should be noted that in a home or on a personal plot, this minus can be turned into a plus by using it for certain practical purposes.
For example, you can water plants (indoors or those growing on the site). If the settings are done correctly, the water from the fountain can be enriched with oxygen in home aquariums or in a decorative pond located next to the house.
Choosing a pump for a home fountain with your own hands
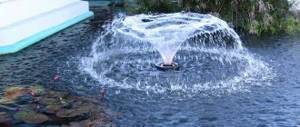
The pump is the main mechanism of the fountain, which ensures the continuous movement of water in the reservoir. The principle of its operation is as follows. Water is taken by a pump, on the suction pipeline of which a filter is installed, where coarse and fine cleaning of the liquid is carried out, and is thrown into the tank through nozzles.
When choosing a pump for a fountain, it is necessary to take into account the operating voltage, productivity, height of water rise and power of the unit. It is better to give preference to models equipped with various hoses, nozzles and spray heads, since purchasing additional elements will be extremely problematic if necessary.
Related article:
Fountain pump: the heart of an artificial water source
Operating principle and purpose. Varieties. Criterias of choice. Manufacturers. Installation. DIY pump for a home fountain.
For the fountain, two types of pumping units are used: piston and surface. The first option is installed at the bottom of the tank and works on the principle of a centrifuge. It is represented by a small, low-power, inexpensive device that is suitable for small fountains. The unit operates silently and consumes little electricity.
Important! The piston pump is a low-voltage device and can be powered either from the mains or from a transformer.
Two types of pumps are suitable for fountains: surface and piston
For more complex multi-level designs (in the form of DIY home waterfalls), you should use a surface type of pumping equipment. It is installed in close proximity to the tank and must be reliably protected from exposure to precipitation and direct sunlight. To do this, it can be covered with a special protective casing or placed in a pavilion or box. The pump is quite noisy and is characterized by high cost. However, this is a reliable and durable type of unit that can last for many years without additional maintenance.
Additional equipment for creating a DIY fountain house
Thanks to various sprayers, nozzles, and water flow regulators, you can create unusual visual effects by changing the shape and adjusting the intensity of the jet, which can be smooth, intermittent, high or low. Due to the use of different types of sprayers, the fountain can move around its axis and release bubbles of different shapes from under the water.
Single sprayers throw small vertical jets of water to a certain height, tiered sprayers - to different heights, forming several layers. The geyser nozzle provides a large amount of soap bubbles. A continuous cascading wall of water can be created using a fishtail sprayer.
Decorative lighting from a home fountain will help make the place truly magical. To do this, you can use moisture-resistant spotlights. With the help of multi-colored LED strips that are laid around the perimeter of the fountain, the contours of the tank are favorably emphasized. You can install solar panels along the shore of the pond, which accumulate energy during the day, and in the evening they spend it on waterproof lamps. It is recommended to provide soft, diffused light by using diode lamps.
Additionally, you can install spotlights to make the fountain glow beautifully in the dark.
Helpful advice! Floating devices and lamps illuminating the water surface from the inside will look unusual and fabulous.
How to choose materials
In order for the “endless engine” to really work smoothly, there is a need to select high-quality materials and vessels for the construction.
Most often, fountains are located on the street. With this in mind, you should pay attention to the following design elements:
- two five-liter containers. It is thanks to them that the fountain will work continuously for almost an hour. If you have the desire and opportunity, you can take vessels with a larger displacement;
- a decorative bowl with a capacity similar to the two previously mentioned containers;
- silicone sealant;
- tight-fitting lids;
- three connecting tubes (those used for droppers are also suitable).
How to choose a place
You need to carefully choose a site for a homemade fountain. In particular, the choice of location depends not only on the structure itself, but also on the nuances of the landscape area. And also from aesthetic details.
To place, for example, decorative cascades in a dacha, it would be best to do this on a natural or artificially created relief break. Which will coincide with the direction of the water flow.
A pressure fountain is suitable for a flat open space on the site. And a waterfall can add dynamics to the landscape, emphasizing the beauty of the area. A fountain for an apartment can be placed in any corner of the room, the main thing is that it does not interfere with movement.
DIY fountain installation step by step
There are many design options for garden fountains, and among them there are quite simple, as well as complex multi-level decorative ponds with lighting (Figure 5).
Note: Any project must be thought through in detail and take into account the characteristics of your site. Let's look at the step-by-step design of the simplest fountain project.
The beginning of any construction process always begins with the development of a project and selection of a location, after which they begin to gradually implement their idea:
- Preparing the bowl: according to the developed project, the future reservoir is marked and a pit is dug according to the dimensions of the future bowl. After completing work with the pit, it is necessary to fill its bottom with a sand cushion at least 5 cm thick, which must be leveled and thoroughly compacted. It is necessary to lay a high-strength polyethylene film on top of the sand so that its edges extend beyond the contours of the pit. It is recommended to lay a layer of clean small crushed stone on the film, which will help press the material against the walls and bottom of the pit. There is no point in pouring crushed stone in the area allocated for the pump, since there will be a water reservoir with a base for pumping equipment there.
- Preparing the water collector: you can make a water collector yourself from a 10 liter plastic bucket. To do this, you need to drill holes in the walls of the bucket using a feather drill. Next, the prepared bucket needs to be placed on the film and leveled horizontally.
- Design of the fountain: you can increase the stability of the installed water collector using stones, namely pouring a small amount of crushed stone inside the bucket. Then comes the time to install the pump in the reservoir. The pump should easily enter the bucket; if it enters with force, this will complicate its further maintenance. The wire from the pump must be laid along the bottom of the reservoir, and it must pass freely outside the fountain. Before laying the electrical wire at the bottom of a decorative pond, it is worth checking the quality of the insulation and for damage. Next, you can lay stones around the catch basin and thereby decorate the future fountain.
- Connecting the pump: from the building where the power source is located to the fountain you need to dig a trench for the wires. There is no need to dig a deep trench, since the main task is to remove the cable from the grass so that it does not interfere with walking around the area. It is recommended to thread electrical wires through the corrugation, and only then lay them in a trench.
Figure 5. Several installation options
Before directly filling with water, it is worth laying the water supply hose to the pump in the water collector, which will prevent small stones at the bottom of the fountain from being washed away.
How to make a home fountain from bottles
To create this design, the already mentioned scheme will be used, but slightly modified and reduced to two vessels. Depending on the volume of the bottles, the indoor fountain can be made so small that it can even be placed on the table.
For production you will need:
- two tubes of different diameters;
- vessel with water;
- bowl.
Process of creation:
- The two covers must be combined, having secured the tubes in them in advance.
- This mini fountain can be decorated however you like. You just need to be a little creative. The decor may consist of stones for the aquarium, lighting for the water, original decorations, and so on. Using imagination and ordinary details, you can create a real small miracle.
What you need to know for stable operation of the device: the tube where the liquid is drained must be longer than the one where it rises. In addition, it is she who must be wider. A bottle fountain on a table is sure to become the center of attention in the room.
More detailed instructions can be found in the video.
How to make a fountain with your own hands
The idea of creating your own fountain with your own hands at the dacha always begins with a long search and development of a fountain project, without which all the work on arranging such a decor cannot be completed (Figure 1).
Note: When drawing up a project, you should always start by taking measurements of the dacha plot and choosing a place for the fountain. It is also worth taking into account the terrain features, since the durability of the structure will depend on the correct location.
If the choice fell on an area under trees, then such a place would be undesirable for placing a fountain, since plant rhizomes could damage it. Falling leaves and branches will clog the decorative container. It is recommended to set aside an area for the fountain on the leeward side of the house to prevent moisture from getting on the walls of the building. It is better to build a decorative container at a distance equal to three times the length of the fountain.
You can build a country fountain in the following sequence:
- Digging a pit for a hydraulic tank: the size of the pit depends on the dimensions of the selected tank. It is recommended to dig a hole slightly wider than the size of the future hydraulic structure in order to freely install the tank in the pit. It is also worth installing the fountain 5 cm above the edges of the side and making a groove in the soil for electrical wires.
- Installing the tank in a pit: before starting to install the tank, the bottom of the pit is leveled with small pebbles, which are poured in a layer of 4-5 cm, after which the tank is mounted and secured. The space between the tank and the walls of the pit must be filled with sand, which is compacted by pouring water on it and compacted. As the sand compaction is completed, you can begin decorating the area near the fountain. For example, decorate the area near the tank with decorative stones.
- Prepare a pit for installing a tank: you can use waterproofing material to line the bottom and side walls of the dug hole. Then install the container.
- Upon completion of the installation of the tank: it is worth starting to install the electrical wires for the pump, which are placed in a plastic tube and insulate all joints. This pipe must be laid in a previously dug ditch and buried after completion of all work.
- Install the pump: it is worth taking into account future preventive maintenance and maintenance of this device.
- Mesh Layout: A galvanized mesh arrangement helps protect the container from foreign objects and debris. It is also worth making a folding hole in the mesh through which you can get to the pumping equipment for maintenance or repair.
- Carrying out installation work on the base of the fountain: a metal pipe for supplying water is connected to the installed pump. It is placed 10 cm higher than the expected height of the future fountain. Next, you should lay wooden bars (section 50x50mm) on top of the metal mesh; the length of the bars should be 8-10 cm longer than the length of the container. With the help of bars you can achieve stability and reliability of the structure.
- Preparing stones (pot, bowl, etc.) for the fountain leg: when drilling the selected material for decorating the legs, make the holes very carefully, since the drill can heat up and this will cause the material to crack. This can be prevented by using water to pour over the material being drilled. The diameter of the hole should be 0.5 cm larger than the cross-section of the pipe.
Figure 1. Installation diagram of a country fountain
The final stage is installation of the structure. Drilled stones (pots, bowls, etc.) are placed on a metal pipe like a children's pyramid and secured with silicone-based glue. After the glue has completely dried, the tank is filled with water 15-20 cm above the pump. Next, the pump is connected to the electrical network, the first start-up is carried out and the water pressure level is adjusted.
Fountain on the site
In fact, it is possible to do this and is not so difficult. Autonomous operation is carried out without electricity. And the device itself does not require any special skills or expensive tools or materials.
You need to prepare the following:
- sealant;
- adapters;
- plumbing tools;
- special tubes;
- three plastic vessels;
- decorative elements.
The stages of work are as follows:
- It is required to specify the dimension and type of the finished structure. It’s worth mentioning right away that there is no need to make a large fountain. After all, the water jets will not be strong.
- Next, you need to select the most suitable location for installation.
- Now you can start designing. The simplest way is to build a “perpetual motion machine” based on communicating tanks. These principles are taught in the school curriculum during physics lessons. The bottom line is that the tanks are placed at different heights and are connected by tubes. In this way, water exchange can take place - from one container to another. This is a well-known option, which in this case will be improved.
- The vessels must be placed at an equal level and connected by tubes.
- And connect these tubes to the T-shaped plumbing adapter.
- The principle of operation will be as follows: when water enters the tanks, it will be able to freely get out of them using an adapter. All that remains is to ensure unimpeded water flow in the direction of the vessels so that the water flows into the fountain.
- Holes must be drilled in the bottoms of the tanks. They should be slightly narrower in diameter than the prepared tubes.
- The tubes must be inserted into the holes and treated with sealant. If possible, cold welding can be used for greater reliability.
- Now you will need a third container. Its volume should be a couple of times larger than the volume of the first two containers.
- A plumbing adapter must be installed in the middle of the bottom of this container. Then make a couple more holes in the bottom. Two tubes from the upper smaller containers will be stretched through them. Re-seal the tubes with sealant.
- Now you can install the finished structure at the selected point on the site. However, do not forget that small tanks should be installed higher than large ones. To ensure a stable fluid supply.
The fountain is ready for use!
Helpful tips for creating this model:
- Containers for liquids are best made of plastic. It is desirable that they have the same volume.
- It is advisable to make a removable fountain. Then the water from below can be poured to the top.
- It is recommended to connect the containers with a thin tube. This will make the work time longer. For example, a tube for a filter will do.
Step-by-step guide for installing a fountain in your country house with your own hands
You can build a unique fountain in your dacha with your own hands using inexpensive materials. The simplest option is to build a decorative element from stones. However, you can give free rein to your imagination and create an original structure to decorate your garden plot.
Choosing a place for the fountain
When choosing a location, you should take into account the aesthetic purpose of the structure.
At the same time, it is necessary to take into account the size of the reservoir, how the water jets will be directed, as well as what decorative elements will be around. Recommendations for choosing a location:
- do not place near bushes and trees, as falling leaves clog the water, which can cause the pump to break, and the root system also destroys concrete structures;
- Do not install a water tank and a spray system near the house or other buildings, so as not to damage the façade of the building;
- it is advisable to choose a place where the wind blows least often, otherwise frequent garbage collection will be required, and instead of the sound of flowing water, the noise of the wind will be heard and drops of water will fly in different directions;
- You should not install it in an open area so that the water does not overheat and bloom and the plants do not dry out.
Worth knowing!
Hot water causes the pump to fail. Therefore, the fountain should be located where shadow and light change throughout the day.
Preparing the tank
It is worth making markings at the chosen location for the reservoir. You need to dig a pit along its contours, but deeper than the bowl and 5 cm more around the perimeter. In the direction of the drain, you will need to make an additional recess of at least 40 cm.
The water tank is prepared according to the following algorithm:
- lay geotextiles on the bottom and around the perimeter of the container;
- pour a drainage layer of coarse sand, level it so that the sand is 5 cm thick over the entire surface;
- place a water reservoir in the hole.
Unique container shapes can be easily created using cement mortar. The procedure for pouring and drying the solution takes about 3 weeks. The process of constructing such a tank consists of the following stages:
- digging a pit, but 20 cm deeper and 20-30 cm wider;
- cover the pit with geotextiles or thick PVF film;
- Fill the bottom with a 10 cm layer of crushed stone and 5 cm of sand on top;
- strengthen the walls and bottom with reinforced mesh;
- pour concrete into the bottom and wait until it hardens completely;
- then build the formwork on the walls and fill it with concrete;
- wait until the concrete hardens completely.
Installing the pump
The water circulation system in the fountain depends on the type and power of the pump. The general principle of operation of the device: liquid enters the reservoir through a nozzle, then moves through a pipeline, is cleaned and again enters the nozzle. The liquid moves under pressure; depending on the power of the pump, high jets of water can be obtained.
For reservoirs, two types of pumps are used:
- submersible is placed in the center of a small tank and placed on its bottom. No fasteners are needed to install the device, since the structure is heavy and remains in place;
- the surface one is placed next to the tank on the ground. The device is powerful and ensures fluid circulation in complex and large structures. For the pumping system, it is necessary to construct a pipeline from plastic pipes.
Recommendation!
You can ensure constant pressure in the system and facilitate the operation of the pump using a pressure tank.
Fountain decoration + lighting
The final stage of designing a recreation area is decoration. Decorative elements for a pond: clay figurines, plants, stones of various shapes and structures, glass figurines, etc. Their selection is carried out according to the style of the object and the entire plot. All elements are selected by the owners according to style preferences.
An interesting and bright decoration of water bodies is lighting. Suitable for water bodies:
- LED strips;
- underwater lights;
- floating lanterns;
- ground lamps;
- decorative lampshades.
Lighting elements can be combined to create the perfect fountain composition. Lighting devices must be sealed, the contacts must be covered with reliable waterproofing. This ensures safe use of electrical appliances.
Interesting to know!
It is documented that the first fountains decorated houses and streets in Ancient Greece and Rome. At first, people simply decorated natural springs. In Ancient Greece, city dwellers used springs to cool the air.
You can build a fountain on your own plot by spending a little money. Initially, you need to draw up a construction plan and follow it. To build a decorative pond, you should choose high-quality materials. There are no restrictions in decorating, so you can experiment and change the design. Thanks to this, the pond will delight the eye for a long time and give positive emotions.
A decorative fountain will help to improve your summer cottage plot, create a cozy oasis and a beautiful recreation area. The sound of water calms and gives coolness in hot weather. In order to make a fountain at your dacha with your own hands, no special construction skills are needed. This element of landscape decor is easy to construct and decorate any garden plot with it. A cool oasis with a fountain creates a peaceful atmosphere for relaxation.
Waterfall without using a pump
Making a fountain yourself is quite easy. You just need to show more imagination.
To make such a fountain you will need:
- main water container, large size;
- pre-prepared “steps”;
- container for installation below;
- supply pipe;
- water filter.
The creation scheme is as follows:
- From the tube of the upper container, water should descend along the steps to the lower container.
- That is, two vessels are connected by a tube from the inside, and steps from the outside.
The operating principle is as follows:
- since a pumping system is not provided for this fountain model, it is necessary to regularly fill the upper vessel;
- The duration of operation depends directly on the volume of the selected tanks.
Mostly such a waterfall is built for decorative alpine slides, in ponds or indoors.
As an alternative, you can use a water mill for the same waterfall. And the water will move due to water hammer. But filling in this case will still occur manually. This option is used very rarely and only for fountains in an apartment or house that are easy to maintain.
It is immediately worth noting that such structures are not intended for permanent or long-term operation.
Decoration of the structure
It is not so important where the homemade fountain will be located:
- country house;
- garden plot;
- apartment or house.
It should still look attractive. In its original form, this design looks very unsightly. Therefore, it is advisable to take care of decoration.
If the fountain is planned to be installed on a site (as happens most often), a small recess needs to be made in the planned location. About thirty centimeters will be enough. It is important to level the bottom of the hole so that a couple of eggplants can be installed there. The recess itself at the end can be covered with pebbles or similar decorative material.
On the contrary, you can lay out a pile of stones above the elevation, and place a decorative fountain bowl on it. You need to try to direct the flow of water correctly - so that it flows directly onto the hill. It will look much more impressive this way.
To add variety to the design, you can create a backlight for the water. To do this you need to use LED lamps. You can even have different colors.
In the end, you can completely make your task easier and choose special decorative tanks that simply do not need to be hidden from prying eyes. Otherwise, everything depends on the imagination of the master.
Do-it-yourself fountain in the country: the main advantages
A do-it-yourself pond with a fountain in the country with flowing water is the personification of the transience of life. This is a symbolic structure that has special magical powers. The murmur of water creates a feeling of peace, tranquility and unity with nature. The water flow thrown up can take different shapes, which is fascinating, conveying the atmosphere of the holiday. In the descending water surface, exquisite water patterns drawn by the sun's rays are visible.
A fountain on the site is a beautiful design element that pleases the eye and lifts your spirits.
The fountain at the dacha is a real decoration of the site, which will make an unforgettable impression on the guests and will be a real aesthetic delight for the owners of the site. It will certainly become the basis for the emergence of a tradition of throwing coins in order to return to this place again. By using various lighting and organizing unusual effects of water transfusion, you can create a real landscape masterpiece with your own hands, which will noticeably distinguish your suburban area from the background of neighboring territories.
Important! A fountain or waterfall on the site allows you to optimize the humidity and temperature of the surrounding space.
It will be nice to just stand near such an oasis, enjoying the coolness on a hot summer day. Relaxing near the water after a week of work is very beneficial. The water element can saturate a person with energy, relieve fatigue, give peace and a feeling of absolute harmony with the surrounding world.
How to care for a homemade fountain
A home fountain, like any other equipment, needs regular and timely maintenance. The basic rules for using a pumpless fountain are:
- The water in the tanks must be replaced every three to four days. Otherwise it will stagnate and start to smell bad.
- During use, the bottom of the bowl becomes covered with mucus. Therefore, it must be washed regularly. It is most convenient to do this together with changing the water.
- When installing the fountain, it is very important to leave free access to all components in advance to facilitate maintenance.
- If the structure is located outdoors, it would be better to move it indoors during the winter so as not to damage the parts.