Home / Buildings on the site
Back
Published: 07/12/2019
Reading time: 4 min
0
257
Do you have a summer house, a car and even your own garage? But all the same, the iron horse exposes its casing to hail, sun and rain, or, at best, hides in the shade of trees. Here's your problem.
It turns out that driving the car into the house after each trip is inconvenient, and leaving it in the open air is harmful. And willy-nilly you have to make a carport out of polycarbonate. And now we’ll tell you how to do it correctly.
- 1 Choosing a place for a canopy
- 2 Choosing a covering for the canopy
- 3 Making a covering for the canopy
- 4 Selecting material for the canopy
- 5 What should you consider when creating a frame?
- 6 Technology of installation of cellular polycarbonate
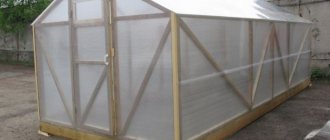
Carport: features
A carport at the dacha can be of two types:
- stationary;
- as an extension to the building.
A canopy in the form of an extension will naturally occupy a minimum area. Also, depending on the chosen material, it will be an excellent addition to the entire design of your site. Examples of such canopies can be seen in the photo.
To attach the canopy, you need to partially attach it to the wall , and install the second part on support posts. To make it stable, the pillars should be concreted or installed on a concrete platform. Use a metal profile or a block of wood as a frame and support.
And for a stationary carport with your own hands, you need to install the entire structure on a support. There must be at least four support posts, they must be installed at a distance of at least a meter from each other.
Depending on the frame material, the roof can have different shapes. Also, the size of the carport should be planned depending on the planned number of cars that will be kept there.
So, for example, if you plan to place one car about 4 meters long under a canopy, then the canopy should be at least a meter larger . To make the correct calculation of the height of the canopy, take into account the height of the car and the cargo that you can transport on its roof (boats, bicycles, etc.). Please note that the canopy should not be made too high so that slanting precipitation does not fall inside and the roof does not shake under the influence of the wind. It is advisable that the height be no more than 2.5 meters.
Algorithm for constructing a structure
To build a polycarbonate carport , you need to complete three stages of construction work:
- Prepare the site and foundation.
- Install supports and rafters.
- Make a sheathing.
After this, you can install the sheathing and use the finished canopy.
Each stage of construction work has its own characteristics and therefore deserves detailed consideration.
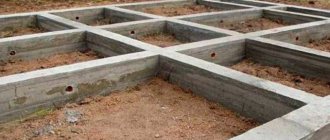
Site and foundation preparation
To make a drawing of a polycarbonate carport, you need to decide on the area of the structure. To do this, a parking space is measured at the construction site. It should be fenced with stakes and a thin rope stretched between them.
If desired, you can not build a foundation on the site, leaving it unpaved. But it would be more correct to prepare the parking area and perform the following work:
- Dig a pit around the perimeter of the site with a depth of 30-35 cm.
- Make recesses for the racks with a depth of 20-25 cm.
- Fill the pit with layers of sand and crushed stone 10 cm thick.
- Compact the base by watering it abundantly.
- Install the formwork into the recesses for the racks.
It is worth noting that the process of installing formwork is quite complicated. To do this work correctly, you must first lay reinforcement mesh in two layers in the recesses for the racks. Install corrugated steel rods between the layers of reinforcing mesh and fasten the entire structure with mounting wire.
There are three important nuances to this process. Firstly, the distance between the layers of the reinforcing mesh must be at least 10 cm. Secondly, the top layer must be well stretched. Thirdly, after pouring concrete there should be no protruding metal structural elements left.
Installation of supports and rafters
The length of the canopy support pillars is calculated in advance based on the drawing. They are inserted into prepared recesses, secured to the foundation with metal corners, leveled and filled with concrete. In this case, the concrete solution is poured not in layers, but once. After this, the solution will take about a month to completely harden. However, the subsequent stage of construction work is quite simple and places almost no load on the supports, so you can proceed to it a week after concreting the support pillars.
The canopy for the barbecue area is built like this...
The installed supports must be measured, their height compared with the drawing and, if necessary, leveled. After this, you can lay the rafters on the supports and attach the trusses to the structure frame.
Steel pipes with a diameter of 5-10 cm are most often used as the material for support posts. To build a canopy of a standard size of 6x3 m, you will need from 4 to 8 posts (depending on the type of structure). The outer length of the rack is 3 m, and 25 cm is laid in the foundation. Accordingly, you should take racks 3.3 meters long, leveling them after installation.
Before laying the rafters, the racks are tied in two rows with a 4x4 cm steel profile. They are united by a transverse profile laid in such a way that the strapping structure consists of right triangles.
After this, the rafters are installed using trusses. Trusses can be used ready-made or assembled on site. For structures with rounded shapes, rounded trusses are used.
After installing all structural elements, its metal parts must be cleaned of rust, primed and covered with two layers of metal paint.
Installation of sheathing
The finished frame of the structure must be covered with cellular lathing. For cellular polycarbonate, you can use a wooden lathing with a cell size of 5x5 cm or a lathing made of metal profiles with a cell size of 7x7 cm.
How to build a carport with your own hands
To build a canopy yourself, you don’t need any special construction skills, but you need to be able to work with a saw and hammer at least at a minimum level.
The algorithm for installing a canopy does not depend on the material used, so the construction of a wooden canopy or a structure made of corrugated sheets will not differ from the construction of a car shelter made of polycarbonate.
How to lay a foundation
The foundation for the canopy can be purchased ready-made in blocks and installed with brackets and corners, attaching support columns to the blocks.
Or you can dig holes one meter deep for support pillars and concrete them; you can also use paving slabs.
Assembling the canopy frame
When using foundation blocks, the frame is mounted immediately after fixing the supports , and when using a concrete platform, you should wait until the solution hardens, this will take about a week, and only then install the frame.
The frame is assembled from a metal profile or wooden beams; it is desirable that the frame has at least cross sections, less than those on the supporting columns, so that the load on the frame is minimized.
First, tie the posts together and fix the cross beams to them, assembling the rafters and filling the sheathing.
Roof installation
Now we can install the roofing material on our canopy. The roof is made from different materials, such as:
- sheet material;
- corrugated sheeting;
- tree;
- polycarbonate
The last material is the most common, and we’ll talk about it in more detail.
Making a covering for a canopy
We hope that paving slabs are currently the optimal covering for a polycarbonate carport, we have convinced you, now we will try to make it ourselves. But even if you are not used to physical labor and plan to hire a contractor, the information will still be useful, because knowing the nuances of the technology makes it easier to control someone else’s work.
And so, we have the following algorithm of actions.
- We mark the dimensions of the site. Ideally, it should completely accommodate your car with all doors open. Plus 1000-1500 mm in length. You should still be able to exit the salon onto clean paving stones, and not a flowerbed soggy after rain.
- We remove the fertile layer of soil. This is a prerequisite for almost any construction. But don’t worry, the ball of black soil rarely exceeds 400 mm, but we need to dig at least 600 mm. When digging a pit, do not forget to create a slight slope in it away from the nearest building.
- We fill the site with a five to ten centimeter layer of crushed stone and compact it with a vibrating plate. This is the only way to really compact the soil a meter or even deeper.
- We lay a drainage pipe along the bottom of the slope and connect it to the storm sewer. This procedure is especially relevant if the site has clay soil.
- We lay geotextiles on top of the stone platform and pour a ten to fifteen centimeter sand cushion on top.
Which we compact again with a vibrating plate. By the way, geotextiles here will perform not only a separating function. Protect the crushed stone from sand getting into it. But it will also make polycarbonate reinforcement for the carport. The one-piece fabric copes with this task with a bang. - Next comes ten centimeters of concrete. As we understand, it is no longer necessary to reinforce it, and classical reinforcement with such a small thickness of the cushion would inevitably collapse from corrosion, or a composite would have to be used.
- When the concrete has cured, we install curbs on it and fill the space between them with sand. And this is another 7-8 centimeters.
- On top of the sand follows a six-centimeter backfill with a garter, which we, like all previous layers, compact with a vibrating plate. It should also be noted that we fill the prance along the beacons, again forming a small slope towards the drainage pipe.
- The last step is laying the paving stones themselves and filling the cracks with sand. This is a step-by-step technology for laying paving slabs from A to Z. In practice, it is simplified, but it cannot be done with impunity.
DIY polycarbonate canopies: features
If you plan to use polycarbonate to build the structure, then for work you will need the following:
- square profile pipes for support, pipes for purlins and sheathing;
- load-bearing arch;
- cellular polycarbonate 10 mm thick;
- galvanized screws;
- press washers;
- cement-sand mortar and crushed stone;
- in some cases - anchor bolts.
Polycarbonate used for carport construction can be monolithic or cellular . Their differences are as follows:
- Cellular polycarbonate has voids inside , it is lighter and easier to install. And monolithic polycarbonate is able to withstand more weight of snow or water mass;
- cellular polycarbonate is used for installing thin supports and frames , while monolithic polycarbonate is more difficult to install due to its durable frame;
- Cellular polycarbonate is cheaper than monolithic , but also lasts less.
Now that you have decided on the type of polycarbonate you need, you can install it. Measure the dimensions for the frame and use a hacksaw to cut the polycarbonate sheet to the size you need.
If you choose cellular polycarbonate, then the channels of the sheet must be strictly perpendicular to the ground , so that the moisture that will get inside the sheet can then come out on its own. If this is not done, then after a certain time wet bubbles will appear inside the sheet, which will make the coating look bad, and it will take you a lot of time to clean them. When using monolithic polycarbonate, you will not encounter such a problem.
After cutting the polycarbonate sheets, drill holes for fasteners . This must be done before you install the sheets so as not to damage them during the process. Please note that the diameter of the holes must be larger than the screws.
This is necessary because, under the influence of temperatures, polycarbonate tends to expand and contract, and the fastening points can crack. And too large holes are also not needed to prevent water or dirt from getting into them. When fastening, it is advisable to use rubber gaskets between the roof and the screw, or sealant.
To ensure that the lower edges of the polycarbonate are covered, use perforated tape, and the upper edges - solid, respectively.
Polycarbonate carport for 2 cars
This type of structure will require more material than a conventional (single) roof. It is necessary to correctly calculate the volume of polycarbonate to provide equal protection to both vehicles. Usually such canopies are:
- gable,
- arched,
- with a hip roof.
Such buildings look much more complex than standard ones.
At the development stage, it is necessary to calculate the weight of the structure in order to calculate the stability of the entire structure. If you doubt your own abilities, it is better not to take risks. We advise you to contact our company. We organize everything professionally and in a timely manner.
Installation of a structure made of corrugated sheets
A carport made of corrugated sheets is also a good option, but when installing it, you should consider the following:
- lay sheets only overlapping;
- when fastening sheets, use galvanized screws, and use rubber gaskets to prevent scratches when screwing the screws;
- Fix the sheets at the extreme corners, and then only along the rest of the plane.
As you can see, the process of building a carport at the dacha is not that complicated. You can also pay attention to the photos - on them you will see a selection of canopies that are original in terms of design, which will undoubtedly attract attention to your site.
Carports for a car in the country
Advantages of polycarbonate for the production of canopies
The undeniable advantages of raw materials include:
- Increased resistance to sudden temperature changes;
- Ease of transportation and installation;
- Weak susceptibility to mechanical loads;
- Good light transmittance;
- Reacts poorly to acidic environments and various types of chemical solutions;
- Does not pass or absorb water;
- Non-flammable, does not spread fire;
- Plastic;
- Availability and ease of installation;
- Excellent sound-absorbing properties.
Based on this, you can draw the appropriate conclusion about what characteristics your carport for the country house – made of polycarbonate – will have. Universal properties, coupled with excellent physical qualities, create a reliable barrier from bad weather at any time of the year.
Polycarbonate for canopy - tips for choosing
Those who do not know what material to choose for a canopy, roof, canopy or gazebo should pay attention to polycarbonate, which has many advantages.
Advantages of the material:
- Able to protect against the negative effects of ultraviolet rays.
- Has an excellent appearance.
- Can be completely transparent or matte.
- Durable.
- Has a low cost.
- Easy to install and maintain.
- Not subject to combustion.
- Has a rich palette of shades.
- Has flexibility.
- Able to withstand significant impacts.
Cellular polycarbonate allows you to make a structure of any color and shape.d
How to choose the thickness of polycarbonate panels?
When building a carport, you should not use the cheapest thin sheets. You won’t be able to save money, because in this case, to make the structure strong and stable, you will have to do frequent lathing steps , which leads to additional costs.
Recommendations for choosing material thickness for various canopies:
- for roofing large areas, material with a thickness of 16 mm is ideal;
- for vertical surfaces it is best to use 10 mm panels;
- for canopies, roofs, partitions, stained-glass windows, sheets of 6-8 mm are used;
- 4 mm thick material is perfect for advertising structures, greenhouses and greenhouses.
Color and quality of material
Construction markets offer panels of varying degrees of transparency and colors: bronze, green, blue, milky, turquoise, etc. In order for the canopy to protect the car well from the sun's rays, matte sheets should be used .
Transparent ones will not work in this case. The choice of material color can be different, it all depends on the wishes of the owner. In order not to doubt the quality of cellular polycarbonate, it is recommended to choose products from well-known brands. Such manufacturers produce reliable and environmentally friendly products that have a special protective layer on their surface.
A canopy made of high-quality polycarbonate can protect the car and everything under it from ultraviolet radiation. Companies that value their reputation provide a high level of products and adhere to strict standards.
Types of canopies made of metal profiles
When building canopies, it is necessary to focus on their shape and spatial position.
Semicircular profile canopy
In accordance with these criteria, the following main types of canopies are distinguished: single-pitched, gable, arched.
Single-pitch canopy
This type of canopy is very convenient because it has the shape of an inclined plane located at an angle. This design provides maximum protection for the area and also has a natural drainage system. Water and other precipitation are not able to linger on the inclined plane, thus protecting roofing materials from premature deterioration.
If you want to make a lean-to canopy from a metal profile with your own hands, you need to take into account several features. First, determining the angle of inclination is key. If it is too steep, then there is a risk of unwanted moisture getting under the canopy, and there is also a high probability of damage to the metal under the influence of strong gusts of wind.
Single pitch carport
Secondly, it is imperative to consider the organization of the drainage system, since the constantly rolling liquid will turn into a water flow capable of eroding soils.
Thirdly, the choice of slope direction should be based entirely on statistical data on the predominance of air masses, or more precisely, their direction.
To obtain such data, you can use the services of meteorologists, or independently note the wind direction for six months.
And fourthly, additional strengthening of the canopy should not be neglected, especially in regions characterized by frequent gusts of wind. A lean-to canopy made of metal profiles will perfectly protect not only from precipitation, but also from excessive sun, which is extremely convenient for all seasons. Most often it is used not as a separate structure, but as an extension.
Detailed diagram with dimensions of a lean-to canopy
Gable canopy
In those regions where it is difficult to determine the prevailing wind direction, a gable canopy made from a profile is more often in demand. It differs from a lean-to roof by an additional plane; this design looks like a regular house roof, but has a slightly different structure.
Such a canopy has many more advantages, since its area allows it to cover much more territory than in the first case. To achieve maximum effect, as well as make the structure reliable, it is necessary to use a more serious fastening system that requires additional profile supports.
Multi-slope awnings
It is most convenient to equip exhibition centers, playgrounds and car parks with multi-slope canopies, which look like a cascade of gable canopies.
A multi-level arrangement allows you to maximize the area covered, but the installation process will take much longer.
This is due to several needs:
- measurements and drawings (in order for the multi-slope canopy to be durable and fully perform its functions, it is impossible to do without accurate measurements and design skills);
- selection of suitable material;
- mandatory arrangement of drainage and stormwater systems.
You can often find a multi-slope canopy in a private house, which plays the role of an extension of the garage, serving as an excellent option for protecting vehicles from precipitation.
Arched canopies
For those for whom a canopy is not only a means of shelter and protection, but also a decorative element, an arched canopy is ideal.
Option for installing an arched canopy from a profile
It has an attractive and neater appearance, which does not in any way affect its quality characteristics, giving any home or area individuality.
The main disadvantage of such canopies will be their higher cost. This is explained by the fact that it is almost impossible to make a canopy from an arched profile with your own hands. This will require special tools, as well as knowledge and skills in working with metal.