Beautiful and practical headboards are part of a bedroom set and a well-thought-out interior. Instead of going to a furniture store, you can do DIY wooden headboard. Here is a great collection of 25 DIY wood headboards. Some of them are so simple that you can literally make them in an evening.
Most are really inexpensive, and some can be made at virtually no cost. For example, from old boards or a headboard made from pallets . Imagine a great new bedroom in just a couple of hours, while keeping your budget intact! Check out the examples presented here and make one of these wooden headboards for your bedroom. To awaken your imagination, at the end of the article, see a large gallery - 200 photos of wooden bed headboards in the interior.
Board headboard
If you have several boards, no matter new or old, you can make such a simple headboard for your bed with your own hands in just a couple of hours. It’s just that if you use second-hand boards, it will take quite a lot of time to sand. The headboard is a simple design, essentially just a knocked down wooden board, but the main task is to make it beautiful.
The configuration can be any, imagination is not limited here, you don’t need to worry about strength either, just cut it out, sand it and varnish or paint it. Here, all the stages of work are shown in this small collage, four photographs were enough.
If you need instructions, you can visit the website of the author of the project, link under the gallery. Since headboards today play more of an aesthetic role, your style choices are limitless. This example is very simple, if you like curly backs, you can cut out any configuration and even write something, fix a lamp, hang decorations. Well, besides beauty, a durable headboard when you sleep at night allows you to feel more comfortable and safe in your bedroom.
Photo source: www.addicted2decorating.com/cheap-easy-diy-wood-headboard-from-cedar-fence-pickets.html
Care instructions
Solid wood furniture (especially white or black) looks presentable, luxurious, and it is clear that everyone who has purchased such a bed with a mattress wants to keep it in its original form. It is necessary to follow very simple rules: both for operation and maintenance. And first of all, you need to properly place the bed indoors, avoiding direct sunlight on its body. Also, you should not place wooden furniture near heating radiators, as constant heating of the surface can lead to drying out and deformation.
Impacts and overloading of a bed made of natural wood are not allowed, which can lead to chips, scratches, various abrasions, weakening and breakage of accessories. Do not place hot objects on wooden surfaces, as this will cause stains, damage the integrity of the coating, and may even cause cracks. Models with drawers should not be overloaded, and all things inside should be in perfect order.
Caring for such furniture is not a complicated matter; the main thing here is to carry it out systematically and correctly. The simplest thing is dust removal, for which it is good to use soft flannel napkins. On dark models, dirt will not be visible, but a white wooden bed will require more attention and more thorough care. In this case, it is recommended to wipe the body and surfaces in the direction of the wood patterns in order to more effectively remove all dirt and dust from the pores.
If the headboards of a solid wood bed have carved ornaments or reliefs, then these fragments should be wiped very carefully, removing dust from each curl.
To avoid deformation, it is prohibited to use abrasive agents, or to clean solid wood furniture with steam. If water gets on the surface, you should wipe off the moisture as quickly as possible to prevent it from being absorbed into the wood. For dry cleaning, it is good to use a vacuum cleaner with a special brush attachment.
DIY plywood headboards
Considering wooden headboards , I would like to dwell on very simple examples made using plywood. For example, this option with a curly back.
You can’t buy a headboard like this in a store, but you can make it in a couple of hours.
You can cut any shape; you don’t need much experience to work with a jigsaw.
You can do it even simpler, buy a sheet of plywood.
And so that it is not just a sheet of plywood, nailing a few shelves will turn out stylish and functional.
That's all, all that remains is to firmly attach the plywood to the wall.
Photo source: www.ivd.ru/dizajn-i-dekor/mebel/kak-sdelat-izgolove-krovati-svoimi-rukami-35911
Which style should you choose for your headboard?
This is the very first thing where you should start designing future headboard . In no case should it contradict the overall interior of the room or the style of the bed itself. Let's look at the most popular styles:
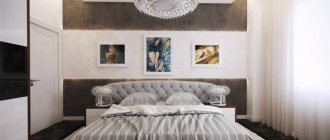
- Baroque . This style is preferred by people who want to emphasize their wealth. It includes a lot of gilding, expensive luxurious fabric, and artistic forging. The main atmosphere that this style creates is luxury , wealth , chic and pomp. A soft headboard made of velvet, brocade or other beautiful fabric with gold buttons will fit perfectly into such an interior. Or a mirrored headboard in a wide, beautiful carved frame, painted gold, or a canopy headboard made of heavy, light-proof fabric with gold garters with tassels at the ends. In general, everything that looks expensive, but is not a rectangular wooden headboard.
- Provence . A very light and pleasant style comes from France. This is a beautiful combination of classic style with rustic elements. French country houses are often decorated in this style. Characteristic features are the use of warm pastel shades , preference for natural materials with their natural texture, specially aged elements of wooden furniture and cute floral patterns. Wooden headboards with antique elements or panel headboards made of light light fabrics with an unobtrusive floral pattern are perfect for this style.
- Vintage . The main feature of this style is clearly visible and clearly defined elements of antiquity , and not just old things, but those that really belong to past eras, precisely from the materials that were used in those times. Collecting decorative elements for this style is sometimes difficult. The color scheme is neutral and includes “faded” shades. For headboard material , wood in its natural form, an old mirror, or a soft headboard made of light linen fabric or specially aged velvet are suitable.
- Art Deco . This style is very easy to recognize due to the predominance of lines , stripes, broken curved lines and trapezoidal objects. It is characterized by natural rough surfaces, mirrors , and stained glass. For an Art Deco style bedroom, it is preferable to use a large mirror, because this style implies a lot of space and light. It can also be used as a headboard. The colors of this style can be colorful, but always muted. Shades of brown, white or metallic are preferred The color of the furniture should contrast with the color of the walls, and one of its elements must be of a non-standard shape. In addition to the mirror, a soft rectangular or trapezoidal fabric is well suited as a headboard.
- Loft . This style is loved by many due to its spaciousness . An integral element of this style is the presence of rough brickwork , often white. The main colors are white, gray, and shades of brown. Materials characteristic of this style are wood, glass, concrete, brick, chrome parts. This style combines rough finishes that have an unfinished look with modern technology. The furniture is simple, laconic and extremely practical. the headboard of the bed made of wood or make it soft, so it will create the effect of incompleteness, especially against the background of a brick wall.
- Eco-style is distinguished by the use of natural materials while preserving their textures. The color scheme is as close to natural as possible - shades of green, brown, yellow. Such an interior has a positive effect on human health, not only physical, but also mental, providing a calming effect. Furniture is made of natural wood. The headboard of the bed can be either wooden or soft, the main thing is to maintain the overall color scheme.
Lace headboard
The most delicate and delicate type of headboard that can be. It will fit very well into the interior of a bedroom in light colors. Making such a headboard will be very simple, especially if you yourself know the technique of artistic knitting, and maybe your grandmother or mother can help you with this. We will need crocheted lace or lace fabric, fabric for the base and the base itself. If you want a flatter headboard, then a sheet of chipboard or an old shelf from a wardrobe is sufficient in thickness; if you want a more voluminous and soft one, then you also need foam rubber.
Let's make a soft lace panel. We have a door from an old cabinet with a thickness of 12 mm. Glue 5 cm thick foam rubber onto it and trim off the excess along the edges.
Our lace is white, so to make it stand out better and be more noticeable, you can use dark gray linen fabric as the fabric for the base. Just like when making a soft headboard, you need to cover the base with fabric and secure it around the perimeter with a stapler. Now let's carefully secure our lace on top of this. Then you can modify the headboard to your liking. You can add some rhinestones or bows. You can not use foam rubber, but make the headboard flat, then it will look more like a panel. In any case, the lace will look very original.
Headboard shapes
The impression the sleeping place will make depends on the shape of the headboard itself The simplest shapes are rectangular or slightly rounded at the edges. Semicircular shapes are also often used. But why not give the room a more interesting look and make the headboard, for example, in the shape of a shell or crown , a large flower or a rainbow? Children will certainly like such bright headboards and will always cheer them up, even on the coldest and cloudiest day. Even small curves will look more interesting than a regular rectangle. You will need to spend a little more time giving the headboard a custom shape, but the results will be worth it.
I think you have already decided on the style in which your bedroom is designed, if not completely, then in its overwhelming majority, an image of a pleasant headboard shape has probably already popped into your head, then it’s time to get down to business .
Headboard - panel
This type of headboard will not only make your bed more cozy and comfortable, but will also decorate the wall behind it, plus it will be pleasant to lean on. We suggest making soft printed panel with your own hands . The panel will be a square or rectangle, consisting of small squares covered with beautiful fabric, to which we will give a little volume with the help of filler.
The manufacturing technology is very simple, having mastered it, you can use not only squares, but also rhombuses, triangles, hexagons as elements for panels, and make not just a rectangle, but any shape you like. So, we will need two sheets of plywood of the desired length and height - one for the base, the other for cutting. Scraps of fabric of different colors, foam rubber for stuffing, glue, furniture stapler, hacksaw.
To give you an idea of the size, let's look at the technology for making panels measuring 160x100 cm. Our squares will have a size of 20x20 cm, so we need 8 squares in length and 5 in width, for a total of 40 pieces. Mark one sheet of plywood and cut it into 20x20 cm squares, now cut the foam rubber into 40 pieces of the same size. Using glue, glue the foam rubber onto the plywood squares. After this, cover each square with a piece of fabric and secure the edges with a stapler. The fabric should be 5 cm larger on each side, that is, our flaps have a size of 30x30 cm.
When all the squares are ready, you need to secure them on a second, whole sheet of plywood. To speed up and facilitate this process, you can use liquid nails. Make sure that the lines are straight and the sides of the squares are adjacent to each other without gaps. The finished panel can be attached to the wall using hinges and self-tapping screws. By the way, such soft squares can be inserted into old window frames. Maybe you still have old-style frames that are divided into many small rectangles.
Headboard with shelves
The most practical type of headboard, which is quite easy to make yourself. The material you can use is an old cabinet or an old countertop. If you don’t find anything suitable in your house, you’ll have to spend a little money and buy sheets of laminated chipboard and a special tape that covers the ends. One sheet should be enough for a medium-sized headboard, since chipboard is quite large. to make the markings correctly and cut the sheet with a minimum amount of waste. The same place where you will make the purchase can help you with this; they usually have their own small sawmill and cutters.
After you have the rectangles of the required sizes cut, you will need to assemble the entire structure together, having previously covered the ends with a special laminated strip. This is done very simply using a regular iron. Heat the iron to maximum temperature, apply the tape to the end of the sheet, you can cover it with a thin cloth on top, and iron it several times until it sticks, trim off the excess. This way you should finish all the edges except those that will be adjacent to the base of your headboard.
Now you need to mark the location of the shelves on the base and the distance for the mounting holes. When the work is done, drill small holes in the marked places, attach the shelf and use a marker to mark a dot on its end through the hole in the base, so you will be sure that the holes will line up exactly when assembling. To attach the shelves, you can use self-tapping screws, which must be screwed into the back of the base.
If you don't want to bother with a screwdriver and screws, you can use special glue. This way the work will be completed much faster, but remember that such shelves should not be overly loaded. They should serve as a location for decorative objects or lamps, but not books or massive figurines.
Wooden headboard
Wood is a universal material that suits any style. It is very easy and pleasant to work with, and it always looks appropriate and natural. Let's make a wooden headboard with an antique effect . For this you can use anything - just wooden boards, maybe you have saw cuts of various sizes, maybe an old wooden door or unnecessary pallets. We will make burnt wood , you can also paint it, you can simply open it with varnish, you can paint it and then partially sand it with coarse sandpaper, you can draw a pattern or an unobtrusive design, or use a stencil... We will tell you the theory , and you improve it to suit your own version.
Let's take three boards from an old floor in good condition. Knots, small cracks or chips are not a hindrance, it’s even more textured, the main thing is that they are even and can fit snugly against the wall. First, let's tidy up the appearance of each board separately. We will need a gas burner . With its help, it is necessary to burn the surface of the wood, which will lead to its darkening. You can do it completely, or just the edges, as you like. It should look something like this:
After aging, open the boards with clear varnish . Read the composition carefully . Not all are suitable for internal use, as they contain resins that emit harmful substances. It is better to give preference to water-based , it takes longer to dry, but is completely safe. Open the boards on all sides in two layers, this will extend the life of your headboard. If you decide to decorate the wood with a pattern, then apply varnish before opening it and make sure that it does not smear. When the boards are dry, you need to fasten them together. For this you can use wooden planks or a metal profile. Using small nails, nail the boards to the planks or profile from the back side.
Select nails so long that their points do not go right through and come out on the front side. A wooden headboard will have a fair amount of weight, so ordinary screws may not hold it. Anchor bolts are better suited for this . Before mounting, draw a straight horizontal line on the wall so that the headboard hangs perfectly straight.