Hand made has become mainstream for both designers and ordinary citizens. People can no longer be wowed by high-quality bathroom carpets, so they are resorting to DIY.
Rug made from scrap material
You can use various materials: old T-shirts, T-shirts, plastic bags and even wine corks. The latter will be discussed in this article.
What you need to make a cork rug
It’s easy to make a bath mat from corks; the main thing is to prepare the materials and tools. The number of plugs is up to 200 pieces, 150 is possible, but there is no point in using a smaller number.
You will also need:
- sharp knife;
- work board;
- a large piece of emery;
- glue for wood, rubber or glue gun;
- a rag to remove any remaining adhesive.
You should immediately think about what the base for the cork mat will be. This could be a rubberized fabric, a product for sports training, a ready-made rubber shower carpet, or soft plastic. Less often - simple oilcloth.
Important! Wooden wine stoppers are natural products made from natural wood that do not lose their visual characteristics over time.
When the base is selected, measurements are taken for it and the required set of blanks is determined. It is better to prepare corks with a small supply; if there is not enough, it will be problematic to find additional ones and the completion of work on the mat will have to be postponed.
Natural wine products resist mold well, but they still need to be dried
Materials should be properly prepared before starting work. The product can be plain or with transitions; in the first case, the elements should be thoroughly washed to remove traces of wine and odor. You can pre-soak with bleach.
Picture frame
To decorate the frame, you will need a small amount of corks and a glue gun. Designing the product is quite simple:
- Free the frame from the glass and back, then heat up the glue gun.
- Decide how the plugs will be positioned and begin gluing them to the frame one at a time. Do not coat the entire frame with glue at once, otherwise the composition will dry out before you have time to attach the decorative elements.
- When the glue is completely dry, insert the selected photo into the frame.
You can use whole corks or cut them into the desired shape. If desired, add additional decorative elements or spray paint the finished frame.
How to make a rug from corks
Cork mats are made according to different patterns; the working elements are cut or used as is. Usually the fastening is adhesive, but you can do without using glue; for this, the parts are tightly installed inside a box with strong sides.
Important! An interesting decor option comes out if you attach the elements vertically rather than horizontally. In this case, the blanks must be fastened together.
For those who like to be creative, we can recommend making a product using the bead weaving technique. First, holes are made in the working parts, then the elements are strung on a base of fishing line, like beads. Frames and base are optional.
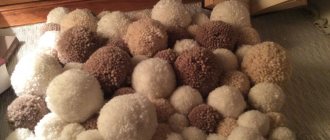
DIY champagne cork rug
Working elements need to be prepared in advance; you can buy the required batch right away - such services are provided by online stores. Unlike wine corks, champagne corks do not need to be washed.
Procedure:
- Cut each product into a couple of even pieces; work should be done on a plastic or wooden board so as not to accidentally injure your hands. Be sure to use a well-sharpened knife (the material is quite difficult to cut).
- Sand the cuts so that they look as neat and even as possible.
- If the shades of cork blanks are different, they are first bleached by keeping them in a special solution, then thoroughly washed and dried. It is not necessary to take blanks of equal length and height; sometimes the differences allow you to create original structural compositions.
- Place the blanks on a waterproof base, starting from the frame. Move gradually towards the middle. Non-standard options are laid out as close to the center as possible, using smooth edges to form.
- During the work process, it is important to check how much material is left. If there is more of it than necessary, you can create an unusual pattern.
- Lay out the elements on the base and start gluing them. Glue is applied to a smooth area of the cork, then pressed carefully. The locations of the main parts should not be changed.
- Excess adhesive is immediately removed with a soft cloth. The corks are not glued to each other; there is no need for this (if everything is done correctly, the fixation will be strong).
- Dry the finished mat; if necessary, make an additional solid base (flexible polymer or thick textile piece will do).
- The final work is to treat the edges and bottom with a sealant that will protect the structure from damage as a result of exposure to moisture.
You can go over the top with varnish or PVA glue. The base must first be prepared for application, and be sure to degrease it. The most popular patterns are zigzags, straight lines, checkerboards, etc.
Wine cork rug
First prepare:
- a sufficient number of working parts;
- a cut of moisture-repellent material to obtain a strong, reliable base;
- sharp knife;
- coarse emery;
- board.
If there are not enough corks, you can buy more. Before starting work, be sure to rinse them thoroughly.
Procedure:
- Each cork should be cut lengthwise in half on a cutting board. For uneven cuts, sand the edges with sandpaper. For maximum convenience, it is recommended to cut the corks not on the side, but vertically.
- Arrange the products with the cuts facing down in the order in which they are needed on the finished rug. Cut the base to the specified dimensions. Type of pattern - straight rows, checkerboard, zigzags.
- Initially, the corks are glued around the perimeter, then carefully moved towards the center. Excess glue is always quickly removed with a cloth before it sets.
- The finished product is allowed to dry thoroughly.
To increase water resistance, they are treated with a sealant.
Mat made from plastic bottle caps
The cork yoga mat has good reviews; the product has a pronounced massage effect and increases the effectiveness of your workouts. If desired, you can build the same one for the bathroom, the result will be excellent.
To get started, prepare:
- a thick needle or awl;
- the fishing line is thick enough;
- rigid base;
- covers.
Procedure:
- Holes are made on the sides of the lids and fishing line is threaded through them. Other options that can also be used are strong thread or wire.
- Create a pattern on a dense base by arranging the lids according to the pattern. It is convenient to use an awl to create side holes on the lids.
- They plan the shape of the rug; it can be any, strict geometric or shaped.
- Perform the path starting from the bottom. The elements must be placed on the fastening tape like a snake.
- When the covers are fastened, the fishing line is pulled together so tightly that the plastic products come as close to each other as tightly as possible.
The ends of the fishing line and nylon cord are sealed with a match or lighter. Rods and metal wires are wrapped.
Important! The lids can be kept in hot water until pierced, this will make it easier to pierce them.
An alternative option is to simply lay the working elements on a surface coated with glue and carefully press them together. Each master chooses the method to his own taste.
Stationery stand
For this craft you will need a lot of corks, a small piece of thin plywood, a utility knife and a glue gun. When everything you need is prepared, follow these instructions:
- First, determine what size the finished stand will be, and only then cut out the base from the prepared plywood. Remember to add 2 cm on each side of the square so that the corks do not reduce its size.
- Heat up the glue gun and glue one cork in each corner of the square base, placing them vertically. Glue the rest horizontally, one on top of the other, thus creating the walls of the stand.
- Adjust the height of the finished product yourself. If necessary, trim the plugs to a more suitable shape and size.
After the stand is glued, let it dry for 24 hours and you can start using it.
How to clean a cork rug
A massage mat made from corks requires special care; it is not complicated, but you must follow the rules. The first point is that the product is regularly dried on a radiator or in the sun. Second, you need to wipe the floors under the rug to prevent mold from appearing underneath. The third is to regularly remove dirt using a brush (for cleaning baths or a soft toothbrush). You can carefully wash the product, but first you need to assess the risks and whether it will withstand the procedure.
Important! When washing in a machine, you should never turn on the spin cycle, nor should you turn on the dryer.
Corks need to be cleaned and dried from time to time, both wooden and plastic.
Wall panel
For the panel you will need a large number of corks. Use a picture or photo frame as a base. In extreme cases, a sheet of thick cardboard or thin plywood will do. Prepare everything you need and follow the instructions:
- Warm up the glue gun and proceed to attaching the corks to the prepared base.
- Arrange the plugs the way you like. For example, glue them all only in a horizontal position or only in a vertical position. You can come up with your own layout.
- Let the glue dry completely and secure the panel to the wall.
To make the craft completely match your home interior design, try covering it with spray paint of a suitable color.
Floor mat
For the rug you will need a glue gun, lots of corks and a base. As a base, you can use a ready-made rubber or rag mat made of durable material. A thin wooden plank will do if the rug is located in the hallway. The manufacturing process consists of the following stages:
- Attach the corks to the chosen substrate using a glue gun or a more suitable adhesive.
- The corks can be attached entirely, but then the mat will turn out to be quite thick. By cutting them lengthwise, you will get a thinner product.
- Once the corks are secured, let the glue dry and you can use the mat.
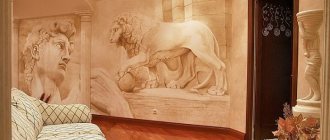
Three-dimensional picture
To begin, choose the picture you will create, then prepare everything you need: a base for the future picture, a glue gun and a sufficient number of corks. To make the finished painting look more voluminous, you can cut the corks into different sizes and shapes. When everything is ready, proceed to creating the picture:
- Cut and paint the corks to better match the color of the picture being recreated.
- Warm up the glue gun and secure all the elements of the picture on the prepared base.
- Wait until the glue dries and attach the picture to the wall.
The more corks you collect, the larger the craft you can make. And if you don’t want to wait until you have enough decorative material, just buy the missing amount from the appropriate store.
Cabinet handle
If you want to make your cabinet design more original, replace its handles with wine corks. This option is also suitable for restoring old furniture. To replace the handles, prepare a screwdriver, several plugs and an equal number of bolts. Follow the instructions:
- Remove old handles.
- After this, insert a new bolt through the empty hole and secure it with a screwdriver. This must be done from the inside of the door.
- Mark the center of the plug and carefully screw it onto the bolt on the other side of the door.
If desired, you can do the opposite by first pressing the plug on the outside of the door and then screwing the bolt into it. But for this you will need the help of a partner. To make your new pens look even more unique, try using champagne corks.
Hot stand
Prepare corks, a utility knife, a glue gun and material for the base of the stand. Thin plywood, a wooden plank or thick cardboard are suitable for this. Having collected everything you need, proceed to making the stand:
- Using a utility knife, cut out a base from plywood or other suitable material. It can be round or square, since the plugs can take any desired shape.
- If necessary, cut the corks, then heat up the glue gun and secure them to the prepared base.
- After 24 hours, when the glue has completely dried, you can use the stand.
If you used cardboard as a base, try not to wet the finished product.