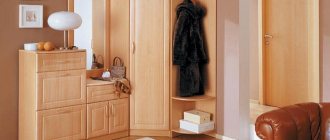
As soon as a person opens the door to an apartment, he finds himself in a hallway, which can be represented as a small room or a corridor, or maybe it will be a spacious hall - the only thing that can unite all types of hallways and have a positive impact on the interior is an arch, make which itself is not so difficult. It is not difficult to create it, since the most common material is ordinary drywall. Despite all the apparent complexity, the work can be completed even by a non-professional; you just need to follow the recommendations and choose the appropriate project.
Drywall arches in the hallway
Important nuances
In any job there are moments that require special attention to detail. The arch in the hallway is no exception. The first thing that is required from a person is to decide on the place where it will be located. The most popular places are:
- passage from the hallway to the room;
- arch leading to the kitchen;
- arch from the hallway to the corridor.
Arch with a niche from the corridor to the hallway
Of course, the location largely depends on the layout of the apartment, so you need to think about where to place the arch, based not only on your own desire, but also on maximum convenience for those living in the apartment or house.
Another thing to consider is the quality of the material. When purchasing drywall, you should not save money, since not only the attractive appearance of the arch, but also its durability will depend on this.
Arches made of durable plasterboard can have a complex shape
Parameters for choosing drywall:
- strength;
- moisture resistance;
- fire resistance.
As for the shade of the arch, its style and shape, it is necessary to ensure that all these indicators are in harmony with the existing decoration in the apartment/house. The main style solutions are classic, modern, modern.
Preparing for work
A beautiful plasterboard arch in the hallway begins with calculations and measurements. In order to do it yourself, you will need to measure the doorway and prepare all the tools and materials necessary for the work:
- drywall (3 sheets);
- metal profiles (4 pieces);
- roulette;
- fasteners;
- perforator;
- jigsaw;
- metal scissors;
- putty;
- Decoration Materials;
- reinforced tape.
A set of tools and materials for arranging an arch
Marking should be done in the following order - the width of the doorway is measured, then the height of the future arch. Then the obtained values must be applied to a plasterboard sheet and the workpiece cut out, after which it is necessary to cut out the arch itself - the arc. Next, the steps are repeated with another sheet of drywall. You can think over the design of the future arch, marking the places for the mirrors on it.
It is important to remember that the arch preparation must be smooth, so that during installation work there will be no difficulties with fitting.
Pros of arches
It would seem that it is just the design of the doorway; it cannot have fundamental significance in the decor of the room. But no! The effect of the arch is enormous, and is expressed in the following advantages:
- This design allows you to save space - now you no longer need to take into account the availability of free space in order to be able to open the door, which is especially important for a standard corridor. Every square centimeter of space is for the benefit of the cause;
- makes it possible to combine rooms - for example, an arch between a small kitchen and a corridor visually and actually unites two zones into one, giving a feeling of spaciousness. The only condition is that the design of both zones must be in the same style;
- the arched vault expands the space, visually moving the walls apart.
The only thing that an arch will not give you is privacy, but if this prospect does not scare you, then decorating and arranging an arch is exactly what you need to refresh the design of the room.
And then, decorating your house with an arch is much faster and easier than installing a full-fledged door. And the financial side of the issue is not the least important - the arch will cost less than the door structure.
Related article: Pros and cons of a central vacuum cleaner
Creating an arch
The next stage of work is the preparation of metal fasteners for the future pride of the apartment - the arches. Their total number is six. Two fastenings are placed on the sides of the arch, and the third is in its upper part. Accordingly, two parts will require 6 metal fasteners. After this comes the stage of attaching the arch parts. To do this, you will need self-tapping screws and a screwdriver, with which you need to attach plasterboard blanks to the inside of the doorway.
Fastening a special design - an arched profile - is a stage that requires increased attention. It must be done so that all elements are securely fixed. You will need to measure the arch, then bend a metal profile of the same size, then, every couple of centimeters, make clearly visible cuts with metal scissors.
Important: the central part of the profile cannot be cut, as this is the basis of the entire structure. The fasteners are connected to the workpiece using a screwdriver. In order to complete the assembly of the arch, you will need to create a curved part, the material for which will also be drywall. A rectangle is cut along the width of the opening, in which several cuts will need to be made perpendicular to the length. They shouldn't be deep.
Creating an arch with your own hands
To make working with drywall easier, you can lightly moisten it with plain water - it will bend. After this, the rectangular blank must be attached to the arch parts and screwed with self-tapping screws to the fasteners that were securely installed before. This will need to be done as carefully as possible to prevent the structure from shifting. You should start attaching the inner frame of the arch clearly from the middle, moving towards the edges.
Types and shapes of arches
At the moment, there are several basic structures made from gypsum plasterboard sheets. Each variety has features that should be taken into account to ensure a combination with the style of the property.
Classic semicircular
Also called “Roman”, it is found quite often. This is explained by the fact that installation does not require special skills or complex equipment. All work is carried out using ordinary drywall.
The peculiarity of this variety is an even semicircle in the upper part. Standard systematization prescribes that the classic design should have a diameter that matches the width of the opening.
With a reasonable approach, a classic arch can fit into most existing styles
Various overlays act as additional elements: a keystone is installed in the center of the upper arc, external areas can be decorated with stucco. There are species with a noticeable separation of the transition from a circle to a straight line.
The classic form requires an increase in the standard doorway, which does not always look beautiful in one-room apartments with low ceilings. Therefore, this design is used for windows in a private house or niches where piles of stucco molding are inappropriate.
Rectangular and square
They are also called “portal” or “Slavic arch”. The first type is a regular doorway, which is complemented by a frame on the outside. For example, the design can be used to highlight a window.
The second variation is an improved solution to the standard portal. The difference lies in small circles replacing right angles, which gives the opening softness and creates comfort.
It is the arch with a slight rounding and a straight base on top that is a universal solution for any interior. This is the best option for small rooms because it does not require additional accents. In addition, creating such a design will not require much effort.
“Portal” is the most accessible form for amateur installation of an arch with your own hands, and small roundings in the corners can be easily arranged using an inserted figured tray with platbands
On a note! During installation, attention must be paid to maintaining a uniform level of curves to avoid distortion.
Elliptical
This arch has a regular or irregular oval shape. The existing diversity makes it possible to use products in various situations. Due to the greater curvature in the middle part, the resulting structure looks graceful and soft.
The ellipse is recommended for use for narrow or, conversely, wide doorways. Even with low ceilings, the arch will look appropriate. An excellent solution is to install interior partitions in spacious rooms, which are complemented by through and open niches.
The ellipse is considered a universal shape and is suitable for any design styles and room sizes
Arch in Art Nouveau style
Another name is “British”. It is also an improved version of the portal: the resulting curvature of a small radius smoothly descends from the center in both directions. This creates visible transition lines from the upper section to the racks.
This solution is well suited for an interior without fancy objects and accessories, so it is not recommended to cover the arch with various overlays or stucco molding.
The simple shape of the “British” arch makes it very popular in city apartments with budget renovations
Eastern or Turkish
This is an unusual variety that has a minaret configuration. Such an arch most often frames the entrance to the madrasah. The design has a slightly elongated shape; in the center two lines are connected without rounding, practically forming an angle.
Although the design of the arch is very beautiful, its use has limitations. The fact is that it is necessary to maintain this style not in one room, but throughout the entire house or apartment. The Mediterranean or Eastern direction is suitable for decorating the premises.
Oriental motifs look original, but such arches are the most complex in construction, and besides, they are designed for a specific, narrowly focused interior
Trapezoidal
The basis is a standard opening with right angles. When compared with other variations, this composition is an alternative to a simple rectangular arch with roundings. The decorative effect is achieved due to the different sizes of the upper segments, the side elements can have a larger or smaller slope, and the central part can have a different width.
In installation, a trapezoid is not much more complicated than a portal, but it looks more original, which is why novice craftsmen often choose this form
Curly
This configuration is an example of individuality; it can be very diverse, which gives room for imagination. A distinctive feature is a wavy structure, completely devoid of straight lines. Naturally, this decision presupposes a certain style that does not gravitate towards classics or industrial trends.
Since there are no strict dogmas regarding figured arches, there is a real opportunity for a master to make an exclusive doorway, but the construction of such structures requires professional skills
This arch is suitable for making doorways and partitions inside the room. External finishing complements the relief and creates the desired ambiance.
Attention! For very complex shapes, special plasterboard sheets with better flexibility are selected.
Finishing work
Finishing is the final step towards the arch in the hallway or corridor. Here you will need to work with seams and joints. To do this, you should use a special mixture, which you can make yourself, but it is better to buy a ready-made one, since the concentration in it will be the most suitable for a high-quality result.
Installation of a flexible corner is necessary to obtain beautiful body shapes
The first layer of the mixture should be thick. It must dry, after which work can continue. The next stage is filling the outer part of the arch. It is important to do everything carefully and diligently here, since this part will be seen by everyone who enters the room. The first layer must also dry, after which the next one is applied. Excess finishing material is removed carefully until it dries.
Plaster will hide minor installation imperfections
The last step is making the arch. You will need reinforcing tape, which is carefully applied to the corners of the structure, but so that one half is on the wall of the arch, and the other is opposite. It should remain and dry a little, then the putty is applied on top again, after drying, which will require sanding the surface - first using sandpaper with coarse grain, then with fine grain. After this, the entire structure must dry for 12 hours. The main work on creating the arch has been completed. You can move on to decorating.
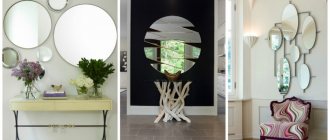
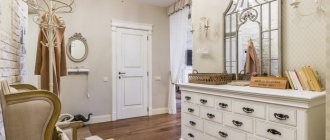
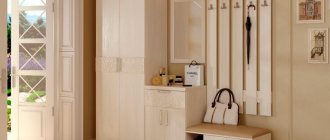
Decor using mirrors
Of course, the arch must be decorated. Here you can use paint, wallpaper, plastic inserts, lighting, wooden structures - there are many options, only your imagination can limit them. An ideal addition would be mirrors, for which you can make separate frames, both in the arch itself and on the frames in the hallway or corridor. Mirrors will help not only decorate the structure, but also visually expand the space. The installation can be done both on the arch itself - attaching mirrors in a frame or in specially created holes in it, or by decorating, for example, the upper part of the structure.
It is practical to decorate arches with natural wood
In addition, mirrors look very harmonious in a narrow hallway or long corridor. Therefore, in combination with an arch, the room will look unusual and stylish. Mirrors built into the ceiling will also help make the hallway more comfortable; together with the lighting, they will look original. You can attach mirrors using special tools, inserts or frames.
Mirror doors are an excellent option for an arched opening
Thus, making an arch in the hallway is not difficult. If you carry out all the actions slowly and follow the recommendations, then in the end the design will turn out modern, will complement the room, and will also become the basis for a flight of fancy - for example, you can place mirrors around the entire perimeter and visually expand the hallway or make niches for figurines, flowers, etc. other little things that make the interior come alive.
Arches in interior design
It is recommended to choose the most suitable compositions for different rooms.
Kitchen
Since this room can combine two functions (a place for cooking and eating), the arched opening should not create discomfort. If the apartment is a studio, then the structure plays the role of a partition dividing the space.
The best option for a small kitchen is a rectangular arch, and for high ceilings - a classic one. The main thing is not to overly widen the opening and not to use a large amount of finishing materials for external cladding.
If the portal is not satisfactory, and the height does not allow you to make a classic arch, then you can choose a semi-arch, ellipse or the British version
Bedroom
The modern style of premises often implies the presence of niches. In such a room, an arch of any kind is suitable for creating a small recess above the bed, but its size should not exceed the dimensions of the headboard too much.
For additional ambiance, lighting is used: spotlights or a hidden LED strip along the entire perimeter of the bend.
With well-organized lighting, the arched structure in the bedroom will become the central detail of the interior
Children's
This room requires a special interior. Since such rooms are rarely large, the arches must fit well into the space. For example, niches for shelves are formed from them. The design can be simple trapezoidal or curly.
You can also use an arch to make a standard window unusual. To do this, it is advisable to use an ellipse, which involves installing a special window unit.
Arched gypsum board structures in children's rooms are often used to divide the room into functional zones
Hall and living room
These rooms can be walk-through rooms, then figured arches will break up the monotony. But for rooms used as a resting place, the selected structures are located in the walls. In this situation, oriental styles (for example, Turkish) will look great.
In a traditional interior, it is necessary to avoid complex figures so as not to disrupt the harmony.
Arches in oriental style can turn an ordinary living room into the room of an Arab sheikh, but at the same time the rest of the surroundings must also correspond to the direction
Corridor and hallway
When working with these rooms, you should take into account the design of adjacent rooms: the composition should be combined with other objects. For high ceilings, the classic arch relief is preferable, but if space allows, then a figured design, which is complemented by niches or shelves along the perimeter, would be an excellent solution.
To emphasize the effect of the resulting bends and visually expand the room, additional lighting is installed at the end areas.