Building a house is one thing, but you need to make it look beautiful. Only then can we say that it will be comfortable to live in. Therefore, great attention should be paid to wall decoration. Yes, many still prefer wallpaper, but it is not as impressive as decorative plaster. It is its use that allows you to create real miracles. There's just one problem, it's not cheap. True, you should not dismiss this option. Decorative putty would be an excellent replacement. In addition, everything is easy to do with your own hands.
Why and when is it necessary to putty walls under wallpaper?
Flaws on the surface of the walls can make the process of wallpapering it difficult. And the result can hardly be called successful. Therefore, the walls need to be prepared. This is what putty is used for. It helps to cope not only with large, but also with microscopic surface flaws. This is facilitated by the graininess of plastered walls, which is several times smaller than that typical for putty. Thus, it is much easier to glue wallpaper onto the leveling material, since minor imperfections will not show through it.
There is an opinion that there is no need to apply plaster to plasterboard walls. It's a delusion. On the contrary, such surfaces especially need it, and here's why. If you start to peel off the wallpaper during subsequent repairs, it will peel off along with the layers of drywall. In this case, more serious finishing will be required before carrying out new repairs.
Conclusion: putty is an important part of repair work. Therefore, it is necessary to approach it rationally.
Types of bases
In order to begin finishing the walls with a liquid mixture, it is necessary to carry out preparatory measures. These largely depend on the type of substrate, but the main rule remains the same: the surface must be clean and free of any loose deposits. The ideal option is a bare wall on which high-quality plaster has been applied.
Tools you'll need to putty your own walls
The final leveling of walls using putty or putty can be carried out on wood, concrete or brick. A concrete base, if it is level and there are no large differences in the level of plaster on it, can be considered ready for processing. In this case, it’s time to use putty materials on concrete bases. They contain epoxy and other types of construction resins, as well as polyvinyl acetate. In the instructions on how to putty walls under wallpaper with your own hands, the video clearly demonstrates how to print and apply the material.
Working with brick foundations is easier. To do this, you can use putty of any composition, including one intended for concrete. Mixtures for wooden materials are based on drying oil or acrylic primers. But for the owner of the premises where repairs are being carried out, it is important not only to decide on the type of surface, but also what materials they will need to be processed. After puttying, the walls should be completely suitable for painting or wallpapering.
A special corner spatula is used to putty external and internal corners.
What does a person without experience need to putty walls with their own hands?
To putty the walls, it is necessary to select materials and tools, without which it will be difficult to complete the work. Don’t be afraid to buy them for future use: if you don’t use them at the current stage of renovation, then you will definitely need them later.
Materials
You don't need a lot of materials to putty walls. But it’s better to buy them right away, so you don’t have to waste precious time going to the building materials store. Main positions:
- There are two types of putty – starting (rough) and finishing (finishing).
- Primer. Experts recommend buying a primer composition containing antiseptic additives. Its use helps prevent the emergence and growth of colonies of microorganisms under the wallpaper.
- To treat a plasterboard wall, you need to purchase a sickle mesh. It is needed to reinforce joints between sheets.
- Wallpaper. There are no special recommendations here - this is your personal choice.
If there are large irregularities, differences, chips, sinkholes or other defects on the wall, it will be necessary to prepare a repair compound. The variant of such a mixture is selected depending on the situation, but most often a cement-sand mortar or a special polymer putty is used.
Tools
To putty walls you need a large arsenal of all kinds of tools.
List of main items:
- Spatulas. One or two spatulas will definitely not be enough to carry out this type of work. Therefore, take care to buy several of these tools, and they should have different sizes. They are very inexpensive, so there is no need to skimp on them. However, thanks to them you can make high-quality putty on the wall surface. For the main wall, you can use a regular putty knife, but for hard-to-reach areas you may need other varieties of this tool.
- Tools for stirring the mixture. A special drill-mixer is perfect for these purposes. It can be used to mix concrete or paint, so it is also suitable for plaster. If you cannot buy such a device, you can use a simple drill with a small attachment. But this process will take longer.
- Container for mixing putty. It can be a simple metal bucket but has good capacity. It is not always advisable to use plastic containers, since the bottom may burst while stirring the mixture. But in the absence of another option, you can use such a bucket.
- Tools for applying and distributing primer. The best option is a set consisting of 2 rollers and a set of paint brushes.
- Level. It is necessary for maximum wall alignment, measuring the distance between walls and calculating the size of the room. To reduce hassle, it is recommended to buy a laser level.
- Sandpaper. It will be needed at the final stage, when you need to “clean” the surface to create a perfectly flat surface. You will need several sheets of sandpaper with different grit levels. To make sanding walls more convenient, you can purchase a special holder.
For repair work, it is important to provide good lighting. It is also necessary to acquire protective equipment - a mask and special construction glasses. They can also be purchased at a specialty store.
How to prepare and clean surfaces yourself
Immediately before puttying, it is necessary to perform the so-called rough work.
They are also the preparatory stage, which includes:
- Removing old wallpaper. If they are removed along with the plaster, then before removing them you need to moisten the roller with water and “walk” over them several times. Then they will come off much easier and faster. You can also purchase a special liquid in the store.
- Sealing cracks. If the old plaster is still in good condition, then you can simply repair all the defects in it with fresh mortar. To begin with, the connector is expanded with a chisel to the desired size, and then it is cleaned with a sponge or brush. Then fresh plaster or sealant is placed into the resulting cavity.
- Primer of walls. It is carried out using a special solution, which is applied evenly to the wall using a roller. There is no need to skimp on the primer - it needs to be distributed generously over the entire surface. You can proceed to subsequent stages of putty only after this layer has dried. This takes about 48 hours.
- Grouting the surface. After applying the first layer of putty, without waiting for it to dry completely, you need to proceed to grouting the surface. This is done using sandpaper. The procedure is carried out in a circular motion from one end of the wall to the other. Grouting the surface makes it possible to eliminate flaws that were made when applying putty.
All stages of preparation, like the putty itself, must be performed only with personal protective equipment. Otherwise, it is possible that particles of the mixture will get into the eyes, nasal and oral cavity.
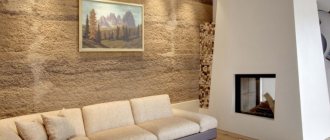
Creating a decorative surface from putty
Anyone who has dealt with finishing work is probably familiar with putty. Especially the finish line. It is used during the final stage of wall leveling. It is very easy to apply to the surface, hides minor imperfections and makes the wall completely smooth. After it, you can glue wallpaper or apply paint. But not everyone knows that this material can be successfully used for another purpose. Namely: as a mixture for decorative finishing.
Of course, this is not an entirely easy process. In order to do everything on your own, you will need a little practice. Although the most important thing is that if you want to achieve a good appearance and durability, you need to strictly follow all technological procedures. And it all starts with the preparation process. Only then can we say that the desired result will be achieved.
VIDEO: imitation sandstone on a wall using putty
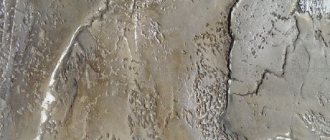
Obtaining a decorative layer
Putty is excellent for replacing plaster. After all, the most important thing is to create the decorative layer itself. Not being a specialized material for this, putty requires faster processing. There is no time to waste here, especially if the work involves gypsum and cement based mixtures. Yes, in this case a polymer composition will be more advantageous, but it is quite expensive. And since the primary goal is savings, it makes no sense to use an acrylic and latex mixture.
Polymer compounds are considered the ideal option for decorative finishing, but cheaper gypsum or cement putties can also be used.
There are two main types of decorative coatings, which include various variations. So:
- Texture putty The name speaks for itself. After applying it, a beautiful textured pattern appears on the wall. This coating hides all minor imperfections that could be on the surface. Anyone can work with it; no special skills are required. The result is visible after the first processed layers.
- Structural putty If the textured version has a certain pattern, then the structural one is completely unpredictable. A completely unexpected result may result. Maybe you won’t even see any particular irregularities, but the wall will still not be smooth.
Preparation
What is most important at this stage? Make the wall surface flat, without any significant differences in height. And we also must not forget that any work on old materials must begin with their strengthening or complete replacement. In addition, it is necessary to ensure excellent adhesion of the base to the decorative putty. It is impossible not to attach importance to this. Otherwise, in the end it will turn out that repairs must be started from the very beginning.
Before you begin decorative finishing, you need to seal all the cracks and remove surface irregularities
To ensure everything works out as it should, it’s best to follow these tips:
- The walls must be pre-leveled. Yes, the decorative mixture will hide minor irregularities, but everything else will remain visible and will spoil the entire appearance.
- For interior work, it is better to use gypsum putty; for facade work, it is better to use cement putty.
- Any surface is well primed. This is the only way to ensure excellent adhesion of the finishing layer.
- The work is carried out without delays. The fact is that gypsum putty dries quickly, which means that if you don’t hurry, the solution will have to be changed.
- Subsequent finishing of the decorative surface. This is especially true for gypsum mixtures. It is covered with wax, varnish, and paints. This adds richness and also increases service life. Although this is not always necessary.
Preparing the mixture
In order not to waste time preparing the mixture, you can buy it ready-made in the store. But if there is a need to breed it, this process must be approached correctly. The main stages of this process:
- Pour water at room temperature into the bucket for mixing the solution. For 1 bag of plaster with a capacity of 25 kg, 9-10 liters of water are enough. But you should not dilute the entire dry mixture at once, especially if it has a gypsum base, which hardens quickly. To prepare the putty, it is enough to take 1/2 or 1/3 of the powder at a time.
- Gradually add the dry mixture into the water poured into the bucket, stirring it periodically using a drill mixer. As a result, a homogeneous mass should form without the slightest lumps. Particular attention should be paid to the walls and bottom of the bucket, since this is where the dry mixture, undiluted with water, is often collected.
After using the first portion of the solution, the bucket and working tools should be washed thoroughly. Only after this can you prepare a fresh mixture.
How to properly apply the starting and finishing composition with your own hands
Wall putty is carried out in 2 stages. First, rough material is used, and only then finishing material is used.
For starting putty, coarse repair material is used. Usually 2 layers of this mixture are applied. After the first layer has dried, you can treat the wall with the second. The thickness of the layer is about 1.5 cm.
To achieve maximum surface quality, a special mesh is installed on the wall. And you can spread the putty mixture on top of it. This must be done as evenly as possible, distributing or removing excess material. The putty should be applied in a continuous layer, close to each other.
The thicker the gauze mesh, the more firmly the putty will adhere to the walls. And the longer it will serve you.
The finishing putty follows the rough or lighthouse putty. For this purpose, special “finishing” mixtures are used. They make the wall surface as smooth as possible.
With the help of such material, all defects and, above all, pores and cracks can be eliminated. But its plane must exactly coincide with the previously prepared surface. Therefore, it must be applied in small layers. However, it is worth considering that if the preparation of the wall for puttying was done incorrectly or carelessly, there can be no talk of concealing defects.
Puttying corners is especially difficult. But this process can be simplified as follows:
- Apply the mixture with a spatula to the outer corner, along its entire length.
- Place a metal corner on the putty mixture. By the way, do not forget to purchase it before starting work, so as not to waste precious time later.
- Press the tool and remove excess mortar along the entire length of the corner.
This process of plastering the walls before wallpapering it is universal. But there are some nuances associated with the type of wall surface. Or rather, with the material from which it is made.
Applying putty to concrete
Concrete in its properties is not much different from brick. But in this case, it is better to choose a primer with a quartz additive, and then the wall surface will acquire some roughness. And this will greatly facilitate the process of wallpapering.
The entire puttying process takes place in several stages:
- Fill cracks and shallow holes.
- Allow the primary layer to dry. This process takes approximately 24 hours.
- Clean the surface and remove dust. Prime the wall.
During such work, you can determine how much finishing material will be needed to complete the putty. The best option is to apply 2 layers.
The material is placed on a large spatula very simply using a small tool. After this, it is applied to the wall in one approach using sweeping, cross-shaped movements with medium pressure.
Types and compositions of putty mixtures
The price of puttying walls for wallpaper depends on the contractor. If this is a difficult job, it is better to entrust it to professionals. Remodeling can cost twice as much. Here, not only professionalism is important, but also experience, which will tell you what type of mixture and in what proportions should be applied in one place or another.
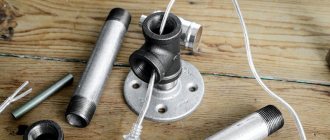
Universal putties are successfully used in places where different materials are joined. For example, when sealing pipes in a wall
According to the principle of use, putties can be universal, special, starting and finishing.
Universal
This type of material combines many positive qualities. They are lightweight and convenient for working in rough and front-facing formats. This material can be used to level out minor distortions. Also, the versatility of the material is confirmed by the fact that it has high adhesiveness on any type of substrate.
The ready-made putty mixture is advantageous in that it is ready for use immediately after opening the package
Special
The video of puttying walls under wallpaper with your own hands shows that this putty is used where finishing-type putties are powerless. There is no point in using special putty for smooth surfaces. Its task is to penetrate deep between the joints of plasterboard panels or into corners and cracks. This material provides ventilation of the material in places where deep seams are clogged. It also has expanding properties.
To putty plasterboard walls, special plastic putties are used that easily penetrate deep into seams and cracks.
Starting
It is not difficult to guess that this will be a reliable material that covers the surface of the walls with a layer of up to two and a half centimeters. The smoothness of surfaces and the absence of roughness is ensured by the increased plasticity of the mixture.
Starting putties are used for initial (rough) puttying of walls
Finishing
They are applied to the walls in a thin layer and, after drying, rubbed over. After this, the surface becomes even, smooth and ideal for applying subsequent finishing layers or wallpaper. You should not try to level the walls with this material. It will help to correct the base after applying the starting layer of putty.
The dry putty mixture is mixed with water according to the instructions indicated on the package.
According to the degree of readiness, all mixtures can be divided into two large groups - dry and ready-made.
Dry putty mixtures are cheap, do not require special storage conditions and are easy to prepare for use. To do this, you need to do everything as indicated in the instructions. Putty in a ready-to-use state is more expensive. Its use is convenient; the mixture can be divided into portions. The disadvantage is that it is poorly stored and does not last long, losing its qualities. For the finished putty mixture, it is important to maintain the temperature regime.
After applying the finishing putty and grouting, you can begin wallpapering the walls.