Features of textured plaster
The composition of textured plaster, along with the binder, also includes other components that make its consistency softer - pieces of granite or other minerals.
Using this fine-grained mixture, it is easy to create a colorful texture on the smooth surface of the ceiling and walls. If necessary, it can be used as putty.
Plasters of this type are used for decoration. A thin layer of the composition is applied to the surface of the walls and the desired pattern or relief pattern is created on it.
Their main properties:
- plastic;
- viscosity;
- strength;
- no shrinkage after applying the layer and drying it;
- immunity to high temperatures;
- ease of application on any surface, even with imperfections.
You can make textured plaster yourself. To do this, add stone chips or wood fibers to the usual composition and tint the resulting mass.
This finishing material has a number of advantages over others:
- Textured plasters can be considered a universal way to decorate walls. The original coating can be selected for any interior style.
- Patterns and designs to create texture are done quickly and effortlessly. It is enough to move the roller one or several times.
- The composition includes components that are resistant to ultraviolet rays. The initial color saturation does not change over time.
- You can add different paints to ready-made mixtures and change their shades and tone.
- Characteristic enhancement of the thermal insulation properties of the base.
- Environmentally friendly composition. It does not release harmful substances into the surrounding space. Suitable not only for decorating the exteriors of buildings, but also interiors.
- To increase the aesthetic expressiveness of textured plaster, mother-of-pearl is added to it.
Textured or relief plaster does not smell. It also does not absorb foreign odors. When working with this material, you should strictly follow the rules for applying plasters of any kind to walls. Otherwise, it may begin to gradually collapse. Or vice versa, it will be very difficult to remove it, if necessary.
Selection and preparation of composition
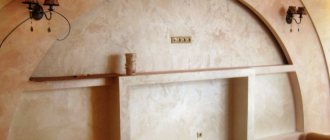
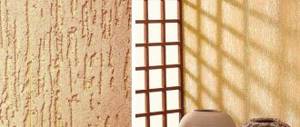
The choice primarily depends on your taste preferences. Decorative plaster in relief is divided into two more types: textured and structural. Textured mixtures have excellent plasticity; the creation of relief occurs with the help of special tools; it is textured mixtures that create bas-reliefs from plaster. Take a look at the textured relief plaster in the photo below.
Related article: Options for finishing window slopes with your own hands
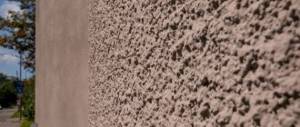
Structural mixtures create a relief on the surface of the wall due to crystals of various sizes in their composition. When these mixtures are applied to the surface of the wall, the minerals, under the action of a grater, draw fancy patterns and thereby decorate your room.
The structural variant includes such a well-known mixture as bark beetle. Minerals make channels on the surface of the cladding similar to the paths of a bark beetle in wood, hence the name. This is what relief plaster looks like:
The preparation of textured and structural compositions should only be carried out strictly following the instructions on the packaging. In most cases, the amount of one portion of decorative cladding solution is calculated based on its setting time. So, for example, if the same bark beetle, after mixing, begins to harden after an hour, then you need to prepare the plaster solution in such quantity as to use it up in 60 minutes.
The hardening time of decorative plaster depends on the type of binder. Gypsum dries the fastest; cement-based compositions require 10 hours or more.
Types of textured plasters
There are several types of popular plasters. They are easy to make yourself. This does not require any special professional skills. A solid but breathable compound applied to a flat surface can resemble wood, leather, natural stone or fabric.
Bark beetle
The plaster called “Bark Beetle” resembles a wooden surface eaten away by bugs. The color, size and volume of the fractions differ.
The walls of a building or room can be decorated either completely or fragmentarily. “Bark beetle” is a finishing coating that is applied to stone, brick, cement, plasterboard or wood surfaces that are strong enough to support the weight of the plaster without deformation. Bright and expressive effects can be achieved using mixtures with inclusions of different sizes.
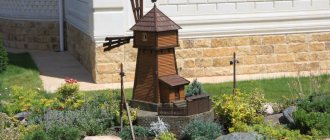
In this case, their properties will be identical. This type of plaster is also successfully used for exterior work - finishing fences, walls, garden gazebos.
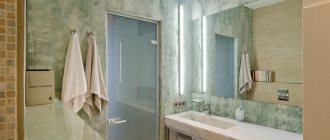
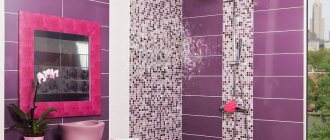
They decorate bathrooms and swimming pools. To prevent exposure to moisture, the finished surface is coated with a special protective varnish.
Under the brick
One of the most stylish and interesting types of textured plaster is considered to be an imitation of a brick wall. Smooth, unsloping walls are suitable for decoration. If there are flaws or tilt, the defects are first eliminated. The cracks or individual recesses are sealed with mortar. The cemented surface is primed. If the walls are smooth, there is no need to use cement mortar. They are immediately treated with a primer with the addition of glue. When creating a brick finish, you should take into account the dimensions of real bricks, which are not only rectangular, but also square.
Color range of textured plasters
To create plaster mixtures, natural and natural paints are most often used. It is best to imitate wood using yellow or ocher shades, such as straw, golden oak, or pear. But brown colors are also suitable - nut, light brown with a hint of ocher, coffee, cream.
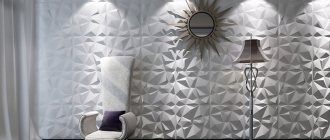
White textured plaster is most often used to decorate public buildings and offices. Its neutral shades allow you to add solemnity to any room with a large area.
This finish is also suitable for small rooms and bedrooms. Makes them lighter, creates the illusion of exceptional purity and freshness. White walls fit perfectly into many interiors and suit any color palette. They prevail in Scandinavian style and in most modern ones.
Gray plaster with a concrete or metal effect is chosen by lovers of high-tech, industrial, techno, minimalism or loft styles.
Mother-of-pearl options with a beautiful patterned texture will delight owners of interiors in oriental styles - Arabic, Indian, Moroccan and Asian. The walls look especially original in combination with mirrors and decor with mother-of-pearl inclusions and silver metal.
Compound
Usually, mica, gypsum, sand, ground brick particles, and wood fibers are added as inclusions to plaster mixtures.
Textured acrylic plasters also contain acrylic resins. This allows you to give the mixture the necessary plasticity and increases the possibility of setting with bases of all types.
The use of a spectrum of acrylic paints makes acrylic-based plasters the leaders. This finish is durable and durable. But there are also disadvantages. First of all, the flammability of the mixture and the ability to attract dust.
How to apply textured plaster
Home comfort and cleanliness often depend on the right choice of materials. Decorative plaster is considered one of the most interesting design options for modern apartments and building facades. It can be applied to walls and ceilings either by hand or using mechanisms, for example, a plastering station. A large selection of textures and shades allows you to use the compositions in new design projects or complement the design of walls and ceilings in previously created interiors.
Before starting work on applying textured plaster to any surface, you need to clean it of any remaining wallpaper, debris or dust. And then do the following:
- Carefully prime the wall.
- Choose a relief based on the capabilities and characteristics of the room. It can be a rock, wood, natural stone, orange peel, bark beetle and a number of others.
- Evenly distribute the contents of the package or container over the surface using a spatula.
- Adjust the resulting patterns or texture with a brush or sponge, and smooth out the resulting seams.
- To give the texture greater relief, you can use not only construction tools, but also improvised means: flat paint brushes, a notched trowel, a relief roller, crumpled stiff paper or whatman paper.
Shaping the texture and painting the wall
In order to create a textured finish, you need to be creative, because what the wall will look like at the end of the work depends entirely on you.
There are three ways to form a texture :
- Using a sponge. We press it into the applied mixture and at the same time rotate it 180 degrees, thereby removing the smoothness of the surface.
- The sketch method. The solution is poured onto the wall, after which it is evenly smoothed with a damp spatula, forming the desired picture.
- Drawing "Furrow". It is applied using a special grater that has a serrated edge. The depth and shape of the grooves depends on the configuration of the edge of the grater.
These three options are the most popular, however, like any other technology for applying textured plaster, there are other ways to create unique finishing options.
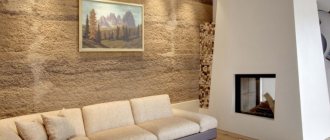
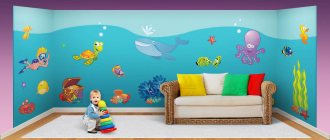
Application in the interior
Decorative wall decoration in the form of textured plaster allows you to emphasize the advantages of various interiors. The presence of Bark Beetle plaster in an apartment or office enhances its modern look and adds practicality to the design.
The matte surface with long grooves applied to it is very similar to wood. Beige, blue or pink shades are chosen for bedrooms, and more saturated colors for hallways.
Kitchen walls coated with a dark composition will look gloomy. Therefore, they plaster with textured mixtures with delicate shades or combine colors.
Textures similar to drops of water, sea foam or snake skin look impressive.
How to make textured plaster yourself
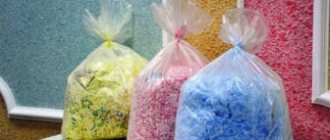
The cost of the decorative composition depends on the brand of the incoming components. Buying ready-made textured plaster from well-known manufacturing companies can be expensive. But, if you make the mixture with your own hands from putty, then decorating the walls with it will be much more profitable than with wallpaper. The mixture, made independently, is suitable for application with a roller or using a stencil:
- The base is gypsum or chalk powder (6 kg 500 g).
- 2 kg of CMC glue solution (5%). Bred in accordance with the recommendations src=”https://balkon4life.ru/wp-content/uploads/2020/04/5e284af49f35998f484a3455.jpg” class=”aligncenter” width=”480″ height=”600″[/img]
- 800 g PVA glue.
- 1 bar of laundry soap (72%) serves as a plasticizer. Grind on a grater and dilute with water to the consistency of thick sour cream or gel.
It is better to mix the ingredients with a construction mixer. First, liquid components, and then gradually add powdered ones. Leave for a while and then mix more intensively. This composition has a long drying period, which allows it to be used even by inexperienced beginners.
Features of the material for textured plaster
The problem of choosing decorative textured plaster can only arise if the consumer is unaware of the compositions and methods of application, and then we go to the construction supermarket and try to concentrate on the names - plaster, structural plaster, decorative, textured, stucco, semi-textured. But in fact, under all this diversity there may be one, maximum two compositions hidden, which can be easily made with our own hands and called whatever we want. When choosing a material, the consumer is primarily interested in the final result, and it is influenced by:
- method of application;
- exact composition;
- filler fraction size;
- binding material;
- maximum thickness of the decorative layer.
When we know all this data, we will be able to create a decorative textured coating the way we want.
Price
The cost of the decorative composition depends on the brand of the incoming components. Buying ready-made textured plaster from well-known manufacturers can be expensive. The price for 1 m2 of treated surface depends on the professionalism of the specialist, the quality and speed of work. If you do everything yourself, then renovations in a house or apartment can be done without spending a lot of money and time.
But you can also buy a ready-made mixture. VGT textured plaster is easy to apply. It is highly viscous and coarsely dispersed. It is distinguished by its versatility, as it can be used to decorate various coatings. In addition to elasticity, the composition is moisture resistant. Suitable for indoor and outdoor use. Preliminary preparation of surfaces is not necessary. All defects are smoothed out using this mixture, which is made on the basis of acrylic binders and marble chips. One container holds 18 kg. 2 kg of mixture is required per 1 m2 (when applied in one layer). This means that one container is enough to treat a wall with an area of 9 m2.
Application instructions
As with mixing the composition, to apply it you also need to adhere to a certain algorithm, which in a simplified version consists of 4 points.
- Preparation of the surface to be decorated;
- Applying the first layer;
- Relief formation;
- Painting or polishing decorative cladding.
Surface preparation
As you know, to create something new, you need to get rid of the old. So in this case, to apply a new cladding you need to remove the old one and prepare the surface. Therefore, the first thing you need to do is remove old wallpaper, paint, and sometimes the old layer of leveling cladding from the wall.
Do I need to remove old plaster? This can be determined in this way: tap the wall over the entire area. If you hear that there are many voids under the cladding, then it needs to be removed. If there are few of them and they are small, in this case the old finish can be left.
Related article: Blast furnace and its use in the production of cast iron
But regardless of whether you tore off the old plaster or left it, after removing the cladding, the walls need to be inspected for damage and repaired as soon as it is identified. For example, cracks are covered with a small amount of mortar, chips and potholes are eliminated in the same way.
After the wall has been rehabilitated and the solution has completely dried, it must be treated with a deep penetration primer. Select primer mixtures based on the material from which your walls are made. Which primer is applicable for specific materials is indicated on the packaging; for example, acrylic primers are used for brick.
Do not forget that the prepared wall must be completely free of dirt and dust before priming, otherwise adhesion will be significantly reduced.
It would be useful to additionally treat the surface with an antiseptic to reduce the likelihood of mold. Next, after the wall has dried, you can begin applying the first layer.
First layer
If you did not remove the old layer, then you can immediately apply a decorative composition to it, but if not, then the first layer will be an updated leveling composition. It is not used as a decorative composition, as it is impractical and meaningless. Relief plaster is applied exclusively at the finishing stage of wall cladding.
For the first layer, conventional leveling compounds with various binders are used. I do not recommend using mixtures based on gypsum and clay; they do not tolerate moisture and are quite fragile. The ideal option for the first layer would be cement-based plaster.
It needs to be mixed and applied to the wall, leveling it at the same time. It is advisable to use ready-made mixtures purchased at a hardware store, since if you do not have experience in construction, you will not be able to create a well-balanced composition, which will certainly affect the quality of the cladding.
Related article: How to seal a doorway after installing the door
If the surface to be treated is very uneven, then the first layer should be quite thick, from two to six centimeters. In this case, it must be applied in two passes, guided by the beacons to create a flat plane. If the evenness of the surface is satisfactory, the thickness of the first layer will be much less and it can be applied using a long tool called a rule.
Making relief
As soon as the first layer has dried, you can begin to apply the final decorative ball of cladding and form its relief. The composition is applied in the same way as the leveling layer, using a trowel and floats.
The relief can be formed in several ways. As already mentioned, textured cladding gets its relief through manipulation with tools, such as wooden and metal graters, various brushes, etc. When creating a relief wall structure, you can even work with your hands, giving free rein to your imagination.
By using plasters interspersed with minerals, the relief is created by itself; you only need to smooth the surface with a special tool, as a result of which a unique structural pattern is formed.
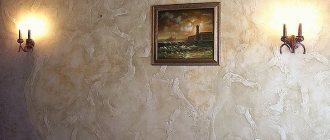
Painting or polishing
What to choose? Painting, polishing, or maybe both. It all depends on your ideas about the appearance of the walls of your home. Facade paint is used to paint relief plaster. With its help, you can emphasize differences in heights on a relief surface, painting deeper places with dark shades and lightening the hills of the wall.
I recommend polishing relief walls using wax-based products. This treatment will give the surface a glossy sheen. This effect looks especially good on textured cladding, and polishing makes the bas-reliefs more pronounced.