Varieties
When choosing a material, financial capabilities are taken into account. You can choose both cheap and quite expensive materials:
- The best option is to choose wooden slats, bars, and boards. Wood is easy to process and has a long service life.
- Brick, stone, and metal are also used in construction. The construction of these materials is solid and durable.
- For external finishing of the surface of the structure, artificial stone, shells, siding, lining, and stone chips are chosen.
Wooden
Wooden structures create coziness on the site and fit harmoniously into any design. In order for the mill to serve for a long time, all parts need to be treated with a special impregnation and antiseptic.
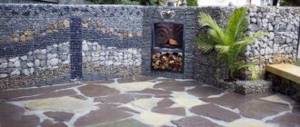
Stone
A strong and reliable structure can be easily made from stone. The finished structure looks beautiful in the garden, surrounded by low bushes and flowers.
With a waterfall
A mill with a waterfall will definitely attract the attention of all guests of the country house. If space allows, a recreation area is created around the mill.
Original DIY garden decor ideas
To decorate your garden plot, you don’t have to spend a lot of money on the services of a designer and the work of landscape craftsmen. Also, decoration elements may not require large expenses. In fact, you can make your garden original and unique with your own hands, as well as using improvised means.
A lot of material sometimes lies right under our feet. And in the literal sense of the word. Sometimes plastic bottles, pieces of wood or iron, old tires, etc. can be used. It all depends on imagination and, of course, the availability of free time. Convert empty. a five-liter plastic canister into a fantastic flower or a mysterious bird, if desired, anyone can do it. Special fans of such decor can place their creations directly in the front gardens of apartment buildings, which certainly enlivens the sometimes dull landscape of city courtyards.
There can be a great many ideas. Perhaps the main concept will be a certain time of year or the plot of a famous film will be the basis. One way or another, in order to bring your design fantasies to life, it is enough to have a clear idea of what should happen in the end and make every possible effort to achieve it. The end result will delight you and your guests for many years.
Autumn decor
The autumn season is known not only for its inclement weather, but also for its incredible riot of colors. If you want to decorate your garden according to this season, the emphasis should be on the color scheme. Moreover, absolutely anything can be used: leaves, acorns, chestnuts, pumpkins, etc. The latter, for example, generally provides unlimited scope for creativity. You can make interesting sculptures from pumpkins, and carving them, if desired, can be akin to masterpieces of fine art.
You can make interesting compositions from colorful leaves. For example, beautiful bouquets. Roses made from them look good. They can be wrapped around a night lamp, and then its light, although it will be quite subdued, can still display colors throughout the entire garden. You can also use colored stones in decoration in combination with autumn plants. The tree itself is very beautiful during this period. And if you also harmoniously place other decorative elements around it, the result can decorate your area for the whole season.
We recommend reading:
How to do proper drainage in a summer cottage?
In addition to bouquets and scattered acorns, you can create entire autumn flower beds. Moreover, you can place them directly on the ground, or use improvised means, for example, old tires. If you paint them with bright paint, it looks almost like a flower pot. Just larger than usual. You can also use a cart or wheelbarrow in this capacity. The combinations do not have to be laconic; in fact, it all depends on your imagination. Artfully hanging ivy branches, neatly arranged acorns, colorful maple leaves and the same pumpkin in the center of the composition are just some of the ideas that can be brought to life.
Decorations can be placed not only on the ground. For example, a beautiful wreath of autumn foliage and rowan branches will look great on a gate or front door. Wrapping ivy or pine branches around hanging lanterns or columns on the porch can also be a good decor option. Just add a couple of yellow and red to this and the design will become much more interesting.
Decor from scrap materials
As mentioned earlier, any plastic bottle can serve as a decorative element; in skillful hands, it can be turned into an interesting decoration for the garden. Using tires instead of flower pots is no longer new in the world of landscape design. All that remains is to decorate them to your liking.
A bold decision would be to make installations from metal sheets. If you have the appropriate tools at hand that allow you to build some kind of sculpture or something more functional, but no less original, it’s time to experiment. Similar things can also be made from wood. Even a table and benches with an unusual hand-carved pattern can become a decorative element. An innovation in landscape design is also the production of small mills. This gives a certain rustic feel to the overall design concept.
We recommend reading:
How to make a decorative fence with your own hands?
Old shoes can also be used. They make interesting flower beds or original feeders. Bird cages are sometimes used as planters from which flower branches can hang beautifully. Even a paint can, no matter how prosaic it may look, can be used for some seedling, having first decorated it somehow.
In addition to creating something new, you can play with something old in an interesting way. For example, watering taps that stick out unattractively from the ground can be wrapped in multi-colored petals made from the same plastic. Then they will look like small flowers. If there is an old stump right in the middle of the plot that cannot be uprooted, it can be easily adapted into a mini-flowerbed. Only in this case, you should not plant flowers directly inside, otherwise it will rot from regular watering. You can put pots inside, preferably clay ones. Then the decorative stump will remain intact, and the seedlings can be watered as much as they require.
Any installation one way or another requires the investment of creative forces. Some may be happy with a single flowerbed in a car tire, while others will be interested in the overall picture. It’s not for nothing that landscape designers earn such fees. And even they sometimes do not miss the opportunity to use improvised material to create some original jewelry detail. They have their own specific artistic vision of the surrounding objects and a clearly developed creative thought process. But this does not mean that an ordinary person cannot create a masterpiece in his garden. All in your hands.
Design
The structure consists of several structural elements.
Foundation and base
The foundation is necessary to securely fix the house, especially if the structure is made of heavy materials. If you simply place the mill on the ground, it will quickly collapse. The platform is made of stone or concrete.
The base is the lower part of the structure. It is wider than the top for greater stability. It is important to properly treat this part of the structure to protect it from moisture and contact with plants.
Frame
The building is the main part of the structure. The walls are assembled from any materials, for example, plywood, boards, lining. This design detail is decorated with windows, a door, a balcony and other elements.
Roof
The roof is most often made gable. Assembled from slats, lining or wooden planks.
Blade wings
A rotating mechanism is installed at the top of the mill. It is an axle with two ball bearings. The blades are made from blocks or plywood. All wings should be the same weight and size.
Recommendations for placement
A decorative mill at the dacha will transform any area of the site. It is not necessary to install the structure on the shore of a reservoir. Plants, trees and shrubs will only emphasize the originality and beauty of the decor.
See also
Arrangement and layout, design and design ideas for a kitchen in Khrushchev
To install the structure, choose a flat area on a hill, which is supposed to be decorated with decorative elements. The structure will fit especially well on a site where all buildings are made of wood.
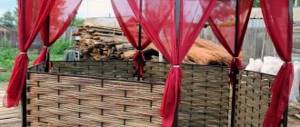
A wicker windmill looks best near a hedge. A decorative bridge will complement the picture.
Where to place and what to combine with
The mill can become the center of the composition of a personal plot. A well in the same style, made in an antique style, or a decorative haystack will support the given theme. The picture will be complemented by wooden figures of animals, shrubs and a flower garden.
The structure can be placed anywhere. It will look equally harmonious in a garden among trees, overgrown with tall grass and in an open space next to the terrace surrounded by flower beds. The main rule is that the material of manufacture and finishing must fit into the general style of buildings on the site.
A mill with a waterfall is ideal for a recreation area. It is better to place it on the bank of a pond or stream. This will allow you to enjoy the calming splash of water on warm summer evenings.
Purpose
If you provide all the details and supplement the design with additional elements, then in addition to the decorative function, it will have several other purposes.
Tool storage
If the structure is installed in the garden, then garden tools or construction tools will be neatly placed inside the mill. It is convenient to store fishing equipment in a room near a pond.
Country toilet or shower
The places of use will look original in the form of a decorative mill.
Doghouse
The decorative mill is also being equipped as a home for a yard dog.
Multi-level flower bed
If you attach boxes and baskets with flowers to the walls of the structure, you will get a beautiful, unusual flower bed.
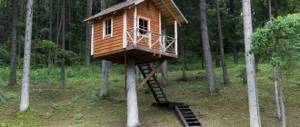
Children's playhouse
The mill can become part of a child's playground. In this case, the structure must be extremely strong and durable.
Alcove
The room inside the structure is equipped for relaxation and tea drinking. Benches and a table are installed.
Summer cuisine
In the summer, a working kitchen area is organized here, but this is only if the size of the mill is large enough.
Masking of utilities
A decorative mill is used to cover sewer hatches, electrical panels, hoses and other similar objects.
Construction process of stone garden windmill
The stone structure is durable and strong.
Materials
To build a stone decorative mill, you will need the following materials:
- The base is made of brick or other block material.
- A working solution is made from sand and cement (3:1).
- To finish the external part, natural stone or tiles are prepared.
- It is better to make the blades out of plastic.
Tools
To make the work go faster, you need to prepare the tools:
- putty knife;
- Master OK;
- bucket, shovel;
- A mixer is useful for mixing the solution;
- a grinder is prepared for cutting parts;
- centimeter tape measure.
Foundation
Since the stone structure is quite heavy and massive, it is imperative to organize the base. Otherwise the mill will quickly fall apart:
- On the site selected for construction, a recess is made onto the bayonet of a shovel measuring 41 by 41.
- Fill the hole with mortar, install the frame and leave the foundation until completely dry.
Building a house
The height and shape of the house may vary. The main thing is that the base of the mill matches the size of the foundation:
- They begin to make masonry.
- A threaded pin is mounted in one of the upper walls of the house to attach the blades.
- A plate is welded onto the stud
Making a propeller
Step-by-step instruction:
- Two circles are cut out of plywood. A hole is made in the center of the blanks.
- Blades are cut out of slats and treated with antiseptic agents.
- Attach the blades between two plywood disks.
- The structure is installed on a stud.
Decor and completion of construction
To decorate the outer surface, tiles are used, which are cut into bricks and placed on glue. Artificial and natural stone are also used.
Construction of a stone mill
The undeniable advantage of a stone mill is its durability. With minimal care, it will last on the site for decades. The disadvantages include the difficulty of moving and dismantling, so the construction should be taken thoroughly.
Required materials and tools
Construction begins with a project. Having decided on the size and appearance of the future structure, you need to draw a plan. This will allow you to calculate the required amount of materials.
Materials:
- brick or broken fragments for the base;
- cement and sand;
- natural stone or tiles for cladding;
- sheet iron or wooden slats for making blades;
- threaded rod; nails, bolts, nuts, self-tapping screws of different sizes.
Tools:
- mixer and bucket for mixing the solution;
- putty knife;
- Master OK;
- roulette;
- level;
- if the blades are made of wood, then you will need a saw, hacksaw or jigsaw.
Foundation
A stone mill will need a foundation; this is the only way to guarantee that the building will not float along with the soil in the spring or during rain.
The depth of the bookmark depends on the overall dimensions. For a small mill 1-1.5 m high, a hole 40 by 40 cm is dug, approximately 30 cm deep, reinforcement is laid inside and filled with cement-sand mortar. The foundation should dry out within a few days, after which construction can continue.
To prepare the solution, take one part cement and three parts sand.
Construction of a house
The finished house will not be empty inside, so you need to prepare the base. It is most convenient to use a brick or its fragments. It is necessary to fold the masonry into the desired shape. The size and proportions can be any, but it is better to make the mill in the form of a trapezoid or cone. The same cement-sand mortar is used for the bond. The structure must be level, therefore, during construction, a level is used.
During the process of laying the brick, a threaded rod is embedded in the base for further fastening of the blades. A plate is welded onto it in advance or a large nut is screwed onto it, with which it will hook onto the brickwork.
At the same stage, other technical holes are provided in the base of the mill, because when the solution hardens, it will no longer be possible to change the design. Of course, you can try to drill through the masonry, but in this case it is possible that the entire base will split.
The shape of the roof depends on the shape of the house. For a cylindrical base in the form of a tower, a traditional cone-shaped roof, the covering of which is made of facing material, is suitable, and for a rectangle, a regular gable roof.
How to decorate
The mill can be decorated with natural or artificial stone. Tiles made in the form of small bricks look best. A building lined with such material will look like a smaller copy of a real antique mill. The outer layer must be laid using moisture-resistant glue, avoiding voids. The better the work is done, the less moisture will penetrate inside, and the mill will retain its good appearance longer.
Making a propeller
The blades rotating under the influence of the wind are the most recognizable part of the mill, however, when making a decorative version, they can be stationary.
There are several ways to assemble a propeller.
First option:
- Two circles with a diameter of 15-25 cm are cut out of plywood, and a hole for the pin is made in the center with a drill.
- The blades are assembled separately from the rack. In order for the wind to spin the propeller and rotate the millstones, in a real mill they are slightly angled, which allows them to capture air currents.
- Both parts are treated with an antiseptic and coated with paint.
- The blades, at equal distances from each other, are clamped between two circles of plywood using glue or bolts.
- The finished propeller is put on the stud and the nut is tightened on both sides.
Second option:
- Two long slats are connected crosswise using glue.
- A hole is made for the pin in the center of the intersection.
- Blade-shaped slats are nailed to each edge.
- The finished propeller is put on a stud and secured with nuts.
If desired, the blades can be cut from sheet metal. In this case, the sharp edges must be processed and the parts welded together. A decorative stone mill with a metal propeller looks more harmonious, but the iron must be painted to avoid rust.
How to properly make a wooden version with your own hands
Wood products have their own characteristics.
See also
Small Living Room Interior Design Ideas and Modern Layout
What you will need
To make construction quick and easy, prepare the following tools:
- To quickly connect parts, use a screwdriver.
- Using a plane it is easy to process a wooden surface.
- A saw is used to cut wooden elements.
- A drill will help you make the holes.
- Fasteners are useful for firmly fastening the structure.
- Self-tapping screws.
- Rake for making blades.
Additionally, you will need buckets, screws, nails, a square or ruler, paint and painting brushes.
Do you need a foundation?
A small structure does not require a foundation. The decoration is easy to move from one place to another. For tall structures it is better to make a foundation, but use a lightweight version:
- Dig a hole (32 cm).
- Install a metal strip.
- Pour in the solution.
If the structure is light, then it is installed on wooden legs.
Support platform
Initially, the lower part of the structure is made. The platform must be strong and reliable to support the weight of all other parts. The higher the mill is supposed to be made, the wider the platform is made:
- A platform is made from boards.
- The finished base is placed on a foundation or support legs.
- To prevent water from accumulating, it is recommended to drill several holes in the base.
Case manufacturing
Most often, the body is a trapezoidal box:
- Vertical bars of equal length are attached to the platform with self-tapping screws.
- It is better to connect the upper parts with another beam.
- The resulting joints are finished with eurolining, wood, or blockhouse.
Roof arrangement and blade assembly
For a low structure, a gable roof is better suited. For large structures, a hipped roof is made:
- Two triangular sides are made from timber.
- All joints are covered with beams to prevent moisture from getting inside.
- The finished roof is placed on the mill body and secured with self-tapping screws.
A threaded rod is secured to the top of the wall. Then the blades are secured with bolts.
Decorative finishing
A wooden structure can be easily decorated with painting or carving. Flowers and low shrubs are planted around the mill.
Making a wooden structure
A wooden mill will not be as durable as a stone one, however, the product looks completely different and creates a different mood. Some may think that assembling a structure made of wood is much easier, but this is not entirely true. You can't do without carpentry skills.
Wood products do not tolerate high humidity well, so the mill must be brought indoors for the winter. This will help avoid rotting and darkening of the array.
Required materials and tools
You can make a wooden mill from leftover building materials or buy everything you need in a store. Any solid wood scraps and lumber will do.
Pine is the easiest to work with - it has a soft, plastic structure, and it is also the most inexpensive and accessible wood in the store.
Materials:
- wooden beam;
- moisture-resistant plywood;
- wood for decoration;
- blade rail;
- roofing material
- nails, bolts, self-tapping screws of different sizes;
- threaded rod;
- wood varnish or drying oil.
Tools:
- saw, hacksaw or jigsaw;
- drill or screwdriver;
- Sander;
- sandpaper;
- hammer;
- brush;
- roulette.
Foundation – is it necessary?
A small wooden mill that serves a decorative function does not need a foundation. The mobility of the structure will allow you to move it to any part of the garden if desired.
In cases where the stability of a future building is in doubt, four legs made of timber with pointed ends are used as a foundation, which are attached to the bottom of the support platform on one side and stuck into the ground on the other.
If you are planning a substantial construction with a utility room or a children's playground inside, then you cannot do without a foundation. This will prevent the mill from tipping over. In this case, a shallow foundation is made along the perimeter of the future walls.
Support platform
The support platform will give the mill stability. A square of the required size is assembled from timber. For rigidity, you can additionally connect the opposite corners crosswise.
If desired, the area of the support platform can be larger than the base of the mill. This will protect the structure from falling in strong winds and can serve as an additional platform for placing decor, such as a wooden fence.
Case manufacturing
The simplest housing for a mill is a box in the form of a trapezoid. Four bars of equal length are vertically attached to the support platform using self-tapping screws. At the top, the edges are additionally connected horizontally by a beam. When assembling, it is important to maintain symmetry.
The edges of the resulting structure are sheathed with wood. Almost any material can be used. Eurolining, block house or imitation timber looks good.
Roof arrangement and blade assembly
The roof can be either gable or hipped. The second option is best used for large structures, and for small ones a gable roof is ideal.
From the timber we knock together two ends in the form of a triangle. Once upon a time, large flour mills were covered with real roofing tiles made of baked clay. A decorative analogue can be the same material that was used for the base, cutting colored corrugated sheets, or modern antique tiles. A plywood slope is first laid under the roofing material.
The joint of the ribs on the roof should cover the ridge. It can be purchased or assembled yourself. Without a ridge, the roof will look unfinished, and rain will get inside the structure.
The finished roof is placed on the mill body and secured from the inside with long self-tapping screws.
The propeller is assembled in the same way as for a stone mill. A pin is installed in one of the faces of the base, only in the case of stone it was embedded in the masonry, but here it is secured with nuts. Similar to the previous version, the blades are put on the other side of the pin and fixed.
Decorative finishing
A wooden mill has a lot of decorative finishing options. Flowers and greenery look good next to her. As an option, turn the building into a flower garden. To do this, its base must contain a box for soil, where marigolds, phlox, petunia or any other annual garden plants are planted in the spring.
The finished mill must be impregnated with a protective solution and painted, or covered with drying oil or varnish. If you first go over the wood with stain, you can emphasize the structure of the wood. Each additional layer will darken the surface of the mill.
Features of manufacturing the version with a waterfall
If you want to create a mill with a waterfall, take these features into account.
Working principle of a water mill
A windmill's blades are driven by the blowing wind. The flow of water is responsible for the operation of the water structure. The basis of such a structure is a wheel, which is installed on the bank of a river or lake. The wheel is placed under the gutter through which water will flow.
If there is no reservoir on the site, then other options are suitable:
- installation under the gutter (the blades will spin when it rains);
- a container is installed on a hill to collect water, which will flow down the gutter to the mill;
- work can also be carried out using a pump.
Materials and tools
To make your own mill with a waterfall, you will need the following list of materials:
- wooden beams, plywood and slats;
- threaded stud;
- screws and nails;
- pipe for making a gutter.
Using a saw, drill, screwdriver, tape measure, hammer and level, the work will be fast and correct.
Step-by-step instruction
Follow the step-by-step instructions.
House
The structure of the house consists of a platform, base and roof:
- If a massive material is chosen and the structure is tall, then it is better to make a foundation.
- The house is installed on the finished platform.
- The base of the structure is made of stone, wood or tile.
- The roof frame is assembled from bars and plywood.
- The roof is being installed.
- A stud is fixed on one side of the wall.
See also
Features of turquoise color in the living room interior and shades, combinations and design
Wheel
The rotating element can be any object that has an axis of rotation, for example, a bicycle wheel. It's easy to make the wheel yourself:
- two circles are cut out of plywood;
- the blades are fixed between the circles;
- A hole for a pin is drilled in the center of the plywood circles.
The wheel will be activated when water enters the space between the blades.
Installation
Once the structure is assembled, it is installed in a permanent place:
- The house is placed on the shore of a reservoir, and the wheel is placed under a stream of water.
- The water supply must be carried out using a gutter.
- It is made from a pipe cut in half.
Decoration in various styles
The decorative mill is additionally decorated with other elements:
- will highlight the beauty of the house design with windows, doors, chimneys, balconies;
- the roof of the mill is decorated with straw or reeds;
- stones are laid around the structure, shrubs and flowers are planted;
- Lighting will help highlight the beauty of the scenery.
Creating a structure in a certain style will help emphasize individuality.
Japanese
Stones and plants (sakura, Japanese maple) will help you create a composition in an oriental style. Various structures are made from stones, for example, a tower, a bench, a castle. The shore of the reservoir is decorated with pebbles and shell rock.
Country
The style involves making all decorative elements from wood. A wooden mill with a thatched roof surrounded by a wooden bench, a bridge, and a well will create a special atmosphere.
Russian
The house is made in the form of a hut with windows and carved shutters. You can make a fence around it, on which clay pots are placed. Sunflowers and daisies are planted.
Dutch
This style is done in bright colors. A flower bed of tulips, crocuses, roses, daffodils and hyacinths is planted around. The base of the house is made in the form of a half-timbered house.
What is a decorative windmill
The wind has long been the “motor” for the vast majority of children's entertainment. Starting with soap bubbles and ending with raising a kite into the sky, and even every schoolchild knew how to build a simple pinwheel out of a square of paper. But times are changing, children have armed themselves with iPads and iPhones. Their games are now measured not by squares of sandy beaches and expanses of green meadows, but by gigabytes of RAM and pixels of the image-transmitting matrix. But not everything is as sad as it seems.
True values are not so easy to lose. So windmills migrated from inept youthful hands to the courtyards of elite cottages, transforming them into an integral element of modern landscape design.
Just look at how beautiful the masters are.
And if you add a little more ingenuity, then such joy can easily be upgraded to a wind generator, which, for example, will illuminate your utility room. But this is not for everyone. The main task of such “toys” is exclusively decorative in nature, and therefore you will have to make it with your soul and with the utmost care.
Common Mistakes
The most common mistakes are:
- improper manufacturing of blades, which subsequently do not rotate;
- the lack of a foundation leads to early destruction of the structure;
- Poor processing of parts leads to rapid wear.