You are planning to make a modern renovation in your apartment, and nowadays a modern interior is unthinkable without modern light sources, which are replacing conventional incandescent and fluorescent lamps, I mean LED lighting.
LED lighting has many benefits, here are some of them. Thanks to the flexible base, the LED strip can be laid in any place. With its help you can create comfort in your home. And thanks to ribbons with changing colors, you can choose the color of the room to suit your character.
- LED light consumes several times less electricity than traditional incandescent lamps.
- LED strips do not heat up like regular lamps.
- Using LEDs you can create any shade of color.
- LED lighting can be distributed.
- Long service life, more than 10 years of continuous operation.
In this article we will tell you how to choose an LED strip and how to illuminate a plasterboard ceiling with it. And not just choose, but get the result in lighting that you want to achieve. There are many offers on the Internet, but choosing what is really needed is sometimes very difficult and takes a lot of time.
Ready-made sets for ceiling lighting
We will assemble the lighting personally for your ceiling. Qualitatively!We will deliver to your door in any city in Russia.
Read more >>
For example, here are only some of the questions that a person will not even ask a store consultant when choosing, but these questions are extremely important; if you do not take these points into account, then you may be disappointed with the purchase.
When choosing lighting, it is important to choose three things correctly:
- The correct LED strip.
- The power supply for this tape, its power must correspond to the footage and model of the tape used.
- A controller for controlling the brightness of the tape and creating the necessary shades. If you do not plan to change the brightness, you do not need a controller.
If these three components are not combined correctly, you may experience the following effects:
- When choosing a power supply for the tape, you should take into account that some power supplies make noise, hum, squeak or get very hot and this will have a negative impact on your well-being. How to choose a power supply that does not make noise? Moreover, with one model of tape it can make noise, but with another it cannot.
- The power supply is incorrectly selected for power; it does not “pull” the tape connected to it.
- The voltage of the power supply and the voltage of the LED strip are incorrectly selected.
- Power supplies and LED strips come in different voltages; this must be taken into account when purchasing.
- The tape burns dimly due to the fact that it is not of high quality; individual segments of the tape may also burn out after several months of use.
- The controller does not fit the tape; different controllers can control different tapes.
- The tape gives blinking brightness imperceptible to the eye, it would seem imperceptible, but you will quickly get tired in such a room.
- Everything works fine, but you can’t take a video in the room, stripes are visible in the video. This also indicates a low-quality controller.
- Spontaneous turning on of the backlight, sometimes due to “glitches” of the controller
You can step on all these “rake” when independently choosing components for LED lighting of plasterboard ceilings. How to figure it all out?
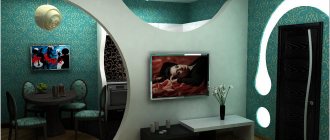
LED ceiling lighting in the interior
First, let's look at a few photographs to understand what beauty can be created with such lighting, and only then we will discuss the rules of installation and selection of equipment.
LED strip under the ceiling - linear lighting in niches
Nowadays, complex ceilings made of plasterboard or PVC sheets are in demand. Their shape can be such that decorative lighting is easily hidden in niches. The photo above shows how ceiling LEDs help not only illuminate a narrow passage, but also visually make it more spacious. For a narrow part of the corridor, the tape acts as the main source of lighting.
Mounting above a suspended platform
Here, lighting helps create the effect of a floating ceiling. Again, a complex structure is assembled from plasterboard, behind the edges of which the tape is hidden. Little light enters the room from such a composition, so its purpose is purely decorative
LED ceiling lighting
A very interesting composition, and it needs to be perceived in its entirety, since spotlights on the ceiling and box also take part in creating the atmosphere. The designer did not make complex boxes and provided for attaching the tape directly to the ceiling. The result looks amazing in the dark, and from a practical point of view, everything is fine here - there is easy access to the equipment, which will facilitate subsequent maintenance. Lovers of the unusual, futuristic and technologically advanced should take it into their arsenal.
Contrasting color combination on the ceiling
LED strips are also good for creating a beautiful transition between ceiling levels, especially if they are made from different materials and have distinct colors. The photo shows how a continuous strip of light is reflected in the glossy surface of the stretch ceiling, which creates the effect of depth and volume. This technique visually increases the height of the ceiling, which means it is suitable for low rooms.
LED wall lighting from the ceiling
The photo again shows the effect of a floating ceiling, but now the distance to the walls is reduced to a minimum. The solution looks elegant and beautiful, but servicing the tape will not be very convenient. This technique, on the contrary, visually brings the ceiling closer to the floor. When doing something like this, you shouldn’t buy a massive chandelier for the center of the room - let it be flat and wide so that the intensity of the lighting is not lost.
Ceiling lighting with LED strip photo
The room in the photo is an exclusive solution, and few people will encounter something like this in life. But we are publishing it for its unique appearance, which was achieved precisely due to the LED strips.
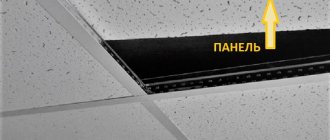
LEDs in a suspended ceiling - is such an installation necessary?
One of the latest trends is the installation of an LED strip above the tension fabric. It looks unusual and interesting. The ceiling itself is made of a material that can transmit light. Designers create very interesting and beautiful compositions in this way. However, in practice such ceilings do not take root. Firstly, the fabric for their creation is more expensive than standard PVC fabrics. Secondly, big problems arise when the LED strip starts to burn out. Imagine that instead of clear lines, intermittent segments are formed, and the further you go, the uglier it will all look.
We recommend: Glass tiles for interior walls and floors
It is not possible to repair or replace elements without dismantling the ceiling, which few will do. As a result, the backlight is simply abandoned and not used. This could happen within a year or two. You should not believe in the unrealistically long service life of LEDs. They also burn well, since electrics in our market are often sold of low quality.
LED strip installation methods
In this chapter there will be only one table, which will present all the main methods of attaching an LED strip. We will describe the features and difficulties that may arise during installation.
| Tape layout: | Description: |
| Complex box, light directed upwards | The first diagram shows a standard perimeter box of a two-level ceiling with lighting. The front wall of the structure has an upward protrusion, which allows you to hide the LED strip from view. The tape is located on the horizontal part of the niche and shines into the ceiling. This should be done if the illuminated surface is matte, since the gloss will be too bright a spot to reflect the light flux, and you will get a clear backlight boundary. |
| The light is directed into the room | The same box is shown here, only the light flux will be directed towards the room. The outer edge will partially cut off the line of light. The diagram will help to better illuminate the ceiling. There will not be a strong reflection effect, as in the first case, even on glossy surfaces. |
| The light is directed inside the box | In our opinion, this solution is the most successful of the ones proposed. The light reflected from the back wall of the box will softly dissipate. The tape will not be visible in the reflection. The highlight line will be uniform and beautiful |
| Installation of tape behind the ceiling molding | To simplify the task for installers, the box can be made straight, without an additional shelf. The diode strip along the perimeter of the ceiling is hidden behind a special plinth. It all looks beautiful and interesting, however, to hide the power supply you will need either a large baguette or a special niche. |
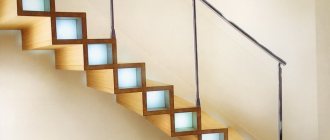
| Horizontal installation | To make the main lighting from an LED strip, it should be directed downwards. As we saw earlier, some do not cover the device at all, but it would be correct to build a stained glass window into the ceiling, which can be easily dismantled if necessary. Such an insert will serve as a light flux diffuser, which is very important for diodes, since the beam they produce is narrowly directed. |
| Floating ceiling effect | To create the effect of a floating ceiling, you will need a reverse-shaped box. The easiest way to assemble it is with a router and plaster glue, but that’s not the point. LED lighting under the ceiling is directed towards the wall. Light fills the remaining space, which creates a visual separation of surfaces. |
Ready-made sets for ceiling lighting
We will assemble the lighting personally for your ceiling. Qualitatively!We will deliver to your door in any city in Russia.
Read more >>
Of course, you can choose the cheapest tape. But it’s worth thinking about why it costs less than its competitors; perhaps it uses low-quality LEDs or poor-quality installation of LEDs, and, in the end, this will affect the brightness of the backlight and the duration of operation.
Rest assured, such ceiling lighting will not bring you joy. You don't need a dim, barely smoldering strip of light. You want the room to be light and cozy, don't you?
To make the right choice, you need to understand how LED strips differ from each other. They differ in the following parameters:
LED strip for floors and baseboards
To decorate the floor, just mount the LED strip under the transparent baseboard. Depending on the degree of protection, the tape can be used in the bedroom, bathroom or kitchen. By choosing the color and its temperature, you can emphasize the cold or warm notes of the interior design.
The LED strip can be mounted under a translucent floor. It looks impressive in the dark. This option is ideal for decorating floors finished with glass matte or colored tiles.
Degree of moisture protection of the tape
Most often, the tape has a degree of protection indicated by the following designations IP 30 or IP 65. These numbers indicate the degree of protection against dust and moisture, here is the table.
There are two types of waterproof tapes, those that are completely sealed with transparent sealant and tapes that are in a transparent protective casing.
The more LEDs, the brighter the light. One meter of tape can accommodate 30, 60, 120, 240 LEDs. But at the same time, power consumption increases, and you pay more for electricity.
Once you have chosen the tape, you need to think about how you will mount it. You may want to hire a specialist. The cost of his work ranges from 400 to 600 rubles per meter (depending on the region).
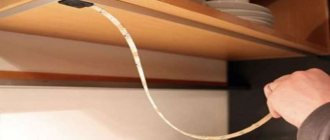
But you can install the tape yourself; there’s nothing complicated about it. On the back side of the tape there is an adhesive base (double-sided tape).
Adhesive LED strip
Glue the tape in the right place on the tape and that’s it. The main thing is that the surface is first well cleaned and degreased. No additional fasteners are required to install the LED strip.
The store usually sells tape in 5-meter lengths, in plastic reels. If you need to cut off a piece of 5m, then there are special notches on the tape with the designation of scissors, which you can use to safely cut the tape without fear that it will fail. These notches usually follow three or six LEDs.
The tape is cut with a multiple of 3 or 6 LEDs, depending on the type of LED strip
If you make a mistake and cut in the wrong place, then nothing bad will happen, just a few neighboring LEDs will not light up, they can then be cut off according to the rules along the cutting line marked on the tape.
When you cut off part of the tape, you will need to solder wires to the cut end of the tape, try not to overheat the LEDs, use a soldering iron with a power of no more than 25W.
And if you use a soldering iron that is not “isolated” from a 220-volt network, then ground its body, otherwise you can burn out all the LEDs in the strip, or use a soldering station with a soldering iron supply voltage of no more than 24V. We have figured out the type of tape and the method of mounting it, all that remains is to figure out how to power it? The tapes come in two types and are powered by 12 or 24 volts.
Neon lighting: how does it work?
What is neon lighting
To create neon ceiling lighting, special ceiling lamps are used. Classic neon lighting is a closed glass tube, the inner surface of which is coated with powder - phosphor. The peculiarity of the phosphor is that it is capable of glowing under a certain influence.
Neon is pumped inside the tube, an inert gas that does not interact with either glass or phosphor. Electrodes are attached to the ends of the neon lamp, to which voltage is applied.
Note! Neon lighting requires a fairly high voltage to operate, so when installing it, it is mandatory to install a converter (step-up transformer).
Under the influence of a high voltage current, neon is ionized, and ions striking the phosphor cause it to glow.
Neon ceiling lighting can be of several colors. The color of the neon backlight is determined by the composition of the phosphor. At the same time, the combination of colors forms the basis of the entire lighting design - you can make it either monochromatic or rainbow, either matching the shade of the overall style of the room or contrasting.
Neon tubes do not have a filament, so unlike conventional light bulbs they do not burn out. The nominal glow period of neon lighting from serious manufacturers is 10 – 15 years. Most industrially produced lamps have a length of 1.5 m and a diameter of 8-15 mm.
Advantages and disadvantages of neon lighting
Along with its aesthetic appearance (and a ceiling with neon lighting looks simply great!) such lighting has a number of advantages:
- Neon found in neon backlight tubes is an inert gas. This means that it is non-toxic to humans and pets, does not burn or explode, i.e. – completely safe to use .
- The illumination of neon lamps can be made continuous, without dark spots at the junction of adjacent lamps. This backlight provides a fairly smooth and uniform glow .
- As noted above, the service life of neon lamps is 10-15 years . So you won’t have to think about replacing the lighting fixtures any time soon.
- Neon lighting is comfortable to work with : the temperature of the lamps reaches a maximum of 40 degrees, in addition, neon lighting lamps operate completely silently.
Ready-made sets for ceiling lighting
We will assemble the lighting personally for your ceiling. Qualitatively!We will deliver to your door in any city in Russia.
Read more >>
To power the tape, a switching power supply is used, if anyone knows, previously they used power supplies based on transformers designed for 50 Hz, which were large and heavy.
Modern power supplies use pulsed voltage conversion and have significantly smaller dimensions and weight. The task of the power supply is to reduce the mains voltage of 220 volts and rectify it to 12 volts or 24 volts.
As we wrote above, there is a huge selection of power supplies, large, small, sealed, open, for different voltages and different powers.
The main parameter of a power supply is power. You will have to calculate this parameter. If we know the total length of the strip and its type, which we need to illuminate the ceiling, we can calculate its total power and, based on the obtained value, select a power supply equal to the power consumption of the entire strip multiplied by a factor of 1.2.
For example, the total consumption of the entire tape is early 230 W, therefore, the power of the power supply should be 230 x 1.2 = 276 W or more. In other words, any power, but not less than 276W. On the other hand, there is also no point in buying a power supply that is too powerful, since it will cost more and have large dimensions.
Also, instead of one power supply, you can take two power supplies, but with less power, but so that their total power is higher than the same figure, 276W for our example. In some cases, it is more convenient and profitable to replace one powerful power supply with several less powerful ones.
Also, the dimensions of the power supply are important. Since for beauty you will most likely want to hide it in the same niche where the lighting is located or behind a suspended ceiling, sometimes instead of one large power supply you can use two small ones, which will be easier for you to hide. Now you can make the lighting yourself, without resorting to the services of installers. The cost of their work ranges from 50-150% of the cost of lighting components.
Ready-made sets for ceiling lighting
We will assemble the lighting personally for your ceiling. Qualitatively!We will deliver to your door in any city in Russia.
Read more >>
In addition, you will have to invite strangers home to install the lighting; this is not always convenient. By using our kits, you can save up to 100% of the cost required to create LED lighting in your home, as well as your nerves and time.
Just choose the set that suits your purposes and order it, delivery is free. All components in the kit are already connected and tested by qualified installers. To check the backlight kit, you just need to plug the plug into the socket.
To install the kit you do not need to have any electrical skills or any tools. The tape is glued to the double-sided tape that is already on it. All electrical connections have already been made and checked by professional electricians.