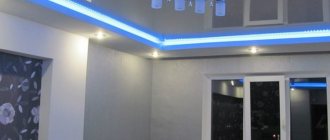
Advantages of LED lighting
The advantage of the LED strip is its ease of installation.
An increasing number of owners of private and commercial real estate strive to ensure that their property looks original and presentable. One way to fulfill this desire is to install an LED strip in the kitchen.
This solution is supported by the advantages of this light source:
- High color rendering index. Crystals recreate the natural colors found in nature.
- Flexibility. Products can be given complex shapes and used to decorate items and objects with angular and curvilinear configurations.
- Easy to install. Fastening is done on an adhesive base.
Dimmer for LED strip
- Durability. High-quality products have a service life of up to 15 years.
- Wide ambient temperature range.
- Possibility of dimming and setting different lighting modes.
- Safety in terms of electric shock.
- Resistance to moisture and organic vapors.
The set of equipment has an affordable price for all categories of the population.
How do LEDs work?
An LED is a semiconductor that emits light when electrical energy passes through it. To select the required brightness, you need to know the chemical composition of the material itself. It should be said right away that LEDs are not connected directly to the power source, since in this case overheating will occur, which leads to breakdown. In order to avoid this, a stabilizer is used, which is a current-stabilizing circuit.
In terms of colors, they can be of absolutely any tone. But if you wish, you can install infrared or ultraviolet lighting in the kitchen.
LEDs are not the main lighting, they play the role of backlighting. Therefore, they are used to enhance portable lamps or headlights on a car.
A common form of LED design.
To decorate the kitchen interior with your own hands, you can use LED strip. It will add a certain elegance and help set accents. This type of lighting has its own advantages:
- there will always be enough light in the kitchen for cooking;
- not afraid of mechanical damage;
- if such lighting works 16 hours a day, it will last a little more than 15 years;
- no problems with choosing the color of the lamps;
- immediately gives brightness of light, since there is no need for heating;
- if necessary, it is easy to select the desired radiation angle;
- fireproof, and for their installation there is no need to create certain temperature indicators in the environment in the kitchen;
- There is no release of toxic substances during operation, which makes them safe for living quarters.
Related article: How to insulate and finish a basement
For DIY kitchen installation, SMD tapes are suitable. They come in one, two, three and four crystals. Depending on the section, monochrome and full color are distinguished. The size varies from 1.6x0.8 mm to 5x5 mm.
Methods and places of interior lighting in the kitchen
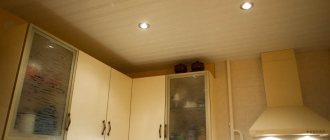
LED kitchen hood lighting
Connecting lighting to the kitchen allows you to give this room a new and unusual look, making it a center for family gatherings and special events.
To create interior lighting you can use the following places:
- a box in which the pipes are disguised;
- hood;
- furniture set;
- wall cabinet;
- dinner table;
- apron over the tabletop;
LED lighting of the kitchen unit creates a floating effect
- corner rack;
- plastic profile around the perimeter of the ceiling;
- Kitchen Area;
- window hole;
- floor plinth;
- cornice.
The products can be installed in any place where they will not interfere and will not suffer from external influences.
How to install lighting in the kitchen with your own hands?
Lamp body diagram.
Regardless of the chosen lighting option, the main thing is to remember that LED lighting should provide the required amount of light to the selected space.
Before you begin installation, you should stock up on:
- LED strips with a power of 12 W;
- electrical cable (diameter 0.75 mm²);
- forks;
- electrical installation brackets;
- soldering iron;
- transformers;
- double-sided tape;
- electrical tape;
- LED profiles;
- scissors;
- 12 W power supply;
- corners for lighting.
Installing the LED strip looks like this:
- First of all, the working surface must be prepared, that is, cleaned and degreased.
- The tape is measured into the required lengths and then cut. It is necessary to expose the contacts from the edges (1-1.5 cm). Next, two cable blanks are soldered to them. All contacts must be protected with insulation.
- Adhesive tape is glued to the corners on one side, and an LED strip on the other. The transformer itself is installed nearby. But before installing it, it is necessary to remove its case in order to determine the lower voltage, since the stripped backlight contacts are soldered on this side. On the opposite side, an electrical cable and plug are attached to it.
- A plastic box is placed inside the cabinet, in which it is necessary to secure excess wires so that they do not interfere. To do this, a hole of the required size is made there, through which the wires are pulled and fastened with staples. They must be connected in one place where the power supply will be mounted. By the way, regarding the connection of wires. The main thing is to remember that the plus must match the plus, and the minus, accordingly, the minus. Next they are connected to the block.
- The last step is to install the switch and connect it to the same block.
Article on the topic: 3-room apartment in a house of the P-44 T series
Classification and comparison of LED strips
Appearance of SMD LED strips
LED strips are available in monochrome and multi-color versions. Products of the first type have LEDs of the same color.
The second row models consist of crystals of three or four colors:
- RGB - red, green, blue;
- RGB+W - red, green, blue, white.
Each row of diodes is connected to a separate channel. There are from 30 to 240 light bulbs per linear meter. Using dimmers of various designs, you can set the operating parameters of the device in overflow, pulsation or even lighting modes.
Classification of degrees of protection
According to the degree of protection against moisture, products are divided into the following categories:
- Open. Conducting lines are on the surface. When water gets on them, a short circuit occurs. Can be used for finishing objects located at a sufficient distance from the stove, window and sink.
- One-sided. The conductors are covered with silicone on top. The products are splash-proof and can be installed almost anywhere.
- Double sided. The strip is packed in plastic. You can attach and connect even inside sinks and hoods.
When choosing a tape, you should pay attention not only to tightness, but also to filling. It is advisable to illuminate the tabletop in white. For LED lighting for the kitchen under cabinets, it is better to choose RGB and RGB+W models.
What types of LED strips are there?
Popular series of LED strips.
Many have seen such a designation as LED strip on store signs. So, this is an LED strip. Small LEDs are arranged in one order on it. The shape of the tape is very convenient for DIY installation.
There are several types of strips, depending on the density of lamps per 1 sq.m: 60, 120 and 240 pieces. Accordingly, the more there are, the brighter the lighting in the kitchen will be. You should also highlight the types of moisture protection:
- IP 20 is the weakest protection. This LED lighting is intended for living rooms or bedrooms, since the moisture level there is generally at an optimal level.
- IP 65 - average protection. This type can already be used not only in the kitchen, but also in the bathroom.
- IP 68 - strong protection. This type can be classified as professional lighting, since it is mainly used in landscape design, for example, for fountains or swimming pools.
Before buying material, you should determine the lighting locations for yourself.
Parallel connection option.
If this is a work surface, then it is better to choose a more powerful brand, but if these are cabinets, and the LEDs will serve a purely decorative role, then you can get by with low-power strips. The same LED lighting can be used on the ceiling to zone the kitchen into working and dining areas.
As mentioned above, the light intensity depends on the number of crystals. In addition, this parameter also affects color changes. When choosing a tape, you should pay attention to its markings. It is possible to combine different ribbons, which will allow you to create 15 million shades.
This material is sold in rolls, each 5 meters long. But in addition to the tape itself, you should purchase a power supply and fasteners separately.
Related article: Manufacturers of bathroom furniture: should you choose a domestic or foreign brand?
Selecting a power supply
Ecola power supply, for LED strip, 6 W, 220-12 V, IP20
The diode backlight operates on 12 V direct current. To obtain it, an electronic transformer is used, receiving power from a 220 V household network.
Power supplies are divided into the following categories:
- Regular. The electronic filling is located in a steel case, which has holes for cooling. They can be mounted in dry areas of the room.
- Sealed. The products have a closed aluminum or plastic case that protects the contents from moisture. Such products can be mounted anywhere, without restrictions.
To calculate the power of the converter, you need to multiply the indicator of 1 m of tape by the number of meters (according to the standard there are 5) and add another 30-50% to the result, since the current consumption parameters change during the operation of the product.
Illumination of the tabletop, dining area
To illuminate the workspace, it is advisable to use bright monochrome strips with white crystals. To achieve maximum brightness, you should use tapes with a density of 120 or 240 diodes per linear meter. To prevent light from blinding your eyes, you need to use a U-shaped profile, which will create a narrow strip of light directed at the desktop. It is better to connect the tape and the profile before attaching it to the cabinets.
To decorate the dining area, it is better to use low-power colored products. You can attach the strip to the end of a wooden table or from the bottom along the perimeter to the glass. Run the cable along the leg and connect to the nearest outlet.
What is required for installation
Connector for connecting tape
The basis for the work is the scheme according to which the tape should be connected to the network.
To perform installation, you need to purchase the following equipment:
- Dimmer;
- power supply (1 x 5 m);
- switch (mechanical, touch, infrared);
- headset for connecting parts of the system;
- controller;
- connector for joining sections.
It is advisable to shop in a store where you can select products from one manufacturer. Such electronics work better and last longer.
Algorithm for installing lamps
Mandatory marking of the mounting location for the LED strip is required.
Installation is carried out in the following sequence:
- Drawing up a project.
- Marking.
- Degreasing surfaces.
- Screwing boxes (if provided).
- Gluing tape.
- Connecting wires to the controller.
- Connecting the power supply and dimmer.
- Installation of the switch.
- Connecting the line to the network.
Before starting work, you need to de-energize the room, checking the absence of voltage with an indicator.
Tools and materials for installing LED strips
DIY LED strip installation tool
To install an LED lighting system in the kitchen, it is enough to have a standard set of household tools.
To work you will need:
- perforator;
- level;
- roulette;
- tester;
- pliers;
- soldering iron;
- stationery knife;
- insulating tape;
- pencil;
- screwdriver;
- alcohol;
- cotton pads.
If you are designing the upper level of the kitchen, you will need a stable stepladder. To avoid injury, wear safety glasses and gloves.
Necessary calculations
Furniture lamps for the work surface in the kitchen should be chosen with special care. To do this, it is necessary to remember that proper placement implies the creation of lighting with the formation of the smallest number of shadows, which can visually change the shape and color of objects. To avoid mistakes, it is recommended to first make the necessary calculations taking into account the characteristics of the lighting device:
- Power. It is selected based on the size of the illuminated surface according to the principle of proportionality. Low power LED lighting fits perfectly into a kitchen with a small work area. But for a kitchen set of impressive size, it is recommended to choose brighter lighting fixtures.
- Scattering angle. The required number of lighting points depends on it. The wider the angle, the fewer lamps will be needed to fully illuminate the tabletop.
- Colorful temperature. It must be remembered that the cold spectrum is brighter than the warm one. Therefore, the higher the temperature, the more lamps will be needed.
What furniture to choose for a small kitchen, secrets of saving space
Thus, having chosen the lamp option you like to illuminate the work area, you should study its characteristics. Then you need to measure the area of the working area. Only after this can you accurately calculate the required number of lamps.
Power
Scattering angle
Colorful temperature
Selection of cable cross-section
Wire calculation table for connection
The cross-section of the cable cores is selected based on the total load created by the assembled structure when operating at full mode. Models of monochrome tape SMD-3528 and color SMD-5050 at 1 m consume up to 15 W. To this is added the power of the dimmer and power supply, which consume 75-150 W each. The total is up to 400 W. Considering that 1 mm² of copper wire can withstand 2 kW, to connect the tape to the network you need to take a cable with a wire cross-section of 0.3-0.5 mm. In this case, you need to pay attention to the quality of insulation. Preference should be given to fire-resistant products that do not support combustion.
Installation of LED strip under kitchen cabinets
A special feature of the room is the large number of hanging cabinets, which create a feeling of cramped space. The problem can be solved visually by decorating furniture with monochrome and colored ribbons.
They can be connected in an open or semi-closed way. In the first case, colored stripes are glued to the bottom of the shelves in one or more lines, creating soft diffused lighting. The closed version is used to solve two problems: illumination of the work area and decoration. The tape is fixed in the box at a distance from the apron.
Types of backlight
Lighting devices for the work area in the kitchen are varied. The approach to choice is strictly individual, it all depends on the needs and personal tastes. Nevertheless, there are a number of recommendations for choosing lighting proposed by designers. Preference should be given to the white spectrum, since its characteristics are as close as possible to a natural light source. Thanks to this, the appearance of food is not distorted, which is important when cooking.
It is recommended to use three or more light sources simultaneously. In this situation, uniform illumination of the working surface without unnecessary sharp shadows is guaranteed. The illumination is soft.
When choosing lighting, it is advisable to take into account the style of the entire kitchen. LED lamps should fit into the overall concept of the interior, being a natural complement to the kitchen set. In this case, the result will be not only functional, but also beautiful.
Recessed luminaires
Recessed lamps are considered a fairly common option for illuminating a work surface. They are spots with LEDs that have a number of advantages:
- Lighting brightness. All objects located on the tabletop can be examined in detail.
- No heat generation. Even with prolonged use, the lamp does not have an undesirable effect on food products located in the work area.
- Possibility of directional illumination of all necessary areas.
- Easy replacement of light bulbs.
The disadvantages of recessed lamps include the mandatory installation directly inside the bottom panel of the cabinet. This is explained by the fact that the height of the lighting element reaches 5 cm. Consequently, the kitchen set loses its integrity, and the facade can be damaged during installation.
Standard and non-standard sizes of kitchen corners, table options
LED panels
Another option for LED lighting under kitchen cabinets are LED panels. This model is an innovative lamp that is becoming increasingly popular among consumers. This is due to a number of important advantages:
- The thickness of the LED panel is less than 14 mm. Overhead lamps will be as invisible as possible.
- Diffused soft light. Thanks to this characteristic, there is a visual expansion of space. This makes you feel more comfortable while cooking.
- Energy saving.
- Durability of use.
- Possibility of installation under the base of lower kitchen cabinets to create a floating effect.
- Variety of existing sizes.
The LED panel is an easy-to-assemble design. The structure includes an aluminum case, an LED line, a power supply, and a power button. The presence of additional elements is the only drawback of this innovative lighting device.
LED Strip Light
The simplest option for illuminating a work surface is considered to be LED strip, which is widespread in all areas of life. It consists of an elastic conductive substrate and LEDs. The tape is so thin that it is practically invisible on the surface. Main advantages:
- Instant operation, the backlight does not require time to warm up, the light appears the moment it is turned on, without delay.
- Does not spoil the appearance of kitchen cabinets. Thanks to its compactness, it is suitable for any interior, regardless of style.
- Electricity consumption is reduced to a minimum.
- Durability: By installing linear LED strips, you can forget about replacing them for a long time.
- A variety of colors that can be changed depending on the situation. For example, when cooking, a white spectrum is selected, which brightly illuminates all objects on the work surface. But for tea drinking you can set it to red or yellow.
- Ability to create a variety of configurations.
The use of LED strip under cabinets in the kitchen is ideal in all respects. The only drawback is the mandatory presence of a transformer. A separate place should be allocated for this element. It is advisable to disguise it somewhere inside one of the lockers.
Types of corner kitchen cabinets, rules for choosing them