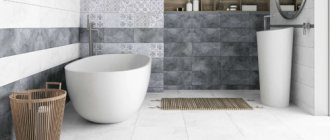
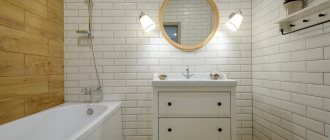
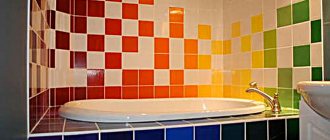
Tile remains the best finishing option for bathroom renovations. If the installation is done efficiently, it will last more than 10 years, maintaining its original characteristics. At first glance, the work is not difficult, but it requires a large preparatory stage, in addition, you need to know all the nuances of the technological process. First you need to choose your style and color scheme, make the correct layout. Today the editors of Homius.ru will conduct a master class on simple, but at the same time very beautiful laying of tiles in the bathroom and will share the nuances with which you can easily complete the whole process yourself.
The main thing in bathroom renovation is the quality of installation
Preparing for dry laying tiles
List of required tools:
- Building level;
- Putty knife;
- Rubber hammer;
- Chalk (bold marker);
- Roulette;
- Tile cutter (glass cutter);
- Screwdriver;
- Large square.
Always start laying tiles in the bathroom with the so-called dry installation, that is, without adhesive. You need to understand how the tiles will fit into the dimensions of your floor. We are not talking about tiling the ENTIRE floor surface. First, you need to use a large square and chalk or a thick marker to draw a line perpendicular to the main entrance to the room (the symmetry of the line in the opening does not play a role in this case).
Important: Ceramic tiles necessarily require a solid base for installation. Tiles are not a flexible floor covering and may crack if not properly supported.
Preparing the premises
Dismantling and cleaning work
This work is simple, but labor-intensive. It includes the required steps:
- Clean the panels from old paint so that after laying the tiles in the bathroom they do not fall off.
- Dismantling of old equipment.
- Removing tiles.
Completely clean the walls of old coatings.
Surface preparation
When laying tiles, the main condition is smooth surfaces. If you are laying tiles on an uneven floor, then you need to be careful when laying the tiles. The condition of the plaster also needs to be checked before laying tiles in the bathroom. There should be no swollen places on it. If they come across, you need to replaster. The vertical of the wall must also be perfectly leveled using putty or plaster. If the walls are uneven, you can use drywall. You might be interested in learning how to level the walls in the bathroom.
Be sure to prime the walls so that the tiles stick better!
Wall marking
It is carried out using the same method for all walls. The marking order is as follows:
- The lowest place in the bathroom is determined. A mark is placed equal to the height of the tile. At this level a line is drawn along the perimeter. (a hydraulic level will help you with this, you can see how to work with it in the second video)
- A metal profile or wooden strip is placed on the line.
- Determine the middle of the wall.
Preparation of glue
Before laying tiles on the bathroom floor, prepare glue. It is made as follows: the dry composition is placed in a container and mixed with water. The following step-by-step instructions can serve as a guide for laying tiles:
- Before laying floor tiles, make markings. You need to find the point where half of each wall is located, put a mark and connect the marks with lines. The floor area is divided into four parts.
- Laying tiles on the floor with your own hands can start from several places. It is best to read from the center of the room, but they can start from the corner, from the door, from a prominent place and other options.
- Before laying the tiles, glue is applied using a comb. The first to lay out is a square of 4 tiles. After which the longest of the rows of the room is laid out along the wall. The work is controlled by a level after 2-3 slabs so that the laid surface does not have unevenness.
- At the last stage of the work, when laying floor tiles with your own hands, remove the crosses, rub and clean the seams from glue.
As soon as the glue reaches the required consistency in the form of a soft solution, you can start working with it. Remember that adhesive for laying tiles in the bathroom has its own “expiration date” indicated on the package. You may be wondering which tile adhesive is better.
How to tile a bathroom
Having decided on how to properly lay tiles in the bathroom, they begin to install them. The installation procedure is as follows:
- Knowing how to glue tiles in the bathroom in two ways, you can use one of them: having placed the tile on the wall, you need to move it so that the solution covers both surfaces well and presses it against the wall. The entire second row should be laid out this way.
- The crosses necessary to maintain the specified joint width are installed between the tiles.
- If we lay tiles without seams, then independent work is excluded here, since the end result may be disappointing. Seamless masonry is usually installed by specialists.
- To ensure that the surface is level vertically and horizontally, it is checked with a level.
- At the end of the row, when laying tiles in the corners begins, trimming is used.
- During the process of laying tiles on the walls, the joints are cleaned of glue.
- The next row is laid out using the same technology.
- The plank is removed from the walls after facing up to the first row.
- After this, the tiles are laid on the wall of the first row.
- When completing the work, use a rubber spatula to remove excess grout from the seams, after which the finished surface is wiped first with a damp cloth and then with a dry one.
By the way, laying tiles without seams is allowed if the tiles are perfectly flat. As a rule, this is any branded tile.
Laying the first row of tiles dry
Start laying the tiles along the line you drew in the direction from the doorway to the wall opposite it. To achieve the same distance between the laid tiles, use special crosses designed for installing tiles.
When you don’t have room left to lay the WHOLE tile in the first row, attach a straight strip or beam to the floor using a screwdriver or drill along the edge of the last tile (perpendicular to the row).
Determining the height of the second row of wall tiles
And now I’m installing a laser level in the middle of the floor to use it to determine the highest point of the floor, and later the beginning of the second row of wall tiles. The good thing about a laser level is that it allows you to get a horizontal line around the entire perimeter of the room. The height of this line is not important now. The most important thing is that the laser beam hits the square that I use for measurements.
Now I will install the square in different corners of the room and sequentially record the readings of the beam, thereby determining the height of the floor in this place. I write down the height marks with a pencil on the floor near the square. I repeat this operation for all corners and several points in the middle of the room. All this time the laser level is in place, I turn its body in the direction I need.
I transfer the received readings onto paper in order to find the highest and lowest points of the floor. I circle 13.8 centimeters because it is the highest number on the list and also the lowest point on the floor. But the number 12.5 is the highest point, and I write it down as the maximum.
The difference in readings was 1.3 centimeters, and this figure can be used to select the toothed trowel with which to apply the adhesive to the floor.
Next, find the mark of the highest point on the floor. It fell on a corner, which suits us quite well.
Now I will prepare two pieces of cardboard 2-3 millimeters thick to simulate the adhesive layer under the floor tiles. And, as you probably already guessed, I lay tiles on the cardboard and get the highest point of the finished floor on the wall. From the level of this tile on the floor I will start the first row of wall tiles.
But for convenience, I will start laying the wall tiles from the second row, so first I must lay two spacer crosses. The next step is to apply the wall tiles, resting on the crosses below. After installing the first row of tiles, I will draw a small line at the top.
I need this line to install the support profile for the second row of tiles. Now you need to continue the line of the second row very accurately along all the walls.
This is where the laser level comes in handy again. We raise it to the desired height, but if there is no laser, this can be done using a long level or a regular level complete with a long rule.
Please note that this line must be strictly horizontal along the entire perimeter of the room. The more accurately it is applied, the better the convergence of tile seams on different walls will be.
Laying the second row of tiles dry
Next, lay the second row of tiles perpendicular to the first row, along the batten you attached, in both directions from the last tile of the first row. Continue laying until you are able to lay a whole tile. Don't forget to use the installation crosses.
After laying the second row of tiles (parallel to the doorway), remove the first row of tiles (except for the last one in the row) and align the second row of tiles so that the distance from the outer tiles of the row to the walls is the same.
Installation of the support profile
The next stage is the installation of the support profile. For these purposes, I use a guide profile for plasterboard structures . I drilled the holes for fastening the profile in advance. It corresponds to the diameter of the dowel-nail tube.
I draw your attention to the fact that before drilling, you must know exactly where you can drill and where not, so as not to spoil hidden communications.
The profile is applied to the wall so that our line is on top. The more accurately we do this, the better it will be.
Now I shake off the debris and insert the fastener into the resulting hole. As I tighten the dowel-nail, I observe the alignment of the line and the edge of the profile. We are done with the first hole and continue to make fasteners in other places. The pitch I use is 60-70 centimeters. Further operations for attaching the profile are performed in the same way.
I cut the profile joints in the corners at 45 degrees to align their planes.
To be on the safe side, you can check the level directly on the profile.
Installing the second row support profile is a very important step. The more accurately it is fixed, the fewer problems you will have with laying wall tiles.
Determining the starting angle
After leveling the second row of tiles, you can determine the starting angle line. Use chalk or a marker to draw this line. The starting angle line is parallel to the line that you drew at the beginning of the work and runs from the batten to the opposite wall along the edge of the last tile of the second row. The intersection of the second line and the slats will become the starting angle - the exact starting point for laying the tiles. We no longer need the first line.
Laying the main tiles in the bathroom
Using a notched trowel, apply tile adhesive to the starting corner area of the floor. The size of the area with tile adhesive applied depends on the size of the tiles being laid. Begin laying the new tiles directly.
Continue to use the installation crosses to ensure even installation. To check the level, use a Level, and to level the tiles, use a rubber hammer and a wooden block (the best combination).
Continue laying tiles in the same order, row after row, until you fill the entire floor area with WHOLE tiles. At this point, the work is finished. Let the glue harden overnight (more precisely, see the instructions for using tile adhesive) and you can continue working and install the missing tile (or rather, its cuts).
List of required materials:
- Tile adhesive;
- Ceramic tile;
- Tile grout;
- Installation (mounting) crosses;
- Wooden block;
- Rail.
Tile laying technology ↑
After making sure that the surface of the walls is smooth, primed, and free of dust and debris, you can proceed with the actual installation. The work is carried out from the bottom up, that is, first the first row is laid out above the floor, then the next one, etc. In order for the rows to be strictly even, you need to put a strip on the floor and level it. The first row is laid along this slats, and to ensure horizontal evenness of the next rows, vertical slats are nailed at the corners of the walls.
Then, at the level of the second and subsequent rows, nails are hammered into the slats, a thread is stretched between them and along it you need to ensure that the rows are strictly horizontal.
Fastening the first row above a wall-mounted rail
Using a notched trowel, glue is applied to the lower surface, on the wall, then the tile is applied to the base. You need to press down lightly so that the glue is evenly distributed. A similar procedure is carried out with adjacent tiles, crosses are inserted between them.
Important: the recommended seam thickness is 3-4 mm.
As for the gap, it has not only a decorative meaning. If it is not left in place, thermal expansion will cause the tile to crack or peel off. The laying of each is controlled horizontally and vertically.
It is not always possible to place only whole tiles on the wall, so the excess in the corners is cut off with a tile cutter. Here it is necessary to take into account one important aspect: if there is no experience in such work, it is extremely difficult to cut off a part less than a few centimeters wide. Then it’s better to use a grinder.
Important: it is advisable to place the cut-off part in the corners, which will then be covered with all kinds of cabinets and shower stalls.
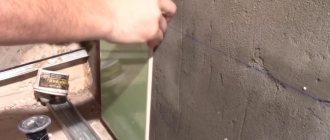
Preparing tiles for cutting
Now you need to lay the tiles adjacent to the walls of the room. To do this, it must be cut to exact dimensions. How to do it? First, attach a strip about 15 mm wide to the wall. Next, take a new tile and lay it exactly one on one on the tile behind which you will be laying a piece of tile (this will be the second tile).
Now take another whole tile (this will be the third tile) and place it on top of the second tile until it touches the batten. Draw a line across the second tile. This will be the cutting line.
Preparing the bathroom and toilet for installation
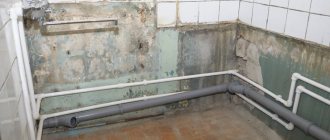
Dismantling old tiles
We bought tiles and glue, which means we can start preparing the room itself.
To do this, you first need to remove all furniture and plumbing from the room; also, before turning off the toilet and washbasin, it is important not to forget to turn off the hot and cold water.
Next we need to remove the old tiles. It is best to use a hammer drill for this; if you don’t have one, you can get by with a chisel and a hammer, but of course it will be easier with a hammer drill. The technology is simple. Switch the hammer drill to chipper mode and start with the outermost tile.
To protect your eyesight, be sure to wear glasses, as the tiles crumble and its fragments can cause trouble.
Most often, the tiles will fall off in layers, along with the glue and plaster, do not try to avoid this, you will still have to remove all unstable areas later. To do this, we also use a hammer drill in hammer mode.
After the wall is cleared of old falling material, we need to level the walls of the bathroom and toilet. To do this, you need to determine the vertical slope of the wall, as well as the angles, which should be equal to 90 degrees. In the first case, we will need a plumb line, which we will hang from the ceiling and thus determine the slope; in the second case, a mounting bracket is sufficient. If the wall turns out to be level, great, but if not, you’ll have to level it.
For this we need:
- plaster mixture - gypsum is best;
- trowel and spatula for applying and leveling the plaster mixture on the wall;
- bucket for preparing the solution;
- mixer (you can use a special attachment of the same name for a hammer drill);
- plaster beacons;
- rule - a flat board is suitable for this; you can also use a metal profile.
Aligning the walls according to the beacons
So, let's start leveling the wall, gypsum plaster will help us with this.
First, we attach the plaster beacons, for this you can use the plaster mixture, until it dries, we align the beacons according to the level and rule. Next, you need to wait until the mixture under the beacons has dried.
When the beacons are already well adhered to the wall, we prepare a mixture - gypsum plaster and water, mix all this with a mixer until the mixture is homogeneous.
The further technology is simple. Using a trowel, apply mortar onto the wall to the edge of the beacons, an area of approximately 0.5 square meters. m and level it from bottom to top with a spatula. In this way, we plaster the wall completely and check whether everything is the same level; if somewhere it is not enough, we add the solution to this place and remove it in a circular motion, rubbing it with a grater. The walls are ready.
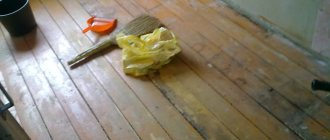
Let's start leveling the floor.
To begin with, using a level or rule, let’s check how uneven our floor is; if the slope exceeds 5 mm, you will have to resort to using a self-leveling mixture, and you can prepare it yourself.
To do this, we simply make the cement mortar more liquid, with approximately the same consistency as jelly, so that it spreads over the floor and thereby covers all the unevenness. After the floor has dried, we’ll check with a level and a rule whether everything is even, if so, great, if not, we’ll have to trim it again in the same way.
Tile cutting
To cut tiles, it is preferable to use a mechanical or electric tile cutter , or a grinder, especially since it is practically impossible to produce ceramic tiles with a high hardness coefficient using a roller or oil glass cutter. However, for small volumes of cutting and suitable tiles, you can easily get by with a glass cutter . Place a ruler along the cutting line and, using equally strong pressure, draw the glass cutter along the line you previously drew.
Place the tile on the edge of a table or other flat and hard surface and, with a sharp movement (pressure), break the tile along the line cut with a glass cutter. Continue measuring and cutting until you have the required number of tiles. Label each cut by row number. Remove the lath and complete the tile installation. After complete installation, also give time for the glue to harden.
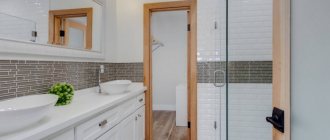
Inspection and measurements of the premises
Now let’s proceed directly to the preparatory work and carefully examine the room.
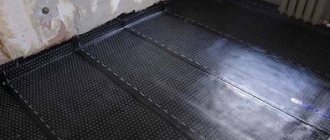
We have to lay tiles on plastered walls, a partition made of gypsum fiber and a concrete floor. And since this is a bathroom, two-layer waterproofing was done on the floor and walls of the shower compartment.
In theory, we can now prime the surfaces and start laying, but first we will check whether the walls and floor are level, and based on this we will decide whether to lay wall or floor tiles first.
Let's start checking with the walls. We have three big walls here. The check is carried out using a long rule with a level attached to it. You can also use a long level, but I didn’t have one.
Meanwhile, we see that the wall is vertical, and there are practically no gaps between the wall and the rule.
This means that on this wall we will use a minimal amount of adhesive when installing.
But with the other two walls the situation is more complicated. They were plastered over the insulation without the use of beacons. Such walls must be checked in both vertical and horizontal planes. We set the level rule again and observe that the top of the wall is tilted outwards, which automatically means that if this wall is not leveled, then each new row of wall tiles laid from bottom to top will require more and more tile adhesive.
Checking in the horizontal plane also revealed flaws, but they are less serious and can be treated, if not by leveling, then by using beacon tiles, which I will talk about in the following parts.
Now I'll check how level the floor is using the same rule and level. First I set the rule with a level along the long side. I see a slight deviation.
Then I turn the rule across and check the other sides and look not only at the level, but also at the gaps under the rule. And again I see a deviation from the horizon.
And here are some conclusions that can be drawn from this test:
- It will be difficult to quickly and efficiently lay floor tiles due to the curved surface.
- It will not work to start laying wall tiles from the first row, leaning on the floor tiles.
- It is necessary to find the highest point of the finished floor and from there find the level of the second row of wall tiles - the installation will begin from there.
Applying grout to tile joints in the bathroom
Once all the tiles are completely laid and the adhesive has completely cured, you can begin grouting the tile joints . But first, do not forget to remove the installation crosses and clean the seams between the tiles. Mix the grout according to the manufacturer's recommendations and apply it with a rubber spatula at a diagonal angle of 30-45 degrees, tightly filling the tile joints.
Cleaning tile grout
Give the grout time to dry (manufacturer's recommendations). First, use a grater or a hard sponge to remove the remaining dry grout without using any liquid. Then remove any unwanted grout from the tiles using a sponge and water. Be careful not to accidentally remove the grout located directly in the tile joints. To finish cleaning, slowly and thoroughly walk with a clean sponge over the entire surface of the laid tiles.
Tip: if you want to make it easier for yourself to remove excess grout, pre-treat your tiles with special liquid solutions designed for pre-treatment. Select the solution in a specialized store based on the characteristics of the tile.
Installation of baseboards.
According to your choice of the type of skirting board you are going to install, install it. You can choose a ceramic skirting board, you can use a ceramic skirting board, or opt for a plastic skirting board. Accordingly, you either use tile adhesive or fasten the baseboard with special glue or self-tapping screws.
This completes your work on laying ceramic tiles in the bathroom.
Primer of walls, choice of trowel and glue
And, since we decided to lay the tiles directly from the walls, they need to be primed first.
Keep in mind that the soil must dry before laying the tiles, which can take up to 24 hours. I use a roller for priming, as I find it more convenient to work with.
The movements of the roller can be arbitrary. The most important thing is to thoroughly saturate the walls. Highly absorbent surfaces must be primed in two layers with a break for drying.
While the primer is drying, let's look at the main tool. To level the tile adhesive, notched trowels or notched trowels are used.
Different tooth sizes are used for walls and floors. I will use a 6 by 6 millimeter tooth for laying wall tiles. After pressing the tile, it will create a layer of adhesive of 2-3 millimeters. Given the unevenness of the floor, I will use a trowel with a 10 by 10 millimeter tooth to lay the floor tiles.
A few words about choosing tile adhesive. It can be of any brand, but since it is a bathroom, it must be approved for use in wet areas - look for the appropriate symbol or marking. This adhesive is quite suitable for laying wall tiles.
But for floor tiles we need glue that can withstand the thermal expansion of a heated floor.
And I don’t recommend joking with this, since cheap glue will remind you of itself in 2-3 years.