Advantages and disadvantages
A glass apron compares favorably with a tiled one and has many advantages:
- no special care is required, since the material is not able to absorb dirt - easy cleaning ;
- high hygiene - since the material is non-porous, bacteria simply have nowhere to settle to build their nest and reproduce;
- beauty and versatility - an apron is often considered the highlight of the kitchen, and in the case of glass it cannot be otherwise, because most often a unique design is chosen. And just glass is still rarely found in the kitchen (other options for designing an apron were discussed in this article);
- Easy installation - if you have the tools, you can hang and remove the glass yourself. This is very convenient, because in the future it will allow you to change the image without calling a specialist;
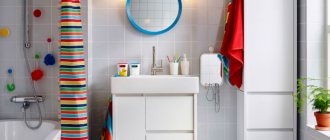
- visual expansion of the room, thanks to the glossy finish - will be especially important for small rooms;
- the ability to install additional lighting , which will make the room visually even larger and more unique;
- high strength and durability - tempered glass is not afraid of changes in temperature, humidity and even scratches.
This apron also has much fewer disadvantages than advantages. Some note its fragility. The fragility and strength of the material depends on the specific glass: tempered options are most often used for aprons, and it is considered one of the most durable.
Problems may arise for people who decided to install the glass themselves, but were not prepared - in such cases, cracks and chips, and sometimes complete cracking of the canvas, are likely. But there are still several disadvantages to this solution:
- the tempered panel cannot be subject to any changes, that is, you first need to think through all the fastenings to the wall, sockets and other openings, and only then place an order. If you try to drill an outlet for an outlet on a finished glass panel, the entire panel will crack due to high internal stress;
- the high cost of such an apron is due to the fact that the canvas is most often made to order, based on the individual characteristics of the room;
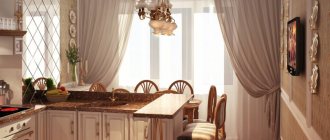
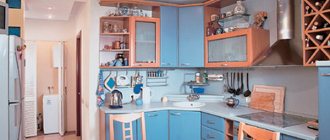
- Such an apron will not always be appropriate for the style of the kitchen. For example, it is not suitable for Provence, country, classic or shabby chic.
Despite the shortcomings, more and more housewives are in favor of installing a glass apron and are satisfied.
Installation of a glass apron
The process of installing a glass splashback for the kitchen will consist of careful preparatory work. It is necessary to make sure that the working surface of the wall in the places where the glass panels are attached does not have protruding sharp fragments. The dimensions of the ordered panels are checked for compliance with the dimensions of the opening and the installation surface. The diameter of the hole drilled in the apron should be slightly larger (1-2 mm) than the diameter of the screw for fastening to the wall. The holes on the panels must be positioned symmetrically.
The permissible distance from the edge is 50 mm. For a total area of less than one square meter, a minimum of two pairs of fasteners are required. For a large area of the apron, another pair of fastenings is added.
For the corner parts of the apron, the verticality of the walls is checked and the angle of 90 degrees is ensured, which should ensure a uniform gap in the corner connection of the glass panels. The number of drilled holes in the glass panels matches the number of fasteners. If there are household electrical sockets, switches and other elements, the decorative trim is removed from them. The glass sockets extend to the size of the thickness of the glass panel (up to 10 mm).
installing a glass splashback
It is recommended to install a glass splashback after installing kitchen furniture, electrical sockets and plumbing equipment. Thus, you eliminate the possibility of shocks or mechanical damage to the skin. The glass panel is applied to the working surface of the wall, and holes are marked. It is recommended to prevent the panel from sliding on the wall.
A hole is drilled in the wall equal to the diameter of the plastic dowel being mounted. The standard fastening element supplied in the kit is a plastic dowel with a diameter of 6 mm.
A plastic dowel is driven into the drilled mounting hole in the wall. The protective film is removed from the panel and the panel is pressed against the wall. To work with the glass panel, a special device with suction cups and comfortable handles is used. Each glass panel is threaded onto fasteners in the wall. A silicone damper is inserted into the mounting hole of the glass panel, which prevents the mounting screw from coming into contact with the glass. Inserts a brass bushing with a thread into which a self-tapping screw is screwed. Without letting go of the panels, decorative caps are attached to the top of the panels for fixation. The fasteners should not be tightened tightly.
The ideal option is for the glass apron to hang on the fasteners, but not sandwiched between the wall and the fasteners. Replaced sockets or switches that were removed. Another way to attach the apron is to use high-strength polymer adhesive. In this case, the apron is glued directly to the wall.
Installation by specialists can be seen here.
Which is better - tiles or glass?
A tiled apron is a classic for our apartments. There is such a variety of tiles that it is easy to create a completely unique design. Despite this, there are even design trends among backsplash tiles. For example, just a couple of years ago, everyone installed a “hog” in the kitchen - tiles that resembled white brick. Now this trend is gradually fading away.
The tiles, as they were skinned, practically do not absorb fats and other dirt, so caring for them is quite simple. But this does not apply to relief specimens, where dirt loves to settle in the recesses.
The tiles have one very weak point - the seams. The grout has a porous structure, so it gets dirty easily, quickly absorbs dirt and loses its appearance. The glass apron has no seams - and this is a big advantage.
In addition, the tiles require a perfectly leveled wall, and the glass is installed at a distance of 4 mm, so there are no serious requirements for the base.
Glass is a new word in finishing aprons in the kitchen, which over time will completely replace tiles.
Kitchen apron made of transparent glass
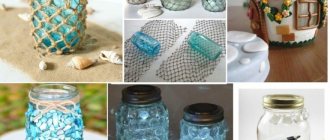
Transparent glass aprons are used to protect wall coverings in the kitchen: wallpaper, paint, wood, stone, etc. In addition, you can decorate such an apron yourself by inserting old family recipes, beautiful photos, newspaper clippings with your favorite dishes, etc. P.
What can you make a glass apron from?
Of course, the apron is made of glass. But it turned out that there are a lot of types of glass, and you definitely need to know the differences between them in order to choose the best option.
Ordinary silicate glass is not suitable for wall decoration, since it reacts strongly to temperature changes: when you turn on the stove, it can simply crack, and fragments can get into the dishes that are being prepared.
Stalinite
Stalinite is tempered glass. The tempering process is very simple: first the glass is heated strongly and then cooled sharply. This creates internal tension in the material, which is what makes glass so strong.
| Advantages | Flaws |
| 5-10 times more impact resistant than regular glass. When broken, it crumbles into non-sharp fragments that cannot be cut. | Costs more than other types of glass. |
| Can be installed even near a gas stove (unlike acrylic or regular). | You cannot change the size of the panel after hardening or even drill holes. |
| Does not deform. | Waiting as it is made to order. |
| Easy care. | |
| Durable and fireproof. The approximate service life is from 10 years. |
Stalinite has several varieties:
- stemalit - the glass was first painted and then tempered, so the paint and the canvas became one and did not separate;
- satin - has a matte surface, which is also more difficult to care for. But it looks beautiful, which is why it costs a little more than the transparent one;
- skinali - tempered glass with a decorative image applied;
- Optiwhite - whitened tempered glass without a bottle bluish tint. It is more expensive and is used only in its pure form or with a light backing.
It is worth noting that when choosing tempered glass online, the price most often indicated is for the entire product or for one square meter. But the final price may be affected by the mounting option, socket holes or installation of lighting. You must be prepared for additional costs.
Tips for choosing tempered glass
There are several tips that will allow you to choose the best tempered glass apron and not be disappointed in it:
- The most budget option for an apron is only 4 mm thick - this is not a strong enough material. It’s better to pay a little extra for the 6 mm thickness, but be sure of its reliability.
- Most often, Stalinite aprons are ordered on a turnkey basis, that is, the company itself takes measurements, manufactures and installs the panel, so the calculators presented on the website are of little information value, since they only take into account materials.
- You can choose an image or photo for the skin yourself on one of the photo stocks. You just need to install a filter so that only panoramic images in size are displayed.
- A beautiful image is very important, but do not forget that it must be combined with the surrounding atmosphere. It is advisable if there are no more than three colors in the photo or picture. It’s great if these colors resonate with the tones that are already in the kitchen. If in doubt, you can stick to the classic options for the kitchen - glass in white, beige or another universal color.
If the walls in the kitchen are beautiful and you want to emphasize this, then it is better to choose Optiwhite transparent glass, which will protect the finish. Brickwork or textured concrete will look especially chic.
Triplex
Triplex, or laminated glass, has the following feature: it is assembled in layers, like a cake. The two sheets of glass have a film between them, which, in the event of breaking, prevents the fragments from scattering. Because of this, the average thickness of the canvas is 8 mm.
This technology is used for car windshields. And in the case of kitchen aprons, the layer can have a pattern, which will serve a decorative function.
| Advantages | Flaws |
| Maximum strength | Costs more than tempered glass |
| Not afraid of temperature changes | Due to the price, it is less common in stores |
| Wide variety of designs | Heavy |
| Easy to care for | It takes a long time to produce - from two weeks to a month |
| Not as clear as tempered glass |
The advantage of such an apron is its simply incredible number of decorative options. The film that holds two layers of glass together can be:
- mirror,
- foil,
- matte,
- painted,
- plain
- or have any design.
You can decorate the apron even with leather or fabric.
Plexiglas
This glass is called organic or acrylic because it is made of plastic. Withstands heating up to 80 degrees, so it is rarely used in the kitchen. The mounting is simple - unevenness on the wall is allowed. But care is difficult, since all active household chemicals are excluded. The best option is soapy water.
| Advantages | Flaws |
| Cheapness | Quickly loses its presentability - gets scratched, fades |
| Lightweight, flexible | Not suitable for gas stove as it melts |
| Impossible to break | Not as beautiful as analogues |
| Can be drilled | Afraid of acetone and alcohol |
| Not afraid of moisture |
Polycarbonate
This material is similar to plexiglass, but its characteristics are more suitable for use in the kitchen. It cannot be broken even with a hammer, but it quickly loses its presentable appearance, in particular it turns yellow.
| Advantages | Flaws |
| Lower cost compared to tempered glass, triplex, tiles | Appearance – Looks worse than regular glass |
| Stronger than tempered glass | Scratches quickly |
| Resistant to high temperatures | |
| Easy to install with your own hands as it is flexible and lightweight |
Decor options
Deciding on the appearance of a future glass apron is very difficult, since there are a huge number of options on the market and on the Internet. But it is precisely this diversity that allows you to choose an apron for almost any kitchen. Let's look at the most popular options for decorating glass.
Photo printing
Photo printing is the simplest and most popular solution that comes to mind when talking about decorating glass. Such a panel even has a special name - skinali.
The design is applied from the reverse side of the glass - this is a high-tech process, so over time the picture does not fade even in direct sunlight.
The latest trend is skins with a 3D effect, but they cost an order of magnitude more than regular models. A win-win decor option - pictures of a culinary orientation:
- juicy fruits;
- delicious dishes;
- aromatic coffee beans;
- champagne in a misty glass with droplets and much more.
Such a pattern will always create the mood in the kitchen. But you should understand that too bright colors can quickly get boring, and such an image cannot be replaced - only together with glass.
To avoid this effect, you should abandon the idea of combining several images on one apron - this will greatly overload the interior. Don’t forget that you can choose absolutely any photo – even your own childhood photo. The main thing is that the quality is appropriate.
Film
You can stick a film with any pattern on the glass. Vinyl film is often chosen, but, in fact, any film will do - even children's drawings on paper. This will definitely add originality to the room, but such decor will not last long: the image may lose the brightness of its colors, the film may wrinkle or even peel off. But replacing the design in this version is as easy as shelling pears, which means the kitchen interior can be changed without much expense.
It is worth giving preference only to high-quality films - this will delay replacement for a longer period. It is worth noting that the film does not necessarily have to have a pattern or design - it can simply give color to the glass or tint it.
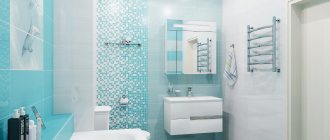
Clear glass
An excellent option for those who do not want to complicate things. It will look great in modern styles with elements of minimalism. Most often, a transparent apron is used to emphasize the beauty or unusualness of the walls - for example, old brick or an intricate pattern on the wallpaper.
Housewives often wonder whether it is possible to attach glass to tiles. It is possible if you choose a very reliable mount.
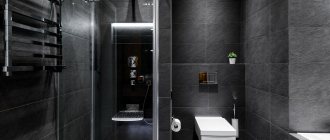
Frosted glass
Another classic and versatile option. It differs in that it attracts much less attention compared to the glossy version. You can use either transparent glass or apply a pattern on it using one of the popular methods.
A matte surface visually expands the room to a lesser extent compared to a glossy one, and drops of fat or water may be more noticeable. Moreover, care will be difficult due to water stains.
Painted glass
As noted above, glass can be painted in different ways: for example, before or after tempering - this is what will affect the durability and quality of the color. The palette is limited only by the customer’s imagination, but it is best to choose from those tones that are already presented in the kitchen. When in doubt, you should pay attention to universal neutral colors.
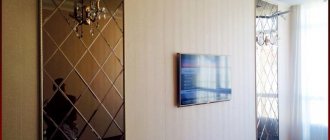
Mirror
A mirror on an apron is a very controversial decision. On the one hand, it is unusual, beautiful and significantly adds air to the room. On the other hand, it requires careful care, since every speck of dust and grease is visible on it. In addition, such an apron is only suitable for a kitchen in a minimalist style, where nothing is stored on the countertop: otherwise the apron will reflect objects, and the impression of disorder and clutter will be created.
Advice! If the kitchen is too small and you don’t want to overload it with a mirror, you can choose a picture with perspective, for example, fields to the horizon or city streets stretching into the distance.
Mirror tiles can be used not only on the backsplash, but also on the floor, walls, and even the ceiling. We wrote more about this here.
Self-installation of a glass splashback: really cheap and fast?
Indeed it is. The glass option is truly one of the cheapest, fastest and highest quality. Of course, if we decide to install it ourselves, without the help of expert installers. Why is this so? The main thing that we need, and what is the main financial component, is high-quality glass, according to the given dimensions.
Which glass is suitable for our purposes?
Often, for these purposes, special tempered glass or triplex is recommended . However, the cost of such an apron for the kitchen literally increases several times. Moreover, if you need to drill holes of a certain diameter, not everyone, even specialized organizations, will be able to do this. But you should not pay special attention to this fact. For our purposes, ordinary glass with a thickness of 6-8 mm is quite suitable. That's right, don't you have the habit of hitting the kitchen apron with a hammer? Well, if there is, then hardening will not save you: the hardened product simply crumbles into small pieces, unless it is laminated.
Where can I get the required glass?
As always, we have several solutions. One is cheap and very complex, and the other is more expensive, but much simpler and more reliable. So, the options:
- Self-production . Even if you cut glass for windows in the country, the option of making the base for the apron yourself is not advisable due to the lack of suitable equipment for cutting glass of the required thickness and according to the required parameters (do not forget about the holes for sockets);
- Order from a specialized organization . In this case, the result is a high-quality product with ideal shapes, machine finishing and other worthy characteristics. We are only required to provide the exact dimensions of the product (total length and width, location and dimensions of holes for sockets, if any), and here you cannot make mistakes.
If you install the apron at approximately the same time as the installation of the kitchen unit, then it is better to measure it after installing all the cabinets. Of course, the choice of an apron should be made after choosing a kitchen set.
For more information on where to start choosing a kitchen set, how to choose the right color of furniture and material for cabinets, read the article “How to choose a kitchen set?”
In addition to the set itself, the apron must be in absolute harmony with the tabletop, its color and structure.
If you have not yet fully decided on the choice of countertop and have not decided which countertop to choose for the kitchen, pay attention to the article “Which countertop to choose for the kitchen”
Additional materials and tools
It is absolutely clear that glass is not all that is required to make a kitchen apron. But, in fact, you don't need much at all. The second necessary component is wallpaper. Preferably, it should be light-resistant, high-quality non-woven wallpaper , but not essential. Here you can’t make a mistake in choosing a color, tone, pattern or pattern. When making a choice, pay attention to the overall design and interior of the kitchen, analyze the color scheme of the furniture and countertops. What you will need for installation:
- Glue suitable for the selected wallpaper;
- Painting knife;
- Glass cleaning liquid;
- Adhesive sealant based on silicone or any other one-component adhesive with a high degree of transparency.
When you are ready and have all the necessary materials, you can begin installing the glass apron.
Backlight
Another option to add aesthetics to your backsplash is to illuminate it. Lighting in the kitchen is rarely superfluous, because the more light there is, the larger the room appears. Backlighting is more often used in modern styles, since it is easier to fit into a similar interior.
This solution looks impressive and original. Such an apron will easily become the highlight of the kitchen. Backlight can be of two types:
- built-in LED;
- LED strip around the perimeter.
The color palette here can also be varied.
If you decide to do the lighting using LED strips, then it is possible to change the color of the light bulbs using a special remote control. This will help create a different atmosphere in the kitchen: invigorating, calming or neutral.
There is another positive aspect of such lighting: thanks to the latest technologies, it practically does not consume electricity, which will result in good savings if you occasionally replace the main lighting with it.
In addition to the classic options, you can consider more original lighting methods. For example, side lighting. To do this, you need to purchase an aluminum profile that matches the color and cover the light bulbs with it.
Mounting options
The process of installing a glass apron is quite simple and does not take much time. For these two reasons, advisors from the Internet are advocating hanging glass with your own hands. But for a non-specialist this can be quite problematic, since even the glass itself weighs quite a lot; if we talk about the tempered version, then an assistant will obviously be required.
It’s better to trust a specialist - he will do everything quickly, and the apron will remain intact. There are several ways to secure a glass apron:
- using special fasteners - a method specifically created for glass. The weight and thickness of the material have absolutely no role. The advantage is that no preliminary work on the wall, for example, to level it, is required. If necessary, the panel can be removed and hung in place. Fasteners can be walk-through or hinged;
- using glue or liquid nails - this installation is considered less reliable and is only suitable for light, opaque glass and a perfectly flat wall. Glue can be used on plastic aprons, but tempered glass should be avoided;
- using a decorative profile - the top one can be left unfastened, as it will be held by its own weight. The essence of the installation is that the glass seems to be inserted into a photo frame, the role of the frame is played by profiles;
- using magnets is a very neat and clean way to install a glass splashback, but not everyone trusts it. The bottom line is that there are several magnets placed on the wall, as well as on the glass itself. Based on physical laws, they attract each other. One can only hope that such a mount will not demagnetize.
When working with serious materials, for example, stalinite, it is better to focus on those fasteners that were specially created for a glass apron. There is absolutely no need for amateur efforts here if there are no plans for repeated repairs. The video will introduce you to the correct installation of glass to the working wall.
The Soviet past makes us distrustful and prejudiced towards new products in the construction industry. And the high cost of trendy building materials is a deterrent. Meanwhile, along with really not very necessary and expensive fashionable things, practical and very beautiful finishing elements appear in our arsenal, the existence of which we had no idea just a few years ago. Such things can easily include a protective apron installed in the kitchen. In city apartments this is already a common thing, but people who spend a lot of time in the country and want to create a stylish interior for a country house should definitely take a closer look at this option for decorating a country kitchen, especially since making a glass apron with your own hands will not be difficult.
Content
- What is a glass kitchen apron video
- Requirements for materials for a glass apron
- Glass apron with photo printing
- Making a glass apron video
- Installation of glass apron video
- Image options
What is a glass kitchen apron?
A kitchen apron is a decorative surface finish between the countertop and wall shelves.
This work area in the kitchen is the most susceptible to contamination and requires the closest attention to its protection.
We are accustomed to the fact that this surface is usually covered with washable wallpaper or tiled.
With wallpaper, of course, it’s simple, but it’s so impractical that it makes you think about more serious wall protection.
Tile helps here, however, its installation requires serious qualifications and is characterized by large labor costs.
In addition, the tiled apron does not differ in the variety of compositions and colors.
And the choice of modern owners is increasingly choosing a glass apron, skinali (skinali is a general name for a decorative vertical panel installed on the surface).
It is quite easy to install, you can apply a design to it and, importantly, the apron is easy to dismantle.
Requirements for materials for a glass apron
For a glass apron, any glass with a thickness of at least 6 millimeters is suitable.
It is recommended to install tempered glass that can withstand high temperatures next to cooking surfaces (stove, oven).
The edges of the glass panels must be ground so that the joints are less noticeable (this operation is performed in any glass workshop).
Photo wallpapers are purchased as regular ones (economical option) or ordered from printing houses in the form of self-adhesive film (more expensive option).
You also need an opaque backing, which can also be ordered from a printing house.
When choosing a film, you must take into account that the image will be displayed as a mirror image.
Glass apron with photo printing
A quite popular and certainly very effective solution can be the use of a protective glass apron for the kitchen with multi-color photo printing on the back of the glass.
This option provides a variety of images, but you just need to post a high-resolution image (at least 3000 pixels horizontally).
The image is applied to the back side of the glass apron and covered with special protective enamel.
This method of application and processing will make the pattern durable, resistant to moisture and withstand high temperatures in the cooking surface area.
Making a glass apron
If you decide to make a glass splashback for your kitchen yourself, you need to strictly follow the following algorithm:
- the wall where the glass will be mounted is ideally aligned to avoid cracking when clamped
- schematically, the entire surface is divided into several parts (you must remember that tempered glass must be installed near the stove and oven)
- The distance from the bottom edge of the wall shelf to the top edge of the tabletop is measured with a tolerance of 5 mm
- glass is ordered from a glass workshop (with mandatory edge grinding)
- if the background is photo wallpaper, they are glued to the wall; if photo printing is used, it is glued to the glass using a backing with mirroring
Installation of a glass apron
Installation of a glass apron is carried out only after complete installation of kitchen furniture and built-in appliances.
The first to install are the apron elements above the stove (and under the hood, for which a U-shaped aluminum profile is screwed onto the wall, into which glass will then be inserted).
Then, along the entire lower edge of the cabinets, L-shaped profiles are screwed to the wall, to which the remaining segments of the apron are attached.
They are pressed from below and secured with a plinth.
Instead of profiles for fastening, you can also use special fastening glass elements.
When drilling holes in glass, the following requirements must be observed:
- The minimum diameter of the hole in the kitchen apron is 8 mm
- minimum rounding radius 8 mm
- the minimum distance between the edges of the holes is 10 mm
- the minimum distance from the edge of the glass to the edge of the hole is 10 mm
- minimum size with equal distance for mounting hole - 25 mm
- the minimum distance from the hole to the outer edge/socket/cutout is 12 mm
- The minimum distance from the cutout for sockets to the edge of the glass is 30mm.
The video shows how to cut holes in glass.
Image options
A glass apron made of ordinary transparent glass will perform only one function - protect the kitchen surface from dirt.
But you shouldn’t give up the aesthetic component of this finishing element.
Surely you will want to experiment with the color scheme both on the glass itself and on the drawings if you are installing a glass apron with photo printing.
The choice here is truly limitless, we will show only a few photos of glass aprons, and your imagination will tell you which one you need.
Plain
Marine theme
Flowers
Image of different heights
The choice of composition is limited only by your imagination and the size of the surface to be protected. It is important that a glass apron for the kitchen will be a unique and practical solution for the modern summer resident.
Author: Sergey and Svetlana Khudentsov
10
Tips for choosing the perfect glass splashback
Only a careful selection of an apron can guarantee that it will last a long time and will please the owner. Advice from professionals will help you decide on the ideal model:
- Tempered glass is the best material, since it is not afraid of even accidental contact with a frying pan. Its strength and durability attract many housewives.
- Be sure to consider the overall design of the kitchen. The apron should be in harmony and complement the picture.
- When attaching a glass apron over the hob, you need to make sure that the material can withstand it. Only heat-resistant options should be used.
- The desire to save money can backfire if the kitchen is located on the sunny side. Cheap materials like acrylic or polycarbonate quickly turn yellow in the sun, which means that repairs will have to be repeated soon.
- When choosing tempered glass, it is better to entrust the measurements to a professional, since there is no way to “modify” it afterwards.
- It is also better to entrust the installation of the apron to specialists if you do not have confidence in your own abilities.
The main requirement for the finished apron is that the shape and size match the surface where it will be fixed. The standard height of the apron is from 40 to 90 centimeters. It’s more difficult with length, since kitchens and layouts are completely different.
Experts agree on one thing: it is undesirable to use a panel longer than 2.5 meters. If the apron exceeds this value, it is better to cover it with different panels. In this case, you don’t have to worry about the joints: a good craftsman will make them almost invisible.
Measurements are taken after finishing and even installation (or at least imaginary fitting) of the kitchen unit. This is due to the fact that specialists usually require that the apron extend 20 centimeters under the set. To save money, these “invisible” areas can be made from cheaper material.
How to remove sockets?
If we talk about glass, then in this case the holes for sockets must be agreed upon when placing an order for the apron, since it is not possible to work with the panel later. If we are talking about acrylic or polycarbonate, then making a hole is quite simple - even an ordinary knife will do.
- First you need to mark the future hole with a pencil.
- Then drill inside the resulting circle next to the hole markings using a drill. For convenience, you can make several holes.
- Using a jigsaw or a regular hacksaw, cut out the material according to the markings, connecting the holes from the drill.
You don’t have to worry too much about evenness, since the socket cover will still fall on top, but it’s better to sharpen sharp corners or pieces so that they don’t damage the wire in the future.
You might find it useful:
Sockets on the kitchen apron for lighting and appliances - how to safely install and hide
What sockets should be installed in the kitchen, and how many are needed?
Retractable, built-in, hidden sockets in kitchen units and countertops
How to care for glass surfaces?
Caring for a glass apron is very simple. For cleaning, you can use a soap solution or any glass cleaner from a nearby supermarket. The procedure is as follows:
- Remove heavy dirt from glass.
- Spray the product over the surface of the apron.
- Wipe with a dry microfiber cloth.
This cleaning should be carried out regularly as the apron becomes dirty. Such quick cleaning was possible due to the absence of seams, like tiles, in which dirt usually accumulates and which, because of this, is quite difficult to clean.
What is the price?
The price of a glass apron may even depend on the region in which it is cast. The minimum price per square meter is 2 thousand rubles: the glass thickness is normal, the edges are processed, and the apron is made to order.
If you want tempered glass for your kitchen, then the price tag increases by 1.5–2 times. The final cost depends on thickness, color, backlighting, and so on. The average cost of a standard panel 2.5 meters long and 60 centimeters high is 4-9 thousand rubles. For each socket you will have to pay another 400–500 rubles, as well as 70–100 wooden ones for each mounting hole.
If you want an original photo print based on the selected image, then a “square” of such an apron will cost from 6 to 15 thousand rubles. The most expensive aprons are considered to be models made of Optiwhite glass with a 3D image printed on it.
It's just material. But there are several other factors that affect the final cost:
- type of structure (composite or solid);
- presence and method of decoration;
- on the way the glass will be attached and the complexity of this process;
- the need for a designer.
Most manufacturers recommend applying a protective film to the apron. Sometimes this service is provided as a gift. Additionally, it is worth considering the services of measuring, delivery and installation of the apron.
Do not forget that most often the glass panel is made to order, so you will have to wait 10–15 days for it.
We threw off aprons for the kitchen made of glass with photo printing
Skinali are glass panels for the kitchen with photo printing. A beautiful pattern in the apron area will make the kitchen design bolder and more interesting, and will also entertain the hostess while preparing dishes. Sunrises and sunsets, landscapes, marine themes, geometric patterns - any image of your choice can become part of your kitchen decor. Note that high image quality is one of the advantages of skinali aprons. At the end of the article, we invite you to look at 12 photos of glass aprons for the kitchen with photo printing.
Also read: Stylish photo wallpaper in the interior - 45 photos Also read: Short or long? Choosing curtains for the kitchen