Why do you need to connect a double switch to two light bulbs?
The main reason for using double switches is to optimize the use of electrical equipment that is connected to the same circuit. The most striking example of an optimized circuit is the standard organization of lighting for a separate bathroom. In this case, one key switch is installed on the hallway side. As a result, you can control the lighting in the toilet using one key, and in the bathroom using another.
Thanks to this switch, it becomes possible to perform two actions simultaneously with one movement - turning on the lights in one room and turning off the lights in another.
Connection diagram for a two-button switch with two light bulbs in the presence of a grounding conductor in the network
However, it is necessary to install a general type switch only if they are located nearby. If the rooms are located at a distance, then it is better to use standard separate settings to avoid confusion.
And if you are wondering how to connect a double switch to two light bulbs, then in addition to the connection diagram, you need to study what tools are needed for this, how to prepare for the installation, and how to directly carry it out. Let's take a closer look at each point.
How to connect two-key switches
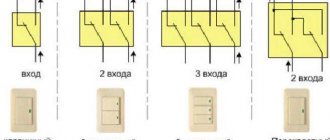
Let's consider the connection using the example of a two-section lighting fixture (the diagram is shown in Figure 4). Note that this is a standard option that is used to turn on/off any devices.
Drawing. 4. Connecting a two-section chandelier to a double switch
As can be seen from the figure, the zero is supplied directly to the lighting sources, in contrast to the phase, which is switched. When the “cl1” contact is triggered, “L1” is turned on, respectively, “cl2” is responsible for the operation of “L2” and “L3”. As a result, we can set three options for the intensity of lighting in the room (one, two or all light bulbs are on).
Please note that the phase is supplied to input “1”, and two control lines are supplied to the outputs (“2” to “L1” and “3” to the group “L2” and “L3”). The supply can be made with a three-wire cable; if this is not available, then 3 wires are laid.
The option shown in Figure 4 is more general. Therefore, I will also give a simpler connection diagram specifically for 2 light bulbs (lamp):
Simple connection diagram
Preparatory stage of work
In the process of preparing for the installation of electrical switching devices, that is, switches, it is necessary to study the structure of the device, its purpose, design and principle of operation. It is also important to prepare all the necessary tools for installing the switch in a domestic or industrial environment.
The number of switched-on lighting devices should be adjusted using a switch, which is equipped with an additional outgoing contact and a separate button for control. In terms of dimensions, it is usually identical to single-key switches, which is provided for greater ease of interchangeability. The main difference is the switching filling.
Devices with two keys have a working part with three contacts, one of which is incoming and two are outgoing. It is the outgoing contacts that have independent control from each other, carried out using a switch.
When installing the switch, it must be positioned so that the outgoing contacts are on top. This is the generally accepted standard for the on/off position.
A wire with a phase must be connected to the terminal of the incoming contact, which comes from the distribution box. Phase wires of consumers must be installed at the terminals of outgoing contacts, that is, from individual lamps of individual luminaires.
The neutral wire, also called the working zero, must be brought out to consumers from the distribution box, and it must not pass through the switch in any way.
For open
For hidden
Separately, it is worth noting that two-key switch models have certain varieties:
- models for installation on the wall itself (used for open wiring);
- models for indoor wall installation (suitable for hidden wiring).
Having understood a little about the theory of connection and phases, you need to prepare the workplace and proceed to direct installation.
Errors that occur when connecting a switch with two keys
Even experienced electricians can make connections incorrectly, and this can be for various reasons: fatigue, redoing someone else’s work, and others. In any case, the most common mistakes are:
Don't forget to isolate all connections you make.
- Connecting the neutral (blue) conductor to one of the “phase” conductors (red, yellow or brown). The neutral must always be connected to the neutral directly in the junction box.
- It is possible to connect a “phase” supply conductor to one of the outgoing contacts L1 or L2 (“1” or “2”), when it is necessary to connect to the common contact L. In this case, the chandelier will light up only when two switch keys are pressed simultaneously, otherwise in case there will be no lighting.
- The output to the switch is a “zero” conductor instead of a “phase” one. In this case, voltage will always be present at the bulb base. Accordingly, you can feel it the first time you replace the light bulb.
Incorrect connection of electrical contacts poses a fire hazard.
Always be careful when working with electricity. Otherwise, you risk receiving a strong electric shock, which causes dangerous consequences for the further functioning of the body. If you still have questions about connecting two-key switches and deciphering the circuits, ask them in the comments. We will definitely answer you as soon as possible.
Share Tweet Email Pin
Connection diagrams
Step-by-step installation instructions
Theoretically, the process of connecting a switching device can be divided into several main stages. Installation must begin with the cables. So, if the wiring is old enough, then it must be replaced with a new one. After this, you need to make the correct connection of the wires in the junction box, and then in the switch itself. To install a lamp or chandelier, you must use the manufacturer's instructions, specially designed for a particular light source.
The first stage - preparing the walls
The wall gating stage is very important and should only be skipped if new wiring with copper conductors of a suitable cross-section is installed. If there are any doubts, it is better to consult a specialist. If the wiring is old, be sure to replace it with a new one.
For lighting purposes, the most ordinary VVGng wire is suitable, the cross-section of which is 1.5 mm² square. If, along with lighting, sockets will be connected, then it is better to give preference to the same wire, but with a cross-section of 2.5 mm².
At the stage of preparing the walls, grooves and arrangement should be carried out, preparation of places where the installation of distribution boxes and socket boxes will be carried out. At this stage, experts also recommend installing an additional circuit breaker in the electrical panel. This separate device will not be superfluous, especially in situations where repairs are required on the lighting line. Using such a simple protective device, it will be possible to turn off only one circuit, while the rest will continue to operate in standard mode.
It is worth noting that in the case of wooden houses the type of wiring is significantly different, so a hidden installation method is not used, since this additionally increases the level of fire danger. In this regard, cables must be insulated as much as possible.
Wires are installed from the outside using special insulators. In this case, not internal, but surface-mounted switches are installed, however, the basic principle of connecting the cores to the terminals remains the same.
After the gating of walls of different materials is completed (this can be concrete, brick, or foam concrete), the grooves for laying wires must be sealed using a building mixture or alabaster. Then you can move on to plastering and decorative finishing of the walls. It is recommended to save the location of the wires on the diagram or drawing so that future repairs and replacement of wiring do not cause problems.
Useful tips
During the installation of the switch there are several very important points that must be remembered. Moreover, this applies not only to the installation process itself, but also to the selection of the necessary equipment. By following a few simple rules, the system will be more reliable and secure.
Below is a list of recommendations and rules that must be followed for safety reasons:
- all work on connecting equipment in the distribution panel must be carried out by qualified electricians; in the absence of knowledge and skills in this area, interfering with the security system located on the site is unacceptable;
- any actions should be carried out exclusively after a power outage at the general apartment switchboard, and before carrying out any operations with wires, you should make sure that the electrical circuit is de-energized (you can use a probe for this);
- in the case when it is planned to connect and install a contactless device or a device with a dimmer, a detailed study of the circuit is required, since the basic installation principle may differ significantly from the installation of a two-key switch, and may have many nuances.
To summarize, connecting a two-key switch to two light bulbs is quite simple, especially if you have at least some skills in this area. But if you have no experience working with electrical equipment, it is better to leave this matter in the hands of professionals. Remember that working with electrical power can be life-threatening. Improperly installed wiring may cause a short circuit and fire. Don't risk your life and contact specialists!
Important points in the question of how to connect a switch with two keys at home
Agree, a switch with two keys is an engineering development that is practical and easy to use. As they say, from one point you can control several lamps or lamps in a chandelier at once.
Be careful when installing the switch to the electrical network - wear insulated gloves
We collect tools for installing the switch
Every craftsman has a standard set of tools in his household arsenal that are necessary for repairing lamps or electrical wiring. This bag should include:
- pliers with side cutter;
- painting knife;
- Screwdriver Set;
- well rubberized gloves;
- electrical tape or special tubes;
- self-clamping terminal;
- screw clamp;
- drill, cable (if the wiring is being installed for the first time).
IMPORTANT INFORMATION!
All tools for working with electricity must have rubberized handles, otherwise there is a risk of electric shock if a wiring breakdown occurs unplanned.
The list of materials involved in installing the switch may expand depending on the preparation of the site
Preparatory activities you need to know about
Before you begin installing a two-key switch and connecting it to lighting, it is ideal to familiarize yourself with the safety precautions for this type of work. Unfortunately, many people ignore this fact, so we decided to limit ourselves to the extremely important points:
- Don't forget to turn off the power to the room. Without this manipulation, it is extremely dangerous to start connecting the dimmer.
- We determine which of the cable conductors is a phase and which is a zero. A special indicator screwdriver will help you figure this out. When you touch a phase, the light on it lights up.
- Let's prepare all the insulating material. These can be silicone or rubber tubes, electrical tape and other materials that prevent the breakdown of high potential.
The insulation layer on the conductors may be faulty, so check the voltage with an ammeter or indicator