How to make paintings from natural materials
Using shells, you can create unusual paintings or decorations. Doing this is not as difficult as you might think at first glance. You just need to approach the work from a creative side, using your imagination. The main material is shells, which can be bought or collected on the coast. Then they need to be sorted depending on type and size. To create a masterpiece, you will also need the following materials at hand:
- base, you can use plywood, board or thick cardboard;
- frame;
- glue;
- paints;
- beads, twigs, blades of grass, sand, beads and other decorative elements.
The process of creating a picture from shells consists of the following steps:
- Sketch design. If you are not very skilled with a pencil, find a picture on the Internet, scan it and make an image along the outline.
- Preparing the base. Thick plywood or a cutting board, such as a cutting board, is best. It is recommended to sand the base and then repaint it. The background can be made with a stain of a suitable color or potassium permanganate.
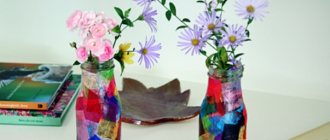
- Drawing. If you are working with a sketch, it is better to use a carbon copy to transfer the picture onto the base, or simply create the future picture directly on the board, like a mosaic. You need to paint the material before you start gluing it. It is advisable to use bright acrylic paints. If you are making a flower, it is better to take white or multi-colored paints, but for a panel with a seascape, green and blue shades are suitable, which convey the color of the waves well.
- Gluing the material. Shells and other decorative elements are well fixed with PVA glue.
- Framing the painting. Homemade baguettes can transform paintings, but making them will require a lot of patience and skill.
Basic instructions for preparing shells
Before you start making crafts from shells, you need to prepare them well.
- If the shells are “dead” and there are no shellfish remains left in them, then you just need to soak them in a solution of water and any chlorine-containing product (for example, bleach, “Duckling”, etc.) in a 1:1 ratio for 30 minutes. If the shells are very dirty or you want to remove the dark outer layer (periostracum), soak them longer. After soaking, brush the shells and rinse in clean water.
- If the shells are “live”, that is, they have the remains of mollusks (even if they died long ago) and have an unpleasant odor, then they need to be thoroughly cleaned. To do this, put the shells in boiling water for 5 minutes, and then remove the remains of the shellfish using tongs, nail scissors, etc. There is a second way: heat the shells in the microwave for 30 seconds, then try to remove the remains with tongs. If unsuccessful, continue heating the shells in the microwave, checking the result every 10 seconds. When all remains have been removed, treat the sinks with a bleach solution according to the first instructions.
After processing, inspect the sinks for chips and, if any, sand them with a sanding block, disc or sandpaper. If desired, you can add shine to them using clear nail polish or furniture polish, as well as using oil or rich cream. True, in this case, before treating the shells with glue, the gluing areas will have to be additionally degreased with alcohol.
Drilling holes
To make some types of crafts from shells (for example, wind chimes, garlands, beads, bracelets and other jewelry), you need to drill a hole in them. This task is quite simple, the only difficulty is that the shells can crack or delaminate at the drilling site.
- Therefore, remember the main rule: the thinner the shell, the smaller the hole should be in it and, accordingly, the thread/accessories of the decoration.
Shell frog
You will need: shells 5, 3 and 1 cm long, 2 pieces each, 4 shells 2 cm long, glue gun, 2 black beads for the eyes.
Master Class
- Glue together 5 cm of shells, leaving the wide part slightly open as a frog.
- Glue 2 shells of 3 cm each as a body.
- Glue the frog's body and mouth together.
- Glue 2 cm shells in place of the paws.
- Glue a bead onto the smallest shells.
- Glue the smallest shells as eyes.
The shell frog is ready! Check out the photo gallery of ideas for creating green beauties from shells!
I recommend watching the video master class!
Crafts from shells. Little frog.
DIY shell panel for beginners
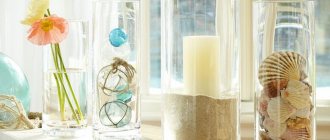
Surely everyone has shells brought from the sea. They evoke pleasant memories of relaxation, sun and sound of the sea. Seashells themselves are a beautiful work of nature. Making a panel of shells with your own hands is quite simple. You need to use your imagination.
Materials for creating panels can mostly be found at home:
Anyone can make a panel from shells, showing a little of their imagination and desire
If you don’t have any, you can buy everything for needlework in the store.
Making shell panels can be a great hobby. This is a fun activity for adults and children. When working on crafts, a child incredibly develops fine motor skills, fantasy, imagination, perseverance and attentiveness.
How to make a panel from shells with your own hands: master class
Creating panels develops incredible creative abilities in everyone. Such a panel can be hung at home; for example, a marine-style panel looks great in the bathroom. And panels with flowers or trees, as well as in the form of toys, are perfect for the design of a children's room. In addition, a hand-made panel of shells is a good gift.
To create a panel of shells you will need:
- Seashells of different sizes and shapes;
- Board or plywood;
- Glue;
- Acrylic paints;
- Wooden frame, suitable for photos;
- You can also use various beads, feathers, pearls, rhinestones, pebbles, buttons, cereals, seeds.
Thanks to the variety of shapes and colors of shells, the panel can turn out original and colorful.
In general, you can use any available materials that you have. There are no restrictions.
First you need to collect all the material for work. Prepare everything.
Shells can be brought from the sea, or they can be purchased at a craft store.
Actions:
- It is necessary to sort the shells by size and type. All shells should be thoroughly washed and dried.
- Shells can be painted with marigold to give them a darker and richer shade.
- If there is no stain, you can use a strong solution of potassium permanganate, then the color will range from dark red to brown, depending on the strength of the solution. It’s easier and faster to cover shells with acrylic paints.
- The shade of paint is selected at will, in accordance with the concept and design of the picture. For example, to create a sun from shells, use yellow color, and for flowers you need to paint shells pink and red.
- Before gluing the shells onto the panel, the paint must dry, or it will smudge. You can, of course, paint the shells after attaching them to the panel. But it may not turn out very neatly.
You can make a lot of different panels from shells: paintings, decorations, figurines, patterns, etc. The main thing in this matter is imagination and ingenuity.
If you don’t have any of the above on hand, you can use nail polish to give the shells a tint. Pearlescent varnishes look especially impressive.
You need to take a wooden frame, you can use a photo frame. It can also be coated with acrylic paint.
The board or plywood must be level, to achieve this you should walk over the surface with sandpaper. The board should be adjusted to the size of the frame.
How to make an unusual panel
You can make the panel abstract, that is, simply stick on shells of various shapes in a chaotic order, or you can arrange the shells into a pattern.
For example:
The next stage is a sketch of the panel, made in any way. You can not only draw a picture by hand with a pencil or paints, but also find a photo you like on the Internet or scan a beautiful picture, photo or even a postcard. Using Adobe Photoshop, you need to outline the image.
Most people bring a lot of shells from their seaside vacation, which eventually gather dust on a shelf and are forgotten about. Not everyone realizes that they can be used to make an excellent and original panel
Shell frame
In this master class you can decorate – photo frames, picture frames, decorate mirrors and watches.
You will need: shells of the desired sizes - small, medium, large, glue gun, tape, newspaper, optional decorative elements - beads, stars...
Master Class
- Cover the picture or mirror with newspaper and secure with tape. If you have a regular frame, you don't have to do this.
- Distribute according to shell size
- Glue shells of the same size.
- Glue the remaining shells, adhering to the same style, in a chaotic order or overlapping in a checkerboard pattern.
- Fill in the gaps with small shells.
- Glue beads and starfish as decoration.
- Remove the tape and newspaper.
The shell frame is ready! I recommend viewing a photo gallery of ideas for decorating frames with shells!
I recommend watching the video master class!
DIY: Seashell Photo Frame
Step-by-step instructions: DIY shell paintings and panels
After preparing all the necessary materials, you can start working on the panel.
Step by step guide:
- We paint the frame with stain, potassium permanganate or acrylic paints. The frame needs to dry completely. A white and blue frame works well for a marine-themed panel.
- We insert the board or plywood into the prepared frame.
- Mesh, fabric, sand, burlap are used as a background.
- We cut out the mesh, fabric or burlap prepared for the panel to the size of the frame. We attach it with glue. It is convenient to use a special glue gun. If creating panels is a hobby, then you should spend money and buy a glue gun; it is not expensive, but is very convenient, since the glue is applied carefully, in small portions. This will prevent the glue from spreading.
- The next stage is the main, most exciting and interesting. We make panels from shells and other materials directly on the panel. We carefully attach each part with glue.
A panel of shells is a rather painstaking task that will require a little of your patience and diligence.
We treat the assembled panel with acrylic varnish. This will allow the panel to look more finished; in addition, the varnished parts shimmer beautifully in the sun.
Feng Shui about shells in the interior
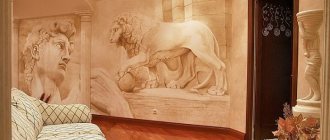
The shells are delightful in themselves: the complex shape and mysterious shimmer of mother-of-pearl are what have attracted decorators for centuries. Shells were used in decoration back in Ancient Egypt, both whole and in the form of crushed mother-of-pearl chips. Walls were lined with keratin fragments and furniture was inlaid, and pearl dust was used as a pigment. Whole shells were strung on threads and collected in spectacular clusters around lamps, attached to an adhesive base, forming a panel.
Ancient decorators rarely did anything without a secret meaning: all their work was literally imbued with beliefs and mystical meaning. This trend has not spared shells. Since for some peoples small cowries replaced money, for many peoples panels made of shells and stones are a symbol of wealth and profit, a kind of wall amulet.
There is a lot of talk about the symbolism and influence of shells in the literature on the principles of interior design according to Feng Shui . Shells have a double meaning:
- money symbol;
- wanderer's amulet.
This interpretation determines the optimal location of the seafood accessory in the apartment. Place a panel made of shells, a photo in a frame decorated with them, or a craft-souvenir made of mother-of-pearl fans in the corners responsible for financial well-being: on the south and south-east sides of the apartment.
Another case is a shell amulet for those who are often on the road. Protection for a safe return to your home can be a hand-made panel of shells: a photo of the traveler himself or a family photo in a frame decorated with shells. This accessory is recommended to be placed in the northwest. By placing a photo of the country you want to visit in a hand-made panel of shells, you can attract good luck and speed up the realization of your cherished dream.