Indoor flowers in flowerpots are a wonderful way to decorate an apartment or house, making the room more lively and cozy.
In this article we offer you interesting ideas on how to make beautiful hanging flower pots using a variety of materials, such as wood, leather, twine and other available materials.
Also 5 step-by-step master classes with diagrams and photos on how to weave flower pots quickly and easily with your own hands and create a truly beautiful interior decor.
Leather plant pots
Leather hanging flower pots are easy to make and look very original. Add a little style to your home decor with this wonderful leather planter. It can definitely become the highlight that makes the interior unique.
Master class: leather hanging planter
Necessary materials:
- Distilled (purified) water
- Tracing paper (21x28 cm) and 4 pieces of strong rope (or leather laces), each approximately 90-120 cm in length
- Leather dye (optional) and gloves
- Leather (square size 30x30 cm)
- Packing tape, a pencil and a utility knife
- Computer and printer (to print the template) and template
- Sponge for wetting and staining
Step-by-step diagram:
Step 1: Preparation and Placement
Print the factory hanger template on tracing paper. Lay the template down on the wrong side of the leather and choose the ideal placement (not too close to the sides to avoid any imperfections in the leather).
Step 3: Soften the skin
Dip the sponge into purified water and then apply the moisture evenly to the skin. Repeat this step at least three times until the skin looks like it can't take in any more water. This will soften the skin and make it easier for us to weave the flowerpots.
Step 4: Transferring the Template
Now place the template in the previously chosen place and tape it on the sides so that it does not move to the sides. Using a simple pencil, draw the lines printed on the tracing paper, pressing the pencil with medium force. Be careful and don't miss any line.
Step 5: Cutting
Now remove the template from the leather to see how the design has been transferred to the surface of the leather. Using a utility knife, make cuts along the lines.
For convenience, you can first cut a circle along the outer contour. The cuts should be clearly along the drawn lines.
Step 6. Coloring
Note: This step is optional and depends on the color you want and the materials you have on hand. In our case, we painted the leather dark brown.
After the skin has dried from moisture (at least one hour), apply the desired dye. Apply the paint using a sponge (wearing gloves) until the desired effect is achieved.
As the leather dries, pull it back a little at a time to create a voluminous shape. You will begin to see the leather distort, continue to pull and stretch it to create the shape of the pot as it should be when finished.
Step 8: Hanging
- Once the leather is completely dry and the shape of the planter is formed, punch four holes in the top to thread the strings through.
- You should place them evenly, at the same distance from each other, so that the hanging flower pot does not tilt in one direction.
- Take four ropes (regular or leather) and tie a knot in each of them, pulling it tightly at the end.
Step 9: Decoration and installation
Add tassels, beads, studs - whatever is needed to achieve the desired style in the end. At the top of the hanging cords, gather all four of them together and tie them into a knot.
You can use this knot to hook onto a ceiling hook and/or ring. See if the length of the pendant suits you; if necessary, tie the knot at a different level.
Hanging planter made from straws
This pot will suit the interior with an innovative touch. Transform and complement your home decor with these neon straws and thread stands. Moreover, even 15 minutes will be enough for you!
Necessary materials:
- Neon threads
- neon straws (8 pieces per pot)
- flower pots for indoor flowers (we used white ones made of melamine)
- house plants (succulents)
- scissors
How to weave - instructions:
Step 1: Cutting the threads
Cut eight pieces of neon cord, each 90-150 cm long, depending on how close to the ceiling you want to place the pots.
Step 2: Making a Knot
Take the newly cut strands together and tie a knot at one end, creating a tassel from the small excess cord at one end.
Step 3: Divide the threads into sections
Lay out the rope into four sections (like a cross shape). That is, two ropes in each section.
Step 4: Cutting the Straws
- Cut off the small part of the straws that is separated by the spring. Then cut it in half. Take eight of these small pieces and thread a thread into each of them.
- Move the straws towards the center (knot) and make a knot on every two strands (in sections). This is what it will look like:
- Arrange the threads again in a cross shape, two threads per section. Only now, to form a section, take one thread at a time from the previously adjacent sections.
- Cut the straws into pieces (16 in total) , each of which should be the size of the part of the straw that is separated by a spring.
- Thread a thread through each of and make knots in the threads from one section.
- Similarly, arrange 2 threads in a cross shape, one from adjacent sections.
Add the third and final set of straws to the threads and tie adjacent threads (similar to the previous set).
Step 5: Hanging
All that remains is to hang the flowerpot and insert a flowerpot with indoor flowers into it. Make several pieces, then together they will create a beautiful composition.
And neon straws will also glow a little at night, which will look very original.
Macrame flower pots
The macrame technique probably has the most variations in making pots. They can be either very simple, which can be done in literally 10-15 minutes with your own hands, or complex with many hours of work. Practice weaving first on easy ones, hone your skills, and then improve.
Master class: Do-it-yourself macrame weaving
Macrame is back in fashion again, as is handicrafts in general. In this master class you will learn how to make a hanging plant pot with your own hands using this technique. There is nothing complicated, just follow the instructions and you will succeed!
Necessary materials:
- 3 cords 2.5 m long and 0.5 cm thick
- Metal ring with a diameter of 2.5-3 cm
- Hook (on the wall, slot) to hold the macrame while working
- Scissors and colored rope
- Glass pot in the shape of a ball with a diameter of 20 cm
- Drainage stones and soil
- Houseplants that climb (eg Stephanotis)
- Decorative moss (optional)
Step-by-step instruction:
Step 1: Thread the ropes into the ring
Pull all three ropes through the metal ring until the ring is in the middle of the ropes. Thus, you now have six ropes to work with, each 1.25 m long.
Step 2: Making a Knot
- From all six ropes, tie a knot right next to the ring. Make it as tight as possible; to do this, after forming the knot, pull each rope separately.
- Hang the ring on a hook (if there is no hook, then use a separate small rope to tie it to a cabinet handle or something like that, the main thing is to secure it). This will allow you to use both hands while working.
Step 3: Divide the cords into groups
- Divide the cords into three groups, two in each . Tie a knot in each pair 45cm below the ring. You will have three knots at the same level, make sure they are tight.
- Take one rope from two adjacent pairs and tie them together about 12 cm below the previous knot .
Repeat the previous step with the remaining ropes so that they are all tied together. This will create a zigzag pattern between the cords.
Step 4: End Node
- About 12 -15 cm below the second set of knots , gather all six ropes together to make one large end knot. Pull each cord individually to make the knot as tight as possible.
- See how long you need to leave and cut the ropes to the size you need.
- Wrap colorful threads around the rope in several places, creating blocks several centimeters long. This stage is decorative and is performed at will. Now the macrame pendant is ready and you can place the pot in it.
Step 5: Planting indoor flowers
Place drainage stones in the bottom of the glass pot to create a layer about 2.5 cm high. Fill the rest of the bowl with soil.
- Remove the plant from the temporary pot and place it in a glass container. Apply water and press down on the soil to compact it. You can place decorative moss on top of the soil if desired.
- Place the glass bowl with the flower over the lowest knot and spread the ropes to the sides to secure well.
- Straighten the plant if it gets tangled in the strings. Hang it and admire the beauty of the plant and your own product.
Macrame patterns for flowerpots
Here are a few more patterns for those who want to master macrame weaving. They are very simple - suitable even for beginners. We look at the photo and repeat. Clothesline or thin twine are perfect materials. The minimum consumption for a hanging planter is 10 meters of rope.
Ways to hang a flower pot using rope
Nowadays you can buy a hanging flower pot for every taste and color, but sometimes it happens that you don’t have the opportunity to buy a special flower pot, but you really want to hang flowers beautifully. In this case, you can independently make various hanging stands or handmade flowerpots that will make the interior more cozy and original.
Rope is a fairly inexpensive and simple material, but despite its simplicity, a lot of interesting and useful things can be made from rope. If there is no room for flowers on the windowsill or if pets are constantly trying to eat them, then it is best to hang indoor plants from the ceiling or walls. There are several ways that will help not only protect flowers, but also make the room more modern and unusual.
Floating shelf
To make such a shelf you need to take a wooden plate, rope and scissors.
The rope must be cut into three parts, each three meters long. All parts need to be brought together and tied in a strong knot in the middle. If you want, you can tie not a simple knot, but some interesting and beautiful one. Afterwards, the ends of each rope need to be divided into several parts so that you get something similar to a brush and twist them tightly. If you wish, you can use these ends to braid an unusual braid.
Now you need to thread a wooden plate through the resulting three braids and place it strictly in the middle, then it will hold very firmly. To make such a hanging shelf look more decorative, you can tie a small tassel at the end. On a floating shelf you can place several small pots of flowers. It can be hung from the ceiling or even from a window ledge. It looks very stylish and original.
Macrame
You will need scissors and rope. The macrame technique is used in many places; it is also very suitable for making hanging flowerpots. Weaving a hanging system for a pot is very simple. It is enough to cut the rope into eight parts, approximately 3 meters each. Tie all the parts together with a strong knot. Turn the pot over and place the resulting knot in the drainage hole, which is located in the middle. Then you need to divide two parts into four sides. At the end of the base of the pot, tie a knot from each two parts. Then you need to retreat five to seven centimeters to the bottom. Take one rope from adjacent pairs and tie them together. You need to continue these actions until the entire pot is in the woven “mesh”. The knot should be staggered. This system for hanging pots is quite durable, looks very unusual and makes the interior very cozy.
Multi-level shelves with holes
You need to take several boards of the same size. Mark exactly in the middle of the base of the pot and cut holes a centimeter larger. Make holes in all corners of the boards through which the rope will pass.
Then divide the rope into equal four parts and tie a strong knot at the end of each, thread the ropes through the board so that the knots remain at the bottom. Then roughly mark the distance that the flower will occupy and add another ten centimeters for reserve. At this level, tie another knot on each rope so that they are at the same level, and thread the piece of wood through again. And so continue until the end. The result is a very unusual multi-tier shelf, which will become a real decoration and a very unusual element of the interior.
AlinaAuthor of the article Did you like the article? Share with your friends:
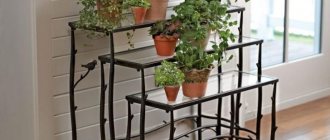
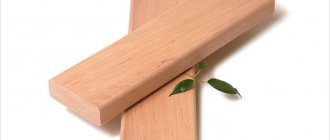
Wooden flower pots
Wood also provides a fairly wide range of actions, various shapes and colors. Choose what you like best and create.
Master class: hanging wooden planter
This hanging planter will wonderfully complement your home interior. It’s quick and easy to do, and it won’t cost you a lot of money on materials either. The optimal solution for an apartment.
Necessary materials:
- Wooden plate and saw
- House plants and flowerpots
- Rope and metal ring
- Drill and sandpaper
- Paint and brush
Step-by-step manufacturing scheme:
Step 1: Making Wooden Squares
Consider how many tiers your flower stand will have ( there are 4 here, but you can do more or less ). Select the houseplants you want to place there.
Based on all this, cut out the required number of squares from the wooden plate.
- To do this, turn the pot upside down and place it on a plate, circle it and leave about 5 cm , thus determining the size of the square.
- Use a saw to make squares .
Step 2: Making holes for the pots
- You already have a circle drawn on the tree from the top of the pot, now you need to draw another one in the middle so that their centers coincide, but the diameter of the new one is about 1-2 cm smaller.
- This value depends on how quickly the pot you will be placing in the stand grows towards the top, and also you want the wooden square to be almost at the very top, or in the center of the pot .
- You can take another pot that is the same size as the stencil and trace it.
- Use a jigsaw to cut out this new circle. For convenience, you can first make a hole with a drill and, starting from there, work with a jigsaw.
- The pots should now fit inside the squares.
Step 3: Hanging Holes
At the corners of the squares you need to make holes for the rope so that they can be hung. To do this, use a drill with a diameter of up to 1 cm.
Step 4: Paint the tree
Using sandpaper, remove roughness and unevenness that formed after sawing and drilling. Now the wood can be painted or simply treated with an antiseptic. In this case, dark brown paint was used.
Step 5: Paint the pots
Pots can also be painted, if desired. Casual strokes of white paint look good on plain clay pots. You can skip this step.
Step 6: Putting it all together
In order to fasten the wooden squares together, we need a thick rope: cut 4 ropes of 180 cm each (for the given number of tiers). Stretch one rope into each corner hole of one of the squares and tie a knot at the end, this will be the lower part of the structure.
On each rope, tie another knot 25-30 cm higher than the previous one and thread the ropes into the holes of the next square. Check that everything is level and the second tier is clearly horizontal above the first, adjust the knots if necessary. The second tier is ready. Repeat these steps with the remaining tiers.
Step 7: Plant the Plants
A practical advantage of such a hanging stand is that water that may flow down after watering from the top plant will drip onto the bottom one. So a stand for the pot is needed only on the lowest tier (if you use it outdoors, you can do without stands at all).
You can also place coffee filters or similar water-absorbing materials in the bottom of the pots, this way the water can drain out but the soil won't fall out through the hole.
TIP: To prevent the bottom pot from falling off the stand if someone accidentally snags the string, superglue it to the pot.
Step 8: Transplant the plants into prepared pots.
If you glue the base of the lower pot before inserting it into the wooden square, it will look like the photo below. If you want the bottom pot to be inserted into the tree in the same way as the others, then first replant the plants, insert the pots into the holes in the tree, and only then glue the stand to the bottom one.
Step 9: Hanging
- To hang this structure, thread the ropes through a metal ring and tie a knot, or bend them over and tie another thin rope around them.
- Adjust the rope so that all tiers are horizontal and level.
This stand will decorate an empty corner in an apartment , just don’t forget that flowers need enough light.
A hanging stand is a wonderful solution for those who love flowers, but do not have enough space to display them.
Pot made of copper pipes
The manufacturing principle is similar to that described in the previous master class, only here copper tubes are used (and they are folded into a slightly different pattern). Of course, these materials will be more expensive than straws, and cutting them is not so fast, but in general there is no difficulty, and it turns out beautifully and with high quality.
TIP: If desired, the copper tubes can be replaced with plastic cocktail straws
Necessary materials:
- 2 m copper tube with a diameter of approximately 3 mm
- Mini pipe cutter
- Strong thread or fishing line
- Leather string (length depends on how high you want to hang the pot)
- small pot
- Plant
Step by step weaving:
Step 1: Cutting the tubes
You need to cut the tube into the following pieces: 20 pieces 4 cm long and 5 pieces 24 cm long. Cut the long pieces first, and then the small ones, it will be more convenient. Use a measuring tape for measurements.
Step 2: Start folding the tubes
Tie a knot at one end of the fishing line, and thread the other through 5 small pieces of tube so that you get a pentagon (that is, you need to pass the fishing line through the first piece of tube twice).
Step 3: Continue making pentagons from small tubes
- Pass the line through 4 more tubes of the same size , and then through the tube of the previously formed pentagon. Now the fishing line is in the tube connecting the pentagons, and you need to bring it through the upper tubes of the newly obtained pentagon to its left edge.
- Don't worry if they don't look perfect, everything will straighten out when you hang and place the pot.
- Next, make 2 more pentagons , you should get 4 pieces in total, and they should be located as in the photo below.
- Now bring the line through the tubes to the bottom of the outer pentagon and put the tube on it. Next, thread the line through one edge of the other outermost pentagon.
This is what you should get:
Pass the line through 2 more tubes, and then through the edge of the pentagon, as in the photo below. It should look like something like a flower, or rather like this:
Step 4: String Long Tubes
- Bring the line to one of the highest points of the structure (between the two upper tubes of one of the pentagons). Now the fishing line needs to be threaded through a long tube.
- Thread the line through another long tube, and then direct it to the next highest point of the pentagon structure (any one, not necessarily the adjacent one).
- Thread the wire through the 2 small tubes to reach the next highest point. Now pass through another long tube, the line will come out to the junction of the long tubes, return the line back down through one of the previous two long tubes. Attach the fourth tube in the same way.
- Now all you have to do is attach the last tube, but first place the pot in the middle of the structure, otherwise later it will not fit between the tubes.
- Now attach the last tube. This is what you should get:
Step 5: Attach the leather lace
Cut about 30cm of leather cord and attach it to the connecting point of the long tubes. You can tie a knot, but here, for aesthetics, we used hot glue to secure the neatly folded end of the cord. This is what it looks like:
To prevent the gluing area from being visible, cut another small piece of cord, secure it with hot glue, and wrap it around the cord by which we will hang it.
Trim excess fishing line and cord. And the last step: plant your favorite indoor plants!
Installation of pots outside the windows of houses and apartments
Both residents of houses and owners of apartments in high-rise buildings, wanting to beautifully furnish their homes, are interested in how to secure a flower box outside the window. Fastening elements of holders for containers with flowers can be placed either under the cornice or attached directly to the frame.
On ready-made flower boxes made of wood or plastic, you need to install dowels, the head of which will be used for installation. It is easier to attach flower boxes or brackets for them in your own home than, for example, in high-rise buildings.
But if you decide to do the installation yourself, you will need simple instructions:
- Behind the window, drill two holes at a distance at which the dowels will be attached.
- Install dowels there, and seal the excess space inside the holes with cement mortar.
- After trying on the flower box, mark where its bottom will be.
- At the level of the bottom of the box, drill two more holes, focusing on the width of the box, and install L-shaped elements in them.
- Place the flower box on dowels. The L-shaped elements underneath will reliably protect it from falling.
These instructions are suitable for those who want to install a box with fastenings. But you can also install brackets and holders for flowers, which I talked about in the previous section, and only then put pots there. Such stands are also installed by drilling holes.
Where to hang the pots
Moreover, in the summer, plants can be placed both inside and outside the house, but since it’s cold now, we’ll focus on indoor ones. You can green any room in your apartment, kitchen or hallway, the main thing is to take into account the needs of the plants and the right amount of light. In fact, each version of a hanging planter can be placed in any room of the apartment, so it is only your design decision.
Of course, you can just put a flower pot on the windowsill or bedside table, and it will already look good. But if you try a little more, you can decorate the appearance of the pots and make more optimal use of the apartment space, at the same time arranging the plants and not taking up extra space with them (with hanging flowerpots).
Above the workplace
Here, a hanging planter will not take up much space, especially since we always try to place the work table closer to the window, which will really appeal to indoor plants.
In the bedroom
Placing plants in the bedroom is not only beautiful, but also very useful. They enrich the room with oxygen. How nice it is to wake up among greenery. Try hanging a pot of plants in your bedroom.
In the kitchen
This is an ideal option; you will never snag or overturn a flowerpot. The flowerpot looks very homey in the kitchen!
On the balcony or in the chill-out area
If the area of your apartment allows, then with the help of hanging flower pots, you can green up an entire room and make a mini-garden. But spruce does not have enough square footage - you can arrange a comfortable seating area on the balcony.
How to quickly fix a hanging flower pot » Useful homemade products
Hello to all DIYers, as well as lovers of home gardening!
Currently, many gardeners use various hanging pots or cache-pots to grow flowers, which are suspended on hooks from the walls or upper jambs of window openings. Such hanging pots are in many ways much more practical, since they do not take up space on window sills or shelves, and they look quite beautiful.
At the same time, there are many designs and types of hanging pots and flowerpots. For example, such a hanging pot with a suspension made of metal chains and a steel hook is quite reliable, but also very expensive.
Significantly cheaper (and therefore much more often used) are hanging plant pots with hangers made of plastic elements. Such pots, in general, are also quite reliable and durable, but, unfortunately, the plastic becomes more brittle and brittle over time. Therefore, one of the most common failures in such pots is the breaking off of one of the three plastic suspension rods.
At the same time, despite the fact that the other two suspension rods remain intact, it is no longer possible to hang such a pot-pot, as it can easily tip over. Sometimes such a pendant (without the pot itself) can be bought at a flower shop. But as practice shows, this can not always be done, since several times I myself was faced with the fact that the store did not sell hanging pendants separately and offered me to buy the entire complete set, that is, the pendant along with a flower pot, which was completely unacceptable to me. need to.
However, there is often no need to spend extra money, since a plastic hanger can be repaired very easily and quickly.
To do this, we only need a short, strong rope, which will need to be tied into a ring, and the tools we will need are a lighter and pliers.
Holding one of the ends of the broken plastic rod with pliers, you need to carefully heat it with a lighter and bend it into a hook.
This must be done very carefully and try not to melt the plastic of the rod too much, as this can make it brittle. It is best to just warm the rod slightly so that it can be bent and formed into a hook from its tip. The bent hook needs to be held for another 10-15 seconds so that the plastic cools down and finally takes this shape.
The same thing needs to be done with the other end of the plastic rod.
And now both hooks at the ends of the rod are ready.
Now all we have to do is put the rope ring on the hooks. By the way, instead of a rope, you can use a chain or wire of a suitable length.
Well, now you can safely hang our flower pot with the plant in its place.
This repair took us no more than a minute, but at the same time such a “repaired” suspension turns out to be quite reliable. True, its appearance is certainly not very beautiful, so it is better not to hang such a pot in a visible place. However, if there are no special requirements for the beauty of the pot or it hangs somewhere in the corner, such a pendant can be used, especially since it can last for quite a long time.
Well, that's all for me! Bye for everyone, more simple and quick, but effective homemade products!
Pot ideas from scrap materials
If you show your imagination, you can make a hanging plant pot from absolutely any available materials. Starting from old cans, bottles to unnecessary towels and T-shirts.
From beads
If you have old beads lying around and you don’t know what to do with them, then here’s one option to solve the problem - decorate the pots.
From baskets and pots
Such pots can be used for a single pot or for several at once. Such wicker baskets will probably be found in many homes. They often lie idle, and in vain they will make an excellent hanging for flowers.
Flowerpots in high-tech style
Modern pendants made of concrete or brass will fit into the modern style of the apartment.
From bottles
Probably the cheapest of all methods, but it looks no worse than the others. We collect empty plastic and glass bottles and make original flower pots.
From moss and shells
Many people at home have shells brought from the seas, and if you drill a small hole and plant small succulents there, you can create a mini-pots. The main thing is in quantity, 3-8 pieces will create an excellent hanging garden.
conclusions
Boxes for growing flowers outside the window and stands for them will become a real decoration for your home, window or loggia, and an independent decorative element. Tell us what boxes and brackets you use when growing flowers outside your windows? You will find more useful tips on the topic in the video in this article.
September 22, 2020
If you want to express gratitude, add a clarification or objection, or ask the author something, add a comment or say thank you!
The charm of the most beautiful and well-groomed plants will not be complete if they are planted in assorted pots that differ in shape, size, and the material from which they are made. An excellent solution to the problem is a flower pot. Purchased in a store or made with your own hands, they will complete the look of the collection and help decorate a country plot.