- Features and purpose of the drainage ditch
- Advantages and disadvantages of a storm drain
- Open drainage ditch and its arrangement
- Construction of a closed drainage ditch
- The procedure for arranging a drainage ditch on the site
- Methods of strengthening
The problem of high groundwater levels and constant flooding of the site can be solved by a drainage ditch. This is a simple engineering structure, which is a linear excavation along the border of the territory. It's easy to do it yourself.
A drainage ditch is a structure in the ground designed to protect the soil from erosion or waterlogging, collect surface water and drain it into the nearest watercourse.
Features and purpose of the drainage ditch
The purpose of the drainage ditch is to drain the garden plot, i.e. removal of excess moisture from the soil and drainage of the soil. Its construction is necessary in low-lying and swampy areas, with a high level of groundwater, and in the presence of clay in the soil.
Excess water on the site brings many problems. It interferes with the normal growth of plants and causes their death, washes away the top fertile layer of soil, prevents the construction of a basement or cellar, causes deformation of supports, mold and rotting of the walls of a house and other buildings. The construction of drainage prevents the occurrence of these phenomena. A drainage ditch collects excess water from a summer cottage and discharges it to the underlying area.
When constructing a trench, adhere to the rules established by SNiPs. According to the regulations, it is prohibited to lead storm drains to animal habitats, bodies of water with running water, and swampy lowlands.
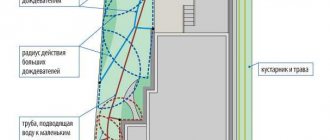
Drainage ditches are placed at a distance of at least 30 cm from fences, houses and other buildings to prevent their foundations from being washed away. The angle of inclination of the drain on flat terrain is allowed no more than 3-5%, i.e. For every 10 m there should be a 3-5 cm height difference.
According to their purpose, there are 3 types of drainage ditches:
- main (main) - they carry the primary drainage of water;
- perimeter (ditches) – laid along the perimeter of a site or building for its maintenance;
- additional – designed to help the main channels.
The device itself
- Dig trenches into which water will flow.
- Once you're done, your area will resemble a herringbone.
- Cut the drainage pipe in the required sections. This can be done with a regular knife, as you can cut the pipe without much effort.
- Connect the pipes. In order to connect them, you will need pipes whose diameter is equal to the diameter of the pipes.
- After connecting the pipes, wrap the fittings in geotextile.
- Wrap the free ends of the pipes with a double layer of geotextile and secure with wire or rope. Preferably synthetic.
- Then fill in the drainage pipes and overlap the geotextiles on top.
- After this, fill the trenches with crushed stone or sand and apply a layer of soil on top.
In principle, this is all you need to know about the installation of drainage in your dacha.
Advantages and disadvantages of a storm drain
Drainage systems remove excess water from the site and thus prevent negative phenomena associated with excess moisture. The construction of a storm drain does not require special equipment or expensive materials; it is easy to do it yourself.
The disadvantages of drainage trenches include the need for regular cleaning, the fragility of the slopes and a short service life. In addition, the appearance of drainage systems is often unaesthetic and stands out against the background of the general landscape. You also need to remember that the efficiency of ditches, unlike other types of drainage, is relatively low.
How to make a drainage ditch?
Drainage trenches
Drainage trenches are dug 80-160 cm deep. A sand cushion is poured onto the bottom.
- A drainage pipe is laid on top.
- It is lined with a volumetric crushed stone filter.
- Geotextiles
- protects crushed stone from mixing with sand
- and top layer of soil
- The volumetric crushed stone filter can be completely wrapped in geotextile. Drainage systems with only crushed stone are more difficult to maintain.
Advice! Making a drainage ditch will not be difficult, since finding an excavator will cause the most problems. Of course, this can be done manually, but it will take much more time.
Just dig an open ditch 1-1.2 meters deep with an excavator. In order for the walls of the ditch to be more durable, they need to be beveled at an angle of 20-30 degrees.
Every year, ditches should be cleared of debris, weeds, undergrowth and anything else that could cause sewage retention.
You should also remember about equipping the drainage ditch with fencing elements, since safety will depend on this.
Open drainage ditch and its arrangement
An open drainage ditch is a rectangular hole dug in the ground, to which a drainage pipe is connected. Its purpose is to drain excess rainfall and water used for irrigation.
The trench is placed where water accumulates in the greatest quantity. It is built with a slope sufficient to allow water to move by gravity to the level of groundwater in natural or specially constructed artificial reservoirs or collecting wells.
From there it can be taken for watering the garden and other needs.
If you need to drain a lot of water, and the soil does not drain it well, several trenches are placed on the site. They can be connected to a common network or located separately parallel to each other. When combining ditches, the main one is made deeper and wider than the others so that it does not overflow with water collected from the entire area.
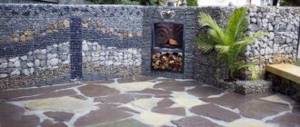
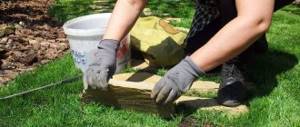
Construction of an open drainage ditch made of granite cobblestones.
In order for an open drainage ditch to be most functional, the following conditions are observed during its construction:
- width – 40-50 cm;
- depth – 60-70 cm;
- slope angle is 30-40°.
There should be no trees or shrubs growing around the ditch to prevent silting. The side walls must be further strengthened to prevent the soil from collapsing. The top of the structure can be covered with gratings to make it more aesthetically pleasing and prevent debris from entering.
A simple open drainage option
Drainage in a summer cottage, the easiest way to do it is to surround the entire area with a ditch around the perimeter. This method is suitable for flat terrain . But a ditch around the perimeter will not help if the site has depressions or has a large area.
Recent Entries
Chainsaw or electric saw - what to choose for the garden? 4 mistakes when growing tomatoes in pots that almost all housewives make Secrets of growing seedlings from the Japanese, who are very sensitive to the soil
It is enough to simply create an open drainage system. To do this you need to do the following:
- First of all, carefully inspect your dacha. Identify places where water constantly accumulates. Natural depressions should also be noted. Shallow trenches are dug in these places. It is enough to go deeper into the ground just half a meter;
- The slopes of the ditches are made gentle so that they do not crumble. If the soil at the dacha is clayey, then the slope can be made steeper. But it’s still better to strengthen it. Any available material that is not afraid of water is suitable for this. Very often, old slate is used to strengthen drainage ditches;
- The ditch itself should have a slope towards the removal of wastewater from the site. This slope is three degrees for every meter. In this case, all the water that gets into the ditch will drain by gravity and not accumulate;
- To prevent the bottom of the ditch from being washed away by water, it also needs to be strengthened. To do this, you can lay stones, broken bricks or broken pieces of concrete. To strengthen the bottom of the ditch (and its walls), you can use thick polyethylene foam.
A network of such simple ditches across the territory of the dacha can quickly remove water from precipitation. At the same time, you will not have financial problems creating such drainage. All work can be done with your own hands, and the materials used can always be found in any household.
Construction of a closed drainage ditch
Closed drainage ditches are recommended to be placed in areas with a low-lying location, groundwater close to the surface and a high percentage of clay content in the soil.
Construction of a closed drainage ditch.
This type of drainage structure is a hole 150 cm deep and 70 cm wide, dug with a slope, at the bottom of which a layer of soil is placed for drainage. A perforated pipe is placed on top of it, covered with earth.
Water is transported through a trench to a collector system or drainage well.
This design has a more aesthetic appearance and works more efficiently than open-type ditches.
Simple deep drainage
If you do not want to see many open trenches at your dacha, or you need to divert groundwater close to the surface, then it is better to use simple deep drainage. Of course, ideally such a system should be carried out using special perforated pipes. Through holes in the sods, water will enter the system and flow to a certain place .
But using plastic pipes for drainage will require financial costs. In addition, such a system requires the installation of inspection wells. Therefore, to create deep drainage, instead of special pipes, you can use the following materials:
- Fachines are a bunch of branches and brushwood. The material is tied into bundles with a diameter of up to 30 and a length of up to 50 centimeters;
- Stone. Ordinary natural stones or large fractions of broken bricks are used.
The principle of creating such a drainage system is quite simple. First of all, the places where water accumulates after precipitation are determined. Next, pits are dug with a depth of 50 to 150 meters, depending on the proximity of groundwater.
When creating a standard deep drainage, the next step will be laying pipes on a crushed stone bed. In our case, we lay fascines or stones. If the second option is used, then large fractions are placed on the bottom, and small ones are placed along the walls of the ditch.
Next, it is necessary to protect the fascines or stone layer from silting. For this, it is best to use geotextiles. But this material costs money, so most summer residents use improvised means. You can line the trench with moss or upturned turf. After this, you can fill in the soil .
Instead of fascines or stones, plastic bottles can be placed in the trench. Used containers of any volume are placed in rows and covered with soil. Since plastic does not decompose for a long time, the bottles will form voids. As a result, water will have a place to flow, and it will be freely discharged outside the site.
Once the trenches are backfilled, your drainage system will not be visible. At the same time, it is quite effective. The advantage of this method is the absence of financial costs . Brushwood, broken bricks and used plastic bottles can be easily collected from any landfill. And you can dig the trenches yourself by hand.
The procedure for arranging a drainage ditch on the site
To ensure high efficiency of the drainage system, it is necessary to note before starting work where water accumulates to the greatest extent. After this, the route of the drainage system through the site is marked and work begins.
If the site has a natural slope, you will simply need to dig a U-shaped or L-shaped trench along the fence. You can form a network of several ditches, which will be located evenly throughout the entire territory of the site and combined into one main one.
If there is no slope on the site or it is very small, when laying the drainage system it is necessary to create an artificial slope (2 cm per meter).
Drainage pipes are used to drain water outside the site. The bottom of the pit is covered with crushed stone or sand, which must be compacted tightly. The thickness of the drainage layer should be 10-15 cm. Cover it with geotextiles.
Then a corrugated drain pipe with a diameter of 6-11 cm is placed. In the upper part it should have several rows of holes with a diameter of 1.5 cm. Its outer layer should be corrugated, and the inner layer should be smooth. The outside of the pipe is wrapped in a layer of geotextile to avoid clogging it with soil and debris that will enter it through the holes.
To strengthen the drainage system, the trench is filled with crushed stone, gravel, broken brick, expanded clay, coarse sand and other water-permeable materials. The layer thickness should be 20 cm. The drainage system is covered with soil on top.
Sometimes, instead of expensive corrugated pipes, parts of cut car tires shaped like a U-shaped gutter are placed at the bottom of the ditch to drain water in the desired direction. They are placed with the open part on crushed clay covering the bottom, and covered with crushed stone or sand on top.
It is important to compact the building materials used as drainage tightly, otherwise over time they will sag under the influence of water flows and the structure will have to be repaired.
When laying a drainage system along the road, it is necessary to take into account the proximity to the foundation of the fence. The water entering the ditch should not wash it away. Therefore, the depth of the trench is made about 20-30 cm, and for bulk soil - more than 50 cm. If it is necessary to make a 90° turn, then one of the joining ditches should be made longer.
The drainage system needs regular maintenance. Several times a year it needs to be cleaned of any debris.
Features of the drainage system
Quite often you can encounter a situation where, after melting snow or heavy rainfall, the cottage is flooded with water. This situation can lead to waterlogging of the soil , as well as a violation of the strength of the foundation of buildings on a summer cottage. To prevent this from happening, it is necessary to create an efficient drainage system. It will drain excess water outside the site.
In general, experts recommend creating drainage if your dacha or the area under a private house meets at least one of the following requirements:
- The soil on the site is clay or loam. Such soil practically does not absorb water;
- Your summer cottage is located in a lowland, on the slope of a hill or at its base;
- In the area where the dacha is located there is constant heavy rainfall;
- If groundwater lies closer than three meters from the surface.
The drainage systems themselves can be both surface and deep . The former serve to drain water from precipitation. It is not difficult to make such a system, and it will require small investments. More complex and expensive deep drainage systems are designed to drain groundwater close to the surface.
Both options for drainage systems work on the same principle. There are pipes or trays throughout the area. Rain or groundwater, penetrating into them, flows by gravity to the lowest point of the site. A container can be located here or the training system can be brought out into a natural pond or ditch.
For surface drainage, trays are installed in places where water accumulates. To protect them from clogging, grates and sand traps are installed. This system is considered the cheapest, since it does not require large expenses for land work.
A more expensive option is a deep drainage system . In this case, pipes or sods must be laid in the ground to a depth depending on the occurrence of groundwater. In addition, deep drainage requires the installation of inspection wells. These designs allow you to clean the system from blockages and monitor its operation.
Since it is very expensive to install expensive drainage for a dacha, many owners try to resort to various tricks. There are many options to create a working system and at the same time spend a minimum of money. We will talk about some of them in the following chapters.
Kinds
There are three types of drainage:
- open;
- closed, laying perforated pipes with backfill;
- backfill, the ditch is filled with coarse gravel and filter fills for rapid drainage of water.
To arrange drainage under the fence around the site from the outside, the easiest way is to use open drainage ditches with reinforced slopes and a stable slope, so that all excess water from the site and adjacent areas, including the road surface, quickly goes to the depth of groundwater or is transported to the drainage field, drainage well.
Among the main advantages:
- small amount of land work;
- minimum materials;
- a wide range of slope strengthening options;
- a simple way to maintain, clean and prevent drainage.
Hydrogeological situation on the site and the need for a drainage system
There are several ways to obtain data about the geological features of a site. The most reliable and expensive way is to order a special study from specialists. In this case, not only information about the situation will be given, but also recommendations on the type of drainage system, choosing a favorable location for building a house, etc.
But you can also obtain information from government agencies by submitting an appropriate request. The simplest option is information from neighbors whose plots are located in close proximity.
In addition, simple observation can also provide answers to a large number of questions. For example, if the site is located on a slope, then, most likely, flood waters will flow through it in the spring, and even the simplest system of trenches and grooves will help speed up their departure from the territory.
You will definitely need to do the drainage of the site yourself on clay soils, which have weak filtering ability. If this is neglected, then even in summer, with the scorching sun, swampy formations can form in the area. This is especially dangerous when the groundwater level is high.
You can also determine the depth of their occurrence yourself by drilling a well.
Often this moment is associated with work on drilling wells for water, that is, at the same time it is possible to solve the problem of providing the site with water and obtaining information about the occurrence of groundwater.