Good day to you, dear researchers of the world of homestead farming! Today I would like to discuss with you one important issue. Tell me, where in your dacha do you store working tools and various gardening equipment? Just please be honest. If you have a garage at your dacha, this is a definite plus. Hammers with a saw, as well as a sprayer and a set of secateurs can be placed on one of the many shelves.
It’s not easy for those who don’t have a car or, at worst, a bicycle. A shovel and rake can be hidden in the far corner of the veranda of a country house. Or place the entire arsenal of necessary gardening aids in a cramped shed, between a portable barbecue and shelves for household clothes. Of course, in such chaos it is difficult to find the desired item on the first try. But it’s compact, the summer residents will object. And it’s simple - you don’t need to invent anything.
Why do you need a change house at your dacha?
Agree, on an ideal summer cottage with flowering flower beds, a fountain gushing out of the ground, paths paved with natural stone, a chopped bathhouse, a dilapidated shed for equipment will look somewhat comical. Moreover, next to a solid cottage or a neat brick house. We make every effort to ensure that complete order and harmony reigns on the site. Therefore, today I propose to talk about how to build a change house at your dacha yourself.
A change house, or utility room, is a small house for storing various gardening utensils. And everything else that has no place in the house - children's toys, sun loungers, a folding bed, a change of clothes and shoes for country work. And also a lawn mower, fishing rods, a folding table for gatherings by the fire... You never know what all sorts of things we use at the dacha for work and relaxation! It is precisely these items that can be stored in the change house so as not to clutter up your own living space in the house.
Some craftsmen adapt a household building into a mini-garage, and also, during the cold season, install a rabbitry or poultry house in it, and place hives for wintering. In short, this simple structure has many options for functional use, it all depends on the specific needs of each individual owner. Regardless of what kind of activity you are developing on your site, the dacha cabin will become your reliable assistant.
Variations in designs of cabins for summer cottages
In principle, as in any matter, with regard to the construction of a change house there are two ways. Buy a ready-made industrial version or go hand-made and build the building yourself. First, let's look at what types of summer cottages the industry offers us.
1. Panel room
The simplest, “budget” option. As a rule, disposable. The rather presentable appearance is deceptive, since due to the lack of special stiffening ribs, the building can become deformed and even collapse like a house of cards.
The fact is that panel technology involves the construction of a frame from thin wooden beams, and the outer cladding from clapboard. The interior is covered with chipboard, and the roof is covered with low-density iron sheets. As a rule, a panel shed cannot withstand gusts of wind and frost; it is better to use this option in the summer - for example, for cooking or as a utility unit.
2. Frame
This is a more reliable, but financially expensive option. Advantages - the use of deformation-resistant wooden beams, visual appeal. Disadvantages - using mineral wool for insulation dries out the air inside the house. Also, due to the dense layer of vapor barrier, the useful area of the change house is reduced.
3. Brusovaya
Luxury offer. It differs from its relatives in its high price. But this is understandable, since massive logs are used for construction.
A log cabin is a capital structure designed for more than one year of operation. It makes sense to spend money on its construction once in order to solve several dacha problems at once for a long time. In addition to the function of storing equipment, such a nice wooden house can serve as a bathhouse. Only in this case should you worry about all internal communications in advance (for example, about partitions, installing a stove or water heater).
4. Container
A completely acceptable type of country house that can organically fit into any design style of the site. The frame is made of a metal channel, and the side walls are made of panels of a modern material called sandwich in English. The advantages of the container model are reliability, durability, and the ability to retain heat inside.
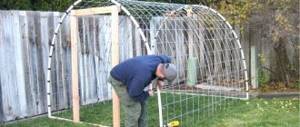
Do-it-yourself frame for a change house
In this part of the article, I will tell you step by step how to make a frame for a construction or country metal shed yourself.
Structure base
The base of the frame for a change house should be the strongest and most reliable. Therefore, for its manufacture we choose a 40x60 mm profile pipe.
First, the pipe is marked and cut to the required dimensions, depending on the required dimensions of the future shed.
Then the pipe is welded according to its outer dimensions, and the so-called edging of our base is obtained, or in other words, a rectangle. There should be two such rectangles, and they should be absolutely identical in size. One of them will be used for making the floor, and the other for the upper part of the structure.
The base for the change house will be a 40x60 profile pipe; it will bear the heaviest load.
If we want the floor to be reliable and not “play” under our feet, then we need to thoroughly weld the “mesh” from the same profile pipe in order to get a strong solid base.
With a standard width of 2.5 meters, it is recommended to weld two or three more longitudinal pipes inside our rectangle along the entire length of the structure, and using the same method along the width every 0.5 meters. The end result should look like the image below.
Ready-made metal frame for the cabin floor, after primer treatment
Making the lower part of the cabin
To do this, we need a galvanized sheet, which must be screwed with small self-tapping screws, which are also popularly called “fleas”, to the base of the cabin. We straighten the sheet along the entire length of the rectangle we welded, level it and screw it on. After this, the base can be turned over and placed with the smooth sheet screwed down. Now everything is ready for the next stage.
We sheathe the bottom of the cabin frame with galvanization, and from the inside we turn it with a mounting rail for further finishing work.
Installation of vertical and horizontal racks
For vertical racks we will take a 40x40 profile pipe. We cut the pipe to the dimensions that must correspond to the required height of the structure. Typically this size is 2.5 meters.
We install the first racks at the corners of our finished base, and set them strictly at an angle of 900. To do this, use a carpenter's corner.
All vertical posts of the frame must be strictly at an angle of 90 degrees.
After the stand is installed level, it is welded until it can independently maintain its position. And so on in all four corners.
In order to install the next additional racks and maintain the correct geometry of the structure, we take a second rectangle, which we made from a 40x60 pipe. It must be placed on top of the racks, which are welded in the corners. Using a level, make sure that all racks are strictly vertical, top and bottom are strictly horizontal, and at the pipe joints all angles match.
We connect all the components of the frame, set the corners evenly and grab them at all points of contact
Now our “cube” can be scalded with additional racks and spacers.
We take pre-prepared 40x40 pipes, cut 2.5 meters long, and weld them in a vertical position like corner posts. We recommend making the distance between the posts every meter. In this case, it is necessary to provide in advance a place for the entrance door.
It is very important to strengthen our frame with additional stiffeners.
After the vertical racks are in place, we begin installing the horizontal ones. There are much fewer horizontal posts. They are at a height of 1.25m. from the bottom point, and with them it is enough to scald the entire frame in a circle once.
We weld the frame with all the necessary horizontal jumpers
Now we need to strengthen the resulting frame of the cabin, which we make with our own hands. To do this, you must first cut 30 cm long pieces from a 20x40 pipe, each edge must be cut to 450. With these spacers we scald each corner, and if there is a strong desire and availability of material, we additionally strengthen the floor. The photo below shows how each corner needs to be strengthened.
Correct reinforcement of all corners of the frame for a change house with gussets looks like this.
Transport loops for metal sheds
In order for the metal shed to be transported multiple times, it is necessary to make hinges. To do this we need a piece of profile pipe and a piece of steel rod. We weld them in the same way as in the photo below and weld them to the finished frame.
This is what a reinforced loop for transporting metal household items looks like.
Roof frame in the form of trusses
And so, the lower part and walls are ready. We begin to form the frame for the future roof of our country house.
If you do not plan to install a second floor on the future change house, then it would be logical to make a roof with a slope.
To make trusses you will need a 20x40 profile pipe. The task is to obtain an isosceles triangle. It is recommended to place such trusses every 1 m.p. each other along the entire length of the structure. An example of roofing trusses for a country house is shown in the photo below.
Preparation of components for the roof of a future cabin
Let's start with interior decoration
Interior finishing begins with the fact that the entire frame must be sheathed with a mounting rail measuring 20x40 from the inside. This is done so that it becomes possible to attach protective membrane films, insulation and the inner lining itself. In our case, we will use an OSB board as the interior finishing.
Interior finishing - first of all, screw a wooden beam along the entire inside of the cabin
After the entire frame is covered with timber, the stage of waterproofing and vapor barrier of the structure begins.
We install a vapor barrier to the screwed beam on the inside of the cabin
On the walls this happens by the usual method of stretching the film, which is cut into the required sizes and stapled to the lath.
When it comes to gender, things are a little different. It is necessary to repeat the mesh (squares) of the frame with film so that niches are created for laying insulation in them.
After the entire cabin is lined with film on the inside with your own hands, we begin installing the OSB.
First of all, we place a slab with a thickness of at least 20 mm on the floor and fasten it with hardened wood screws 35 mm long.
Before screwing the slab, place it and mark with a pencil the lines that will indicate to you where the mounting rail is located under the slab. Otherwise, there is a high probability that the screw will not hit the rail. Don't skimp on screws, and tighten them as often as possible.
The next stage of making a change house with your own hands is the installation of interior decoration. In our case, OSB board. Pre-prepared windows can be inserted at the same time.
The ceiling and walls are sheathed in the same way. The only difference is the need to cut out window and door openings.
The next stage is electricity
If you plan to conduct electricity, then this must be done before insulating the walls, while there is access to all internal areas of the walls and ceiling.
Identify places like:
- Number of sockets
- Location of sockets
- Number of switches
- Switch locations
- Number of lamps and their location
- Possible location of heaters if needed
- Junction box location
After this, calculate the required amount of wire. The recommended cross-section of copper wire is 2x2.5. Read more about choosing the cross-section and material of the wire.
When planning sockets, switches and lighting, mark their location on the walls with a pencil, and use these marks to make holes in the OSB board. Route the wire throughout the structure according to your diagram. Pull out the ends of the wire so that it would be convenient to work with them later.
Do-it-yourself insulation of a cabin
We lean the insulation against the OSB and fasten it to the slab with staples. The more often the better.
For insulation, as stated above, we will use ISOVER mineral wool 50 mm thick. If necessary, 100mm can be used.
We simply take the material, cut it to the required dimensions and insert it into each cell of the frame. At the same time, we immediately shoot it with a mounting stapler to the OSB board we previously installed. I recommend not saving on staples; perform this step efficiently.
External cladding with corrugated sheets
And so, after the electricity has been installed and the structure has been insulated, you can begin to sheath the walls on the outside with corrugated sheeting.
Corrugated sheeting is the most suitable material for external cladding of a cabin
You can use either painted or simply galvanized corrugated sheeting. We recommend using profiled sheets with a height of 8mm or more. up to 20mm. For the roof we take a wave height of at least 35mm.
Take measurements from the bottom point of the structure to the top for each side separately.
On the front part, the sheets will be slightly longer due to the fact that the roof has a slope. For the sides it is better to order sheets of the same length as for the front side. They will need to be cut at an angle at the top so that the end strip can be placed on top.
When placing the first sheet of sheathing, attach it to the frame and align it as accurately as possible along the bottom and top. When you are sure that the sheet is positioned correctly, attach it to 2-3 self-tapping screws. After this, take a level and mark a line with a pencil along the entire width of the sheet (along the lower waves), where the contact between the corrugated sheet and the horizontal profile pipe will occur. This way, you will mark the sheet into which you will screw the screws strictly horizontally and will not miss the pipe.
As for window openings, here you must first attach a sheet, then mark the opening on the inside, and cut out part of the corrugated sheet according to your marks.
>Dilemma: make it yourself or buy ready-made
Having decided that you definitely need a change house for your dacha, you will be faced with the problem of choice. What is the best thing to do - do construction yourself or save time and effort by purchasing a ready-made product? This is truly a dilemma.
Here, as they say, everything is in your hands. If you have construction experience, have the necessary skills, and love tinkering, definitely give it a try! If you don’t know the difference between a screwdriver and a jigsaw or you show up at the dacha once a week, then it’s better not to risk it. When you decide to purchase a finished building, do not forget about the price of transportation costs.
In addition, consider whether your site has access for trucks. And when buying a used cabin for your dacha, don’t forget to evaluate the degree of wear. Preliminarily study the pricing policy for new buildings, and based on this data, judge whether it is worth investing in the purchase. Maybe it makes sense to spend a little time and build a change house yourself?
FENCE FOR PENSIONER
A person always feels more comfortable when he is within his own walls. It’s the same at the dacha - when there is no fence between neighbors, it’s somehow uncomfortable. And not all neighbors are sociable.
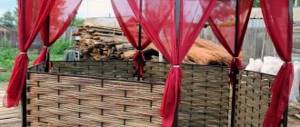
In my case, the fence (photo 14, 15) was created surprisingly simply. Near the garages, someone threw away the braided electrical cables. In rural areas, a weed grew very quickly on abandoned plots - Canadian maple, a shrub with a tall trunk. It goes well with various support sticks for tomatoes, tall beans, peas, etc. I made a wattle fence from it. I cut out stakes from thick maple and pulled a double bundle of cable into three tiers. Then I inserted sticks and it turned out to be a light openwork fence. On top of the sticks I put plastic bottles with the bottom cut off - they seem to scare away birds by tapping in the wind. If the driven stake rots, we drive another one into the side and tie them together. At the bottom I secured pieces of slate. Now the weed doesn't go to the neighbor.
This is how you can make something useful from scrap materials.
© Author: Vitaly Nikolaevich ZINBNK.O. Bletsk, Lipetsk region
TOOLS FOR CRAFTSMAN AND CRAFTSMAN, AND HOUSEHOLD GOODS VERY CHEAP. FREE SHIPPING. THERE ARE REVIEWS.
Below are other entries on the topic “How to do it yourself - for a homeowner!”
- DIY house for a cat with a scratching post (Photo + drawings) DO-It-Yourself ATTRACTION HOUSE FOR A CAT To…
- Do-it-yourself cat house Do-it-yourself cat house -...
- Do-it-yourself teremok at the dacha - step-by-step photo DOING YOUR OWN HANDS BATHROOM-TEREMOK IS NOW DIFFICULT TO IMAGINE...
- Do-it-yourself hut from newspaper tubes How to make a children's house from...
- Do-it-yourself toy house - step-by-step description and photos How to make a dollhouse with your own...
- DIY house over the ice hole for swimming Hut over the ice hole Our dacha with…
- Multi-storey cat house with your own hands (photo + drawing) How to make a cat house…
Subscribe to updates in our groups and share.
Let's be friends!
With your own hands › Construction › Do-it-yourself country house from a trailer (+ photo)
Construction planning
Despite the fact that the change house is a secondary, utility room, you should not take construction lightly. You can't do this without a drawing. With its help, you can estimate how the building will fit into the landscape of the entire site, and also calculate how much materials are needed for the work.
Based on your specific needs, you can easily determine what size the structure needs to be built. Will it be just a small house without windows for storing country equipment, or a building with the prospect of retraining as a summer kitchen.
Or maybe you need a good-quality country house with a toilet and shower - a kind of complex that combines comfort and functionality?
How to choose the right place
When choosing a place to start construction, you should consider some nuances.
Firstly, the operating time and possible transportation to another location. Let me explain. For example, you decided to build a light house at your dacha for a season or two, and later you plan to transport it, for example, to the village to your parents. If you are planning to move, then locate the shed closer to the entrance to the site.
Secondly, consider your use cases. It is convenient to place a household building intended exclusively for storing tools approximately in the middle on the long side of the hacienda, so that it can be reached from any corner without obstacles. In the case where there is a prospect of remodeling a change house in a dacha into a bathhouse, feel free to “push” it into the background. In the farthest corner of the site, the cabin-dacha will be in its place in terms of fire safety.
How to choose a foundation for a cabin
At first glance, it seems that the answer to this question is simple. We do what everyone else does - we take sand-cement blocks, put them on the ground and put a change house on them.
The result of this approach is predictable.
Nicht79 Member FORUMHOUSE
I have a purchased change house at my dacha. The soil on the site is earth enough for a spade, then clay. The change house stands on 6 ordinary sand-cement blocks, approximately 20x20x40 cm in size. The change house stood normally during the summer, and then, after the end of winter, it began. The blocks are “dancing”, and the structure is skewed. The front door doesn't open well, and the inside door doesn't fit into the opening at all.
The user used the standard “medicine” for “treatment” - jacking up the cabin, adding sand under the blocks, using wooden spacers, etc. There is no sense in all this. After suffering for a couple of years, Nicht79 decided to use a radical method - to redo the foundation. To do this, he poured concrete piles 1 meter deep as close to the walls as possible (since a neighbor’s fence is located a meter from the cabin).
The next step is the production of support beams on which the change house will stand. For this purpose, 5x10 cm boards were used, joined together in two pieces.
The result was three “beams” with a cross section of 10x10 cm.
Then the shed was jacked up, beams laid on piles were pushed under it one by one, and the building was lowered.
Our articles tell you how to make a reliable and inexpensive foundation for a cabin, and how to lift and move a house yourself.
Laying the foundation
The basis of any construction is laying the foundation. If your shed is a temporary structure, remove the top layer of fertile soil, compact the soil, and lay down geotextiles. Then add a layer of sand, compact it again and place cinder blocks on top in a symmetrical order, as shown in the photo.
If your building claims to be capital and will be stationary, pay more attention to the foundation. It must be laid out of brick, 10 cm underground and at least 20 cm above its surface. In the center of the foundation, it is necessary to drive iron reinforcement at least a meter high, and all columns must be insulated with bitumen mastic.
The frame of the summer cottage is secured to cinder blocks wrapped in roofing felt.
First, wooden beams are placed around the perimeter of the future building and always in the center to strengthen the structure.
And then you need to connect the opposite sides, laying the logs on the cinder blocks.
For the frame of the cabin, beams measuring 1.5 x 1 m are suitable. You need to mount the floor and corner support posts from them.
To ensure that the logs are connected securely, it is necessary to use reinforcement contours. The beams are strung on them. For fixation, use iron corners and self-tapping screws.
The frame of a summer cottage needs to be built as carefully as possible. After all, the reliability and durability of the structure depends on this.
Vertical posts on the front and rear sides should be of different heights. About half a meter is the optimal difference. The roof should be sloping so that precipitation does not linger and damage the structure.
HOW IT WAS
I bought an apartment in the city of Yelets on the outskirts. There was a dacha area nearby, where I purchased a dacha plot. What was he like? The land was so overgrown that the neighbors could not see each other. There was also a “house” there, and a very original one - half of a passenger carriage (photo 1). By what miracle did he get there? The carriage is ancient, pre-revolutionary, the same age as the one on which grandfather Lenin returned from emigration...
And my construction epic began. I cleaned out everything inside the carriage that had been customized for decades. I hired a metal cutter: they cut off two extra windows from the carriage (photo 2). The scraps were cut into convenient pieces and taken out for scrap; about five tons of metal were sold! I cut off the lower rusty part from the remains of the carriage. My faithful assistants helped me well in this work:
EVERYTHING YOU NEED FOR THIS ARTICLE IS HERE >>>
- • welding machine;
- • Bulgarian;
- • hand winch;
- • railway jack.
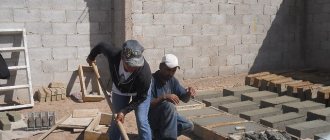
I got an old jack; they just extended the lifting support arm. Can lift up to 7 tons of cargo to a height of more than half a meter. Using a jack and a winch with a pulley, I rolled the rest of the car (photo 3) to the side and cleared the place. I hired an excavator, which in a few hours dug a pit measuring 3x3x3 m. The soil in our area is unique: one and a half meters of black soil, and then pure clay. The excavator operator carefully divided the black soil and clay into piles. Later, I distributed the black soil around the garden, and filled the basement bunker with clay on top. Then, in the pit, I laid out the walls from used bricks, planning to cover them with railway sleepers (photo 4). The result was a bunker approximately 2.8 x 2.8 m and about 2 m high.
Then I covered the bunker with used sleepers and made a window for a manhole in the ceiling in the right place (photo 5). I laid 2-3 layers of roofing felt on the sleepers and covered it with clay, making a clay cushion a meter thick. I fenced off the hole with boards, made steps and a locking hatch. I made a wide staircase to go down to the basement and installed handrails. When I was covering the basement, I inserted two ventilation pipes (plastic 0100 mm). One pipe starts at the basement ceiling and goes under the roof of the house, the second, installed diagonally, starts at the basement floor and ends under the floor of the house. Holes are made in the floor above it and covered with a grille: this ensures supply and exhaust ventilation. The basement is always dry, the temperature in winter is 3-4°, in summer a little higher. I laid out the floor with the remains of the brick. I installed shelving and a potato box. The basement is ready.
Roof installation
Next we install the rafters on the base of the roof. It is important that these boards are as straight and even as possible, this will make lathing easier in the future.
The rafters are laid at regular intervals. An indentation of 50-60 cm will be sufficient. It is imperative to monitor the strength of the fastenings on the roof beams.
Please note that the wooden roof of the cabin should protrude beyond the perimeter of the entire building. This will make it possible to make a canopy on the facade, and on the back side - a base for drainage.
Ondulin can be a reliable roof covering. Its installation is extremely simple - overlapping from bottom to top. Under the ondulin you need to put a lining of boards. You can choose thin beams, because this material does not weigh much.
When designing the roof, do not forget about insulation and vapor barrier. Very often the roof of a cabin is covered with slate sheets. This is a fairly reliable and very popular building material.
TEMPORARY HOUSE AT THE DACHA WITH YOUR OWN HANDS SECOND SEASON
Back in the fall, I discovered that the wooden paneled entrance door, bought in a nearby store, despite being painted, began to creep apart after the rains. Therefore, in the winter I made a new door frame, laid sheets of polystyrene foam inside and covered both sides with clapboard. On the outside, I secured a sheet of painted corrugated sheet with self-tapping screws.
In the new season, the first thing I did was the floor. On the cranial bars I laid 9-mm OSB sheets sawn to size between the joists as a subfloor, and on them - a vapor barrier, going around the joists. On top I laid 50 mm Rockwool thermal insulation boards measuring 600x800 mm in two layers with overlapping joints. I again laid vapor barrier sheets on top.
The floor was covered with high-quality boards 38 mm thick, fastening them to the load-bearing joists with 50 mm screws, which were screwed into the ends at an angle. This allowed us to maintain a smooth front surface of the floor without traces of fasteners.
To enter the house, I built a simple porch with three steps, and then a rain shelter, but more on that later.
I started making the ceiling by attaching the vapor barrier to the floor beams using a stapler. At the same time, I attached a plinth for the ceiling panels on top, with a gap of 10 mm from the frame posts for installing wall cladding. Of course, it would have been more correct to start with wall cladding, but that’s what happened at that time.
Then, using mounting clamps (brackets), I secured five 8-mm plastic ceiling panels measuring 200x3000 mm. On top of them, between the joists, I laid Rockwool thermal insulation mats measuring 600x800 mm and 50 mm thick (also in two layers and with overlapping joints).
Then I installed two more ceiling panels. The width of the vapor barrier sheet (1.5 m) is just enough for seven panels. There is 100 mm left for the overlap of the next vapor barrier sheet.
The installation of the second canvas was done differently. Moving from the short wall, I attached a vapor barrier to each joist and immediately laid insulation on it. I sealed the entire ceiling this way. In this case, the insulation was temporarily held on the vapor barrier, resisting moisture.
Only after this did the installation of the ceiling panels continue. Before installing the last panel, I also secured the ceiling plinth to the long wall. The joints between the panels were covered with a joining profile. An auxiliary element when installing the panels was a T-shaped rack.
When it came to the last panels, I installed corrugated ventilation pipes, connecting them to the corresponding grilles attached to the panels.
The result was a spacious room, however, without windows, the installation of which had to be done in a hurry - time was moving towards autumn. But before that, the walls had to be covered with siding on the outside.
The siding was installed using standard technology. First, I nailed 25x40 mm slats with a pitch of 500 mm, and then attached the sheathing to them. It makes no sense to describe this process in detail, although there are some tricks here. I note that for the sake of economy, I used a j-profile to frame the door and window openings. The sheathing slats around the perimeter of the door and window openings were planed and painted to match the color of the profile.
Finishing work
Once the roof is ready, windows and doors can be installed.
Next comes the turn of the floor. It will be double layered. The first, as builders call it, rough, is made from boards, laying them tightly parallel to each other.
The boards must be treated with a special antiseptic that will protect the wood from pests and extend the life of the flooring. Lay a film over the boards, attaching it with a construction stapler.
Then a layer of waterproofing - mineral wool - is laid.
On top is another layer of film.
And then again the boards. This is already a finished floor.
The boards for it must be clean and dry. Because the floor will be varnished or painted on top.
The external cladding of the cabin follows a similar principle. The walls are covered with film to insulate from the cold.
It is recommended to carefully seal all joints with tape. You can sheathe the outside of the walls with siding, composite panels, wooden boards, or plastic imitation. This, as they say, is a matter of taste.
To make the country house look as presentable as possible, craftsmen advise using such practical material as a block house. This is a planed board in the form of segments of polished timber. It looks very nice, perfect for a major household space.
The final stage is interior finishing work. You can’t do without electrical wiring here; you can install a water supply system inside and install a sewer system. Ventilation and heating – for those who want to add as much comfort as possible.
After completing the renovation, you will decide how you will use the change house in the future. Will it be just a utility warehouse or a cozy house.