Preparation
The initial planning stage includes several stages.
- Determination of the type of living space.
- Choosing an apartment interior style.
- Assessment of possibilities in accordance with the material component, wishes and dimensions.
- Drawing up an estimate.
The owner must fit his wishes within the budget. The organization of living space is also important. Not every wall can be demolished; a professional designer or builder is invited to do this. Housing must remain safe.
Space distribution
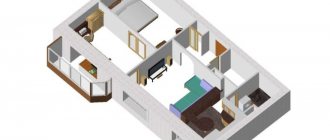
Planning begins with measuring parameters. Calculate the area of the apartment and the distance between the walls. Draw a diagram: top view. Apply dimensions. They mark which partitions can be removed without damaging the building.
Now let's start zoning. Many people follow the rules of Feng Shui. This is an ancient Eastern teaching about the organization of space. It states that the health and well-being of the residents depends on the arrangement of objects and the layout of the room. Today there is no genuine evidence that the principles of Feng Shui actually work.
When allocating space, style is taken into account. The details depend on it: whether to make intricate arches, whether to connect several rooms into a studio. Design options are influenced by the number of rooms and people living in the apartment. Everyone needs personal space - this moment is thought out in advance.
Carrying out the necessary measurements
Before planning where to put household items, you need to take appropriate measurements. To do this, you can use a rangefinder. This device will measure the exact distance (for example, from one wall to another). This option will significantly save energy and time.
There is only one clarification. Suppose it is not difficult to measure a room in this way, but what about utility rooms and storage rooms or rooms with a lot of corners and vertically located pipes? This is where a regular tape measure comes to the rescue. It also works well for measuring the thickness of walls and the width of door or window openings.
All data, in order to avoid their loss, should be immediately transferred to paper, on which a diagram of the apartment with all the clarifications will then be built. Although you can use appropriate computer programs to create a floor plan.
What is important to know before starting work
Several features of the planning:
- This requires the consent of all residents.
- Remember that repair work is carried out at the specified time. Detailed information contains the law and silence. The rules differ in different regions.
- To remove a wall, you must obtain permission from the BTI.
- Repairs in the Khrushchev building will most likely be cosmetic. Small rooms are difficult to edit thoroughly. But the layout will free up extra meters.
- If the corridor and kitchen in the room are shared, the consent of all co-owners is required for repairs.
- A living space where several people live is expanded by demolishing walls. To do this, you will need a house plan, which indicates which walls are load-bearing. Their demolition is fraught with the collapse of the upper floors and roofs.
- They are trying to separate the combined bathroom. Especially if more than two people live in the apartment. Divide and conquer if space allows.
- You can improve the layout by simply rearranging the furniture. This will change the look of the room. Cosmetic renovations will add newness: partial change of furniture and wall coverings.
- The loggia is an additional area. It’s worth making a cozy office out of it, pre-insulating it. It is being turned into an isolated room.
You may be interested in: Features of the layout of a two-story house: optimal area and choice of materials
Take a close look at the apartment plan. It is enough to throw away bulky cabinets and replace them with more spacious ones. You can re-plan the arrangement of furniture without a drawing. All you need is a measuring tape in your hands and a living imagination.
Examples of measurement plans
Home > Examples
Dear Clients, she has extensive experience in carrying out measuring work on any real estate, be it: an apartment in a new building or a Stalinist house, a cottage, a store, a hotel, a restaurant, office premises, garages, administrative buildings (hospitals, schools) and much more . Below you can see examples of our work and samples of drawings and floor plans
Go to the gallery of works
Example No. 1: NEW BUILDING APARTMENT IN NOVOKOSINO The company’s specialists measured an apartment in Novokosino in order to check the BTI area (control measurement), as well as for the architect’s further work with the drawing. The measurement took 2 hours, the drawings were prepared within 1 day.
- Apartment plan in a new building
Example No. 2: TOWNHOUSE IN BARVIKHA Specialists carried out work to measure the premises of a two-story townhouse with a garage, located in Barvikha. The measurement drawings will be used later by the designer to develop a design project. Working time on site is 3 hours. The preparation time for drawings is 2 days.
- Dimensional plan of a townhouse 1st floor
- Dimensional plan of a townhouse 2nd floor
Example No. 3: TENNIS COURT BUILDING FOR RECONSTRUCTION PURPOSES Specialists measured the tennis court building for further use of the drawings when developing a project for the reconstruction of the building for a swimming pool with a gym. Drawings of the ceiling trusses were prepared, longitudinal and transverse sections, and a ceiling plan were made. During the measurements, a special high-precision measuring device of the TOPCON brand was used, which allows for 3D shooting of the entire building, including the trusses. The work time at the site was 5 hours, the work was carried out by 2 measurers. The preparation time for drawings is 4 days.
- Tennis court building plan
- Longitudinal section of the building
- Cross section of the building
- Farm plan
- Scan along the wall
Example No. 4: PREMISES IN A SHOPPING CENTER WITH COMMUNICATIONS FOR RE-PLANNING Specialists from GlavOmer carried out a detailed measurement of the store premises in a shopping center with the implementation of a plan of the ceiling, developments and facade of the store. In addition, all engineering communications (lighting, low current) were measured.
- Space in a shopping center
Example No. 5: MEASUREMENT OF THE PREMISES OF STORES WITH AN ASSORTMENT AND WAREHOUSES WITH EQUIPMENT Specialists carried out measurements of the retail and warehouse premises of a chain of luxury clothing stores. Additionally, an inventory of the assortment of stores was carried out with marks on the plan. All warehouse equipment was measured: cabinets, racks, hangers, etc. The duration of the work is 1 day. The drawings were prepared within 5 days.
- TSUM 1st floor
- TSUM 2nd floor
- TSUM 3rd floor
- TSUM warehouse
- Barvikha Luxury Village - store
- Barvikha Luxury Village - cabinets and shelving
- Barvikha Luxury Village - equipment
- Barvikha Luxury Village - warehouse
- Kutuzovsky - 1st floor
- Kutuzovsky - 2nd floor
Example No. 6: REPAIR ROOM An example of performing measurement work in an office space with measuring load-bearing beams is shown. the drawings were used to develop a renovation project for the premises. The duration of work on site is 4 hours. The preparation time for drawings is 3 days.
- Measurement of office space for renovation
Example No. 7: MEASUREMENT OF AN OFFICE ACCORDING TO THE BTI METHOD WITH A CONCLUSION Specialists carried out a control measurement of the office space in order to determine the actual area of the entire premises according to the BTI methodology and standards with the preparation of an explication. In addition, an explanatory note was prepared describing the current standards for measuring premises and the measurement methodology. The duration of work on site is 3.5 hours. The preparation time for drawings is 2 days.
- Measurement of office premises according to BTI with conclusion
Example No. 8: MEASUREMENT OF THE AREA OF A WAREHOUSE COMPLEX Specialists carried out measurements of the area of the warehouse complex and the goods unloading terminal. A floor plan was drawn up for the warehouse space, as well as office space. The period for taking measurements is 2 days. The preparation time for drawings is a week.
- Warehouse basement
- Plan of the 1st floor of the warehouse terminal
- Warehouse premises on the 2nd floor
- Warehouse and office premises 3rd floor
- Office premises of a warehouse complex 4 floors
- Office premises 5th floor
Example No. 9: DEPLOYMENTS FOR AN APARTMENT WITH ENGINEERING COMMUNICATIONS Specialists were given the task of measuring the walls in an apartment in order to plot utility routes (electrical, low current, air conditioning) on the drawings. The assigned task was completed in full; plans were prepared for all walls indicating the connections of communication routes. The duration of work at the site was 4 hours. The preparation time for drawings is 3 days.
- Schematic plan of the apartment
- Scan along walls No. 1
- Scan along walls No. 2
- Scan No. 3
- Scan No. 7
Example No. 10: TOWNHOUSE FOR PROJECT DESIGN Measurements were taken of a three-story townhouse with a garage extension, located in the Moscow Region. Subsequently, the drawings were used to develop an interior design project. The duration of work on site is 3 hours.
- Measuring a townhouse for a design project
Example No. 11: RESTAURANT PREMISES ON TVERSKAYA Specialists carried out work to measure the premises of a two-story townhouse with a garage, located in Barvikha. The measurement drawings will be used later by the designer to develop a design project. Working time on site is 3 hours. The preparation time for drawings is 2 days.
- Restaurant floor plan 1st floor
- Restaurant plan 2nd floor
- Restaurant ceiling plan
Example No. 12: APARTMENT FOR DESIGN PROJECT WITH DEVELOPMENTS An apartment was measured for a design project with measurements of utilities. Reams along the walls were also made.
- Apartment plan for design project
- Wall scans No. 1
- Wall scans No. 2
Example No. 13: WAREHOUSE BUILDINGS AND HANGARS Measurements were made of warehouse buildings and hangars in the Moscow Region. The actual area of the warehouse complex was calculated. The duration of work at the site was 6 hours. Drawings were prepared within 3 days.
- Warehouse and hangar plan
Example No. 14: APARTMENT IN A NEW BUILDING WITH COMMUNICATIONS Work was carried out to determine the actual area of the apartment (control measurement to check the BTI area), and all utilities in the apartment were measured, which in the future will allow designers and architects to work with this measurement drawing. Duration of work - 2 hours; Drawing preparation time is 2 days.
- Apartment in a new building with utilities
Example No. 15: MEASUREMENT OF A BEAUTY SALON FOR A DESIGN PROJECT Measurements were taken of the premises of a beauty salon in the center of Moscow. The drawings were used to develop a design project and remodel the premises. The duration of measurements on site was 2 hours, drawings were prepared within 1 day.
- Beauty saloon
Example No. 16: COUNTRY COTTAGE The building of a country brick house, such as a cottage, located in the Moscow Region was measured. Floor plans have been developed, as well as a layout for the required section of the wall. The duration of the surveyor's work at the site is 6 hours. The preparation time for drawings is 3 days.
- Plan of the 1st floor of the cottage
- Plan of the 2nd floor of the cottage
- Plan of the 3rd floor of the cottage
- Wall scan
Example No. 17: LAND OF A CUSTOMS AND WAREHOUSE TERMINAL in the Moscow Region Specialists measured the land plot of a customs and warehouse terminal. The survey of the land and the situation was carried out using high-precision measuring equipment from the TOPCON brand. The result of the work was the determination of the actual area of the occupied site.
- Customs warehouse terminal in Moscow Region
Example No. 18: PHARMACY IN THE CENTER OF MOSCOW Linear measurements of the premises of the former pharmacy were made at the site, as well as a section of the building’s façade with the entrance and windows. The facility is located in the center of Moscow. The drawings were used to develop a project for remodeling the store premises. Duration of work on site: 3 hours. The drawings were ready within 2 days.
- Pharmacy floor plan
- Building façade section
Example No. 19: RESTAURANT ON MOKHOVAYA The area of a restaurant located in the center of Moscow was measured to determine the actual area of the premises. The drawings were used to resolve the issue of unpaid rent between the landlord and the tenant. The duration of the work was an hour. Drawings were prepared within 3 days.
- Restaurant floor plan
Example No. 20: STORE FOR A DESIGN PROJECT Measurement work was completed in the store premises for further use in developing a design project.
- Store plan for a design project
Example No. 21: OFFICE USING THE BTI METHOD WITH A CONCLUSION GlavOmer specialists measured the office space using the BTI method, calculating the area of each room and drawing up an explanation. Based on the measurements taken, the dispute between the tenant and the landlord regarding rent issues was resolved. The duration of the measurements was 4 hours. The preparation time for drawings is 3 days.
- Office according to the BTI method with a conclusion
Example No. 22: APARTMENT IN A NEW BUILDING IN KHIMKI FOR A DESIGN PROJECT Measurements were taken of an apartment located in the city of Khimki, Moscow region. Measurers measured all passing utility lines and the heights of all elements in the apartment. The drawing was used to develop the interior design. The duration of work on site is 2 hours. The drawings were ready within 1 day.
- Apartment in the Moscow region
Example No. 23: WINTER GARDEN ROOMS The winter garden room with utilities was measured. The duration of work at the site was 3 hours. Drawings were prepared within 2 days.
- Winter garden room with communications
Example No. 24: SHOPPING CENTER IN ZHELEZNODOROZHNY The premises of a shopping center building were measured after major renovations in order to determine the actual area of the premises before renting out. The measurements were carried out over 5 hours. The drawings were prepared within 3 days.
- 1st floor of a shopping center building
- 2nd floor of the shopping center building
- Attic
Example No. 25: APARTMENT ON MICHURINSKY PR. FOR A DESIGN PROJECT Measurements were taken of an apartment located in Moscow for the subsequent development of a design project. The duration of work at the site was 2 hours. The preparation time for drawings is 1 day.
- Measurement drawing of an apartment for a design project
Example No. 26: PREMISES OF A RESTAURANT AND HAIRDRESSER Measurements were taken of the premises of a restaurant and a hairdresser, located in the same building in the center of Moscow. The measurements were carried out to determine the actual area of the premises. The duration of the measurements was 6 hours. The preparation time for drawings is 4 days.
- Barber shop floor plan
- Dimensional plan of the restaurant
Example No. 27: APARTMENT IN NOVOKOSINO, REUTOV FOR RENEWAL The company's specialists took measurements of an apartment located in Reutov (Novokosino). The apartment plan was later used to develop a redevelopment project. Work on site took 1.5 hours. The drawings were ready the next day.
- Apartment in Novokosino for redevelopment
Example No. 28: OFFICE BUILDING IN YAROSLAVL measurement work was performed in an office building in Yaroslavl. Measurements of the floor areas were made, and sections along the staircase were made. The drawings were used to develop a project for the redevelopment of the premises.
- Office building plan
- Sections of an office building
Example No. 29: MINI-HOTEL Measurement work was completed for a mini-hotel located on two floors of an old building in the center of Moscow. The premises were at the stage of reconstruction. The total area of the premises was 784.5 m². The duration of on-site measurements is about 5 hours. Measurement drawings were prepared within 2 days after the completion of measurement work at the site.
- Dimensional plan of the 3rd floor
- Dimensional plan of the 4th floor
Example No. 30: APARTMENT IN A NEW BUILDING “GlavObmer” took measurements of an apartment in a new building at the renovation stage. The measurement drawings were subsequently used to develop the design project and construction drawings. The duration of measurements at the site was 1.5 hours. The period for preparing measurement drawings is 1 day.
- Dimensional plan of an apartment in a new building
- Wall scan No. 1
- Wall scan No. 2
Example No. 31: COUNTRY HOUSE (COTTAGE) This example presents measurement drawings of a country house (cottage), located 30 km from the Moscow Ring Road. A floor-by-floor survey of the interior of the house was completed. The duration of work on site is 2.5 hours. Floor plan drawings were prepared within 1 day. The total area was 306.1 m².
- Measurement plan of the cottage basement
- Ground floor plan
- Second floor plan
Example No. 32: HOSTEL The premises of a mini-hostel in the center of Moscow were measured; the total area of the premises is 174.1 m². The duration of the surveyor’s work at the site is 2 hours. The preparation time for drawings is 1 day.
- Measurement plan of the hostel
Example No. 33: RESTAURANT COMPLEX "GlavObmer" carried out work on measuring the premises of a restaurant complex, consisting of a banquet hall, kitchen premises and food warehouse, as well as administration premises. The restaurant is located on the territory of the All-Russian Exhibition Center in Moscow. The total area of the facility was 405.4 m². The duration of the measuring work was 5 hours. The work was carried out by two measurers.
- Restaurant plan
Example No. 34: COTTAGE FOR DESIGN PROJECT The company’s specialists measured a three-story cottage located in the Moscow region. The drawings were used to develop the redevelopment and interior design project.
- Ground floor plan
- 1st floor plan
- 2nd floor plan
- Attic plan
Example No. 35: MEASUREMENT OF THE LANDING ROAD, RAMP AND EXTENSION The landing stage, ramp and extension located on the territory of the warehouse complex were measured. The total area of all premises has been calculated.
- Ramp, landing stage and extension
Example No. 36: OFFICE CENTER BUILDING Work was carried out to measure the building of an office center located in the center of Moscow. The duration of work at the site was 2 hours, 2 measurers participated in the work. It was necessary to measure one of the floors of an office building.
- Floor plan of the office center building
Example No. 37: APARTMENT IN KHIMKI FOR A DESIGN PROJECT An apartment in the city of Khimki, Moscow Region was measured to develop a design project.
- Apartment plan in Khimki
Example No. 38: APARTMENT In this example, measurements were taken of an apartment in a new monolithic brick building. The measurement drawings were subsequently used to develop the design project. The total duration of measurements at the site was 1.5 hours.
- Apartment plan in a new building
Example No. 39: BEAUTY SALON Below is an example of a measurement plan for a beauty salon located in the Moscow region. The total area was 108.3m². The duration of the surveyor's work at the site is 1.5 hours. The preparation time for drawings is 1 day.
- Floor plan for a beauty salon in the Moscow region
Example No. 40: STALIN'S APARTMENT A measurement plan of an apartment located in a Stalinist building is presented. The apartment was under major renovation. The duration of the measurements was 1 hour.
- Apartment plan in a Stalinist building
Example No. 41: BEAUTY SALON The premises of a beauty salon and spa, located in the center of Moscow in one of the 7 Stalinist high-rises, were measured. The drawings were used to develop the design project. The period for taking measurements on site is 2 hours. Preparation of the drawings took 2 days.
- Two-story beauty salon and spa plan
Example No. 42: OFFICE SPACE The example shows the measurement plan of an office space. The total area was 148.3 m. Measurement work at the site took 2 hours. Preparation of the drawings took 2 days.
- Office floor plan
Example No. 43: APARTMENT using BTI Work was completed to measure an apartment using BTI technology, located in a new building. The area was 177.9 m. The duration of the surveyor's work at the site was 1.5 hours. It was necessary to measure the interior spaces and the balcony. The drawings were prepared within 1 day.
- Apartment plan in a new building
Example No. 44: COTTAGE IN KLIMOVSK Specialists carried out a full range of architectural measurements of a cottage located in Klimovsk, Moscow region. Measurements were taken of the façade of the building, as well as measurements of the land plot. Based on the measurements, characteristic sections of the building, roof plan, facades and floor plans were made. The drawings were used by the architects to develop a project for the redevelopment and reconstruction of the entire cottage.
- Land plan
- 1st floor
- 2nd floor
- Attic
- Roof
- Cuts
- Facade No. 1
- Facade No. 2
Example No. 45: BAR-RESTAURANT An example of floor plans for a bar-restaurant located in the center of Moscow is presented. The duration of measuring work at the site was 1.5 hours, carried out by two measurers. The preparation time for measurement drawings is 1 day.
- Dimensional plan of a two-story bar-restaurant with a dance floor
Example No. 46: APARTMENT FOR DESIGN PROJECT Specialists measured the apartment for the subsequent development of a design project.
- Apartment plan for a design project
Example No. 47: COTTAGE "GlavObmer" carried out work on measuring: the internal areas of the cottage and facades, in addition, a calculation of the floor area and facades was carried out to determine the volume of work on cladding the facade with porcelain tiles and interior floors with marble. The duration of work on site took 5 hours. The drawings were prepared within 2 days.
- Album content
- Basement plan
- Ground floor plan
- Staircase plan
- Facade measurement plan
- Facade No. 1
- Facade No. 2
- Facade No. 3
- Facade No. 4
up ↑
Making the necessary plans
To make a detailed layout of the apartment, computer programs are used. Many of them are available online, free of charge. It will take half an hour to master. The interface is intuitive.
If you don’t want to waste time on programs, all you need is a piece of paper and a pen. If your plans include demolishing walls, you should buy a design notebook. This is a small square notebook. It's easy to put dimensions and count meters. You will need a pencil, eraser and ruler. It is more convenient to draw a diagram with professional supplies at hand. It's better to prepare in advance and do everything right. The repair is carried out once, the result will remain for a long time.
Creating a measuring plan for an apartment with your own hands
If you don't have a computer, we can try to create a plan. Drawing it by hand. In fact, there is nothing complicated here either, and now we will give you some tips on how to create a high-quality housing measurement plan:
- To work we will need a ruler, a pencil, an eraser and a checkered sheet of paper. Let's leave whatman paper to the professionals, since a regular notebook sheet suits our tasks just perfectly. Starting with the fact that it is already divided into straight lines, which is very convenient, and ending with the fact that each of its cells has a fixed size of half a centimeter. An unfolded double sheet of squared notebook allows us to create a detailed drawing on a scale of 1 to 20;
- The plan drawing must be drawn across the entire sheet of paper, starting from the bottom left edge of the paper. First, you should draw a “box” that corresponds on a scale to the maximum length and width of the home. After this, we draw walls and partitions, indicate the location of windows and doors.
Important! The documents for the apartment also contain a plan, certified in accordance with all the rules. If you have such a plan at hand, you can make a copy of it without changing the scale.
Types of apartment layouts
Apartment layout options depend on its type. A room in a communal apartment, a small family or an apartment with a certain number of rooms. Today it is fashionable to buy open-plan apartments. This is a dedicated space without partitions. The owner himself decides whether to make several rooms, or separate only the bathroom, leaving the layout open.
To get your bearings, look at photos of finished premises with a certain type of renovation. For example, a one-room apartment turned into a studio. Modern property owners increasingly prefer open floor plans.
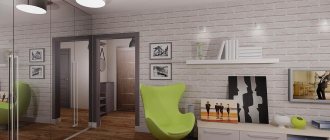
Studio
The kitchen and living room are combined. Separate bedrooms may stand alone or be completely absent. Studio apartments are created by demolishing partitions. The space visually expands. A standard one-room apartment seems spacious. The design allows you to make a distinction between the kitchen and the recreation area. The advantage of this layout is that the studio is visible. Having heard the noise, you don’t need to go to another room and check that this time the cat has fallen: it’s obvious. The room becomes more presentable. This is a solution for small spaces. The downside is the lack of privacy. For a family where the father needs to work and the children need to watch cartoons, this option is not suitable.
You may be interested in: Layout of a two-story house 6 by 6: features of construction and space distribution
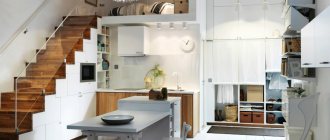
Studio apartment
Ideally, this is a place for two to three people to live. The layout of a one-room apartment is all about freeing up space. For this, designers recommend using sliding wardrobes and built-in walls. The bathroom is combined. If space allows, it is divided by installing a partition. They save space by installing a shower cabin instead of a bathtub.
Often, owners rebuild such premises into a studio. The wall between the kitchen and the room is eliminated completely or partially. Leave the arch. Lighting plays an important role in design. Hanging a bare light bulb in the middle of the ceiling will ruin the most fashionable designer renovation. But a well-thought-out lighting system will transform the apartment beyond recognition. The balcony is also affected. It is being converted into a separate office.
Two-roomed flat
A linear layout is used, when all rooms are located one after another. The windows face one side.
When remodeling, rooms are combined or left as is. Rearranging furniture and light cosmetic repairs will update the appearance. An isolated room in such a room is a classic closed option. The only downside is the limited space in each room. The bathroom in a two-room apartment can be separate.
Three bedroom apartment
It consists of two isolated rooms and a kitchen. The number of fences in the apartment is regulated depending on the number of residents. Separate bathroom. If adjacent, the space usually allows you to delimit it. When 2-3 people live in such an apartment, they leave a separate office and a spacious studio. Plus - a balcony or loggia.
Three-room apartments are transformed using design solutions. If the owners are satisfied with the space and arrangement of the rooms, it is enough to change the color scheme, change the furniture, and make repairs on the loggia.
Four-room apartment
A large area opens up space for imagination.
What influences the layout of a room?
- The number of people living in it.
- The presence or absence of periodically visiting guests.
- Budget allocated for repairs.
- Owners' wishes.
- Selected style.
Ideas come from ready-made solutions. Walls, with the exception of load-bearing ones, are removed or moved for the convenience of residents.
Open plan apartments
The space for ideas is provided by this type of room. The walls are marked on the house plan; when purchasing an open-plan apartment, they will look like boundaries of one brick.
Owners are experimenting with non-standard layouts in such premises. And they get original design solutions. The only thing: the bathroom is placed in the place intended for it. The kitchen also cannot be moved far.
You will be interested in: Project for the construction of a multi-storey building: important points and the necessary list of documents for the conduct of work
Communal apartment and small family
Layout decisions will depend on the total area. Small families are premises similar to a one-room apartment. The kitchen is small, there is a washing machine there. The hallway and kitchen are a single space. There is no kitchen in communal rooms: it is located separately, for use by a group of people living nearby. Separate bathroom.
In small families, cosmetic repairs are carried out. Rearrangement achieves expansion of space.
Pencil drawing of a room with furniture
If you are planning a renovation or simply decide to move furniture, then it is important to present the result before starting work. At the same time, your idea alone will not be enough, because in order for the work to be successful, you need to clearly imagine the result and build an action plan based on it. Therefore, you will need to make a drawing of the room with furniture in pencil. Let's try to figure out how to do it correctly.
Perspective
The first thing we need when deciding to draw the design of a room is to build a frontal perspective. But first, let’s define why it is needed, what it is.
What is perspective?
This is a special distortion of real proportions and a change in the shape of objects in the drawing. This is done to make the image more realistic. For example, a straight road when depicted in perspective will connect to a point extending into the horizon.
Frontal perspective implies that all elements of the drawing will correspond to one point, which is called the vanishing point. At this stage, you should remember that there is also an angular perspective. Although the construction principle of these two types will be the same, they have differences and should not be confused. Angular perspective uses two vanishing points and alignment to create depth in the drawing.
So, let's look at how to create an almost real three-dimensional room on a flat sheet of paper in the form of a pencil drawing with furniture.
Drawing a room
Let's try to depict any fantasy room, but first let's prepare a little.
What will you need?
To create a sketch we need very little:
- Several well-sharpened simple pencils of varying softness.
- An eraser for removing unnecessary lines and adjusting the sketch.
- A ruler for drawing straight lines.
- Colored pencils if you want to color the sketch.
- Pencil sharpener.
- Several sheets of paper to work on.
The preparation is complete - you can get to work. A simple sequence of actions will help you do this.
Steps:
- First, let's turn to the back wall of the room, using a ruler, draw two horizontal lines that will be parallel to the top of our sheet.
- Let's draw two vertical lines parallel to the side parts of the sheet. As a result, we should get a square.
- We place a dot in the center of our square. It will be the very reference point of the drawing of the room with furniture.
- Next, you need to draw two guide lines with a pencil, without strong pressure, diagonally from one corner to the other so that they intersect at the reference point.
- After this, we can erase all the lines inside the square, leaving only the vanishing point, which is located in the center. We got a perspective sketch of the room, but this is just the beginning.
- Next, we begin to outline the door. When working, do not press the pencil too hard so that you have the opportunity to correct the drawing if you make a mistake. Please note that we are drawing in volume, so in the drawing the lower part of the door or doorway should be slightly wider than the top.
- We draw the floor and walls in the same way, while always remembering to create the illusion of volume.
- From the vanishing point, draw a slightly visible line to the near side of the door. It will become the reference for the rest of the drawing of the room with furniture.
- Draw the window opening as well. Usually it is located opposite the door. Don't forget to create volume and make the bottom lines a little larger than the top lines.
- Using horizontal and vertical stripes, draw slopes for windows and doors. Draw a sketch for the stairs in the same way.
- To draw a staircase, you can take the back wall of the room as a basis. Using its model, we draw horizontal and vertical straight lines to get the far part of the staircase.
Important! When creating a drawing, all straight lines must be parallel to the very first ones. Otherwise, the purity of the drawing and perspective may not work.
- Next we will use our starting point again. All corners of the stairs are drawn using a support. Sketches are made from the point to the side, and then the extra lines are removed.
- To give our drawing of a room with furniture clarity, we outline all the corners, making them sharper, and also shade the places of shadows, depending on where the lamps will be located.
The sketch drawing is almost ready, if the result does not satisfy you, you can try a few more times: rearrange the objects in the drawing, arrange different lighting. Next, you can try to draw a sketch of your room.
We make a sketch from a real object:
- To begin, find a convenient point from which you can clearly see the room.
- Make sure you sit comfortably because you will have to keep the sheet motionless for some time.
- Also place the paper so that when you close one eye, it is parallel, or better yet, coincides with the corner of the room farthest from you.
- Next, without moving the sheet of paper, sketch out all the elements that you see in the room: walls, floor, ceiling, furniture, textiles and lighting.
- Afterwards, you can relax a little. The sheet must be scanned and a copy printed. The scanned sheet is colored with a pencil, adding details, light and shadow.
Important! When adding details, don't go overboard. First make a light sketch, and then fill in its lines and sketch out the shadows.
Recommendations:
- When creating a drawing, work carefully and carefully - any inaccuracy can lead to skew of parts relative to each other.
- Don't forget to use a ruler. Drawing by hand, of course, looks more alive, but when it comes to accuracy, a ruler is the best assistant.
- In order not to confuse the guides and main lines, you can shade the areas of the floor and ceiling, or work in different colors.
- If you want to complement the design, you can decorate the walls and other surfaces with patterns, paintings or graffiti.
- To ensure the correct placement of furniture and other large objects in the room, follow the guide lines.
- At the end of the work, do not forget to remove unnecessary lines with an eraser.
Of course, you are unlikely to draw a perfect drawing the first time, but with a little practice, you will get an excellent drawing of a room with furniture and other objects.
We have analyzed one of the complex options for drawing a room. Such a sketch will turn out very beautiful and detailed, but sometimes it is simply not necessary. Therefore, next, talk about how to create a simple plan drawing of a room with furniture in pencil.
Scheme
If you're planning to rearrange, you don't need to imagine what the furniture will look like. Here it is more important that it fits into a given space, so it will be easier and more convenient to draw a drawing of a room with furniture in pencil - a top view.
Important! You can also use computer programs for work. But if they are not installed, then there is no point in wasting time downloading and learning their functions. It's much faster to do this manually.
We will need
Everything is very simple here:
- tape measure for measuring real objects;
- eraser and sharpened pencil;
- sharpener;
- ruler;
- paper on which we will draw up a plan and a sheet of paper in a square.
Having prepared everything necessary, we begin work.
Sequencing
The work is quite simple if you pay attention to the dimensions and follow the following steps:
- The first step is to draw on a piece of paper the shape of your room with all the curves of the walls.
- Next, use a tape measure to measure all the dimensions of the walls and write them down on the drawing of the room with furniture.
- Afterwards, the locations of batteries, risers, windows and doors are marked on the sketch. The area that is involved when opening the door is drawn as a quarter of a circle and shaded.
- Don't forget to mark on the diagram where the sockets and switches are located.
- Next we move on to measuring the dimensions of the furniture. If there are no niches in the room, then the height of the objects is not important to us.
- But the height of the room will need to be measured and noted next to the drawing.
- After all the measurements, take a piece of squared paper or drawing paper and draw up a neat drawing of the room. To do this, select the optimal scale. A ratio of 1:20 is considered convenient, but you can choose any ratio that is convenient for you.
- Let's use a pencil and a ruler and draw the perimeter of the room according to the chosen scale.
- Next, we will transfer all the furniture, windows, doors and sockets from the sketch. You can use a compass to indicate where the door will open.
- The final step will be to remove uneven lines using an eraser and mark the scale and actual dimensions on the drawing.
Important! For the schema to be clear, there is no need to overload it and sign each object. It is enough to shade them in different ways and place the shading outside the drawing as designations.
Video material
At this point, the pencil drawing of the room with furniture is ready, now, guided by the scale, you can move objects the way you would like. Good luck!
Share on social media networks:
serviceyard.net
Interesting options
Two-room apartment: diagram
It often happens that even in an apartment with two rooms there is nowhere to turn around. Before changing the layout (for example, breaking down walls or demolishing unnecessary projections), you need to coordinate your wishes with the BTI. Once the permit is issued, you can begin to make your dream come true.
The layout of a two-room apartment can be adjacent or separate. The first option is access to one of the rooms exclusively from another room. This layout is already disappearing from the list of construction solutions due to its irrationality. The separate layout is considered more convenient.
A large kitchen area is recognized as the main criterion for functional housing. In addition, the presence of utility rooms (dressing room, pantry) can also significantly influence the success of the layout.