Paper is an amazing tool for creating crafts, cards and even layouts. You can make airplanes and even weapons from it. And today, on the eve of Women's Day, I wanted to please you with ideas for paper flowers. I specially selected options with different levels of preparedness, so that small children could create and adults would be inspired to create them.
By the way, such crafts look very interesting as interior decor if they are made in the general color scheme of the apartment design. I had the pleasure of making several bouquets with my daughter to give to grandmothers. The time spent with the child is reflected in his exclamations, “And mom and I did this!” and eyes burning with inspiration.
I invite you to master classes in different techniques. In addition to paper, we will use wire, candy and yarn.
DIY paper flowers
I was really excited about the mimosas. They look very realistic, and are made very quickly, because the buds themselves are pom-poms made of yarn, which are quickly made with a fork.
We will need:
- Colored or corrugated paper
- yellow yarn or threads. But it’s better to look for yarn, because the buds from it look much more realistic and fluffier.
- Wire
- fork or scissors
- Long sticks
The photo shows how to make a pompom using scissors, but you can also use a fork, also tying the middle between the second and third teeth.
You need to wind the thread often to avoid bald spots in the flower.
To prevent the buds from falling under their own weight, we need wire. We screw it to the middle of one flower.
Now you need to wrap the wire with green paper to get a stem. To do this, we glue the base of the flower with glue or using a glue gun, so we fix the edges.
Next, continue wrapping the stem.
After one or two turns, attach the second bud.
So we do five or six flowers on a branch.
Now you need to make leaves.
A long strip of green paper will need to be wrapped around a kebab stick. But first you need to make many cuts along the entire length, not reaching the edge 1 centimeter.
Take a total width of 4 centimeters.
Wrap the prepared fringe around the stick, pulling it tightly.
This is what we get in the end. I congratulate you, the bouquet is ready for International Women's Day!
I also came across master classes made from egg trays. They are also made entirely of paper, only they have a recessed shape.
These same trays will make a wonderful flower wreath that can decorate your apartment or cottage.
This cute panel of daffodils looks like the real thing. See how easy it is to repeat all the steps.
The first spring messengers made of paper turned out to be very tender.
The needlewomen have already come up with all the steps for creating such paper beauty for us. We can only repeat.
DIY corrugated paper flowers: how to make them with photos and videos
You always want to decorate the most significant day in some special way. Ready-made decorations are quite expensive, and if you decorate a large room with them, it will cost a pretty penny. Today, there are quite a large number of handicraft methods. Flowers can be made using quilling, beading, cold porcelain and even wool felting. But all these options are labor-intensive and require certain technical skills. You can make original flowers from corrugated paper with your own hands in literally 30 minutes. It always looks fresh and creative, plus you can add easy recycling.
simple circuit
Such jewelry has several important advantages that make it a leader:
- minimum amount of money spent on necessary materials;
- flowers can be made so realistic that they are almost impossible to distinguish from real ones;
- the material can be purchased at almost any stationery or craft store;
- extraordinary beauty can be achieved without specialized tools and complex circuits;
- quick disposal is especially important when decorating large halls or rooms;
- will be an excellent gift or decorative element for any celebration;
- This type of decoration can be made even by a child.
Even with all the abundance of DIY methods, flowers made of corrugated paper have been and will be at the peak of popularity. A wonderful way to express yourself and realize your wildest fantasies.
corrugated paper flowers
Preparatory work
Before you begin the mystery of flower production, you must first of all equip yourself with all the necessary arsenal in advance. Corrugated paper is best purchased in rolls rather than sheets. The roll contains a large enough footage, which is enough for a whole heap of buds, flowers and petals.
It is recommended to select paper in more natural shades, unless, of course, as planned, the final work should look natural and natural. For buds, leaves and stems, you should take several flowers, in this case, you can play with the shadows. Then the flowers will look more “alive”.
corrugated paper flowers
For the stem you need to take a thin pliable wire, a floral sleeve or any other materials.
You will also need thick cardboard for cutting out blanks, glue and sharp scissors. Not necessary, but you can prepare fishing line or strong silk threads and a breadboard knife.
It is best to work in good lighting, this can be either natural light or fluorescent lamps.
Important! If there are small children or animals in the house, it will be safer to work on a high table rather than on the floor.
process
Flower making process
At the initial stage, many needlewomen are faced with the question: how to make flowers from corrugated paper and where, in fact, you need to start. Of course, each craftswoman has already developed her own technology and some little secrets. However, nothing is impossible for those who want to reach the heights of professionalism.
The most complex technologies always come down to the simplest steps:
- First, you need to draw the necessary templates on cardboard. For a more realistic flower, you should prepare several templates of different sizes and slightly different shapes.
- The more paper petal blanks there are, the better. In this case, we can recall the beautiful rose flower, which consists of a huge variety of petals of various sizes.
- After the cardboard blanks are ready, you can start cutting them out of paper.
- Once all the petals are prepared, you can begin creating the flower itself. To do this, you will need to take 5-7 of the smallest petals and tie them tightly at the bottom. This way a tight bud is formed. For strength, you can glue the bottom part with glue.
- After the bud is ready, you should carefully attach each petal separately, slightly stretching the upper edges. By performing these actions, the petal is given a natural wavy shape.
- After all the petals have been collected into a finished flower, it can be safely “planted” on the stem.
- paper in light lilac, yellow and green shades;
- watercolor, gouache or acrylic paints;
- glue or glue gun;
- wire for the stem, approximately 30 cm;
- brush and sharp scissors.
manufacturing process
The stem, like the flower, should look natural. This can easily be achieved with regular wire and green paper. It is necessary to measure the required piece of wire or floral sleeve and decorate it with prepared corrugated paper, fabric, or even paint it with acrylic paints. Then attach leaves and thorns if the flower implies their presence. The finished flower is “settled” on the stem using glue. Since the wire and the floral sleeve are movable, they can be given absolutely any shape and bend.
peonies
How to make realistic peonies.
by step instructions
Peony is a magical flower that is traditionally a symbol of purity and love. A cute bouquet can be an excellent gift for a wedding or birthday of a beloved friend. Peony flowers in nature are quite large in size. For a bouquet of flowers you don’t need to make a large number of heads; 7 pieces will be enough.
If you want to achieve a shade close to the natural color, you can take snow-white or milky paper and give a few strokes of pink, orange or peach acrylic. You can make delicate peony flowers from corrugated paper with your own hands in just 20-30 minutes.
At the first stage, you should carefully cut out rectangles according to the template and slightly round them, thereby giving a natural roundness to the petal.
To make one peony you will need to prepare 10 strips for small petals, 10 strips of wider paper for large petals and several strips of different sizes of green paper for making leaves. To give a realistic shape to the peony, you need to cut the petals into a slightly oval shape with a small stem, and the leaves should be slightly pointed towards the top.
peonies - process
After all the shapes are cut out, with careful movements the petals need to be slightly stretched in width and height, until the petal is visually closer to the natural one. Next, give the petal a convexity on the outside, thus giving it some volume.
Important! When stretching petals or leaves, you must avoid using nails, otherwise the tenderness and fragility will be spoiled by unwanted lines.
Then the process of “folding” the bud begins. To do this, take several of the smallest petals and wrap one tightly in the other. When wrapping, you must ensure that each subsequent layer overlaps the seam of the previous layer. Thus, gradually, the petals are stacked on top of each other in layers. When the flower has been collected, its base should be secured with thread, fishing line or glue. Since a peony is a carelessly disheveled flower, you can safely tear some of the petals of the finished product slightly and then stretch the edges again.
In total, it will take about 25 petals to make one peony. Sepals are made from green paper. It is necessary to prepare about 10 green leaves, after shaping, wrap them around the finished peony.
To make the flower more voluminous and lush, at the initial stage a round candy or a formed foil ball is placed in the core.
It should be remembered that natural flowers in nature do not have perfectly smooth edges and lines, so the less neatness there is in the bud, the better.
lilies
Master class
on making delicate lilies
The royal lily flower is sensuality combined with majesty. Volumetric flowers made of corrugated paper always attract attention. This is not only a good addition to the main gift, but also a great decorative element for any holiday or event.
Using the example below, we will describe step by step how you can make a wonderful lily from ordinary corrugated paper.
To work you will need:
If the paper is on a roll, then you need to cut a strip 7 centimeters wide from it. From the resulting piece, cut into small rectangular pieces, which should be given a rounded shape to the lily petals. Then, the edges need to be stretched a little with your fingertips, for greater naturalness, and slightly curled with scissors or a regular pencil. Make a depression in the middle of the petal, thus giving it a natural roundness.
When the petals are completely ready, the magical process of transformation begins. To do this, you need to mix brown and dark lilac colors and use the resulting tone to draw natural dots at the base of the petal. For greater naturalness, the dots should be thicker at the base and almost disappear towards the middle.
The stem is made from wire. The required piece of wire is cut and decorated with a thin strip of green corrugated paper. Before wrapping paper around the wire, it is recommended to stretch it properly. This is done to ensure that all unnecessary stripes and folds disappear.
lilies
At any edge of the finished stem we make a pistil and form a stigma using hot glue. To be convincing, you should paint this place with green paint.
The stamens are made from yellow paper. A small even square is cut from the roll. We cut strips along its entire length, but leave the base solid. Then you need to twist each strip with twisting movements and treat the tip with a drop of hot glue. After all the work is done, dip the prepared stigmas in semolina, paint with acrylic or gouache in a brown-chocolate shade and let dry.
Lily leaves have a rather elongated shape. You need to cut long rectangular strips of green crepe paper, slightly stretching and folding them. We glue the stamens to the pistil and add three lily petals to the finished structure, placing them slightly above the tips of the anthers.
After this, glue three more petals over the joints of the previous petals and twist the edges of the finished flower again.
The final stage is “installing” the finished lily on the stem, adding petals and securing with drops of glue.
with sweets
Corrugated flowers with candies
Every needlewoman, having reached a certain level, wants to do something extraordinary and memorable. Not a single holiday or special event is complete without sweets and flowers. Modern craftswomen have decided to combine these two components into one and call this direction suite design.
Flowers made of corrugated paper with candies came into fashion not so long ago, but they have already managed to win over quite a large number of the public with their originality and creativity. Today, through your PC, you can view photos and videos of a huge number of master classes on making an unusual bouquet. A detailed step-by-step description will help you turn all your bold ideas into reality. The main thing is not to be afraid to experiment. Only in this case will you get bouquets that are worthy of decorating not only birthdays, but also weddings.
flowers with candies
To make a bouquet you will need chocolates, preferably round and wrapped. This will greatly facilitate the task during the formation of a flower bud. You can take paper of absolutely any color, here you can give free rein to your fantasies. Squares should be cut out of the corrugation, rounded and petals formed by pulling and stretching the finished fabric.
The next step is to cut out squares of baking film. The candy is wrapped around the finished square and a small tail is left at the bottom, which is then wrapped with a beautiful thread or gold-colored ribbon. We gradually “wrap” the finished workpiece, layer by layer, with petals, immediately giving it the shape of a natural flower. You must try to ensure that the first layers completely cover the candy, but the subsequent ones may already be half-open.
A chic bouquet is carefully formed from ready-made flowers. This is done in different ways. You can “plant” each flower separately on a pre-prepared wire; you can use skewers, a foam ball, a plastic bottle or polyurethane foam. After the bouquet has been completed, it can be decorated with satin ribbons, various laces, beads, stones or rhinestones. Such an original gift will definitely leave behind indelible pleasant memories.
To create a spectacular bouquet, you don’t have to stop at just one type of flower. These can be a wide variety of combinations of daisies, roses, daffodils, poppies, tulips, orchids and so on.
giant flowers
Giant size flowers
You can make large flowers from corrugated paper with your own hands for any occasion. Such decoration will always look festive and unusual. Flowers of a delicate shade can decorate a romantic party or wedding celebration. Huge, but at the same time fragile, as if made of porcelain, can add even more atmosphere to the holiday.
For a children's birthday party, products in bright and flashy colors are suitable. Not only will they become indispensable for decorating the festive photo zone, but also photo sessions. Magnificent life-size flowers made of corrugated paper will be able to “greet” guests at the entrance. With such a huge bouquet, you can properly greet your beloved wife from the maternity hospital or give it to your girlfriend.
giant flowers
Step-by-step process for making a large rose:
- on thick cardboard, draw a petal template in the shape of a heart and a drop;
- cut out 15 large hearts and 5 petals in the form of droplets from paper according to the template;
- each cut petal should be well stretched up and to the sides, giving it a natural and natural shape;
- for droplet-shaped petals, you need to beautifully wrap the edges using a pen or pencil;
- For the heart-shaped petals, we make wavy bends using a pencil only on the sides;
- for the stem you will need a piece of ordinary soft wire, which must be decorated with floral tape or green corrugated paper;
- the formation of a bud should begin with small petals, after gluing them to the stem with a drop of glue;
- after the base is formed, first the droplets and then the hearts are glued to it one by one;
- from a long strip of green paper, a sepal is cut into small cloves;
- The finished sepal is fixed around the base of the bud, secured with green adhesive tape or a drop of glue.
At this stage, the rose is completely ready. In order to make leaves, cut out oblong shapes from green corrugated paper. After this, place the edge of the decorated wire in the middle of the finished sheet, after moistening it with glue. Then fold both halves of the sheet so that the wire remains hidden inside the petal, and bend the remaining edges of the paper back.
At the final stage, the leaves are attached to the stem with adhesive tape and decorated with corrugated paper or a few strokes of acrylic paint.
huge flower
Giant flowers made of corrugated paper can magically turn the most ordinary holiday into an enchanting celebration.
Related posts:
Bouquet of paper flowers
DIY doll – Bronze Lady
DIY panel made from packaging cardboard
Volumetric star made of paper. Crafts for May 9, February 23
Schemes and templates of paper flowers for cutting
To go through the preparatory stage of preparing for the craft, I will give several popular and most often used templates.
You can use them and cut out, rather than draw, the leaves yourself, this will save time for busy parents, and also reduce the waiting time for an excited child.
These diagrams are suitable for such gerberas.
Each petal bends lengthwise. The templates are overlapped and glued to the center.
And the three middle levels need to be bent with the petals towards you to achieve volume.
Another template for creating a fantasy flower.
Popular patterns are daffodil, bluebell and chamomile.
With these templates you can create a whole bouquet using paper of different textures and colors.
Master class on how to make voluminous flowers
Making voluminous flowers is not at all difficult, the main thing is to choose the right colors and carefully cut out all the contours. Otherwise, you may end up with painstaking but sloppy work.
You can get extraordinary hyacinths with a little imagination.
Take a strip of paper, 5 centimeters wide and 10 centimeters long.
Before reaching the edge, we retreat 1 centimeter and begin to make a fringe 1 centimeter wide.
If you are not sure that you can immediately cut straight, then first draw lines with a pencil along the ruler.
We bend each strip to the edge. We bend in one direction only.
Roll up a tube from a green strip measuring 4*10 centimeters. Fix the edges and the middle of the product with glue.
Now you need to tightly wrap the flower blank around the tube, placing the base on top of each other.
Prepare the leaves and attach them to the base with glue.
Using different shades, you will create a bright rainbow bouquet.
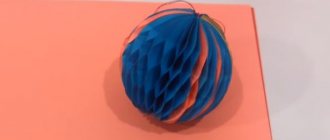
I present to your attention an interesting craft in the form of a ball, which consists of gerberas.
You will need:
- Yellow paper
- coin
- scissors
- glue
The picture shows that a saucer was used to create the circle, but you can also take an ordinary compass or any other round object.
We need to make 8 circles of different sizes.
2 circles with a diameter of 10 centimeters, 2 circles with a diameter of 9 centimeters, 2 circles with a diameter of 7 centimeters and 2 circles with a diagonal of 6 centimeters.
Fold the circles in half to determine the middle. Then, using a coin, we form the petals. We connect their edges to the middle. Determine the center of the flower.
We cut the lines of the petals to the center and bend them along vertically. Glue all the levels and decorate the center of the flower.
Bouquet in a pot - an idea for children
There are unusual ideas for children where you can not only show your imagination, but also decorate the house.
I suggest making an interesting bouquet in a real flowerpot. You can use any store-bought pot, or maybe you have an already used one lying around somewhere.
You can use the bottom of a plastic bottle as a pot and paint it.
A sheet of green paper needs to be drawn in strips 1 centimeter wide and 8 centimeters long.
We cut them to the line and glue the edges.
We place the finished grass in a flowerpot, having previously wrapped it with double-sided tape so that the leaves do not come out.
We cut out the buds and cores ourselves.
Glue the cores in place and go to complete the craft.
I was also impressed by the daffodils that stood on my grandmother’s table during my childhood, only they were made of plastic, but they looked exactly like in the photograph.
Let's start making them. For one flower we will need three levels of petals.
For them, take squares with a side of 6 centimeters.
Fold them in half twice and cut out the petals, not reaching the center 1 centimeter. There should be four petals.
We lay out the flowers and see if all the buds have received petals.
We make a fringe from a strip of corrugated paper, 2.5 centimeters wide and 16 centimeters long. The paper stretches easily, be careful.
We roll up our core and glue it to the bud.
You can stick the finished flowers directly onto the leaves or form a stem from the wire, wrapping it with green paper or ribbon.
Origami flower
Origami greatly develops logic and motor skills. Of course, little children will not be able to fold a piece of paper evenly, but for a schoolchild this is an excellent activity.
Today we will try to make a tulip. Ready? Then make a square out of a piece of paper and let’s start creating.
The diagram shows detailed instructions for folding the sides.
This lotus also looks incredibly beautiful. And it is also made using origami technique. Of course, before everything works out, you will have to puff, this is not a self-sufficient tulip. There are more petals here.
To create this craft, you need thick paper, such as landscape sheets.
First we make blanks. We will need four white stripes, and also take 4 green stripes.
According to this principle, you need to fold all the white and green stripes.
Place white blanks inside each other
Find the middle and sew it on the machine, this way you will fix all the blanks in the center.
Now you need to open the petals.
I think that any girl and even woman will like this decoration.
DIY origami paper flowers: step-by-step photos and instructions for beginners
For those who do not like to cut out and glue flower parts, the idea of folding origami paper in the form of a delicate tulip bud will probably seem very attractive. But since origami is an entire art, it will be quite difficult for beginners to understand how to turn an ordinary sheet of white or colored paper into a tulip. And it is for those children and their mothers who, on the eve of Women’s Day, will make origami flowers out of paper with their own hands, that a step-by-step photo for beginners will be useful, which shows how to fold a flower bud.
The instructions also show the sequence of how exactly you need to fold the green paper to get a stem with a leaf out of it. Therefore, for those who are inspired by the art of origami, in order to make a beautiful three-dimensional tulip on a stem, you will only need two sheets of paper (green for the stem with a leaf and red/pink/yellow/white for the bud) and glue to glue the bud to stem.
How to fold origami paper into a flower: step-by-step photos of turning a sheet of paper into a flower
It is important to remember that the origami technique does not use scissors and glue to fix the folds, since correctly folded figures have the desired shape and do not fall apart on their own. The photo below shows how a tulip bud is folded step by step. First you need to fold a square sheet of colored paper, first along one and then along the other diagonal, to get the result as in photo No. 1. Then you need to follow the instructions and fold the paper along the folds marked on it so that you end up with a tulip flower.
The finished bud should be put aside and take a square sheet of green paper. It should be folded as shown in the photo with step-by-step instructions below. All that remains is to put a tulip bud on the resulting stem and fix it with glue.
The video shows in detail how two sheets of paper are transformed into a delicate and beautiful paper tulip using the origami technique. This video instruction can also be useful for children of primary school age who want to make such a craft for school for a matinee in honor of March 8th.
How to make a bouquet with sweets
Very original ideas are made from candies and corrugated paper. I made it from one that is sold everywhere in office supply stores. But somehow, while watching another master class, I realized that their paper was different! More dense, it holds its shape better.
So, you can use the most affordable paper, but it will be better if you take the trouble and buy the one that florists use. Believe me, the difference is very noticeable.
We will stick candies onto the kebab sticks using tape.
Now you need to prepare the blanks for the rose.
Each top must be bent using a stick or thin rod. It is optimal to use a lollipop handle.
Wrap each candy with the prepared petals.
You will achieve greater similarity if you stretch the paper a little at the place where the candy will be located.
The ends can be tied with thread or secured with tape.
DIY paper flowers - master class showing how easy it is to make paper chrysanthemums
A bouquet of beautiful multi-colored paper chrysanthemums, made by the hands of a child, will delight every mother. From a distance, such a bouquet of paper is indistinguishable from a bouquet of fresh flowers, and it looks especially beautiful if corrugated paper was used to make the petals. But you can also make crafts from ordinary colored paper, but in order for the petals to turn out beautiful and bright, the paper must be double-sided. And how to make such flowers from paper, the master class posted below will tell you.
Paper chrysanthemums - master class for children and adults
On March 8, women rarely receive chrysanthemums as gifts, since these flowers do not bloom in early spring. But if a mother or grandmother loves chrysanthemums more than the popular roses and tulips, a child in kindergarten or school can make just these flowers out of paper. The video instructions show step by step how chrysanthemums are made from paper, and this method is so simple that a 7-9 year old child can handle it. And to make the bouquet truly festive, ready-made chrysanthemums can be tied with a ribbon and a bright bow attached to it.
The simplest crafts made from colored paper
There are always simple and easy product options. So, on my topic, I found just basic steps for making a paper rose. Absolutely any paper is suitable for its creation; you can even use newspaper, thus obtaining a very stylish accessory.
So, we cut an uneven line to the center.
And we begin to roll the entire workpiece into a spiral.
Fix the edges and press the center inward so that the petals straighten.
Everything is ready, adjust the flower a little and run to decorate the room.
I also bring to your attention some interesting tulips.
Each bud is glued together from 4 templates, which were slightly bent in the middle in advance.
Glue the edges, connecting each next template to the middle.
For the rod, you can use terry wire or twist the rod out of paper.
Now the seedlings are ready for planting in pots.
This craft will be much more interesting if you use velvet cardboard or paper of different backgrounds and textures.
Corrugated paper carnations
I also wanted to share some paper carnations with you. Moreover, like most of the crafts considered today, they are made very quickly.
These flowers look royal and can be made in five minutes. Of course, if you collect them in a bouquet, you get a whole gift!
Corrugated paper stretches very easily, so often its top edge is slightly pulled in width. This makes it easier for it to wrap itself inside and form a bud itself.
My dears, these are not all the ideas for paper flowers, but the article turned out to be quite long. If there is something not clear to you in the master classes, then ask questions in the comments, we will understand in more detail.
How to make paper flowers with your own hands to decorate the room and on the wall (templates inside)
Has everyone heard about growing flowers? Today they are often used to decorate events and photo shoots. I couldn’t ignore this topic and decided to share such a wonderful master class with you.
You will need for 7 pieces: 7 rolls of multi-colored corrugated paper + 1 roll of green; metal-plastic pipe 12 m long; 7 wooden sticks; glue gun; 7 packs of glue sticks; scissors.
Manufacturing process:
1. Cut out petals of four different sizes from corrugated paper. For the middle of the inflorescence, you can use a different color - it will turn out more interesting.
2. We stretch the petals with our hands, giving them the desired shape.
3. We stretch everything - both large and small.
4. Their shape may be different, that’s okay.
5. Now you can collect the flower. First we make the core. To do this, glue a wad of paper onto a wooden stick. Like this.
6. Wrap it with petals. We fix each petal with hot glue at the base.
7. This is what happens.
8. Do the same with the remaining petals. You can twist them in different ways - see for yourself whichever you like best.
9. We needed 10 of the smallest petals.
10. Larger petals - 8 pieces.
11. At the last stages, to make it more convenient, the workpiece can be turned over and worked like this.
12. Add the largest petals.
13. It is better to use hot glue rather than PVA: this way you will spend less time and be sure of the reliability of the result.
14. Cut out 5-6 leaves from green paper.
15. We make sepals out of them.
16. Done!
17. Cut off a piece of metal-plastic pipe and give it the desired shape with your hands.
18. We insert our product there and secure it with glue.
19. Decorate the pipe with green paper. These are the different decorations you can make using this step-by-step guide. You can make flowers without a stem, and then they are suitable for wall decoration.
20. You can make double flowers from a long pipe - this also looks very unusual.
Several examples of the use of such decorations.
Would you like to have a couple of these at home?
I think it turns out very beautiful.
And most importantly, doing this is not as difficult as it seems.