Almost everything is ready to celebrate your son or daughter’s first birthday. A plan for the event was thought out, a theme was invented and attributes were prepared to decorate the room. But how can we emphasize that this is the first anniversary? And not just a celebration dedicated to a child. Here the number 1 will come to the rescue. Moreover, it can be used in decoration in the most unexpected way. But large decorative numbers look especially interesting. We will teach you how to make a birthday card with your own hands.
Children's birthday 1 year old: how to use numbers
Let everyone around you at the party just shout that today is your baby’s first birthday. And not only themed decorations, outfits, and treats will help with this. But also the number 1, which can be used in various ways:
- Be sure to add the words “I’m 1 year old” to your holiday garland. Let guests see from the threshold what the holiday is dedicated to.
- It's fun to make hanging garlands with numbers. Decorate each unit in accordance with the chosen theme.
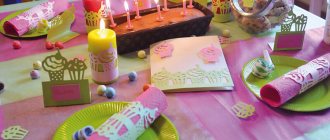
- To decorate dishes, sweets, drinks, use toppers with a picture or in the form of a single.
- Lay out the unit on the wall with balls, bows, or make such a decoration out of paper.
- The photo zone must have a volumetric or flat number, which will later remind you of when the photographs were taken.
And most importantly, a large decorative number, which will practically become the central attribute of the name day. It can be miniature or huge, flat or voluminous.
This decor can be easily ordered or bought ready-made. But a do-it-yourself number for your 1st birthday will look much more interesting. Indeed, in this case, you can take into account the chosen theme, the baby’s outfit, and the size of the room.
And most importantly, preparing for any holiday brings relatives closer and gives it special significance.
The simplest and most cost-effective option for making a three-piece
If you have no talent in needlework or simply don’t have enough time to implement complex designs, then the number 3 made from paper for a birthday is the best option. The appearance of a cellulose product can be completely primitive, or it can be a real masterpiece. 3 options for making paper:
- The simplest option. Make a sketch of the number on whatman paper, paint it with watercolors or gouache, and cut out the blank.
- A number cut out of paper and pasted over with decorative materials will look much more attractive.
- You can make a huge poster on which the three will occupy a central place. The canvas can additionally be used for a photo zone.
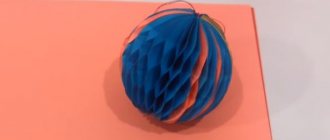
- You can make a three-dimensional figure out of paper using origami techniques and the like.
- Cut out many tiny little hands from colored paper, glue them together, forming the silhouette of a number. The process of tracing the palms and cutting will interest the baby and attract him to work.
A cellulose product can be attached to any element of the interior. The troika can be hung by threads. Decoration features can also be varied. You can make this type of decoration just a few hours before the celebration.
DIY birthday number 1 made from balloons
Kids just love balloons. Even very little ones are delighted with the decor made from balloons.
Moreover, making the number 1 for a birthday from balloons is quite simple.
We offer a master class on making the number 1 from multi-colored balls.
We will prepare all the necessary materials and tools. We will need blue balls up to 10 cm in diameter in the amount of 52 pieces. and 36 green ones of the same size. But it is better to buy balloons with a reserve in case something goes wrong.
To inflate such a number of balloons, it is better to use the simplest pump. This will speed up the process significantly. We will tie the blanks together using fishing line.
We begin the process of making a unit by preparing the basic elements. Each segment will consist of 4 balls.
To do this, fill the balloons with air using a hand pump. At the same time, we control the size of the balls. We tie each ball.
Take 2 balls of the same color and tie them together. Let's make another one like this. We connect the two finished pieces together by twisting them. We've got the basic segment of the craft.
We make the green segment in the same way.
In total, you need to make 9 green segments and 13 blue “fours”.
Let's start making the base of the unit from green balls. We fix the fishing line on the first segment, wrapping it several times between the balls. Now we press the next green segment to it and secure it with fishing line. In this way we connect all the green “fours” with each other.
We cut the fishing line and tie the remaining tail around the balls several times and hide it.
We have the base of the number 1.
We tie a fishing line to the center of the green clearing and begin to attach the blue segments. They will go vertical. In total we will attach 10 blue segments.
From the remaining three “fours” we make the nose of the ones. To do this, we will attach the segments to the side of the vertical part. When we connect all the segments, we pull the edge of the spout to the vertical part. We cut the fishing line, tie it and hide the edge between the balls.
Our unit is ready. If desired, you can decorate it with balls of a different color, from which you can easily make a butterfly, flowers, or ladybug.
In the same way, you can make numbers in a different design.
Non-standard ideas for decorating holiday numbers
When the holiday is planned perfectly, you want to figure out how to make the number 3 for your birthday more original and non-standard:
- Form a silhouette of a number from photographs that were taken during the year. The basis for the product can be a wall, poster or textile fabric.
- Making a base and shape from small balloons. Then the children will be happy to play with creative decorations.
- It’s easy to make a trio of small soft toys. It is enough to sew the animals together with stitches, and then after the holiday, carefully cut the seams.
The principle of creating a composition and the material for this can be found in every home. Such options are universal for both boys and girls. Additionally, you don’t have to think about how to parse the complex structure of the numbers.
Source
Sizes, patterns, decoration options for flat number 1 for birthday
Flat units look original and can be placed on the wall, curtains, simply resting against other decorative elements.
It is enough to decide on the size and height of the workpiece and make a template from paper.
We transfer the finished template onto a cardboard base and trace the outlines with a pencil. Cut out the number along the outline.
The cardboard blank for the festive unit is ready. You can decorate such a blank with anything you like, choosing the design and material to match the overall style of the holiday.
The easiest way to decorate a flat number is to use twine or multi-colored threads, corrugated or colored paper, bright fabric or floral film, flowers or napkins.
These materials are used to wrap or paste over the base.
To give the decoration additional volume, the base is decorated with voluminous flowers, pompoms, and bows.
Volumetric figure 1 from cardboard for birthday
But a volumetric figure will look much more interesting. Her birthday boy will be able to rearrange and play with her. Such a voluminous unit will fit perfectly into a photo zone and into the design of a room or garden area.
To make it, you can use thick foam. But if such material is not at hand, the blank can be easily made from ordinary cardboard.
Even if you don't have large boxes, you can glue the base together from several parts. First, we make two templates for the unit itself.
We cut out the side parts and the base of the number to size.
We connect the blanks together with tape.
The result should be a three-dimensional cardboard figure like this.
Don't be upset that she isn't too pretty.
All flaws and irregularities will be securely hidden under decorative elements. You can decorate such a base with paper umbrellas and flowers, fringe and photographs, felt and thread.
How to decorate one for a birthday
We offer several original options for decorating the number 1 with your own hands from scrap materials. Save these master classes for yourself - they will definitely come in handy for decorating three-dimensional figures for other children's parties.
Number 1 in eco-style made of twine, threads
A very simple option for decorating a flat piece. We will need regular twine and glue.
Gradually apply glue to the cardboard. Wrap the treated area with twine. You can make neat turns, or you can slightly change the angle of inclination. When you have wrapped the glued area, apply glue higher and continue winding the twine.
When you have wrapped the entire piece, leave the number to dry. Almost one is ready. But if desired, the twine can be painted with acrylic paints or decorative elements can be added.
But you can initially use not twine, but bright threads with which we will wrap the cardboard blank.
Number 1 from napkins for a boy's birthday
Make the fluffiest birthday number for your little one.
This will require colorful napkins, a lot of napkins and patience. But the result is worth it.
This decor will be much cheaper than ready-made figures.
We buy several packages of blue or blue plain napkins.
If you want to dilute the blue background with white flowers, purchase napkins of the appropriate color. The numbers with a smooth color transition look very cool. In this case, you will need napkins in blue, light blue, sky and white.
To make napkin flowers, it is better to take single-layer napkins. Without unfolding, fold the napkin twice. It is not necessary to cut the squares; in the future, all folds will be cut off. We fasten the workpiece in the middle with a stapler. You can use regular wire to secure the base of the flower.
Now we cut the square to the size of the flower to make an even circle.
We carefully collect the first layer of the napkin upward, forming flower petals. We perform this operation with each subsequent layer. Once you have lifted all the layers, spread out all the petals.
If you want to make a more magnificent flower, take two napkins. You can also cut the round blank into several petals without cutting to the base.
We decorate a cardboard blank with ready-made flowers. It is better to do this with glue in a gun.
After pasting with napkin flowers, you get a beautiful lush number 1.
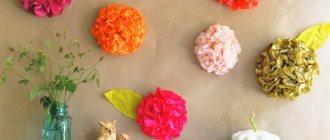
Number 1 for a girl's birthday made of corrugated paper
Corrugated paper roses look great. A number decorated with such flowers will become a chic decoration for the anniversary. You can get creative, experiment with the color and arrangement of multi-colored flowers, or just make a single-color unit.
You will need quite a lot of corrugated paper, and also time to make a lot of blank flowers.
Unfold the paper and cut strips from it. The folds on the workpiece should be located across. The width of such a blank will be 3.5 cm. But decide on the length yourself. It can be 20 or 50 cm. The longer the strip, the more magnificent the rose will be.
We slightly stretch one side of the strip and bend its edge. By stretching the folds you should get beautiful waves.
We bend the edge and form a curl.
We begin to collect the flower itself, for which, holding the edge, we begin to twist a strip of paper around the base.
When the entire strip is folded, the bottom of the flower must be secured with an elastic band or thread.
The first rose is ready. But you need to make another 50, 100, 300 flowers.
We cover the cardboard base of the number with paper.
This will help hide possible gaps that may occur during gluing.
Glue the finished flowers to the base using PVA glue or a hot glue gun.
The result is a beautiful decorative piece that will invariably please the birthday girl.
Other uses for corrugated paper
Don't have the time or desire to tinker with corrugated paper roses? Take advantage of simpler ways to decorate a unit using it.
It is enough to cut multi-colored corrugated paper into squares.
To do this, we fold the blank strips several times and cut them along the resulting folds.
We will get a lot of corrugated squares.
Lubricate the cardboard base with glue. Take a pencil and wrap it in corrugated paper so that the rod is in the center.
All that remains is to dip the bottom of the flower in glue and attach it to the base, straighten the petal edges.
Gradually we cover all the walls of the cardboard blank. Try to ensure that the petals cover the entire surface of the number.
But there is a much simpler way.
We cut long strips of corrugated paper of different colors. We make cuts along the edge of each strip to create a fringe.
We begin to paste over the cardboard unit from below. Glue the first strip of fringe by applying glue to the entire part of the strip.
Stepping back a little, glue the next strip. Make sure that the next fringe overlaps an entire section of the previous one.
We continue to paste over the entire surface of the unit, changing the color of the stripes.
Birthday number 1 made from pompoms
If you have a lot of multi-colored woolen threads at home, you can use them to decorate the number 1. Only this time we will not wrap a cardboard blank, but make pompoms from the threads.
We will need two rings that must be exactly the same size. They can be cut out of thick cardboard.
Put these rings together. We gradually wrap the rings with thread. You can take a single-color thread or threads of different colors.
When the entire ring is covered with threads, cut the threads along the outer edge of the circle. At this stage you need to be especially careful so that the workpiece does not crumble.
We tie all the threads with additional thread, slightly moving the rings apart. Remove the cardboard rings and shake the resulting pompom thoroughly.
We make enough pom-poms from threads to cover the entire unit. In this way you can decorate both flat and volumetric figures.
Corrugated paper craft
First, let's try to make a unit from corrugated paper. For this you will need:
- Graph paper;
- Ruler;
- Pencil;
- Scissors;
- Stationery knife;
- Thick cardboard;
- Scotch;
- Stapler;
- Corrugated paper;
- Glue;
- Paper napkins.
First, we draw the dimensions of our figure. You can use this size as a basis:
Now we transfer our workpiece to thick cardboard.
If you want a stable figure, then make it voluminous (the depth is 16 centimeters). Next, cut out the other side and duplicate all the side parts with rectangles. Tip: make small cuts inside. It should look something like this:
Happened? If yes, then great! But you will still need patience, because difficult things lie ahead. Now we paste the resulting number with tape on the outside. Advice: to be safe, tape it on the inside too. Well done if you managed to do this too.
Now the most interesting work - making flowers! Yes, our unit will be made from flowers. For a boy, you can make blue flowers, but multi-colored ones are also suitable, all to your taste. The flowers themselves can be made very simply.
Take corrugated paper and cut out 25*25 centimeter squares from it. Fold the resulting blanks four times. Then staple these squares in the middle and cut out a circle. Now each layer (with the exception of the first) is carefully lifted and secured. So we have a flower. You can see the result in the photo:
Related article: Beautiful interior design with black and white paintings
For this size of a unit you will need about 340 of these flowers. Don't be afraid that there are so many, because they can be made quickly and easily.
When these blanks are made, glue them to the number with glue.
The reverse side of our gift does not need to be covered with flowers. It’s better to cover it with napkins in several layers.
Our gift for our beloved boy is ready!