Popsicle stick bird feeder
What do you need
- Wooden ice cream sticks;
- paint and brush or spray paint;
- scotch;
- glue gun;
- scissors;
- ribbon or yarn.
How to do
Paint the sticks in any colors and dry. Place several sticks on a straight surface to form the bottom of the feeder. For reliability, secure them with tape.
tCraft YouTube channel
Glue one stick at two edges of the shape opposite each other. Attach another stick at the other edges. Fold a few more rows in the same way. Glue four sticks vertically on the outside.
tCraft YouTube channel
Then make two pieces for the roof as shown in the video. Separately glue two sticks edge-to-edge and glue the made parts to them. Attach the resulting roof to the vertical supports.
tCraft YouTube channel
Place three sticks together and glue another one horizontally in the center. Cut the sticks on three sides and glue the part to the bottom of the feeder. Stretch ribbon or yarn under the roof, tie it in a knot and hang the feeder.
tCraft YouTube channel
You can also build a more durable house from wood. True, you will have to work hard:
Photos of bird feeders made of wood
An unlimited number of ideas makes it possible to make interesting crafts. The beautiful wooden bird feeders shown in the photo will help you decorate your yard and bring joy to your children.
Cuttings of branches will serve as a good decoration for the roof. A bunker feeder made from a glass bottle can be installed as an additional decoration on the table of an open terrace. Birds are more attracted to feeders painted to match the color of grass and green foliage of trees. It is optimal to cover the roof of the house with a non-wetting material, for example, roofing felt. When installed on a pole, create a cross-shaped fastening knot It is advisable to hang a heavy house on a rope so that it sways less from the wind. Elongated houses are suspended with a rope attached to the roof at two points
Feeder made from a plastic bottle with poured food
What do you need
- Plastic bowl;
- scissors;
- awl;
- plastic bottle;
- small tray;
- bolt with washer and nut;
- knife;
- bird food;
- wire;
- pliers.
How to do
If the bowl is too tall, trim the edges. Make a hole in the bottom of the bowl and in the lid of the bottle. Make a hole in the tray where the structure will be installed. Connect the lid, bowl and tray as shown in the video.
Cut a small piece above the neck of the bottle so that food can pass through it. Pour it into the bottle and screw on the cap with the attached parts. Screw a wire to the bottom of the bottle and make a hook out of it. Details are in the video.
Turn the feeder over so the bottle is upside down. The food will gradually pour out of it into the bowl. To add food to the bottle, simply open the cap, pour it in and close the container again.
The bottle can be attached to the board to make it even more comfortable for the birds to sit:
And this video shows how to make a similar design from two bottles of different sizes:
Feeder house made from a plastic bottle
What do you need
- Knife;
- plastic bottle;
- jute twine;
- glue;
- scissors;
- braid;
- lace;
- plastic spoons;
- paint and brush;
- glue gun;
- wooden stick;
- wire.
How to do
Cut two windows opposite each other at the bottom of the bottle. Wrap the bottle with twine, attaching it with glue. Glue braid around the windows and lace at the bottom.
Paint the spoons, dry them and glue them to the top of the bottle as shown in the video. Make a hole under the windows and thread a wooden stick through them. Also make two through holes under the bottle cap, thread the wire, twist and hang the feeder.
You can decorate the house in different ways, for example like this:
Making a bird feeder from a bottle
Every home has unnecessary plastic bottles. Such elements can be given a second life. From a simple bottle you can make a bird feeder - a garden decoration.
Decorated bottle bird feeder
The construction of the feeder consists of the following stages:
- A wide entrance is required. Cut with a sharp knife.
- The edges of the entrance will have to be processed so that the birds do not get hurt.
- It is necessary to provide the feeder with a strong suspension.
Making such a bird house takes very little time. You can feed the birds daily.
Bird feeder made from a plastic bottle
If you want to use the birdhouse as a yard decoration, then it makes sense to decorate the structure. These can be drawings, various inscriptions or bright components.
Laconic bird feeder made from a glass bottle
Bird houses made from bottles in the form of bright lanterns or nesting dolls look great. An unusual decoration for the bottle will be rope weaving, as well as decorations in the form of natural cones.
Log bird feeder
What do you need
- A small log about 40 cm long;
- drill;
- jigsaw;
- 2 wooden disks 2–3 cm thick;
- hammer;
- nails - optional;
- 2 metal hooks;
- large chain.
How to do
Make holes in a circle on both flat sides of the log with a long drill bit. Remove the cut core from the log. Use a jigsaw to cut a hole as shown in the video.
Insert wooden discs along the edges of the workpiece and tap with a hammer. In order for the discs to fit tightly, their diameter must match the diameter of the hole in the log. Instead, you can nail wooden circles to the outside. Then they should be the diameter of the log itself. Screw the hooks on top, attach a chain to them and hang the feeder.
Bird feeder made of plywood and branches
What do you need
- Saw;
- thick and thin branches;
- drill;
- 2 square pieces of plywood;
- self-tapping screws;
- pruner;
- roofing felt;
- construction stapler.
How to do
Saw off two identical sections and two smaller sections from thick branches. You will also need five short pieces of medium-thick branches.
Drill one hole at a time in the corners of the plywood using a thin drill bit. On the reverse side, drill with a thicker drill, but not all the way through. Screw thick branches into the corners, one medium one on one side, and two medium ones on each side. Details are shown in the video.
Weave a fence from thin branches around the screwed bases. Cut off the excess with pruning shears. Make holes in the bottom. Attach a second sheet of plywood on top and cover it with roofing felt.
Attach the bottom of the feeder to a long, thick branch and stick it into the ground.
Making a wooden bird feeder with your own hands
Winter has come, the ground is covered with snow - beauty! But it became not so easy for the birds to find food under the thick snow, so the idea came to make a bird feeder, and at the same time an item for the external interior of the yard.
Of course, you can do it simply - hang the board on ropes, but you need to make something that will also decorate the yard.
Let's get started.
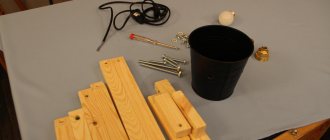
First you need to decide on the material and dimensions. I had leftover plywood - you can make a bottom out of it. Using a carpenter's square, we mark a sheet of plywood. The sizes are arbitrary.
We are preparing the material for the sides of the bottom.
On the miter saw we set the angle to 45 degrees.
Now you need to cut 4 slats of one size, 4 of another, in accordance with the markings on the plywood sheet. To do this, set the emphasis to the required size and cut off the rail. I was not mistaken, exactly 4 slats. The fact is that you will need 2 frames.
After the slats are cut to size, we place them on a sheet of plywood and check them.
If everything fits, apply glue to the sections of the blanks and tighten the resulting frame using a tape clamp.
Now we have free time while the glue dries. You can cut the plywood. You can cut it with a jigsaw, circular saw, band saw, and so on. But you need to cut with a small margin.
It was decided to make the racks in a turning style in “quarters”. We are preparing the material for the racks.
To make “quarters” you will need a strip of the same size with an angle of 90 degrees. We cut the material, set the angle and plan it to the required size in a resmus machine.
After chipping, I got a size of 21x21 mm.
I used two 520mm long slats.
Set the angle to 90 degrees on the miter saw. Set the stop to the required size and cut four slats of equal length.
We fold the slats in such a way that we get a slats measuring 42x42x250 mm.
Using self-tapping screws, we connect the slats together to form a single beam.
We clamp the resulting beam in the centers of the lathe and position the tool rest.
We grind the required pattern. It’s better not to sharpen self-tapping screws!
Six small grooves are made for cauterization. Turn on the machine and use a thin strip to press it against the workpiece in the slot until black stripes appear.
The groove is finished, everything is sanded - the racks are ready. We remove it from the machine.
Now you can unscrew the screws, only before that, at the end of each quarter, you need to put a mark so as not to confuse the top and bottom during the assembly process.
We got 4 identical parts.
In the meantime, the glue on the frame has almost dried, so we begin sanding the plywood.
We apply wood glue to the end of the finished frame and press it with clamps to the plywood blank.
We are waiting for the glue to dry. We place a straight router bit with an upper bearing on the milling table so that the frame serves as a template and the excess plywood is removed.
In the inner part of the corner we apply a 21x21 mm marking and drill a hole for the self-tapping screw exactly in the center.
We install the racks and fasten them to the bottom using a self-tapping screw.
We connect the upper part of the racks to the second frame using glue.
The result was a kind of “mauerlat” on which the roof would be placed.
We prepare the “rafters” and connect them using self-tapping screws.
We install the finished rafters on the mauerlats and fasten them with self-tapping screws.
We cut four slats of the same length to the required size for installation on the rafters. We fasten it to the rafters with self-tapping screws.
At this stage, you can “lay” the roofing material (corrugated sheeting, polycarbonate, etc.), but I decided to make it from wood.
I decided to make the roof from individual lamellas with rounded edges.
To do this, you need to make an exact calculation, depending on the desired number of lamellas and the length of the roof, taking into account the gap.
We collect the required amount of material, calibrate it in width and thickness, and cut it according to the stop.
Since there will be quite a lot of parts, you need to make a template so that the parts are the same.
We install a straight cutter with a lower bearing and process the ends of the workpieces on the milling table according to the template.
These are the blanks we got.
We attach the blanks to the roof rail using glue, nails or self-tapping screws. If desired, we install additional roof elements, think through the fastening, perform the covering, and the work is ready.
I got it something like this:
OK it's all over Now!
Thanks everyone for your attention!
Bird feeder out of the box
What do you need
- Cardboard box (for example, juice or dairy products);
- paint and brush or spray paint;
- scissors;
- wooden ice cream sticks;
- glue gun;
- wooden stick;
- a thread.
How to do
Paint the box any color and let it dry. Cut the wooden sticks in half and glue them to the top of the box. Make the front and back parts of the roof out of them, as shown in the video.
Cut a window in the box, make a hole under it and at the very top of the box. Insert a wooden stick under the window and a thread at the top. Tie it in a knot and hang the feeder.
Edible bird feeder
What do you need
- 7 g gelatin;
- 60 ml hot water;
- 150 g bird food;
- spoon;
- cookie cutters;
- needle;
- threads;
- scissors.
How to do
Dissolve gelatin in water. Add the food and mix thoroughly. If the mixture turns out runny, add more food. Place the food into cookie cutters and compact.
Leave for several hours for the mixture to harden. Remove the figures from the molds, thread a needle and thread through each of them, tie the thread and hang the feeder.
Orange bird feeder
What do you need
- orange;
- knife;
- 4 wooden sticks;
- 2 plastic plates;
- thick needle;
- scissors;
- thick threads or yarn.
How to do
Cut the orange in half and scoop out the pulp. One orange will make two feeders. Pierce each peel half with two wooden chopsticks in a cross pattern.
On each plastic plate, make one hole in the center and four holes opposite each other on the sides. Cut four lengths of thread or yarn and tie each one to a stick next to the peel.
Using a needle, thread the threads through the side holes on the plate and then into the center hole. The plate should be turned down, forming a roof. Level it and hang the feeder by the threads.
The feeder can be simplified by simply hanging the orange peel by threads:
How to make an original bird feeder from wood with your own hands - drawings, dimensions
Bird feeders have long become something more than just a device for feeding them. We admit that we not only want to make life easier for birds, but also to observe the behavior of wonderful birds, decorate our yard, realize ourselves in front of others and teach our children to love this world. If at the same time our wards help in protecting the garden from pests, it will turn out very well.
Bird feeders: what should they be?
When starting to make a feeder, it is useful to remember Exupery’s remark: we are responsible for those we have tamed.
In other words, having accustomed the birds to easy food production, we are obliged to think about them all winter.
Otherwise, they will experience big problems, losing food overnight, and may even die. Now we list a number of characteristics that a poultry canteen must meet:
the bird table must have sides that will prevent the wind from blowing away the food; the craft should not have sharp edges that could injure birds’ legs; a roof over the table will protect food from rain and snow; the feeder should be, if possible, inaccessible to cats; the holes in the walls of the craft must be of sufficient size so that the birds are not afraid of closed spaces; the product must be moisture resistant in order to last at least one season; the craft should not sway too much in the wind, that is, it is better to weigh it down with a piece of linoleum or pebbles.
The birds won't like this feeder.
Bird feeders: what are they?
There are so many people who want to make an exclusive table for birds that they have created an innumerable number of hand-made works. Obviously, everyone's preferences and capabilities are different. We intend to offer you a range of different products with a description of their features and designs. Of course, we will also discuss the wishes of the birds themselves. Putting everything together, you will have the opportunity to compose your own “symphony” called “bird feeder”.
Made of wood - most options
The picture shows feeders made from planks. Depending on preferences and availability of material, you can choose one or another design. The very first option has a twist: a gap on the side bar for water to drain. Any product will last longer if it is treated with impregnation, painted and varnished.
These products are a little more complicated - they are all made of bars and slats. This material allows you to make quite interesting and exclusive options. Pieces of roofing felt on the roof will significantly increase the durability of the craft. The bars and slats can be secured with small nails or glue.
Using tree branches will bring your craft closer to nature. The product can be quite simple and unusual. The use of impregnation and varnish is also advisable in this case.
Feeders made from birch branches look very interesting. Given such material, I would choose this option. Various roof construction methods are possible. Birch bark already has protective functions, but varnish will not hurt.
The photo shows several feeders for mounting on a wall or to a tree trunk. They all have a back plate with a hole for fastening. You can independently make options of varying complexity. The glass jar feeder is very simple and easy to use.
The photo shows surprisingly simple and original wood structures. It’s quite possible to make such feeders yourself. Treatment with protective impregnation did them good.
Carved products are fraught with considerable possibilities. However, in this case it is difficult to do without a jigsaw. A piece of galvanized steel on the roof is correct. Treatment with a blowtorch will give the product a special color. It is simply necessary to protect a product on which a lot of time has been spent from moisture.
The images above show a selection of products made by professionals. All parts of the feeders were first processed and painted, and then assembled into a single structure. As a result, we have impeccable appearance and durability. Nothing prevents you from repeating the same thing!
The photo shows feeders that will decorate a mansion of any level with their presence. Probably, such products are made by specialists in a workshop. I am sure that if you set a goal, it is quite possible to repeat the elite version yourself.
In the photo above we have selected the most interesting ideas for wood feeders. They differ in materials and design. Moreover, it is quite possible to make such products yourself.
Made from plywood – its features and capabilities
Here are several designs of plywood feeders. There are quite a lot of products made using this technology. The parts of such feeders are cut out on a machine and sold in stores in the form of sets. Crafts are assembled easily and quickly. A set from the store is interesting and useful to process and paint to your taste.
These products are made in a workshop from thick plywood. The designs are assembled from simple parts and can be easily replicated yourself if you have a jigsaw. Clean plywood clearly requires coating and decoration.
It is much easier to make a plywood feeder using bars and slats. In this case, you can do without a jigsaw. The designs shown in the picture are different, but simple.
Plywood feeders using wood are quite popular. We demonstrate several more possible options. Simplicity of execution cannot create barriers to exclusive options if creative people get down to business.
The picture above shows evidence of the effectiveness of using paints in making a feeder. In the hands of craftsmen, fairly simple products can easily turn into fabulous attributes. In this case, desire is more important than the inclinations of an artist.
Especially for those who want to make a feeder from plywood and blocks, we have prepared product drawings. All parts are numbered for convenience. To assemble the feeder you will need 4mm thick plywood, a block with a cross section of 20x20mm and wood screws.
Here is a drawing of the parts of the feeder. The number of the latter is given in the table. The cross-section of the 20X20 bar is not shown in the drawing.
From bottles - simple and reliable
Very often bird feeders are made from plastic bottles. This is due to the availability and durability of available materials and ease of manufacture. Transparent plastic bottles allow you to easily observe the behavior of birds.
The sharp edges of the plastic must be treated with electrical tape or a PVC tube cut along the length. Then the birds will not injure their legs and plumage. Light bottle feeders should be weighted with pieces of linoleum or pebbles to prevent them from swaying in the wind. The image above shows the simplest options. Read about how to paint plastic bottles in a special article.
Containers made from automobile fluids make it possible to obtain more reliable and voluminous structures. Unfortunately, they are not transparent. In feeders made from any plastic containers, small holes should be made in the bottom to allow water to drain.
Five-liter eggplants can be decorated beyond recognition. Burlap, twine, washcloth and small twigs will do. To prevent beauty from fading quickly, it is necessary to use moisture-resistant materials and glue.
As you can see, there are plenty of options for decorating feeders made from five-liter bottles. Show your imagination and make it your own and unique. Don't forget about the reliability of the design.
In the photo above there are several more typical techniques for using plastic bottles:
In the first picture, two holes were made in the bottle opposite each other, closer to the neck. A stick was inserted into the holes - a stick. A hole for food was made just below the perch. It should have optimal dimensions: the seeds do not spill, but are accessible to the bird. Then they poured in the food, turned the container upside down and secured it to the tree. In the next image, the role of dispensers and shelves is played by the two upper parts of the bottles, tightly inserted with their necks into the holes on the sides of the main bottle. The lower edges of the specified parts are bent and turned inward so that the birds do not injure their paws. The picture on the left below shows the possibilities of using paints. The simple, tasteful design brings the technical transparency of plastic to life. The presence of wooden spoons helps to call the birds for dinner. They are simply threaded through the holes in the bottle. It is better to place the spoons at an angle so that two birds can eat at once. The holes for food above the spoon should not be too large so that the food does not spill out all at once.
Made from cardboard and bags - cheap and cheerful
Bird feeders made of cardboard and cardboard boxes are the most unreliable. But you can make a large feeder and decorate it as you wish. You can increase the service life of a cardboard bird canteen by covering it with tape or film.
We recommend: How to make a garage from sandwich panels: how to make a garage yourself with a description of step-by-step actions
Dairy and juice bags are a good way to make feeders. They cost nothing and have good moisture resistance. Of course, bottles are more durable, but bags are easier to work with. You have several options for execution.
Made and written with your own hands. Author: Miroshnikov A.P.
We decided to make a fun and simple feeder from a 2 liter juice carton. The idea came up to feed the birds on a makeshift bus. The master class on assembling the craft is quite simple:
Use a marker to mark the windows of the bus. We leave a gap of 2 cm between the windows, 1.5 cm above them, and 3 cm below them. We cut out the windows with a sharp knife. On the top plane we make four holes for attaching pendants. We insert two pieces of soft wire into the holes on the roof. We tie the ends of the wire with a knot to secure the latter. We take four caps from five-liter bottles, make holes in them and screw them to the body of the craft with screws. For reliable fixation and protection from sharp protrusions of screws from the inside of the craft, you can add caps from ordinary plastic bottles. Then we screw the screws into them through the wall of the bus. In the same way, we screw another white cover in front - the headlight. To ensure that the headlights are the same, we screw the same screw into the standard cover on the box.
Unusual – bunker, transparent, designer, funny
Of particular interest to us are bunker feeders, which provide automatic feed supply as it is consumed.
This way, bird food is not blown away by the wind, and we do not have to constantly monitor the availability of grain. The design of such a feeder can be very different, but the essence is the same: through a hole of a certain size, food pours in from above and replenishes the bird’s table. In the above examples, the dispenser is:
gap between two glasses; narrow neck of a glass bottle; holes at the bottom of the plastic bottle.
We have already considered similar options in the description of feeders made from plastic bottles. Based on these principles, you can certainly come up with something new.
Feeders using plexiglass look elegant. Birds and food are clearly visible. The design approach makes you want to repeat a successful experiment.
I don't want to throw away the rest of the tea set. Here are four options for using dishes as a feeder. The moisture resistance and appearance of the material are beyond doubt. Securing a cup or teapot in the garden is not difficult.
Particularly persistent and talented home-made people create funny feeders - jokes. We must be determined to repeat the best examples. It’s especially nice to compose something of your own.
To begin with, you can try a simpler option made from plastic bottles. Much depends on the materials you have at hand. The above examples are quite subject to female hands.
Here are four options for a “male” cool wooden feeder. The design of the crafts is quite obvious. Repeating the proposed ideas is a very real task.
Here are images of several more options for unusual bird feeders. The main idea is obvious: don't be afraid to experiment. It’s easier not to torment yourself with searching for exactly the same materials, but to use existing ones.
Let's make a feeder together - a snowman from a plastic bottle
Made and written with your own hands.
Of course, I want to make a bird feeder simpler and more interesting. It seems to us that a snowman with gifts from Santa Claus for the birds is a suitable option. The master class for making crafts is as follows:
On one side of the bottle we mark the snowman's mouth with a marker. Now this wall will be the face. We cut out the outlines of the mouth according to the markings. Bend the resulting tongue down 90 degrees. On the side we mark the ear in the form of an inclined oval, narrowed at the bottom. Cut a hole simulating an ear. Place the resulting piece of plastic on the other side and outline it with a marker. Cut out the second ear. Mark a large rectangular hole at the back of the head and cut it out. The result was a blank, as in the photo above. Paint the snowman's cap the same blue as the bottle cap. Paint the bottom of the eggplant with white paint. We paint the tongue with red paint. We put a plastic corrugated tube with a diameter of 16mm on the edges of all holes. In an electrical goods store, 2m of such pipe will cost absolutely nothing. We first cut the tube along its entire length. To weight the container we use linoleum. Place the container on it and trace it with a marker. It is better to cut out two such parts. We prepare plugs, screws, a sealant cover and a stick in accordance with the picture. We make holes in the corks for screws. We make a hole in the red cork for the stick. We make two holes to install the nose stick. We punch one at the place of the nose, the other at the back of the head. We insert a stick into them. We first put the red plug on it, and then the sealant cover. The result is a snowman's nose. We collect the eyes from small white and large blue caps. We screw them into place with self-tapping screws. From the inside, we screw two more covers onto the protruding screws to securely fasten the eyes and protect against sharp screws. All is ready!
Master class on making a classic feeder
Made and written with your own hands.
At school, my youngest son was encouraged to make a bird feeder. The following materials were found:
painted galvanized corner 50x50mm; wooden slats with a cross section of 20x40mm; a piece of plywood 4mm thick.
From which it was decided to compose my work. The sequence of the master class is as follows:
two rectangles measuring 22x34cm were cut out of plywood for the ceiling and floor and two more rectangles measuring 23x37cm for the roof; Four supports 18 cm long were cut out of the slats; two sides measuring 23cm and two sides measuring 37cm were cut out of the corner; all wooden and plywood parts were painted in two layers; all parts were fastened with self-tapping screws, as in the photo; The result is a bright and reliable bird feeder.
Cereal biscuits for birds
Sometimes you can do without creating a feeder to help the birds. You can hang special bird cookies on tree branches. Note that bird cookies made from grains look so tempting that I would eat them myself.
The first way to make a delicacy is as follows:
prepare molds for making cookies; place pieces of twine in the molds that will serve as pendants; dissolve the gelatin packet in warm water; pour grain feed into the prepared solution; pour the mixture into the prepared molds; place the food in the refrigerator to harden; We hang the finished cookies on tree branches: accessible to our eyes and out of reach of cats.
In the absence of forms, beautiful food for birds can be made in another way:
cut out figures of various shapes from cardboard; we make holes in the cardboard blanks, thread twine through them and tie rings for fastening on the tree; to attach the food to the cardboard, we prepare special glue, which consists of an egg, a spoonful of honey, 2 tablespoons of oatmeal and flour; mix the mixture and leave to mature for half an hour; When the glue is ready, lubricate the cardboards with it and roll the latter in bird food; send the semi-finished product to the refrigerator to harden; When the cookies are ready, we hang them on the tree and go to the window to observe.
Bird food: “what is good and what is bad”?
Take a close look at the birds that have remained to spend the winter in our area. The hope was frozen in their eyes that we would not give them an “expired product” or harmful food for them, from which the birds would suffer. Let's remember what we cannot treat our charges to, what should never be included in their diet:
salted and fried seeds; cream puffs and cake; fresh white bread; Rye bread; nuts; chips; cereals; leftover bananas and other citrus fruits; fresh fruits.
Fortunately, the range of possibilities is much wider. Birds can be offered:
bread crumbs; sunflower, pumpkin and watermelon seeds; cereals: oats, wheat, millet, barley; rice, buckwheat; unsalted lard especially for tits; viburnum and rowan, maple and ash seeds especially for bullfinches.
Eggshells, coarse sand, and crushed chalk will serve as seasoning for birds' dinner, especially during the nest-building period. Thus, we know almost everything about bird feeders and bird food. By the way, observing the behavior of birds in spring and summer is no less fascinating than in winter. We wish you good luck and offer a video to help.
Source: SamoDelino.ru