Required tools and materials
Imitation stucco Decorative plaster Stencils Water-based paint Photo stickers Dyes Sponge Rubber spatula Liquid nails Glues Scissors Paint rollers Spray gun Brush Show all
It’s enough to learn how to decorate the ceiling with your own hands to make your own home beautiful and truly original. Now there are many ways to fashionably and interestingly decorate any ceiling surfaces.
- 2 Imitation stucco - exquisite surface
- 3 Decorative plaster - we make a chic ceiling ourselves
- 4 Stencils - any paintings on the ceiling surface
- 5 Decor with appliqués and photo wallpapers - original and beautiful
- 6 Painted options - chic and shine
- 7 Decorating suspended ceilings - features and tips from the pros
Technologies and options for finishing the ceiling with your own hands
Let's look at ceiling finishing technologies that you can do yourself
Each finishing technology has its pros and cons. Therefore, there is no better technology, and we will list the main options for finishing the ceiling and describe their advantages and disadvantages, touch on the technology and you will find out how and with what to finish the ceiling, and whether you can do it yourself. We will also definitely consider what preparation is needed for each type of finishing, because sometimes it is important not to overdo it, and sometimes, on the contrary, you need to do it efficiently.
Do-it-yourself whitewashing of ceilings
Simple whitewashing of ceilings is considered quite popular; it was especially popular before, before the advent of water-based paints. This method is quite simple, beautiful and cheap. However, this option is increasingly becoming a thing of the past, as it cannot meet modern finishing requirements. In addition, whitewashing allows you to get only white ceilings, which often, but not always, suits the basic design of the room. Therefore, despite all the advantages, we will postpone whitewashing until later and talk about it in more detail → in one of the following articles.
I recommend: How to insulate a log house from the inside
Nowadays, whitewashing more and more often means painting the ceiling with water-based paints, which is not entirely accurate.
DIY ceiling painting
Painting the ceiling - a classic finish
Better than whitewashing would be painting the ceilings with special water-based paints. This method of finishing the ceiling is popular and considered a classic. In addition, this allows you to get exactly the colors that are needed to complement the interior of the room. And the choice of colors here is truly huge, but it also has its drawbacks. As in the case of whitewashing, even a small leak from neighbors living on the floor above forces the ceiling to be completely redone. Yes, and whitewashing and painting are only suitable for perfectly smooth and well-plastered ceilings.
If you decide to paint or whitewash the ceiling, you will need to make the ceiling as perfect and even as possible. If this is not done, all the small nuances will be visible on the painted ceiling. The smallest flaws will be hidden, but those that are a little larger will be visible.
So, in order:
- Cleaning the base.
- Primer with deep impregnation soil.
- Puttying. If the ceiling is relatively flat, if not, it needs to be leveled and plastered.
- Skinning.
- Primer.
- Painting.
The choice of paint is your choice. We can recommend using water-based, imported paints, but this is a topic for a separate article. Read more about the choice of paint and painting the ceiling in → a separate article on the site, it will tell you how to paint the ceiling with your own hands in detail.
Polystyrene foam (foam) ceiling tiles
Expanded polystyrene tiles are a fairly common type of DIY ceiling decoration. This method is popular because of its simplicity; often the base is not even leveled under it, but simply glued onto an uneven ceiling, but such a finish does not look particularly beautiful.
Pasting the ceiling with polystyrene foam tiles is a popular way to decorate the ceiling with your own hands
The advantage of such tiles is that the base practically does not need to be leveled and cleaned. Even on a ceiling painted with oil paint, if you use good glue, you can glue such tiles. Due to its “weightlessness”, it hangs there for decades.
Minuses:
- There is a fire hazard, but the tiles themselves are not enough.
- The finish is somewhat not modern, but in some cases you can get an excellent result, especially if such tiles are painted with water-based emulsion.
Read more about laying foam tiles on the ceiling in → a separate article on the website, where it is described in detail about finishing the ceiling with such tiles.
Modern polystyrene foam tiles are a beautiful solution for finishing the ceiling
Decorative plaster on the ceiling
The ceiling can be decorated with decorative plaster and doing it yourself is quite simple. There are various options for finishing the ceiling with decorative plaster.
The video below shows the simplest and cheapest option.
The ceiling only needs to be plastered, leveled a little, sealed at the joints between the slabs and puttied in at least one layer, even without putty. The composition is applied as shown in the video. The solution is applied with a trowel and then a pattern is formed on the peel. Next, the ceiling is sanded and the hanging parts are cut off. The ceiling is painted with water-based paint.
The putty (the finishing putty is used) can also be applied with a roller with an ordinary plastic bag wrapped around it. The package method is faster and easier.
A cellophane bag is placed on a roller to create a textured decorative surface.
Another option for decorative ceiling plaster is “Venetian”. The video below shows this process in detail.
A special composition for decorative plaster and wax are used. Such materials are not expensive, they do not present any particular difficulty in the work, but they require good preparation of the ceiling, its puttying, and sanding.
Below are some photographs of decorative plaster that you can do yourself. There will be a separate article on decorative ceiling plaster on the website, where the technology and options for creating decorative plaster on the ceiling will be described in detail.
Ceiling decoration with liquid wallpaper
Liquid wallpaper is a material that can be applied not only to walls, but also to the ceiling (there is an article on the website that describes in detail → how to apply liquid wallpaper to walls, be sure to check it out if you are interested in this type of ceiling decoration). They are also called silk plaster.
I recommend: Wooden swing gates on a metal frame with an electric drive of 180 degrees
Liquid wallpaper is a natural material consisting of a fabric-cellulose base (silk, cotton and cellulose), a dye and an adhesive component. Sometimes glitter is added to them.
The ceiling needs to be carefully prepared; the surface must be at least level. If you have a ceiling with differences of more than 1 cm by 2 m, such a finish will not look good, and there won’t be any, if not suspended structures that simply create another ceiling under your ceiling.
Also, small cracks or dents are not scary, they will be covered with the composition.
The two videos below clearly show how the ceiling is finished with liquid wallpaper.
Several photographs-examples of finishing the ceiling with liquid wallpaper
Wallpapering the ceiling
Ceiling decoration with ordinary wallpaper is also quite popular. Which is not surprising, because they are beautiful, have a huge range of colors and textures, which allows you to choose exactly what you need. Wallpaper can be glued to surfaces that are not too smooth, especially thick textured wallpaper, which can be glued directly to the plaster, although the surface will need to be well prepared before gluing the wallpaper to the plaster.
In any case, the surface (base) must at least be level. And as smooth as possible. The thickness of the wallpaper determines how the surface needs to be prepared, or more precisely, whether it really still needs to be puttied and sanded, or whether it can only be leveled with plaster.
→ Gluing wallpaper on the ceiling is more difficult than on the walls; follow the link to find out how this is done.
Wallpaper on the ceiling can also be painted; by covering the ceiling with wallpaper with elegant patterns and painting it, you can create an unforgettable classic interior.
Ceiling finishing with PVC panels
You can use PVC panels to decorate the ceiling with a length that is enough for the panels themselves; they come in lengths of 3 m. There are 2 ways to attach the panels to the ceiling. They can be glued directly onto a leveled base, onto plaster, or with a preliminary arrangement of a frame made of wooden profiles or gypsum plasterboard profiles.
In the case of gluing directly to the ceiling, the base must be plastered, that is, leveled. You can glue it with super strong water-based glue. Additionally, the edges can be nailed with staples from a construction stapler if there is a layer of relatively soft plaster.
In small rooms where they are most often used (bathrooms, toilets), guides from the starting profile (especially for panels) can be installed around the perimeter of the room.
A variety of designs and colors allows you to realize the most vivid design fantasies.
Ceiling decoration options
Every home has interior elements that immediately catch your eye. They should always look perfect, because they cannot be hidden. One such element is the ceiling surface. Even the smallest defect on it can ruin the impression of a high-quality renovation of the room.
You can easily find exclusive materials for finishing the ceiling and give it a sophisticated look. But their cost is usually considerable. Don't despair. It is not difficult to decorate the ceiling surface in a high-quality and unusual way and on a small budget. Next, we will talk about how to breathe new life into your ceiling at minimal cost and make it original and the envy of everyone.
Exclusive materials for ceiling finishing
You can decorate the ceiling using the following methods:
- imitation stucco;
- painting;
- stencils;
- special plaster (decorative);
- applications;
- photo wallpaper.
We will tell you in more detail about all these methods of inexpensive ceiling decoration.
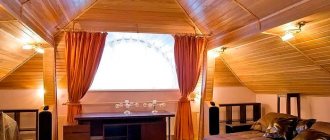
Stretch ceiling
Glossy stretch ceiling in the kitchen
Excellent stretch ceilings provide a smooth, even, solid surface, which looks especially fantastic in a glossy finish. In addition, it is waterproof , which guarantees protection of the interior in the event of a roof leak in a private house or a flood in the upper neighbors in the apartment.
The water won't pass!
The only significant disadvantage of this option is its high cost , which starts at 650 rubles per square meter. And, believe me, taking into account thousands of nuances, it will ultimately come out definitely higher. In addition, it is better to entrust the installation work here to specialists, since mistakes you make due to inexperience will be very expensive.
Installation of a suspended ceiling by a professional worker
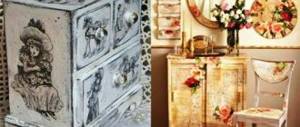
Imitation stucco – refined surface
Stucco gives any room a sophisticated and rich look. This natural material is made from gypsum. The disadvantage of stucco is that not every home craftsman can correctly apply it to the surface being treated. You have to call a specialist and pay for his expensive services. Not everyone can afford it.
An alternative to gypsum stucco is polyurethane elements, which are characterized by low price, increased moisture resistance, good flexibility and low weight.
Polyurethane stucco elements
And most importantly, you can easily install such an imitation of natural material yourself. Decorating the ceiling with polyurethane stucco is most often carried out using the following decorative elements:
- Sockets - they are placed in areas where ceiling lighting fixtures are installed.
- Moldings come in a variety of types and geometric sizes. These elements are designed to mask the gaps between the walls and the ceiling surface.
- Borders are ornamental details that allow you to create beautiful and unusual images on the ceiling.
Polyurethane stucco molding is fixed to surfaces using liquid nails or special glue. All work on decorating the ceiling in this case takes a minimum of time. And you don’t need to seek help from specialists at all. All activities are done with your own hands.
Decorative plaster - we make a chic ceiling ourselves
Another way of high-quality decoration of the ceiling surface is plaster mixtures. They are structural and textured. The former can be used to decorate walls and ceilings. Structural type plaster is sold in the form of a white mass that can be used without additional preparation. The finished mixture must be applied evenly to the surface to be decorated, and then given the planned relief.
All work is carried out with a plaster roller, a special type of spatula and special combs (the latter are needed to obtain the desired “picture”). If you want to make not a pure white ceiling, but a surface painted in any color, you should add color to it before applying the composition. It’s easy to get any pattern on the ceiling using a decorative plaster mixture - geometric patterns, imitation of marble, natural stone or wood.
Drawing on the ceiling using a decorative plaster mixture
It is worth noting that the use of structural plaster by untrained people sometimes causes certain difficulties. If you are not confident in your abilities, it is recommended to use textured compositions. When using them, a relief on the ceiling is formed when the mixture dries without human intervention. Working with textured plaster is really simple:
- apply the mixture with a spatula to the ceiling;
- wait a couple of hours, watching how your ceiling is transformed;
- paint the surface after it is completely dry in the desired color.
You get an exquisite ceiling!
Suspended structures (suspended ceilings)
A suspended ceiling can be both the basis for finishing and the ceiling itself, that is, there are essentially two types of suspended ceilings:
- Designs of ready-made prefabricated ceilings, like slats, Armstrong, tension - a type of suspended structures.
- And suspended ceilings can be a frame or a base that is subject to further finishing, for example, a plasterboard ceiling, which itself is a suspended structure designed to define the geometry of the ceiling and requiring further finishing. Another option is when a frame is assembled from plasterboard profiles or wooden slats and the finishing is done, in principle, to suit every taste according to the frame/slats, with any panel or sheet materials, such as PVC or wood.
There are several suspended structures, the most common are:
- A plasterboard ceiling that is painted or finished with some kind of finish.
- Slatted ceiling (usually installed in bathrooms, less often in kitchens).
- Stretch ceiling is a type of suspended structure.
- Armstrong.
The “Armstrong” type ceiling is a classic of suspended ceilings.
It is quite possible to make a slatted ceiling from suspended structures with your own hands → make a slatted ceiling (the link tells you how to install it). You can also install a tension one, but only a fabric one, which does not require heating.
Stretch ceiling
A stretch ceiling is, in fact, a type of suspended ceiling structure, consisting of guide rails around the perimeter of the room and a fabric: fabric or PVC. More often, PVC sheeting is used, which is heated by a gas heat gun and stretched over slats. As it cools, the canvas contracts and, in fact, stretches, forming an even and elastic ceiling.
Fabric sheets do not require heating and can be installed independently; this is discussed in the article → about installing a fabric stretch ceiling.
Stretch ceilings are considered a classic in modern times; they are inexpensive and protect against leaks from above. Compared to the “plaster + putty + paint” complex, stretch ceilings are cheaper. Installed by craftsmen in a matter of hours (2-3 hours per room).
Behind them, like any other suspended ceilings, you can hide communications: ventilation, electrical, etc. In suspended ceilings you can install lamps of almost any shape and size, from spotlights to wide rectangular and round shapes, as well as any chandeliers; they are attached not to the ceiling, but to the base (ceiling).
I recommend: Is it possible to reconstruct an adobe house with a basement and mezzanine?
The only negative is that it can be easily pierced.
Slat ceiling
Slatted ceilings are a suspended structure consisting of a frame and slats. The frame is mounted on the existing base (ceiling and walls), the slats are inserted into guides along the perimeter of the room and snapped onto pre-installed stringers (combs, tires - other names).
The panels of this ceiling are made mainly from aluminum or plastic. Installation of a slatted ceiling can be mastered quite quickly without any experience. The kit comes with instructions, and how to install a slatted ceiling → is written on the website, read it if you are interested.
Armstrong
Having previously been a “ceiling for offices,” today the Armstrong-type ceiling has acquired new colors. Thanks to transparent panels, patterns and working with lighting, you can create truly beautiful ceilings. There will be a glowing ceiling or sky above you.
Armstrong is a frame that is attached to the base and panels/sheets are laid on top in grooves on the frame.
Plasterboard ceiling
As mentioned above, a plasterboard ceiling is not an independent finish; a frame of almost any shape and size can be constructed from it. All curved, wavy, multi-level ceilings - all this is made from plasterboard on met. profiles. In the future, the ceiling is finished at will with almost any finish described above. There is an → article on the website about installing plasterboard ceilings with your own hands.
Stencils - any paintings on the ceiling surface
Stylish people who want to radically transform their home can be advised to use self-made stencils. With their help, you can draw any image on the ceiling.
Making stencils and then using them is very simple. The algorithm is as follows:
- Draw a pattern or image on a sheet of plastic or thick paper.
- Cut out the drawing you made.
- Apply the cut out stencil to the ceiling surface and apply paint (use acrylic compounds).
Drawing on the ceiling through a stencil
Painting the ceiling is done using a regular sponge. The disadvantage of using homemade stencils is that the quality of the resulting drawing is not always good. But they can be used to decorate uneven ceilings. When decorating ceilings with stencils, it is important to choose the right theme for the design. Professional designers advise decorating ceiling surfaces in children's rooms with images of toys and cartoon characters, in the bathroom - sea waves or fountains, in the living room and hall - animals or trees.
However, the choice of design depends solely on your preferences and ideas about beauty. Imagine!
Decor with appliqués and photo wallpapers - original and beautiful
Independent decoration of children's rooms and bedrooms is often done with appliqués. They make the little ones’ personal space fabulous and unusual. Vinyl stickers are usually used as applications. Such decorative elements will make the ceiling look original, and will additionally mask any stains or small gaps on the ceiling.
Vinyl stickers
Applications are easy to make yourself. For example, from polystyrene foam, plasterboard or high-density paper. But in this case they will have to be put on glue once and for all. But vinyl stickers can be removed at any time and other pictures can be placed in their place. These stickers are good for decorating suspended ceilings. But we'll talk about this later. You can also simply decorate the ceiling using photo wallpaper. At the moment, this is perhaps the most popular option for decorating ceilings. Manufacturers produce photo wallpapers on different themes and subjects. It will be easy for you to choose the perfect pattern for any room in your home.
The most popular photo pictures for ceilings are products that depict space, cloudy or starry skies, vegetation (crowns and branches of trees), sunset or dawn. In children's rooms, photo wallpapers with fairy-tale characters will look chic, and in the bedrooms of young people - products with 3D graphics or abstractions.
Advantages and disadvantages of different finishing options
The choice of how to decorate the ceiling depends entirely on your imagination and capabilities. Any design solutions, no matter how bold they may be, will perfectly complement the overall interior of a nursery, bathroom or hallway, if you adhere to the basic design style and take into account the functional features of the room.
When choosing a method for finishing the ceiling, also take into account the complexity of the work, the overall cost of finishing work and the performance characteristics of the selected material.
Bleaching
The traditional way to finish a ceiling is to whitewash it, when the surface is covered with a special solution of chalk or lime. The result is a snow-white ceiling if no color is added to the solution, which is suitable for absolutely any interior style. Which color of the whitewashed ceiling is preferable, the saturation of the shade can be decided during the work; perhaps a brighter shade will be better for the nursery, and snow-white for the bathroom. The main advantage of this type of design is the low cost of material and minimal costs for finishing work. There is no need to invite a specialist to whitewash the ceiling; you can do the work yourself.
This method has many disadvantages. Firstly, it has a short service life - less than 2 years. Secondly, complex preparatory work - the surface must be leveled and plastered. As a result, you need to get a monochromatic surface, for which the solution is applied very densely, in several layers. What can we say about intolerance to water - any evaporation leads to loss of appearance.
Whitewashed ceilings look more familiar in the kitchen or bathroom. But it is precisely because of high humidity and high temperatures that whitewashing ceilings will quickly lose its attractiveness.
In the kitchen, such a ceiling will quickly turn yellow from the abundance of fumes and absorb all the odors. In the bathroom, excess moisture will lead to the formation of damp spots, dampness and mold. Whatever interior style is used for a children's room or bedroom, a light, whitewashed ceiling will always be appropriate and relevant.
Related article: Natural wooden ceiling in the house
Coloring
The most popular method of finishing the premises of a house or apartment, be it the ceiling in a nursery or bedroom. Allows you to implement a wide variety of design solutions, combine different shades to highlight or emphasize an area in a room or interior features. From a technological point of view, whitening and painting ceilings occurs in the same way. But it is much easier to care for a painted surface.
The disadvantages of painting the ceiling also include a short service life, complex preparatory work and the possibility of cracks and chips on the painted surface.
For rooms with unstable temperatures and excess moisture - such as kitchens and bathrooms - it is better to paint the ceiling. Since both the kitchen and the bathroom are most often small in size and the unevenness of the ceiling is not too noticeable, preliminary leveling may not be necessary. And all the irregularities will be hidden behind the original painting. But for a child’s room, a painted ceiling is most preferable - it can be washed if necessary.
In the children's room, bedroom and living room, you can make a combined ceiling design. Decorate part of the surface with a suspended plasterboard ceiling, and paint the rest of the space in a single color. It’s up to you to decide what the ceiling will be like in these rooms, but you shouldn’t paint it completely in one color. Whatever the idea, the living room is always a spacious room. Use your imagination, decorate the ceiling with bright colors, rich drawings or paintings. In the bedroom you can use pastel shades and create a sophisticated design. And what kind of theme can you come up with for decorating a nursery, using rainbow-colored ceilings or creating magical figures above your child’s bed!
Wallpapering
Using wallpaper to decorate the ceiling is an original way to decorate the interior of a room. There is no special type of wallpaper for covering the ceiling. Therefore, it is recommended to use denser wallpaper in light or beige colors from paper options. The ideal option would be non-woven wallpaper for painting, then you can change the design of the room without re-gluing the ceiling and this is very convenient for a children's room.
This finishing option is cost-effective, since the cost of wallpaper is low, and apart from glue and a roller, you don’t need anything else for the job.
The main disadvantage is the difficulty of doing the gluing work yourself. You will need at least one partner. In addition, the service life of such material is quite short and after two to three years you will have to re-paste it. And this is not the only negative. Paper wallpaper requires certain room conditions - a minimum of moisture, drafts, heavy fumes or strong odors. Before pasting, it is better to make the surface smooth, otherwise all the irregularities and flaws will become visible. As an alternative, use liquid wallpaper. They are applied to the ceiling in the form of a decorative plaster layer, which means that the surface itself does not need to be leveled beforehand.
Wallpapering the ceiling is relevant for living rooms. But this option should not be used for the bathroom and kitchen. And within a month the wallpaper will begin to peel off, swell from moisture and eventually fall off completely, but it will be quite appropriate in a nursery.
For the bedroom and children's room, use wallpaper with a neutral pattern. And for the living room, silk wallpaper in bright colors with an original pattern is suitable.
Ceiling tiles
Until recently, the adhesive method of decorating the ceiling with special tiles made of PVC or polystyrene foam was the most popular. Various in shape, embossed or with a glossy surface, in various color variations, ceiling tiles have conquered more than one heart and the ceiling of a consumer’s home.
Related article: How to create the perfect stretch ceiling in the hall
To apply tiles, you do not need to specially level the surface. Thanks to their volume and relief, they will hide all imperfections and visually make the ceiling even.
The weight of the tiles is very light, and a minimal amount of glue is used for gluing, so you can handle the gluing yourself. The cost of the material is low and the tiles are easy to care for.
The disadvantages include the material’s dislike of direct sunlight, which causes the tiles to quickly lose their color. In addition, it is impossible to hide communications and wires under such tiles. If desired, ceiling tiles can be painted in different colors and this is a good option for a children's room. This type of design can be done in any room, even in the bathroom and kitchen. The unpretentiousness of the material and ease of care contributed to its popularization.
Suspended structures
One of the popular types is the suspended ceiling. For it, you can use panels made of plasterboard, PVC or wood materials; tiles with a mirror surface or lining are rarely used.
This type of finishing is ideal for an apartment, private house or office space. Does not require preliminary leveling of the surface.
A suspended ceiling involves the use of any decorative material that is installed on a metal profile structure. You can not only hide all communications and wires, but also decorate additional lighting in the room in an original way. The suspended ceiling is based on the metal profile structure itself, and the material must be selected taking into account the specifics of the room. For example, decorative panels made from wood materials are often used for the living room. This ceiling design option will highlight the classic interior, especially if the living room is dominated by furniture made of noble wood.
Drywall . Using this material, you can create structures of varying complexity and functionality with smooth shapes and circles, in several steps and tiers. The main advantage of a suspended ceiling made of plasterboard is the low cost of the material and the ease of installation of the slabs. The main disadvantage is that you won’t be able to create a complex shape or multi-tiered structure yourself; only an invited specialist will solve the problem.
Related article: Chandeliers for suspended ceilings - tips for choosing
Metal plates or cassettes. The material is reminiscent of ceiling tiles - it can have a smooth or embossed outside, plain or painted in different colors. Caring for a suspended cassette ceiling is easy - the plates can be easily removed and wiped with a damp cloth. Calmly tolerates temperature changes and high humidity. The specific gravity of cassette elements is light, despite the fact that they are made from an alloy of various metals. The main disadvantages are high cost and low level of sound insulation.
Rack plates. For suspended slatted ceilings, aluminum or steel plates are most often used. Due to its elongated shape, this ceiling is recommended for small spaces to visually enlarge the room. The material is lightweight and easy to install and maintain. Color variations and various reliefs on the surface of the plates will harmoniously fit into and complement any interior. The main disadvantage of a slatted ceiling is that the plates are too thin. Over time, under the influence of various factors, they can become deformed. Since the slatted plates are very long, access to communications that are hidden by the ceiling structure is difficult.
Stretch ceiling
Stretch ceilings are still the most expensive option. Their design, shape and construction vary in complexity and execution. Multi-tiered structures, in the form of a tent or arches, with artistic painting or photo printing - it all depends on your capabilities and imagination. If you can still install a suspended ceiling yourself, then for tension structures you need a specialist and knowledge of the characteristics of the material with which you will have to work. In addition, it is somewhat more difficult to maintain such a ceiling.
Due to their quality characteristics, suspended ceilings are the most profitable design method. They are not afraid of moisture and fire, are waterproof and very durable. They can be used for any type of room.
High price and complex installation work are the main disadvantages of a stretch ceiling. In extreme cold, the tension material loses its elasticity and may rupture. And the intense heat causes the fabric to stretch too much and sag.
Video gallery
Photo gallery
Painted options - chic and shine
If you don’t want to use photo wallpaper because of its high price or because it doesn’t fit with the design of the room, try decorating the ceiling surface with painting. As a rule, it is performed in the center of the ceiling, as well as in the corners of the room.
Decoration of the ceiling surface with painting
The easiest way to paint is using stencils, which we have already talked about. But you can do it differently. Let's say you want to paint clouds on your ceiling to give the room a special lightness and airiness. Do it like this:
- Using a paint brush or spray gun, treat the ceiling with water-based blue paint. It should be applied as evenly as possible.
- Wait for the ceiling to dry (it must be completely dry).
- Paint the surface again.
- Again, wait for it to dry, and then draw clouds on a blue background. For these purposes, use a sponge rather than a brush. Dip it in white water-based emulsion and draw clouds using gentle, pointing movements.
In a similar way, you can paint the ceiling on other topics. Anyone can do this kind of work. Even those who consider themselves very far from creativity.