Features of the threshold between laminate and tiles
Taking into account the design intent, the areas where floor coverings join can have different shapes and be located in certain parts of the room. For aesthetic reasons, they are often hidden under interior doors in the areas where two rooms meet. This option is the easiest to implement; it is designed as a threshold.
There is a scheme in accordance with which the joint lines are given a complex shape or significant length, which is then used for zoning. It is advisable to use a joint without a threshold.
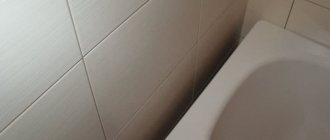
Important! The threshold for the junction of tiles and laminate smoothes out differences, since the materials have different thicknesses and certain installation features.
An important feature that needs to be taken into account when arranging the threshold is the different mechanical and physical properties of the materials. Laminate can increase in volume in case of fluctuations in humidity and temperature; such changes are not typical for tiles. To avoid deformation and other problems, a small gap is left between the materials when laying.
Laminate is hygroscopic, so its joint with tiles must be treated with a special compound - sealant. For the same reason, ceramic cladding is made. To ensure that the rubber threshold between the tiles and the laminate lasts a long time and does not deform, the materials are trimmed before its installation. When the joint line is straight, there are no problems; no adjustments are made. If the joints have bends, adjustment is required. All the necessary cuts are made for it, the tool is a manual or electric jigsaw.
When decorating interiors, joints between different flooring materials must be properly sealed.
Joining two coverings located at the same height
Depending on how the preparatory work was carried out after laying the floor coverings, two situations may arise. First, there is no difference between the coating levels. The second is one of the decorative coatings after being laid above the other. The first option is the best.
Having determined the joint line, it is necessary to begin laying the decorative coating. It is better to start with laying ceramic tiles. In this case, work begins precisely from the joint line. If you start laying tiles from any other place, then when you approach the joint line, you will have to trim the tiles. This will emphasize the transition between the tile and the laminated board, which is extremely undesirable. The laminated board is also laid from the joint line.
Related article: How to make a coffee table from chipboard with your own hands
After laying decorative flooring, you will need to seal the gap that will inevitably form between the tiles and the laminate. If the installation work was carried out carefully, then the width of this gap will not exceed a few millimeters. Therefore, it will be enough to treat it with mastic, silicone sealant or construction foam.
In the end, you will get a neat, almost invisible (if decorative material of approximately the same color was used) joint. But, if it is necessary to replace one of the coatings, both will have to be dismantled. This is the only drawback of this method of joining laminated boards and ceramic tiles without a threshold.
It is fashionable to make curved joints, to create which you need to arm yourself with cutting templates. Moreover, templates for cutting tiles cannot be used for laminate and vice versa.
You need to start work by creating a curved line template. Experts recommend drawing a curved line in such a way that there is no need to trim small corners of decorative floor coverings. It is very difficult to do this accurately. After creating the template, you need to lay the solid ceramic tiles on the floor. Then, according to the templates, you need to cut off the pieces that form a curved line.
To avoid confusion, you can number these pieces. Next, you need to put the pieces in their places and look at the resulting result. If you are satisfied with it, then you can begin installation. The adhesive solution is applied so that it extends 5-7 cm beyond the tile.
After the glue has dried, you can proceed to the next stage of creating a curved joint without a threshold. If the result does not suit you, then you should think about the feasibility of a curved joint. Maybe a straight joint would look much better?
After finishing working with ceramic tiles, you need to start cutting the laminated boards. In this case, each lamella is trimmed separately. The resulting joint can be sealed with silicone or lath.
Related article: Volumetric wallpaper with 3D effect
But, due to the fact that the wood that is part of the laminated board can expand or contract under the influence of the external environment during operation, defects may appear at the joint. The gap between floor coverings, which after installation was only a few millimeters, can increase to a centimeter.
The second option is that the laminated board may swell. Both the first and second defects will spoil the appearance of the floor covering, and the joint will have to be redone. To avoid this, it is advisable to use a cork expansion joint when making a joint.
Types of thresholds for laminate and tiles
Various inserts between tiles and laminate are available for sale. Each species has its own characteristics and physical characteristics.
Aesthetics and functionality are what ensure the right junction
Flexible threshold for laminate and tiles
The soft threshold for the transition of laminate to tile comes with glue on the back side. It is easy to install, but not the most durable. Procedure:
- Unpack the product, measure a fragment of a given length, cut it off.
- Mark the area where the threshold will be placed, draw a contour - this will allow you to fix it exactly in the central part of the joint.
- Cut a strip of paper down the center.
- Carefully remove the protection and re-glue the threshold to the base.
You need to remove the paper before gluing the threshold.
Flexible solutions provide some scope for action
Multi-level threshold between tiles and laminate
This profile for joining tiles and laminate is used when creating curved joints. Each individual part has a protection in the form of a bar, a base. The permissible difference in height is within 0.9 mm.
Installation procedure:
- A joining seam is marked on the base.
- Create a seam and attach the tile to accurately follow the contour of the first line.
- The base of the flexible finished profile is laid along the outer parts of the tiles and secured with self-tapping screws. If there is a need to use dowels, the work will become more complicated. In this case, holes are first made, plastic parts are then inserted into them, and the base is secured.
The laminate must be laid, precisely following the course of the joining lines. The outer parts of the coatings are treated with pre-prepared sealant - this is a mandatory requirement. Upon completion of the work, the cover (or cover) is returned to its place. You will have to apply a certain amount of force, tapping the joint with a mallet or pressing the structure with your palm.
Differences between materials are acceptable, but they should not be more than a centimeter
Hidden threshold between tiles and laminate
The hidden connecting threshold for laminate and tiles in the form of the letter H is arranged according to the following scheme:
- The plank is carefully turned on its side, then inserted under the nearest crusts so that the laminate goes into one groove of the threshold and the tiles into the other. This way the transition will be neat and functional.
- The seam in the tile area is sealed with grout, and a sealant is used under the laminate.
As a result, one side of the letter “H” is held by a hook from below the covering, the upper part is laid on top of the flooring like a metal threshold of a simple design.
Installing the thresholds is simple; you can do the task yourself
T-shaped threshold between tiles and laminate
A profile for connecting tiles and laminate in the shape of the letter T is the best option for arranging a straight or curved joint. The plasticity of the metal and the special shape of the edge allow the product to be bent exactly as needed.
Important! Another popular type of threshold is in the form of the letter G. The differences from the T-shaped one are minor.
Work order:
- Calculate the installation height of flooring materials (both). It is necessary that it matches, otherwise the decorative layer will come out sloppy.
- Mark the seam area in the base area, measure, then cut the profile, bend it, if necessary, compare the results with the joint.
- Lay the tiles and lay a threshold in the joint area. The fastening plates must be under the cladding.
- Start laying the laminate, pushing it to the side of the threshold.
Be sure to plan the gap. The easiest way would be to attach masking tape to the edges of the laminate, then assemble a common threshold and hide it under the threshold, taking into account the markings.
Normally, if the work is carried out carefully, the joint is virtually invisible
Metal threshold between tiles and laminate
Transitional thresholds between laminate and metal tiles are suitable only for direct joints; there are no restrictions in terms of the levels of coatings. Suitable for decorating materials in the area under the door. Colors, textures, height, width of elements may vary.
Method of work:
- Calculate the length of the threshold, trim the part.
- Mark points at the joints where holes for fasteners will then be made.
- Drill holes and install liners in them.
- Attach the threshold to the screws, act carefully so as not to bend the parts.
- For a screwdriver, the torsion should be small.
In order to prevent dust and debris from getting under the thresholds, the edges of the latter are treated with sealants before installation.
Proper execution of work is the key to the durability of the finished coating.
How to join laminate and tiles without a threshold
If you have started a renovation and are going to replace the flooring in your apartment, you will probably encounter the problem of joining different surfaces:
- laminate and tiles;
- parquet boards and tiles;
- solid board and marble, etc.
Even laminate with laminate or parquet board with parquet board sometimes has to be joined.
There are several options on how to do this:
- overhead aluminum or plastic thresholds;
- silicone sealant;
- “liquid” plug;
- cork expansion joints.
Since most people want to get a joint between tiles and laminate without a threshold, and the use of liquid materials requires certain skills, we will dwell in more detail on cork expansion joints .
Cork expansion joints are used when joining parquet, for example, to tiles. This is an ordinary strip of cork, which is inserted into the joint, then sanded along with the parquet and hidden with varnish. However, when using such expansion joints with laminate, parquet boards or other floor coverings that have already been treated with a protective layer, certain inconveniences arise.
An unprotected cork, firstly, becomes dirty and, secondly, begins to crumble over time, as a result of which the joint becomes less attractive and more noticeable. In this case, it is advisable to use varnished cork expansion joints .
Such expansion joints are already sold tinted in various colors and varnished, as a result of which you can choose an expansion joint that matches the color of your floor covering and will last for many years.
Laminate is an inexpensive floor covering, which is why it is very popular among people. Using the example of joining laminate flooring to tiles, we will tell you how to install such cork expansion joints. Since in most cases laminate is laid in a “floating” way, there are certain restrictions on the use of these expansion joints. Due to the fact that the cork expansion joint does not hold the edge of the laminate adjacent to it in any way (unlike the overhead thresholds, which everyone dislikes so much and which everyone wants to get rid of), it must be glued to the base. Because of this, it is not recommended to use cork expansion joints if the floor area under the laminate is more than 25 square meters. If your house or apartment does not fit these restrictions, then you can safely install a cork compensator.
First of all, you need to make sure that the tiles and laminate will lie in the same plane; you need to think about this in advance, even before laying the floor coverings. Then you need to measure the thickness of the cork expansion joint and lay the laminate with the appropriate gap. You need to make sure that the gap between the coatings is of the same thickness along the entire length of the joint. If necessary, you can trim the expansion joint from the bottom to the desired height. Then parquet glue is applied to the joint and a compensator is installed. Make sure that the expansion joint does not protrude above the laminate.
If your parquet or solid board is varnished, then the technology for installing the compensator will remain the same. If the parquet board is laid with gluing, then a cork expansion joint coated with varnish is the only correct option for joining floor coverings.
So, once again the step-by-step installation guide:
- Make sure that the edges of the tile are smooth and that it is in the same plane as the laminate;
- Pre-measure the thickness of the cork (depending on the batch, it can vary within 0.2 mm);
- Cut and install laminate with appropriate spacing;
- Be sure to glue the edge of the laminate adjacent to the expansion joint to the floor;
- To protect against moisture and dirt, treat the edge of the laminate with joint impregnation or sealant;
- If necessary, trim the expansion joint from the bottom so that its height and the height of the laminate are the same;
- Apply parquet glue into the gap between the laminate and the tiles, then glue the expansion joint flush with the laminate and tiles;
Cork expansion joints have two significant advantages compared to overhead thresholds (plastic or aluminum):
- They do not protrude above the floor surface
- There are no extraneous sounds when you step on the threshold.
For advertising purposes:
Residents of Russia and the countries of the Customs Union can order tinted and varnished cork expansion joints on the website https://probka.com.ru, and residents of Ukraine can order expansion joints on the website https://probka.kiev.ua. We came up with these expansion joints and were the first to produce them all over the world. We use the highest quality materials - Portuguese cork and Swedish two-component water-based polyurethane varnish BONA Traffic. There are always 10 basic colors available, plus the ability to produce expansion joints in individual colors and sizes.
Which threshold is better between tiles and laminate?
There are different types of joining thresholds for tiles and laminate flooring; to choose the best option, you need to decide why exactly it is needed. The main options are camouflage at different levels, zoning, protection from damage, and so on.
Important! Thresholds emphasize or hide the joints between different materials - depending on the design idea.
The following parameters are also taken into account when choosing:
- Seam configurations - any thresholds are suitable for straight joints; for curved joints only flexible plastic or metal ones are suitable. The depth of the joint also plays an important role - for small parts, they take parts with internal flat parts and attach them directly to the seam. In this case, the optimal solution would be a self-adhesive threshold for laminate and tiles.
- Manufacturing materials, they can be different, most often they use plastic and metal, less often wood.
- Fixation methods - open or closed. For open ones, take self-tapping screws, the heads of which will be visible. For hidden ones, decorative overlays should be used.
Be sure to consider the dimensions of the products.
Thresholds can hide differences or emphasize joints
How to install a threshold between tiles and laminate
The plinth between the laminate and the tiles is installed according to the instructions:
- The type of joining materials should be determined before laying the screed, so that in the future the levels will be the same.
- For laying on the finished screed, height differences are removed using adhesive for installing tiles.
- To disguise a joint with a significant difference, multi-level profiles are used.
- If materials are laid in a floating manner, take iron thresholds in the shape of the letter T. When the area is small, both coatings are rigidly fixed in the joint area. Compensation gaps are allowed strictly under baseboards.
- Thresholds can optionally be matched to the shade of the floor covering.
- For pruning, you should use high-quality, high-precision equipment; if necessary, you should turn to professionals for help.
The configuration of the site is not important. The accuracy of the connection depends on the technology of the work, and not the type of substrate.
Important! Joints of complex configurations are difficult to make; professional help is needed.
This is what an unformed joint looks like
Joining tiles and laminate without threshold
The joints are also designed without thresholds. The main ways to do this are:
- Inter-joint grout. The option is affordable and easy to implement. It is used during installation, as it is completed. The gap between the materials is filled with a special grout of tile joints; the height differences between the coatings should be insignificant (or better yet, absent altogether). Then the joint line is marked on the base and the tiles are laid taking it into account. The laminate is trimmed and silicone is applied along the edges. The joint is filled with the prepared compound, wait for the sealant to dry, put grout on top and level it.
- Cork compensator. A precise strip of cork (compensator) is placed between the materials inside the gap. The method is suitable for straight or bent joints. It is desirable that the coverings have equal height, otherwise the joint will be unaesthetic. For work, use a compensator, the top of which is finished with a protective varnish composition. Standard length expansion joints are only suitable for processing straight joints in the door area. In other situations, their length is short, which necessitates the need to splice parts and order large elements. When carrying out work according to the scheme, first one type of coating is made, usually tiles, the edges are sanded, unevenness, dirt, dust are eliminated, a compensator is put on if the coatings and parts are of different heights, the cork is trimmed. The compensator is glued, pressed tightly to the edges, then bent a little, sealant is applied, and pressed back.
- Cork sealant. The work on creating a joint is similar to grouting; the seams are filled with a sealed cork compound with crumbs. After complete hardening, a good elastic joint will emerge. The advantage of this method is that there is no need to apply sealant separately along the edges; the cork already has the necessary properties. There is only one drawback - the seam dries out and turns brown. Cork sealant is sold in tubes. It is inserted into the gun and then spread over the surface. If this approach is inconvenient for some reason, the sealant is placed in a container with a spatula. Over time, the composition deteriorates and will need to be renewed.
If you do the work according to the scheme, the joints will be no less reliable than the threshold ones. When choosing the optimal option, you should take into account the features of materials, design, and other parameters of a particular object.
Non-threshold joints are also a working option, their reliability depends on the chosen method of work
Joining coatings of different heights
Due to the fact that laminated boards and ceramic tiles have different thicknesses, a height difference may form at the joint. The situation is aggravated by the fact that ceramic tiles are laid on an adhesive composition, the thickness of which is several centimeters. And if an engineered underfloor heating system is being installed, then the height of the floor after installation rises by 5-7 cm. What to do in such cases?
Related article: How to make a TV antenna with your own hands: for the garden and at home
As an option, you can make a step, which will serve as a transition from one decorative coating to another. Of course, this option cannot be called optimal. But with a height difference exceeding 7-10 cm, there are simply no other options.