In the photo: Bathroom design with beige and brown tiles
Finishing a bathroom with tiles helps achieve two main goals: to give the space an aesthetic appearance and to protect the floor and walls from moisture. Today, there is simply a huge selection of tiles on the finishing materials market. The cladding options offered by manufacturers differ from each other not only in color scheme and design, but also in manufacturing technology. Bicottura, monocottura, mosaic, porcelain tiles, clinker, metlakh, glass and mirror tiles - you can find all these types of tiles on the market today. Each of these types of tiles has its own characteristics. Thus, monocottura, unlike bicottura, is more durable, and therefore it is often used in floor finishing. Mosaics are usually used to decorate some furnishings: countertops, furniture aprons.
In today's review, we would like to bring to your attention a selection of photos of bathroom interiors with tiles. All design projects were developed by specialists from the Fundament Group of Companies.
Bathroom color palette
If you look at the photos of recent years, you can see the prevalence of such a modern idea of design and decoration of bathrooms as the use of light beige tiles. This trend is not accidental. Beige, being as close as possible to the skin tone, is very harmonious in rooms for water procedures. In addition to light tiles, coffee-colored tiles are also popular. And when mixing light colors with black or dark blue, interior designers manage to create contrasts. To make a monochrome interior seem more attractive, experts combine tiles with different patterns and textures in one room.
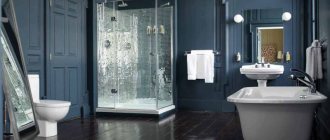
Blue and white monochrome
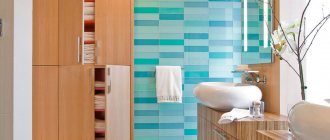
In the photo: Bathroom design with tiles
The interior of this bathroom with figured forging in the finishing of the sink stand and shelving is imbued with Provencal charm. And we owe this effect not only to the mirror in a fancy baguette, but also to the tile itself. Blue and white striped tiles are used in the design and decoration of the bathroom. The upper part of the room is lined with light polka dot tiles, which disguise the tiled texture as cozy chintz or cute paper wallpaper. The interior is close to the classic “checkerboard” monochrome. Only instead of black, dark blue is used here.
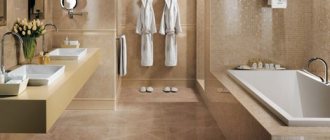
Shades of cappuccino in the lining
In the photo: Bathroom design in cappuccino shades
Cappuccino shades, like the entire coffee range, are an excellent solution for renovating and decorating a bathroom. After all, this range is associated with the morning, and therefore a contrast shower surrounded by such shades will be the best start to the day. The decoration of the bathroom in the photo above combines large tiles with a floral pattern and the now popular mosaic tiles. In the shower area we can also see a plain lining. However, all the tiles used are made in the same color, which creates a monochrome space.
Matte gray shades in the bathroom
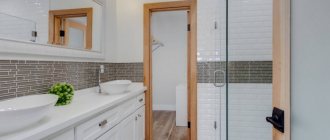
In the photo: Finishing the bathroom with matte gray tiles
Matte blue-gray tiles in a bathroom will look impressive in certain lighting. For example, in the example shown in the photo above, spot ceiling lights give the walls some volume, emphasizing their texture. In finishing the area with the mirror and sink, relief tiles are used to help outline the boundaries of the functional area.
Tiles in champagne shades
In the photo: Decorating the bathroom with light tiles
Decorating a bathroom with champagne-colored tiles is often used in design projects for apartments and houses in the neoclassical or art deco style. If you combine matte and glossy beige tiles in a room, you will be able to create a very elegant festive atmosphere. The presented bathroom project with a shower cabin combines pearlescent glossy and patterned beige tiles. Vignette patterns give the interior composition a classic feel. And the glossy texture of the finish allows you to visually increase the space.
Black tiles
In the photo: Design of a modern bathroom with black tiles
Black tiles are commonly used in modern or art deco style bathrooms. It can only be used in large bathrooms. Moreover, it is highly desirable that the room also has a window. After all, black color, as you know, can visually reduce space. The modern minimalist bathroom in the photo acquired a brutal “masculine” character precisely thanks to the dark tiles in the decoration. A white console, a light curtain and even an elongated mirror help to dilute the dark monochrome.
Finishing a bathroom with shower
It is important for tiles in the shower area to have particularly high resistance to moisture. It is also worth considering that the tiles in this area should be easy to clean, because you will have to wash drops of water from them quite often. Tiles in the shower area can also be used to decorate the rest of the walls of the room. However, designers often choose tiles for this area that are different from the main one, which become decor or a color accent.
Floral pattern
Pictured: Bathroom design with floral tiles
The design of a bathroom with a shower in the photo involves the use of four types of tiles in the decoration. The floor is tiled with alternating brown and white triangles. To create the main background in the bathroom interior, large beige tiles were chosen. The shower area is decorated with small tiles with a mosaic pattern. The same finishing material, along with mosaic tiles, is also used in the decoration of the arched niche. Thanks to the inclusion of green patterned tiles in the decoration, the interior acquired a bit of Moroccan charm. The arched shower doors trimmed with golden slats only enhance this effect.
Crystal drops
In the photo: Bathroom interior with brown tiles
Crystal drops on invisible threads in the shower are the same as streams of water captured by macro photography. This “water” decor creates interesting optical solutions in the interior. It is universal, as it can be used in almost any modern interior and even in design projects in Art Deco and Art Nouveau styles.
Sand pebbles and tiles
In the photo: Design of a modern bathroom with shower
Do you want to feel like a guest of an ocean lagoon when taking a shower? Then decorate the area with a pebble mosaic shower. As an alternative, you can also use textured tiles. The interior in which pebbles are used looks more natural, acquiring eco-style motifs.
Tiles in the bathroom in the attic of a private house
Bathrooms in the attics of a private house usually look not so much like bathrooms, but like cozy home rooms with curtains, paintings, and sometimes even TVs and poufs for relaxation. In order to give these spaces a Provencal charm, interior designers try to limit themselves to a minimum of tiles. Only part of the walls can be finished with tiles. It is recommended to simply paint the remaining space.
White bathroom
In the photo: Design of a white bathroom in the attic of a private house
The design of a bathroom with white tiles in the attic of a beautiful country house, thanks to the floral pattern on the tiles and plants in pots, acquired eco-style motifs. The lights directed at the sloping ceiling are designed to visually “raise” it. A translucent lemon-colored curtain brings a sunny mood to the room.
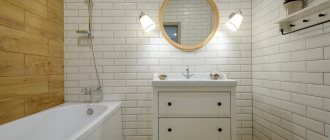
Fashionable white brick tiles
In the photo: Bathroom design in the attic
And in the design of this bathroom you can clearly hear echoes of Provence. White tiles stylized as brickwork, matte blue-gray walls, wicker laundry baskets, a wooden cabinet under the sink, a white curtain on the window - all these furnishings “work” to remind you of the Provençal holidays, warmed by the rays of the gentle sun.
Decor in a tiled bathroom
Decor is what gives the interior composition completeness, emphasizes its style and simply serves as a decoration for the space. In the bathroom interior, decorative functions are performed by lamps, mirror baguettes, vases and textiles. If space allows, you can use decorative installations and even sculptures. Of course, the choice of decorative design is determined by style. Thus, minimalism will strive to create interesting effects through the play of textures, limiting itself to only a couple of decorative elements. But Baroque will require frescoes, gilding or stained glass inserts.
Sconce in the form of candlesticks
In the photo: Design of a neoclassical bathroom with tiles
Sconces similar to candlesticks are used, as a rule, to decorate neoclassical bathrooms. The beige interior shown in the photo with mosaic tiles is a modern interpretation of the classic theme. The elegant sconces in this example are complemented by crystal pendants and placed in the area above the sink.
Chandelier with crystal pendants
In the photo: Design of a large bathroom with shower
A chandelier with a cascade of crystal drops often “accompanies” Art Deco interiors. The bathroom interior design project in the photo was no exception. The monochrome bathroom with shower is decorated with chocolate-colored tiles. Tiles of different textures are combined in wall decoration, which creates an additional decorative effect. The chandelier, reminiscent of water drops in slow motion, creates an interesting play of light and, along with the original heated towel rail, similar to an installation in a modern art museum, helps to give the composition a unique look.
Decorative curtain
In the photo: Bathroom design with a curtain
A curtain in the bathroom is one of the main trends in bathroom design in recent years. Textiles make a space more comfortable. In the bathroom design in the photo, the light green curtain is “echoed” by mosaic tiles in the decoration of one wall. This repetition in color creates unity.
Crystal curtains
In the photo: Bathroom design with tiles and crystal curtains
Crystal curtains, along with beveled mirrors, are “fighting” for the right to be called the main elements of Art Deco interiors. In the bathroom, such curtains can be used as a partition or to frame the bathtub. The design of a bathroom in the Art Deco style with a podium suggests using beige mosaic tiles in the decoration, which combine glossy and matte fragments.
Laying tiles on walls
How to lay tiles in the bathroom can be seen in the video, which will be interesting to both professionals and beginners. However, it would not hurt to describe the process in more detail. After leveling and priming the walls, it is necessary to properly prepare the glue so that the tiles last a long time.
Glue preparation
In order for the tiles laid in the bathroom to last longer, you will need to use tile adhesive. It is sold in stores in the form of a dry mixture, which only needs to be diluted with water, following the instructions on the package.
It is especially important to monitor the amount of water so that the consistency of the adhesive solution does not turn out to be too thin or thick. There should also be no lumps, the mixture should be evenly stirred. For convenience, use a drill with a special attachment, since mixing the glue correctly with your own hands is very difficult and time-consuming.
Wall marking
You need to start laying tiles in the bathroom by marking the walls so that the rows are strictly parallel to the floor. To control this, you need to apply horizontal markings along the walls; it is along these lines that subsequent rows of tiles will be aligned.
The marking line must be strictly parallel to the floor. For accuracy, use a level to ensure the line is perfectly straight.
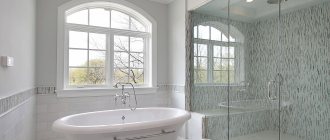
Types of bathtubs in modern bathrooms
Some interior design clients make do with compact shower cabins in modern-style bathrooms. However, as before, the circle of people who cannot imagine their life without a classic bath is very wide. And manufacturers of plumbing fixtures and bathroom furniture today are doing everything to please both of these categories of buyers. Bathtubs are selected based on the configuration, dimensions and style of the room. So, in small bathrooms you can often find corner models that help save space. In large bathrooms, on the contrary, the bathtub is often installed in the center of the room.
Claw foot bath
In the photo: Bathroom design with a claw-foot bathtub
Bathtubs on golden “lion’s” feet have long ceased to be an attribute of exclusively Empire interiors. They are used in vintage and classic bathrooms. If you want to purchase such a bathtub, then you can include mirror-glossy mosaic tiles in the decoration of the room.
Corner bath
In the photo: Bathroom design with tiles and corner bathtub
Corner baths, due to their configuration, take up minimal space. They are most often used in the interiors of apartments in a modern style. The streamlined shapes of such corner models guarantee you the safety of taking water procedures. Due to the absence of sharp corners, such bathtubs are often recommended for children's bathrooms.
Bathtub on a podium with steps
In the photo: Bathroom design with a podium and tiling
A plunge pool built into a podium with steps will transform an ordinary bathroom in a city apartment into a presidential suite in a five-star hotel. Mosaic tiles are often used to decorate such a bathroom. The presented bathroom was also decorated with figured railings. The decoration of the podium steps combines brown and beige tiles. Chocolate-colored mosaic is repeated in the decoration of the built-in niches.
Bathtub with podium in bay window
In the photo: Bathroom design with a podium in the bay window
Bathrooms with a bay window can be designed and implemented in the interior of beautiful modern apartments in luxury residential complexes or in country houses. In the bay window area of the bathroom you can install armchairs and even a couch with a dressing table, thereby turning the bathroom into a boudoir. However, in the bathroom in the photo, the designers installed a podium with a bathtub in the bay window. This will allow you to take a bath while enjoying panoramic views from three windows. The same coffee-colored mosaic tiles are used to decorate the podium.
Bathtub on a wooden stand in the center of the room
In the photo: Bathroom design with a bathtub on a stand
A modern bathtub with a streamlined and slightly elongated oval shape is an ideal solution for a bathroom interior in a modern or loft style. It can be installed on a low wooden stand even in the center of the room. This is exactly what the designers of the Fundament Group of Companies did when working on the interior in the photo. To finish the bathroom in this example, large tiles with a texture close to concrete are used. This finishing material is ideal for decorating a loft-style bathroom.
Built-in bathtub with stained glass
In the photo: Design of a bathroom with a built-in bathtub
The advantage of a built-in bathtub is that it takes up less space compared to island models. As a rule, this model is equipped with a classic curtain or a transparent sliding partition. However, in our example, the designers decorated the built-in bathtub with an arched stained glass window, which brought a little oriental touch to the space.
Advantages and disadvantages
Tiles are a leader among other finishing materials for bathrooms and toilets, due to their aesthetic advantages and durability.
| Advantages | Flaws |
| The market offers a large assortment of tiles and porcelain tiles of different price categories, shapes, and designs. | Laying tiles is a labor-intensive process that requires skill. If the work is done poorly, ceramic cladding can go “in waves”. |
| When finishing with tiles, the level of the floor and walls is leveled. | Over time, mold and fungi may appear at the joints of elements. |
| Ceramic is easy to care for and retains its bright color and gloss for years. | Tiling will make the walls 1-1.5 cm thicker, which will reduce the area of the bathroom. |
We invite you to familiarize yourself with bathroom furniture in white lilac color
Types of tiles for finishing bathrooms and toilets
When creating a bathroom interior, tiles can be used for finishing:
- walls;
- ceiling;
- gender;
- podium steps with bathtub;
- furniture.
Depending on what specific surface you want to tile, the choice of tile will depend. Of course, a lot is determined by the chosen style.
Large tiles and brickwork tiles
In the photo: Bathroom project with large tiles
The combination of large rectangular tiles with texture and small tiles stylized as brickwork is a classic solution for any bathroom interior design in a city apartment or a minimalist house. This finish allows you to get a lightweight version of the industrial loft.
Floral ornament
In the photo: Bathroom with tiles with a floral pattern
Inserts made of golden tiles with a black floral pattern are good in modern classics and art deco. And as the main finishing material you can use large beige tiles with stains.
Hexagon shaped tiles
In the photo: Bathroom interior with rhombic tiles
The hexagon-shaped tiles resemble the honeycombs and mosaics of a children's kaleidoscope. In the design of this bathroom, such tiles occupy part of the floor, giving way to wooden parquet.
Stenciled tiles
In the photo: Decorating a bathroom with tiles with stencils
You can diversify the interior of a children's bathroom with the help of drawings, which are easiest to do with a stencil. In this black and beige Art Deco style bathroom, the degree of severity of the space is greatly reduced thanks to the small silhouettes of dogs.
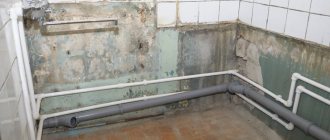
Identification of difficult areas and preliminary preparation of walls
The installation of tiles in the toilet and bathroom is preceded by preparation.
If you need to redo an old renovation, preparatory work should be done before purchasing the finishing material. During dismantling, difficulties may arise that increase the duration of the repair, and it will not be possible to eliminate them urgently.
Remove all furnishings from the room, close the water supply taps, and dismantle the plumbing fixtures. If you don't plan to replace your plumbing, work carefully to avoid damaging fixtures.
Dismantle the door leaf with platbands so that they do not interfere with the finishing and do not become unsightly during repair work. The doorway can be covered with something, and it is best to hang a dampened cloth to trap dust.
The noisiest and dustiest stage is the dismantling of old ceramic or tiles. To carry out this work, you will need safety glasses and a respirator mask: this will help you avoid cuts from ceramic shards and prevent dust from entering your lungs.
We suggest you read why the LG washing machine does not open the door after washing. Why the washing machine door does not open: possible reasons
It is best to make striking movements with a hammer drill, moving it over the edge of the old elements. Please note that the plaster will fall off along with the finishing, and it will not be possible to save it. Let it crumble at the stage of removing the old cladding before it begins to crumble with the new one. Clean the walls of any hardened mortar.
Leveling the walls
By removing the existing cladding, you will get a strong base, but before laying tiles indoors yourself, make sure the surface is even. You can do this as follows:
- using a plumb line, find out how far the wall is tilted from the vertical, whether there are blockages or dents;
- using the rule, estimate the surface deformations;
- Use a square to measure the corners.
If the surfaces are smooth, which is rare, you can move on to the next stage. In most cases, walls have to be leveled. To do this you will need the following devices:
- beacons for plaster;
- container for preparing the solution;
- tile adhesive and plaster mixture;
- building code;
- electric drill with mixing attachment;
- spatula with trowel.
According to construction standards, cement-based plaster is used for leveling, but professional tilers usually mix it in equal proportions with glue. Due to this, the composition gains strength and reduces the likelihood of subsidence between the beacons.
Apply the primer mixture to the surface of the walls and let them dry. Follow the primer manufacturer's recommendations.
Prepare a small amount of solution and mark several points located vertically from the ceiling to the floor surface. After attaching the beacon to the solution, fix it evenly using a building level. Work quickly so that the glue does not have time to dry.
Fix the remaining beacons in the same way, placing them parallel to the first one, at a distance smaller than the size of the rule.
Prepare the plaster mixture (a full batch), leave it for ten minutes to wet it evenly, and mix again using a drill.
Using a trowel, throw the mixture onto the surface of the wall between adjacent beacons and level it, making zigzag movements as a rule, moving downwards.
Recommendation: Fill the gap a few centimeters to allow excess solution to move around.
Carrying out similar actions, plaster all surfaces of the walls, controlling the location of the beacons - it is important that they do not move under pressure.
Leave the solution for two hours to dry, and remove any existing defects on the floor by rubbing in a circular motion.
Before installing the tiles, it is advisable to allow the plaster mixture to dry completely; this requires at least a week.
How to speed up work
Experienced craftsmen prefer to level the walls at the stage of installing tiles, using an adhesive solution. This option is acceptable if you have the appropriate skills.
Beginners are advised to first level the surfaces, since it is difficult to lay the tiles yourself and at the same time determine their level.
Leveling the floor
This stage can be skipped, provided that the floor covering is smooth, with deviations of no more than 5 mm, which can be easily leveled out during laying of the material. But it is important to make sure of this, since laying tiles on an uneven floor will not work. We recommend using a laser level. If you don't have this tool, you'll have to spend more time.
Having determined the highest corner of the room, set a starting point on the wall surface there.
Using a bubble level, draw a horizontal line along all the walls.
Along this line, hammer nails in the corners and pull the lace tightly.
If the lace does not touch the floor at any point, you can fill the screed in accordance with the new level. If you come into contact with the floor covering, even in one place, slightly lift the rope to get a new level, and fix the beacons at its height.
Pour the mortar prepared on the basis of cement and sand and distribute it evenly using the rule.
Naturally, a self-leveling solution will make the task much easier, but will increase repair costs.
The concept of beauty lies not only in the external background of the main material, but also in the correctness of its structure. Beautiful bathroom tiling is based on:
- even trimming and laying out corners;
- on the correct design of the locations of pipes and plumbing units.
- on giving an attractive appearance to the installation points of sanitary equipment (baths, sinks)
To attach the tiles, you need to choose high-quality tile adhesive. Most often, these are universal types suitable for installing tiles on walls and floors. For example, "Unis Plus".
The walls are pre-prepared for finishing. The preparation process consists of dismantling the old coating and leveling the surfaces.
Considering that finishing a bathroom with tiles with your own hands is the only way for many people to carry out renovations, sometimes it is the preparation that becomes the most difficult stage for them.
Sometimes you have to knock down the top layer down to the base (concrete).
Naturally, all equipment is dismantled and removed from the premises. Space is needed for work. This is especially important for small baths.