Almost every apartment, as well as a private house, has a shower in the bathroom. In cases where a separate room is provided for it, the water in it must be drained autonomously. For this purpose, a special structural element is provided - a shower drain in the floor under the tiles. Its presence is necessary when the bathroom is not equipped with an electronic shower. It is also not needed if the shower is located above the bathtub.
Shower drain
Purpose of a drain in a shower stall without a tray on the floor
A shower drain is necessary to drain sewer water during bathing and ensure its delivery to the central trunk of the sewer riser. In addition, its design provides a number of other useful functions, including:
- Filtration - the grate traps large debris and it is not able to get into the inside of the drain and block the passage of wastewater;
- Tightness - thanks to the reliable design, water moves strictly in a given channel, without penetrating into the screed, without causing dampness;
- Preventing the spread of odors - the design feature is that the unpleasant odor is blocked by a small amount of water, clogging the connection between the riser and the drainage hole in the floor.
The shower drain must serve for a long time and reliably in an aggressive environment, so the materials from which it is made resist the spread of corrosion well. Most often these are plastic, stainless or non-ferrous metal alloys, as well as combinations thereof.
Working in an aggressive environment
The appearance of the shower drain depends on the manufacturer, so you can always choose its shape to suit your taste. The most common are rectangular, round, oval and square variations. There are also point and linear ladders. Point ones are installed anywhere in the shower room, most often in the middle or at the lowest floor level. Linear ones are always placed at the edges of the room.
The types and dimensions of drains for wastewater disposal can be very different, it all depends on the preferences of the buyer and the manufacturer. The price category has a wide range, from the simplest models of unknown companies to expensive high-quality products of famous brands. There are variations of drains of the same model with different heights, this is necessary to select the product in accordance with the height of the screed in a particular room.
Shower drain installation
The purpose of the drain is to collect and drain wastewater from the shower room to the main drain riser. It can be plastic, metal-plastic or metal. More details about the device and principle of operation:
- The shower drain filters wastewater from large contaminants and provides a reliable seal with the floor covering. At the same time, unpleasant odors that come from the sewer system do not enter the room.
- Structurally, a shower drain can range from the simplest model for filtering wastewater to a complex device with a cut-off and a cascade of dry and wet valves. To facilitate installation, drains often have the ability to change the height of the product.
- The upper part of the drain ladder consists of a decorative grille, which is made of stainless steel. Next comes the drain grate - it traps large debris and protects the bathroom from odors from the sewer system. To fix the grille, sealing flanges and rings are used.
- After the filter grid there is a drain, consisting of a glass and a base with an outlet. The latter is connected to the pipeline using a coupling. The outlet can be through or single. The first is suitable for several devices that are connected to one pipe.
- At the bottom there is an outlet pipe. Through it, the water goes into the sewer.
- Polyps in the stomach
- Cleansing the body at home
- Zucchini with minced meat in a frying pan - recipes with photos. How to cook fried, stuffed or stewed zucchini
Design features
The appearance of the inside of the shower drain in the floor under the tiles resembles in structure a funnel for overflowing liquids installed in a snail. The funnel is equipped with a flange for reliable fixation in the seat; its other side is equipped with technical outlets, they are intended for collecting wastewater. The flange and volute must be tightly connected to avoid uncontrolled outflow of running water.
Multi-node ladder
There are drains for collecting sewer outflows only from the shower stall; in this case, the outlet has only one hole. If it is necessary to connect additional plumbing equipment (washing machine, sink) to the sewer system, then outlets with several branches are used.
Linear ladder
There is always a siphon in the inside of the drain; its design ensures drainage of water, and resembles a regular siphon like in a sink, but it is somewhat modified.
How the gangway works
Important! When purchasing a drain in a store, you should carefully study its design and correlate it with your existing connection conditions. Particular attention should be paid to the height of the ladder, the diameter of the discharge pipes, as well as the presence of chips and cracks on them.
Gangway work
Shower drains may differ due to several factors:
- maximum load - the larger the diameter of the pipes in the drain, the more water it can handle per unit of time;
- according to operating conditions - for private or public use;
- installation location - there are ladders of horizontal and vertical design;
- appearance - design variations are widely represented.
If you do not yet know what the height of the screed under the tiles will be, then you can purchase a ladder with a telescopic system for changing the length of the pipes.
Shower drain under tiles on the floor: technical aspects and advantages
Recently, there has been a tendency to abandon the use of bathtubs, this is due to the serious costs of water for bathing in them. Universal shower stalls have replaced them, but their cost often exceeds the waste on water over the years. Maintenance in case of breakdown of such booths is also quite expensive. The most acceptable option is homemade shower stalls; their cost, even taking into account the finishing work, is not so expensive.
Assembly principle
The ease of assembling the shower stall is another factor due to which they have gained great popularity. Essentially, it consists of a shower hose faucet, translucent doors, tiled floors, and a drainage system.
Important to remember! The time to install the bathroom drain should be decided before laying the tiles. Otherwise, you will have to deal with a lot of unnecessary work.
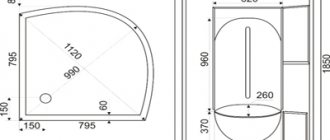
Another important point when laying the floor is to ensure a slight slope relative to the horizon. This is necessary to place the floor drain at the lowest point of the cabin. If you do not ensure spontaneous drainage of water along the inclined surface of the floor, you will have to install additional plastic sides around the perimeter of the shower stall. They will protect the walls from moisture impregnation and fungal infections due to dampness.
Ensuring the slope of the pipe
The main advantages of handmade shower stalls include:
- Dimensions – this type of bathroom arrangement can be done regardless of its dimensions or you can choose a configuration at your own discretion.
- Easy to clean - just wipe the sweaty surfaces and remove the remaining water into the drain with a mop.
- Creating a design - the availability of a variety of building materials allows you to fulfill any whim of the owner.
- Convenience – It is quite difficult for older people to get in and out of the bathroom on their own. There is a similar problem with ready-made electronic booths; there is barely enough space for a healthy adult, and it will be very difficult for an old man to turn around.
- Emergency drainage of water - many drains have this function, it is necessary to prevent flooding. At a certain level of liquid, a valve is activated, opening the damper, after which the water that filled the shower stall leaves.
Shower drains under tiles
The appearance of such a plumbing fixture for a shower has an oval, round, square or rectangular shape.
According to their design, they can be divided into wall, linear or point drains. The first design option is installed near the walls of the bathroom, the second - in the corners or along the edges, the third - can be mounted anywhere in the room. Popular manufacturers of shower drains are:
- Veragio;
- Viega;
- Ravak;
- Berges;
- ACO;
- Geberit;
- Creative;
- Tulips;
- AlcaPlast;
- TECE;
- Magdrain et al.
Spot
| Name | Price in rubles | Characteristics | pros | Minuses |
| AlcaPlast APV3444 | 2280 | Length and width – 15x15 cm, color – chrome, grey, matte, shape – square, drain diameter – 14 cm, shutter – wet and dry, placement – flush with the floor, installation – next to the wall, connection diameter – 7.5 cm , permissible load – 300 kg, throughput – up to 62 l/min, drain – plastic, adjustment scale – 10 cm. | Optimal dimensions, good quality, height adjustable. | No. |
| Viega 557119 | 1880 | Length and width – 10x10 cm, color – gray, chrome, shape – square, drain diameter – 14 cm, shutter – wet, placement – flush with the floor, installation – near the wall, connection diameter – 5 cm, permissible load – 300 kg, flow capacity - up to 36 l/min, drain - plastic, there is a removable water seal. | Cheaper than analogues, good workmanship. | Small capacity, no information on height adjustment. |
Wall-mounted
| Name | Price in rubles | Characteristics | pros | Minuses |
| TECElinus 15101090 90 | 24090 | Drain diameter – 5 cm, length of the outer part – 84 cm, width – 7.5 cm, color – chrome, shape – rectangular, shutter type – wet, placement – below floor level, drain material – stainless steel, total installation height – 9, 5 cm, throughput – up to 48 l/min., load – up to 300 kg, adjustment scale – 3 cm. | Height adjustable, great design, good quality. | High cost, the scale of adjustment is smaller than that of analogues. |
| AlcaPlast APZ10-Simple 550 | 5450 | Drain diameter – 4 cm, outer part length – 55 cm, width – 6 cm, color – matte, chrome, shape – rectangular, shutter type – dry, placement – flush with the floor, drain material – plastic, total installation height – 7, 5 cm, throughput – up to 28 l/min., load – up to 300 kg, adjustment scale – 3.5 cm. | Affordable price, adjustable in height, well suited for small spaces. | Short length, throughput, small drain diameter. |
Slotted
| Name | Price in rubles | Characteristics | pros | Minuses |
| Advantix Vario 704360 | 19627 | Type – shortened with design insert, insert color – chrome, material – plastic, dimensions – 30-120 cm, installation height – 95-165 cm, flow capacity – 0.4-0.8 l/s. | Self-cleaning siphon design, adjustable in height, the dirt trap is removable, good throughput range, can be shortened. | It's very expensive. |
| Pestan Confluo Premium Line 650 | 11990 | Drain diameter – 8 cm, outer part length – 65 cm, width – 7.5 cm, color – matte, chrome, shape – rectangular, shutter type – wet, placement – flush with the floor, drain material – plastic, total installation height – 7.1 cm, capacity – up to 48 l/min., load – up to 300 kg, adjustment scale – 4.6 cm. | Reasonable price, adjustable in height, has a dirt trap. | Relatively short length. |
- Epilepsy - what is it in adults and children. Causes and first aid for epileptic seizures
- How to measure blood pressure without a tonometer
- Breast puncture - how to take it. Consequences and results of breast puncture
Location and types of shower drains and drains for shower stalls
Ladders for draining water are distinguished by the location of the outlet pipes; there are designs with horizontal and vertical outlets.
Horizontal and vertical ladder
- The horizontal drain is the most common model, its popularity is due to the ease of installation; installation of such a drain does not require high filling, and the water, after passing through the funnel, goes through the 900 outlet into the sewer system. It is important to maintain a slight slope when installing the pipe between the outlet and the sewer riser.
- Vertical ladder - capable of providing maximum throughput. This is achieved due to the fact that water passes directly into the sewerage system, eliminating all interfering connections. Another advantage is the absence of possible clogging areas.
Containing unpleasant odors from the sewerage system is possible thanks to a water seal; depending on its design, there are:
Dry shutter
- Drains with dry shower seal– one of the elements of its equipment are special plastic dampers; under the pressure of passing water they open and let it through; as soon as the pressure drops, they return to their original position and prevent the communication of air between the shower and the sewer.
Wet gate ladder
- Drains with a wet plug for showers - wet plug technology was invented a long time ago and is successfully used in sinks, toilets and other bathrooms. Thanks to the small amount of water remaining in the curved tube, unpleasant odors cannot enter the room. The only drawback is the evaporation of liquid if the shower stall is idle for a long time; after two weeks, the water plug disappears and nothing else interferes with the spread of the smell.
The shape of the product can be rectangular, round or angular. Corner-shaped point drains are designed for installation in the corner of the room; other types can be placed in any other place in the shower stall.
Shower drain in the floor under tiles: types and nuances of installation
When installing a shower stall, you need to consider a high-quality tray. To do this, you don’t have to buy an expensive finished product; try building a simple shower drain in the floor under the tiles. This option will save useful space and protect against unnecessary expenses.
Invisible mechanism built into the booth podium
What is a shower drain in a tiled floor: what is it used for?
The design of a shower drain can be made from different types of materials. Plastic or metal is suitable for this. This device ensures the accumulation and removal of water from the shower floor. The product is characterized by simplicity of design, convenience and low cost.
Design of the drainage mechanism
The structure of this product assumes the presence of the following elements:
- funnels for receiving water with a flange where the liquid moves. The outlet pipe is located at the bottom of the product;
- the flange is used to fix the membrane with waterproofing;
- a removable grid is required to retain large particles;
- a siphon that helps create a water seal in the drain mechanism. Such a device protects the room from foul odors.
Drainage components and cross-section of the product
In addition to removing water and collecting it, a shower drain in the floor under the tiles holds debris to prevent clogs and also prevents any odors from passing through.
Types of shower drains
Functional drainage devices come in different types. They differ in design, configuration and specific height. Depending on the type of grating, they can also be of various shapes. Also, according to the type of device, drainage drains are:
- linear ones are used along the edges of the room or in corner areas;
For products of this type, a tilt in a certain direction is required
- spot ones are placed in any area of the room;
Point drainage requires tilting on several sides
- wall-mounted, located along the walls.
This option is convenient
The main parameter is the height of the drain; it determines how much the floor level around the shower will need to be raised.
Helpful information! When installing a conventional water seal, remember that if you do not use the shower for a long time, foreign odors will appear after the water dries. A device with a dry shutter will help eliminate this problem.
Gangway placement
Before installing a shower drain in the floor under the tiles, you need to carefully select a suitable location. It is better to place it at the lowest point of the room where flowing water collects. You can place it in different ways:
- in the central part of the shower, offset to the side. In this case, the tilt is performed on all four sides;
- when installing a corner, the tilt is made in two planes, which ensures drainage to one corner;
- near the wall, the slope is created in one plane, towards the drain. In this way, holes with increased throughput are installed. They rarely get clogged.
Drain in the central part with a grate
Installation of a shower drain
Remember that the installation of the structure is carried out simultaneously with the installation of waterproofing of the entire floor covering in the bathroom. When creating a screed, you will need tools for making a special solution, as well as devices for distributing the composition and leveling the surfaces. These are all kinds of spatulas, levels and special graters. You will definitely need markers and tape measures.
The diagram shows the main stages of installation work
From the material it is necessary to prepare a cement-sand mixture, polystyrene foam for thermal insulation work, a membrane for waterproofing, glue and tiles.
Step-by-step installation of a shower drain in a floor under tiles can be found in the table
ImageStages of work
Drain assembly. Old coverings are dismantled and debris is removed. The old drain system is replaced with new plastic pipes and a special drain pipe. All joints and corner areas are treated with mastic.
For assembly, a ready-made system with slats can be used.
Installing a drain hole. To install the ladder, you will need special calculations. A straight line is drawn from the junction of the pipe with the pipe to the drain mechanism. The junction of the outlet and the sewer pipe is treated with sealant. To create thermal insulation, polystyrene foam is laid. After installing the screed, all elements will be inside the cement composition.
Installation of screed with a slope. The cement-sand mixture is laid out on sheets of polystyrene foam. Plastic elements are installed near the walls. A damper tape is also laid.
An important element is the tilt made towards the drain hole. If the element is located in the center, then the edging of the screed is raised by 5 mm. The cement composition should hide the water drainage device. The tilt is 1 cm per meter of area.
Waterproofing is carried out after the screed has dried. The membrane sheet is fixed with screws. The joints are also waterproofed.
Ceramic tiles are laid out in the direction from the ladder to the walls. The ceramics are laid on the cement surface using glue. After the glue has dried, grouting is done.
When installing a shower drain, you can purchase the entire system at a hardware store. It includes slats of different thicknesses, which helps simplify the work. It is recommended to use special moisture-resistant tiles around the drain. Make sure that the grate is not located higher than the tiles. Treat the joints between the drain and the tiles with sealant.
Installation of a linear drain system structure
How to install a shower cabin without a tray on the floor
How to make a shower without a tray in an apartment is interesting to many, because such a design has many advantages:
- helps create an original design in the shower;
- provides easy access to the shower;
- simplifies the bathroom renovation procedure;
- facilitates indoor cleaning;
- saves money.
Correct slope calculation matters
This design does not have a high tray, and the water flows out through an installed drain mechanism. A product without a pallet has certain disadvantages. This is the collection of water on the floor covering and the release of the collected liquid when the doors are opened. If the siphon is installed incorrectly, an unpleasant odor may appear.
Model design without pallet
In such cases, it is recommended to install a drain structure with a dry shower seal. It is worth considering the throughput of the ladder, which varies from 8 to 16 liters per minute. Wall structures can discharge up to 40 liters. It is better to choose a high siphon, which will provide a large slope towards the sewer. An excellent solution would be to place a water seal in the middle of the siphon.
Discreet drainage design
When equipping a functional area without a pallet, the most important point is the problem of drainage. The drain drains the liquid into a special grid. The slope does not have to be throughout the entire shower room. It is enough to do it in the shower area. Since the ladder grating is compact, it is possible to create a slope in all directions. When laying the mechanism in the corner of the room, you can build a slope on two sides.
The height of the ladder matters. On the market you can purchase structures with a height of 100 mm, which can be mounted in small screeds. It is important to choose the right siphon; the lower it is, the worse its throughput.
Compliance with installation technology will allow you to create a high-quality drainage structure
Installation of drains is carried out before screeding. In this case, the equipment is centered using a level. When screeding, remember to create a special slope. In this case, the construction mixture must completely cover the space under the drainage system.
The shower drain can be made in different configurations
Helpful information! Remember that installation without a pallet is carried out only after careful calculations and design. To install the ladder, a minimum height of 150 mm from the floor is required, including a concrete screed.
Correct installation of the drain system will ensure high-quality and timely drainage of water from the shower stall. In this case, much depends on the selected equipment and correct calculations.
Installing a shower drain
Source
Installation operations
The most common is a point, square shower drain in the floor under the tiles with a horizontal drainage pipe. Let's consider its installation.
| Illustration | Actions |
| The first step is to decide on the location of the shower drain in the floor under the tiles. If you have a rough idea of where it will be, then use a tape measure to mark the required distance from the walls and install a beacon. It is important to correlate the location for the ladder with the dimensions of the future floor tiles; it would be most successful to make a cutout in only one slab; for this, take measurements as accurately as possible. | |
| It is necessary to lay a pipe connecting the sewer riser and the drain to the place of its installation. It is important that the pipe is solid and has a minimum of connections, especially corner ones. The pipe is laid at a slight angle. The highest point should be near the drain, the lower point should be the junction with the riser. The pipe can be installed using cement mortar or wooden blocks of thick consistency. | |
| Carefully check the presence of rubber gaskets at all joints along the pipe; the absence of at least one will become a very big problem after laying the tiles. This is fraught with the presence of constant unpleasant odors and flooding of neighbors. | |
| Having connected the pipe to the riser, you can begin installing the snail. The snail should be installed strictly horizontally, beating the plane using a level. Next, connect it to the supplied pipe. | |
| Under the snail it is necessary to make a gravy with a self-leveling solution, this will ensure its reliable fixation and prevent possible subsidence of the ladder under the weight of a person. | |
| Be sure to test the assembled unit; to do this, insert the hose into the drain funnel and open the water to maximum. But it's better to do a pressure test. If no leaks are detected, you can proceed to the next step. | |
| Before pouring the screed, it is ideal to lay a special film - a hydrobarrier - over the entire surface of the floor; it will prevent possible leaks if suddenly there was an unnoticeable defect in the structure of the drain or pipe. | |
| During pouring, wrap the top of the drain in several layers of cellophane, this will preserve the presentable appearance of the element and prevent possible clogging of the internal parts of the structure during work, or put on a plug. | |
| The gaps between the laid tiles are covered with a special moisture-resistant solution. | |
| After laying the tiles, you can remove the film and install a removable grate. The ladder is assembled. |
Video review: DIY shower tray
Tips for use
If you do not know how to make a shower without a tray in an apartment, are not confident in your abilities and cannot carry out the installation of a drain yourself, it is better for you to contact a specialist, because even a small mistake can lead to redoing almost all stages of the repair. In this case, it would be ideal to contact a professional before starting dismantling operations. It is also better to select all the elements of the bathroom with a specialist, because a high price does not always guarantee the required quality.
For high-quality operation of the drain over a long period of time, you should take care of the shower stall and perform the required procedures:
- cleaning - regular maintenance of the bathroom will not give a chance to the development of mold and mildew;
- ventilation - its absence is also fertile ground for parasitic flora to flourish;
- maintenance - regularly clean the removable elements of the ladder from accumulated hair and other debris;
- accuracy - treat the shower stall with care, try not to drop heavy objects on the tiles and avoid hitting the glass doors, this can lead to cuts.
If the bathroom drain was installed efficiently and the design is free of defects, then if all the listed standards are observed, you can count on many years of service for your shower stall.