Home Country construction
A brick barbecue oven is the safest and most reliable option for a summer kitchen and grill house. The step-by-step instructions presented on this page will help you build a brick barbecue with your own hands. You can also learn how to make a barbecue out of brick in the video, which illustrates the presented material along with a photo. Before you make a brick barbecue with your own hands, you need to carefully calculate the dimensions and install a reliable foundation. To ensure that your own brick barbecue grill is stable and safe in terms of fire safety, the foundation is made in accordance with the instructions.
- 2 Diagram, laying and ordering of a brick barbecue with your own hands
- 3 Construction of a barbecue oven with a brick grill with your own hands (with photo)
How to build a homemade brick barbecue with your own hands (with video)
When installing a major brick stove in a summer kitchen, you should remember that any stove increases the fire hazard and requires compliance with all construction standards and regulations. This means that for its construction it is necessary to use a special refractory fireclay brick, which is resistant to high temperatures, but at the same time is an excellent thermal conductor, warming up the room quite quickly. It is important to properly ventilate the stove. At the stage of constructing the foundation, it is necessary to lay out this area with bricks in the place allocated for the furnace. Also, in the future, when constructing a roof, it is necessary to provide for the installation of an exhaust pipe to remove heat and smoke, etc. from the working area.
Electric BBQ oven
Gas BBQ oven
Barbecue oven fired with coal
Wood-fired barbecue oven
The barbecue oven can run on electricity, gas or burn coal and wood. Outwardly, it is very similar to a fireplace with a combustion chamber, which is usually located at the level of a person’s waist. A barbecue in a summer kitchen requires a reinforced foundation, and it is also important to properly install a hood through which heat and smoke will be removed.
BBQ oven with hob in the photo
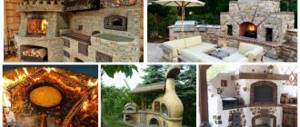
A barbecue oven can have different configurations - it may include an ordinary hob or oven, a grill or barbecue, a countertop, a place for firewood and storage of utensils. There are such designs that include not only a barbecue, but also a tandoor, a cauldron, a smokehouse and other elements.
If you need a multifunctional large barbecue oven, it is better to resort to the help of professionals, but a small oven can be built with your own hands.
There are many options for prefabricated barbecues and brick ovens. Based on the presented models, you can build something according to your own design. The main thing is to arrange everything correctly to minimize the risk of fire, especially when building a stationary brick oven indoors.
A homemade brick barbecue is a more solid version of a stationary barbecue for arranging a summer kitchen.
BBQ oven in the photo
It will become an excellent decoration and, of course, will allow you to prepare more delicious and varied food. Before you build a brick barbecue, you need to know that it is also called a “barbecue”, and in the standard design plan it should include three compartments.
Brick BBQ oven in the photo
Of course, the construction of such a barbecue will cost more, but the meat obtained on bricks is much tastier and healthier. Durable and high-quality brick is quite expensive, but you can save money by doing all the work on building the barbecue yourself. In this case, we will describe the simplest version of a brick barbecue, which you can easily build yourself, even without much experience.
The presented option of how to build a brick barbecue with your own hands can be changed by using your own dimensions of the parts or adding some additional functional elements to the design. You can build a canopy over the barbecue stove to protect it from the rain, and nearby set up a dining room under a tree, or install such a stove inside the summer kitchen or outside not far from it.
In the latter case, the summer kitchen itself will contain all the necessary kitchen equipment, as well as a sink and a refrigerator. It is even more convenient to place a barbecue oven outside the summer kitchen - there is less risk of fire, it will not be so hot to cook in the oven outdoors, and the inside of the summer kitchen will remain cool, unless it is planned to be used in winter - then, naturally, the oven is installed inside .
Convenient place for a barbecue oven in the photo
First you need to choose a convenient place for the barbecue oven. If it will be installed outside, it is necessary that the distance from the stove to the house or kitchen is not large, since during the preparation of the dish you will have to constantly bring something from the kitchen - dishes, water, etc.
When choosing a barbecue design, you need to pay attention to the style that is most suitable for the architecture of all buildings on the site. It is imperative to determine in advance the size and design of the stove, where it will be placed (in an open space or inside a summer kitchen), what kind of foundation is required for it (depending on the components of the structure).
Also at the preparatory stage, it is necessary to think about the lining of the firebox, take into account the shape and height of the chimney, whether the stove will be equipped with an additional oven or smokehouse, what fuel is planned to be used (coal, wood, electricity, gas).
BBQ stoves with a canopy in the photo
There are really a lot of questions - is it necessary to build a canopy to protect the stove from rain, an additional table and wind protection? And also, what facing material will be used, whether to install a heat reflector and a tray under the coal, what will be the design of the spit, grate or brazier, will there be cast iron inserts.
General view of the barbecue oven in the photo
All this needs to be thought out in advance and then be sure to draw a general view of the barbecue, drawing individual details and indicating their sizes. You should also find a place to place the shelves in advance, as they should fit well with the appearance of the barbecue. It is also necessary to provide space for storing utensils and supplies of coal or firewood.
Barbecue grill
Barbecue grill
When drawing up a barbecue plan, first of all, you need to take into account that the structure must be stable. It is also important to position the barbecue (roasting) grate correctly. It should be at such a height that it is as convenient as possible for cooking. Typically, the grating is installed at a height of 9-10 rows of brickwork.
If the grate is too low, you will have to bend over while cooking, which is very inconvenient. And if you put the grate too high, you will have to reach high, and at the same time your face will constantly be close to the burning coals.
The grate and coal tray must be installed on brick ledges or metal rods. They must be removable, since they must be periodically cleaned of rust and stored in the house for the winter.
In a barbecue, you can use a regular stove grate. It should be borne in mind that it should be larger than the hearth with burning coals, so that the finished barbecue can be moved to the side next to the hearth, but at the same time keep them hot. The roasting rack must be protected from the wind. Under it there should be another grate, with smaller cells, on which burning coals will be located, and under it a tray into which burnt coals will fall.
Watch how to set up a brick barbecue with your own hands in the video, where all types of production elements are presented and advice from the masters is given:
Useful tips for beginners
It is impossible to convey in the algorithm of actions all the subtleties of the work of a mason or an experienced stove maker. Therefore, it is necessary to listen to some advice that will help in difficult times.
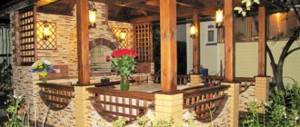
Original design for outdoor cooking
- Despite the fact that the outside foundation hardens the very next day, you should not rush to start laying the walls. Throughout its entire depth, it has not yet become strong and may subsequently collapse. You will have to wait at least two weeks.
- Do not rush to lay bricks on the mortar. Don’t be lazy and fold it with just bricks. A general idea, in addition to the available step-by-step instructions, contributes to better performance of the work.
- Starting a new row, it is necessary to try on the bricks. One or more bricks may need to be trimmed. Then, in the established order, a row is laid out using a solution.
- Adopt devices that allow you to control the vertical and horizontal planes and edges of the assembled frame. The ideality of these parameters increases the aesthetics of appearance and the strength of the structure.
- It should be noted that neatly laid facing bricks look great due to their unique texture. Many designers decorate the walls with materials stylized as brick. A novice master may make mistakes on the tab. Additional decorative finishing of the barbecue fireplace with special materials will help to hide them. But if the picture turns out neat, then immediately after finishing the masonry, start cutting the seams.
- The refractory brick from which the firebox itself is made should be laid on a clay mortar. It takes several days to prepare, due to the need to soak and sift the clay. The sand should also have a fine structure. By adding water to the mixture, you need to achieve a consistency such that the solution does not stick if you take it with your hands, and at the same time retains its given shape.
- The grill cannot be put into operation right away. The masonry hardens for about two more weeks.
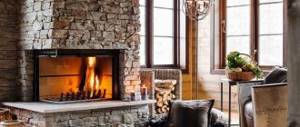
Good to know: We use a gas fireplace as a home fireplace, choose the appropriate model
Decorative stone tiles are usually used to finish the surface of the fireplace. This material is affordable and gives the fireplace a great look with its own style. The tiles are attached using an adhesive composition. It is now available for sale in finished form. For outdoor models, a natural finish is still recommended - red brick.
Diagram, laying and ordering of a brick barbecue with your own hands
Laying a brick barbecue consists of several stages - choosing a location, drawing up a barbecue plan, building a foundation, erecting brickwork with the installation of all structural details, constructing a pipe, cladding and designing the building.
To lay a brick barbecue with your own hands with three compartments, you will need the following materials and tools:
- sand;
- cement;
- gravel;
- bottle;
- reinforcing mesh;
- brick;
- ceramic tile;
- Master OK.
Currently, you can buy ready-made kits for arranging a barbecue oven. The standard set includes the barbecue grill itself, a charcoal tray and fasteners. These kits can be used when building a brick barbecue with your own hands.
What the foundation of the furnace will be depends on its size. The do-it-yourself brick barbecue scheme allows for the possibility of making a concrete strip foundation, but for a more massive structure a tiled one will be required.
The foundation completely hardens approximately 2 weeks after pouring the concrete, and only after that can you begin to build the barbecue itself.
First, you need to lay 2 layers of roofing felt on top of the foundation to protect the structure from moisture, after which you can begin laying the brick stove. In this case, we are considering the option of a standard barbecue consisting of three compartments. From brick you will have to lay out a figure in the shape of the letter “W” with 4 partitions. What kind of brick barbecue will turn out, the order and diagram can be shown in advance by carefully examining the barbecue construction plan.
The rows must be laid out in a certain sequence - each next row must be shifted in relation to the previous one in a checkerboard pattern. This is the so-called half-brick masonry, which should provide the necessary bond of brickwork. Even before starting the laying, you need to tighten the cords indicating the position of the future wall of the barbecue, and use a trowel to apply a layer of mortar. This needs to be done along one of the walls. Then you should make small grooves in the mortar and begin laying the first row of bricks, checking it with a horizontal level.
In total you will need to lay out 8 such rows. If you plan to place a sink in the 3rd compartment, you need to leave a hole for the drain in the 6th row.
First, it is necessary to build floors that unite two adjacent compartments of the future structure. To do this, you need to cut off the metal corners of the required length and put them on top, and then make the same, but continuous ceiling of bricks in one row. To lay the 2nd layer, you must definitely use a heat-resistant clay mixture intended for ovens and braziers, since it is impossible to make a reliable grill using cement alone.
STEP #1
STEP #2
STEP #3
STEP #4
STEP #5
STEP #6
The most difficult stage of the work is laying the furnace itself. This can be an ordinary rectangular direct-flow furnace without a blower. The thickness of its back wall should be three bricks. There must be room in the front for a door. On the side where the oven will adjoin the brazier, you should leave a hole the size of two bricks.
It is necessary to make protrusions for the roasting grate and the charcoal tray. When building a brick barbecue with your own hands, order is very important. When laying the 5th row, you need to form a supporting ledge, and then lay the 6th row of bricks across - the entire row of bricks should protrude from both sides of the wall. The next three rows again need to be laid in half a brick. In this way, protrusions for the grate and tray are formed.
Sometimes it happens that there is no pallet of the required size that would fit the width of the brick projections, and then a metal shelf can be used to support it.
Then, in the 10th row, you need to build another ledge and add three more rows on top using the spoon dressing method - this is the end of the main part of the barbecue.
If the stove design will use metal rods to support the barbecue, then during laying between the 6th and 7th rows, these metal rods must be laid out in all three walls. This should be done in such a way that the rods protrude from the walls by 70-75 mm and a grill with a tray can be installed on them.
The rods must continue to be laid until the 10th row in each subsequent row. This is required in order to install the roasting rack at the required height.
After this, all that remains is to lay out a rectangular roasting pan and make a pipe of any shape. This arrangement of brick barbecues is used in all such structures without exception.
It is also necessary to arrange a barbecue work surface. The simplest way is to build a low - 6 rows high - brick wall.
This building must be done on a separate strip foundation, which is poured parallel to the side walls. Such a small wall is called a plinth wall. You need to lay it out so that the brick rests side by side.
After this, you need to cut a sheet of plywood and lay it between the side wall lip and the baseboard wall. Lay boards on the sheet and cover them with tiles or ceramic tiles. You can even use ordinary paving slabs to cover the working surface.
Expert advice
After completing the construction of the barbecue and its working surface, it is necessary to begin processing all the seams. To do this, use cement mortar, which needs to be filled in all the seams and rubbed in thoroughly. Before the solution hardens, it is necessary to run jointing along the seams to give them roundness. If the craftsman does not have jointing at his disposal, this can be done using a regular cutting of a garden hose.
If the plinth wall will be connected to the main structure, then up to the sixth row the structure must be built in the form of the letter “E”, and then continue laying the side and rear walls of the barbecue itself. As a result, a niche is formed under the grate with a tray, which can then be used to store charcoal or firewood. If this opening is equipped with a door with a handle, it will be quite possible to store dishes here.
With this, the main functional part of the stove will be built, and then the structure can be supplemented with various shelves and other elements, decorated at your discretion, etc.
The constructed furnace must “settle” for several days for the solution to completely harden. If you light a fire in it before the solution dries completely, its walls may crack.
In the future, when using the stove, it is necessary to clean the barbecue after each cooking so that dirt and grease do not accumulate, otherwise in the future you will have to thoroughly clean the stove.
DIY construction of a barbecue oven with a brick grill (with photo)
The construction of a brick barbecue does not necessarily always involve the monolithic construction of all structures. You can build a brick barbecue oven with your own hands in the so-called temporary version. This is convenient if there is no space to build a permanent, stationary structure. If necessary, such a stove can be disassembled and folded for storage in a specially designated place, and then reassembled. This is easy to do, since such a furnace is built without the use of cement or clay mortar. This is the cheapest and fastest to build brick barbecue structure. At the same time, it is very effective, because bricks laid without mortar freely allow oxygen to pass through, which promotes better and complete combustion of charcoal.
The shape of such a barbecue can be rectangular
The shape of such a barbecue can be round
The shape of such a barbecue can be round, triangular, square, rectangular or hexagonal. You can choose any shape - it will depend on your own wishes.
Look on the page for photos of brick barbecues with a barbecue, which were built temporarily and at the same time allow you to cook any dishes over an open fire:
Brick barbecue with grill
Brick barbecue with grill
To build a brick barbecue you will need the following materials:
- boards for formwork (unedged);
- roofing felt;
- fire-resistant brick for cladding;
- clinker matching the color of the brick;
- cement mortar;
- metal pipe with a diameter of 15 cm;
- edged boards for tabletops;
- sheet of metal to cover the cutting table;
- grill grate;
- metal tray for coal.
To build a round barbecue you will need about 100 bricks, and for a different barbecue shape - a little more.
First you need to select a site and build a strip foundation on it. It should dry for about 3 days, then you need to put roofing felt on it and only then you can start building the walls of the stove. You need to lay out the first row of bricks according to the desired shape, leaving small gaps of about 5 mm between all the bricks. The next row is laid with a shift of half a brick to ensure the strength of the wall.
When five rows have been laid out in this way, a metal tray for coal is installed. You need to lay two more rows of bricks on top, and a roasting rack on them. Next, you need to add an arch in the form of a brick gazebo to protect from the wind, that is, build protective walls on the sides and behind the barbecue.
The standard height of such a building should be 9-10 rows of bricks. You can install a tabletop next to the stove to make it more convenient to prepare food; nearby there is a table, benches, and a chaise longue.
STEP #1
STEP #2
STEP #3
STEP #4
STEP #5
STEP #6
STEP #7
STEP #8
- Author: admin
Rate this article:
- 5
- 4
- 3
- 2
- 1
(42 votes, average: 4 out of 5)
Share with your friends!
Foundation arrangement
Brick barbecue fireplaces, like any similar structure, require a reliable foundation - a foundation. But compared to a classic fireplace, its mass is an order of magnitude less, so the depth of the foundation pit is limited to 40 centimeters. A mixture of sand and crushed stone is poured onto the bottom of the pit. This pillow should have a thickness of 25 cm. Exact adherence to this parameter is not required.
Formwork is constructed from boards. After its installation, the foundation is filled with mortar. The solution should be prepared in proportions of 3 to 1. Sand and cement in appropriate proportions may contain large impurities. You will have to sift them at further stages, but for now this is not necessary.
Preparing a quality foundation
The height of the foundation should correspond to the floor level if it is an indoor fireplace and 10 cm in the case of an open model. The most important condition that must be met is that the upper surface of the poured foundation must be aligned with the horizon. You can check this point with a building level. At the last stage, the finished foundation is covered with a sheet of roofing material and dries. The time for complete hardening of the solution over the entire thickness is 2-3 weeks.
Good to know: Types of glass fireplaces, how fireproof glass is created for them