A do-it-yourself polycarbonate greenhouse is an affordable and effective building for growing
. Greenhouses can be found in almost every garden plot these days. This is explained by the fact that with the help of a greenhouse you can get an earlier, higher quality, larger harvest. Today, there are many companies producing and selling greenhouses. The cost of finished structures varies from 10 to 20 thousand rubles, depending on the shape and size of the greenhouse and the materials used in construction. You can save a lot by making a greenhouse yourself. How to build a greenhouse without professional help - read below.
DIY polycarbonate greenhouse designs
After the decision has been made to build a greenhouse or greenhouse with your own hands, you should decide on the shape and size of the greenhouse. So, the size of the structure depends on the gardener’s goals: will you grow vegetables for your own use or for sale? In the first case, the calculation is made taking into account the number of family members. In the second - based on your capabilities (how much area of seedlings you can care for).
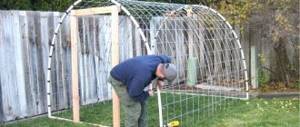
Easy to make, and therefore the most popular, homemade greenhouses are arched.
Arched greenhouses require a minimum number of fasteners. An affordable and simple arched frame made from PVC pipes can be assembled in just a few hours. In addition, such greenhouses look very stylish and are convenient to work in.
If you want to install a winter greenhouse on your property, then a structure attached to the house would be a good option.
The good thing about an attached greenhouse is that it requires less materials to build. The extension turns out to be reliable and durable. In addition, due to the wall of the residential building, the greenhouse will be protected from drafts and winds. Heating such a greenhouse will require less money, and communications to the construction will be much easier.
An attached greenhouse can only be placed on the south side of the house. In this case, you should choose a blank brick wall, preferably with a layer of waterproofing.
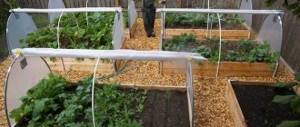
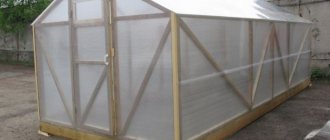
A gable rectangular greenhouse is suitable for those who decide to grow tall varieties in their country house. The building has its advantages: the air in it is heated more evenly. Most often, such greenhouses are made permanent. At the same time, you should take care of a level, solid foundation, which will reduce heat loss in a fairly large room.
For rectangular gable greenhouses, you should choose carbonate with a thickness of more than 0.4 cm, since the load on the roof of such greenhouses is greater than in arched ones.
Round greenhouses are usually made for growing vegetables and berries hydroponically. Such greenhouses do not have very good ventilation. Therefore, during construction it will be necessary to organize windows and upper vents for ventilation.
Types of polycarbonate greenhouses
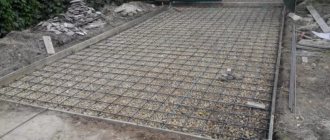
To make a greenhouse yourself, you first need to prepare the foundation for it. The foundation can be made of curb stone, foam blocks, aerated concrete and brick. If there is loose soil, it is better to lay the foundation along the entire perimeter.
The presence of dense soil will allow you not to bother, and to carry out the laying using separate posts, which are set according to the level.
The most expensive, but also the most reliable is a foundation made of a monolith. It is done around the entire perimeter of the greenhouse. Such a foundation is very reliable, it is not afraid of distortions, and does not require repairs. The high costs are worth keeping the greenhouse standing for many years.
Types of frame structures:
- Arched. Beautiful structures reduce the load on the foundation and also do not allow snow to linger on the roof of the greenhouse. Similar structures are also used for garages.
- In the shape of a house. It has a gable roof and vertical walls.
- Rectangular. Allows you to build a greenhouse of various sizes.
Frames can be made of wood, pipes or galvanized profiles. The collapsible design is very convenient, as it can be put away for the winter and moved from place to place. Weaving is of great importance when choosing the size of the frame. The size of the garden area is very important - this should be taken into account when planning the construction of a greenhouse.
Homemade polycarbonate greenhouses: how to choose material
Polycarbonate today is produced in standard lengths of 6 and 12 m, with a sheet width of 210-150 cm. The cost of the sheets is affected by the brand of polycarbonate and its thickness. The life of the greenhouse and the quality of the crop depend on what polycarbonate the coating is made from.
The choice of polycarbonate is determined by:
- Greenhouse shape. For arched greenhouses, it is recommended to take polycarbonate with a thickness of 0.3-0.6 cm, for rectangular greenhouses, the roofs of which will experience heavy loads from precipitation - 8-10 mm. Greenhouses and summer gardens should be covered with sheets with a thickness of 16 mm or more.
- Seasonality of design. For summer structures, choosing thick polycarbonate is not advisable: the greenhouse will cope with its purpose even with a sheet thickness of 3-4 mm. A year-round greenhouse should be covered with a thicker sheet (6-8 mm).
- Weather conditions typical for the growing region. For northern regions and areas with high rainfall, the thickness of polycarbonate sheets can vary from 16 to 25mm.
In order to cover the greenhouse, you should not choose thin, lightweight polycarbonate sheets with a thickness of less than 0.3 cm, since such a coating will not last long.
Accessories for polycarbonate greenhouses
A repair plan for creating a greenhouse must be drawn up in advance. It is important to think about the cost of the greenhouse so that there is enough money for all the components. The materials must be of high quality - they significantly increase the service life of the greenhouse.
Today, many people purchase ready-made polycarbonate greenhouses. Actual Bio, Tsarskaya Zvezda and Perchina are widely popular.
The choice of material for a greenhouse is very important. Polycarbonate is a reliable and durable coating. Double material is especially popular. Choosing white and especially red for polycarbonate covering will have a beneficial effect on the growth and development of greenhouse plants. Working in a greenhouse with colored glass is a pleasure.
Set:
- Foundation;
- Frame;
- Polycarbonate sheets;
- Self-tapping screws.
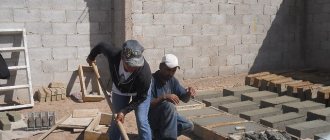
When constructing a greenhouse and fastening polycarbonate sheets, it is important to pay attention to the fact that the joints must be tight. Even gaps of 6 mm can disrupt thermoregulation in the greenhouse. Wide gaps will be difficult to eliminate; it is unlikely that sealant or special protective tape will help in this case.
How to make a polycarbonate greenhouse with your own hands
Options for assembling a greenhouse frame depend on the material that will be used for construction. It is best to choose a galvanized profile for a polycarbonate greenhouse.
The frame must be attached to a wooden frame. If the foundation is made of concrete, then at the pouring stage it is necessary to provide the foundation with fastening elements for the timber.
Further assembly of the frame depends on the stages of work. So, you can attach the metal profile to the base using self-tapping screws. Vertical and horizontal frame posts can be connected using cross connectors or through screws. Sometimes welding is used for connection.
You need to start assembling the frame from the end sides. In this case, you should organize racks on each side for mounting the door and window.
In order for the frame to be even, the horizontal and profiles must be marked before installing the arch or vertical post. The frame must be painted after assembly: this will protect the material from corrosion and extend its service life.
Round greenhouse made of polycarbonate
To install a round greenhouse, you must first take care of installing the supporting frame. Popular materials for making frames: aluminum and steel. You can also use a mounting profile. It would be good if the frame was complex and durable. Smart designs are popular today.
When arranging a greenhouse, you should not forget to correctly position the doors and windows to ventilate the room.
After calculating the meters for the greenhouse, pouring the foundation and installing the frame, it is necessary to install the main cover. To make a circular greenhouse, it is important to correctly determine the dimensions of the polycarbonate sheets, based on the overall dimensions of the material. Cut the polycarbonate with a jigsaw and a circular saw.
Greenhouse assembly process:
- The frame is fixed to a profile frame and polycarbonate panels.
- To secure the profiles, seals, thermal washers and thermal washer covers are used.
- Sheets are cut according to calculations.
- The panels should be tightly secured using self-tapping screws.
- It is important to make the greenhouse airtight. To do this, use self-adhesive and perforated tape.
Straight-walled greenhouse or round - the choice is up to the owner of the structure. It is important to choose a design option in advance, since replacing profiles later will be quite difficult. High technologies make it possible to produce durable and reliable structures. Today, high-quality polycarbonate is produced in Russia and Belarus. Polycarbonate does not burn, is resistant to moisture and gusts of wind. Disadvantages: insufficient lighting and air exchange.
Making polycarbonate greenhouses: how to install sheets
Polycarbonate on the frame should be laid in such a way that the sun's rays fall on the side with anti-UV radiation coating. The sheets are installed vertically. It should be taken into account that different polycarbonates have different directions of the honeycombs: the sheets should be positioned so that water that gets into the honeycombs can be easily removed.
When installing polycarbonate sheets yourself, you must:
- Use fasteners with rubber seals. There is no need to tighten the fasteners.
- The sheets must be connected using special H-shaped profiles, and the edges of the sheets must be covered using an end profile or punched paper tape.
- In order for the material to expand unhindered when heated, it is necessary to arrange technical holes 3 mm wider than the diameter of the fastener.
- The protective film should be removed from the sheets only after completion of construction work.
- To seal seams, only neutral silicone sealant should be used.
After covering, the polycarbonate should be sprinkled with a few cm of soil. You can organize rows and place garden trellises in the greenhouse immediately after roofing work.
Is it necessary to open a polycarbonate greenhouse?
Every greenhouse needs ventilation. This is worth remembering when constructing a room yourself. A warm greenhouse is good, but it must also have good air ventilation, otherwise the plants may die.
A greenhouse can have a variety of shapes and sizes - the height of the windows and doors, as well as their number, will also depend on this.
Windows that are too high can disrupt the greenhouse microclimate. It is important that air and ultraviolet light penetrate freely into the room - this is a strict condition for proper plant growth. You need to use doors and windows for ventilation regularly.
Features of using vents:
- Convenient handles for regulating air flow;
- Temperature regulation;
- The ability to monitor the humidity in the room and change it.
There is no need to cover plants in a polycarbonate greenhouse. Carbonate greenhouses store heat well. And the additional seal will allow you to grow plants even in the cold spring and autumn periods. The polycarbonate sheet is very durable and reliable, so you should not be afraid of its mechanical damage, although repair work must be carried out carefully.
Recommendations: how to build a polycarbonate greenhouse with your own hands correctly
It is better to start building a greenhouse in the fall in order to be able to prepare the site (clear the area of weeds and grass, prepare the soil).
In addition, in order to properly build a greenhouse, you must follow these recommendations:
- We build the greenhouse only on a level foundation.
- Before construction, we draw up a drawing of the future building with three projections (side view, end view, roof view). The foundation, in this case, is drawn separately, as well as the opposite sides, if there are differences on them.
- Experienced gardeners recommend always placing the greenhouse on a foundation: it will allow the structure to be placed level and reduce heat loss.
- If the polycarbonate greenhouse is summer, you can use a wooden beam treated with an antiseptic as the foundation. For winter greenhouses, you should choose a base made of brick or concrete blocks.
- A structure fixed to the base and ground will be reliable. At the same time, you should not drive the piles or reinforcement to the end: the soil may settle over time and the fasteners will weaken.
In addition, during work it is necessary to always control the construction with a building level and a ruler. It is strictly forbidden to build even arched greenhouses “by eye”: the places where the horizontal ribs are attached must be measured with a tape measure and marked.
Square polycarbonate greenhouses
The recommended frame for greenhouses in which they plan to grow tall plants is square. Square greenhouses can withstand heavy loads, which indicates their strength and reliability. The quality requirements for greenhouse materials must be high.
You can lay square frames with polycarbonate yourself, after reading the instructions and recommendations of experienced craftsmen.
The production of square greenhouses has its own characteristics. How many materials will be needed to make a greenhouse depends on preliminary calculations, which are influenced by the area of the site and the budget for the construction of the greenhouse. Joining correctly cut sheets will not be difficult.
Advantages of square structures:
- Twice the thermal conductivity;
- The transmittance of sunlight can be increased;
- The ability to rationally use space;
- High-quality parts protect the greenhouse from impacts from hail and even stones.
Problems in building a greenhouse may arise for those who have never done this type of work before. If we are making a greenhouse, then it must be reliable, since the slightest defects can lead to the fact that the plants simply will not survive in conditions that are unsuitable for them. For example, the pink early tomato variety “Bogatyr” loves the warmth and protection that only a square polycarbonate greenhouse can provide.
DIY polycarbonate greenhouse
The technology for making a polycarbonate greenhouse is not much different from assembling a greenhouse. An arched greenhouse and an arched greenhouse are assembled in exactly the same way. Arches can be made from PVC pipes.
Making a simple greenhouse from a metal profile with your own hands includes the following steps:
- Foundation construction. Gardeners advise making a foundation for all polycarbonate greenhouses. A beam with a cross section of 100x100 mm is suitable for the base.
- Installation of the profile on the base.
- Installation of vertical supports using metal corners.
- Installation of horizontal supports.
- Assembling the folding top frame and installing it on the hinges.
- Cutting polycarbonate sheets and installing them to the profile using self-tapping screws.
After this, the prepared soil is poured into the greenhouse. You can grow seedlings, herbs, short vegetables, berries and flowers in a greenhouse.
Competent preparation for construction
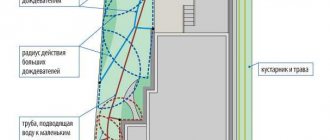
To begin with, it would be useful to study the issue of choosing a location for a greenhouse, find out the intricacies of constructing a structure and draw a project (drawing) of a future structure.
Advantages of a greenhouse made of metal profiles
Greenhouse made of metal profile
A greenhouse made of metal profiles has many advantages:
- It is relatively light, but strong and stable.
- Such a greenhouse is not afraid of any natural influences, especially wind and snow.
- The greenhouse is easily and quickly assembled and, if necessary, disassembled. You can place it on pre-prepared soil in any area. In this case, a foundation is not required.
- Such a greenhouse is covered with film, but polycarbonate can also be used.
Selecting a profile for a greenhouse
The profile must be at least 2-3 mm thick
Before construction, you should decide what profile it will be made from. There are several types of metal profiles:
- round pipes, the diameter of which is about 5 cm, are perfect for a vertical frame stand; for strength, they are connected with corners by welding;
- a square or rectangular metal tube, the wall thickness of which is about 2-3 mm;
- profile for plasterboard, the material required for installation is inexpensive, easy to cut with special scissors, fastened with a self-tapping screw, the structure is durable and, with proper care, durable;
- an aluminum profile is expensive, but with its help you can build a greenhouse with sliding sides, which is very convenient for organizing ventilation.
Planning and preparation for construction
At the initial stage, you should think about where the structure will be located and what shape it will be. More often, garden greenhouses are built separately in the form of a rectangular house with a gable roof. This design is the easiest to assemble. For this, a straight profile is used.
The greenhouse “house” is easy to assemble and disassemble
You can assemble a greenhouse with an arched roof. To bend metal tubular profiles with an arc, you will need special equipment. If you don’t have one, you can contact a hardware store that provides the service of manufacturing metal arches using a pipe bender.
The easiest way is to make your own greenhouse arch from a plasterboard profile. Its sides are cut with scissors, and then the strip is bent into an arc. If a corrugated pipe is used for an arch, then it is cut from one edge with a grinder, bent, and then welded.
When designing a structure, you need to make sure that it is durable. It is better to purchase a galvanized profile for greenhouses; it costs more than usual, but the advantage is that rust will not appear on the metal if its protective surface layer is not damaged during installation.
The parts are connected using self-tapping screws. The greenhouse will eventually turn out to be collapsible. This is convenient if you need to move it to another place.
Dismantling is painstaking and does not require special knowledge, and subsequent assembly will take little time. If desired, you can attach a greenhouse to any building: bathhouse, utility room, garage or house. In this case, the roof is made pitched.
A greenhouse with a pitched roof can be attached to a house
How to make a polycarbonate greenhouse with your own hands (video)
Today, any summer resident can buy a ready-made greenhouse (affordable greenhouses from 9,000 rubles can be purchased in Kazakhstan), or he can save money and build it himself. In order to carry out construction work, it is necessary to determine the size and shape of the greenhouse, choose the material for the frame and polycarbonate frame. Based on the professional advice outlined above, you can easily build a greenhouse on your own!
- Author: admin
Rate this article:
- 5
- 4
- 3
- 2
- 1
(0 votes, average: 0 out of 5)
Share with your friends!
Step-by-step construction of a rectangular greenhouse from a profile
Many gardeners recommend building a greenhouse with your own hands from a plasterboard profile. After all, such a greenhouse has many advantages. Easy to assemble and, if necessary, dismantle. The frame is lightweight and can be moved if, for example, you need to build a foundation or move it to a new location. The profile is one of the reliable and durable materials. Such a greenhouse will last for many years.
Preparation of necessary materials and drawings
The roof shape can be either arched or straight. Cover the greenhouse with film or polycarbonate.
Profile frame for plasterboard
Before construction, you need to collect tools and purchase materials. During work you will need:
- rack galvanized profile;
- guides;
- several packs of flat-head screws;
- screwdriver;
- scissors cutting metal;
- level;
- mounting measuring tape.
In the construction of any building, a well-drawn drawing is important. At the planning stage, not only the shape of the future greenhouse is thought through, but also its size, functionality, and convenience.
Having drawn up a visual drawing, it will be easier to navigate during the preparation and assembly of parts.
Finished drawing of a greenhouse 3×6 m
The size of the greenhouse directly depends on the site. Usually they make a structure 6 meters long, at least 2.5 meters high, and about 3 meters wide. The dimensions indicated are approximate. If desired, the building can be made larger or slightly smaller. In a small stationary greenhouse, if it is narrow, it is inconvenient to work and care for plants.
General rules and sequence of frame installation
When the drawing is drawn up, all materials are prepared, you can begin assembly. Everything is done in a clear sequence. The frame is assembled near the territory where it is planned to build a greenhouse from the profile with your own hands.
- The first step is to prepare the place where the greenhouse will be installed. Everything is cleared, garbage is removed. It is important to level the area as much as possible.
- Markings should be applied for the construction of the frame. If necessary, a foundation is made of boards, bricks or concrete. Here we need to emphasize that a greenhouse placed on a foundation will last longer.
- Galvanized posts are divided according to length. The base of the frame is assembled first. It is to this that all elements will be attached with self-tapping screws.
- It is important to assemble the end part, the doorway, on a flat and hard surface, and then attach it to the base.
Greenhouse assembly steps
All elements are assembled on a hard surface
The reliability and service life of the structure directly depends on the proper assembly and installation of all components. There are several rules for making a greenhouse from a profile yourself. By following these instructions, you can ensure that your greenhouse will last a long time.
- The back wall is assembled first. It is necessary to fasten the profiles with self-tapping screws to form a rectangle. The transverse part is inserted with an edge, and then secured with a self-tapping screw.
- When the back wall is assembled, they move on to working with the roof. First, its middle is measured, and then the profile intended for the roof is attached.
- It's time to assemble the front part. Everything is done in the same way as assembling the back of the greenhouse, because they are identical in size.
- The side walls are built last. It is important to securely fasten the parts to the self-tapping screws.
The greenhouse frame is ready. It needs to be tested for strength. If it is doubtful, the structure is further strengthened inside with the help of diagonal inserts or transverse elements are added. Now that the frame is in place, all that remains is to sheathe the greenhouse, make doors and vents.
How to make an arched greenhouse
There is no need to make the greenhouse very high - it must be strong and stable. The organization of braces is an important point. Without them, the greenhouse will not survive the winter, especially if there is a lot of snow. They build a greenhouse frame from PVC profiles, pipes, and metal profiles for drywall. The difficulty is that in arched structures you cannot make a mistake in size, and preparation, assembly and installation are carried out in stages.
Finished drawing of an arched greenhouse made from a profile pipe
How to cover an arched greenhouse
The arched frame can be sheathed with film or polycarbonate sheets. Film covering loses. It is short-lived and afraid of low temperatures. After harvesting, you will have to remove it from the greenhouse frame. This is inconvenient and requires additional effort and time.
It is better to use polycarbonate for covering the profile frame. Flexibility, strength and lightness are the main advantages of this material. Disadvantage - polycarbonate sheets have a standard size, so you need to adjust or cut the sheets, which is more difficult.
Arch frame made of V-shaped profile
Preparing the foundation for an arched greenhouse
To ensure that the greenhouse lasts a long time and the metal profile does not become corroded, it is necessary to take care of the foundation. It can be made from concrete, wooden beams and other building materials. Which option to choose is up to you to decide. It all depends on the money allocated for construction.
You will have to spend a lot of money on a concrete foundation. Its width should be at least 20 cm. It is also recommended to deepen it to the distance where the soil freezes. The strapping must be made of wood or a metal profile.
You can prepare a different foundation for the greenhouse, more economical and simpler. Considering that polycarbonate greenhouses are lightweight, it is possible to organize a greenhouse structure on concrete posts. They also need to be deepened into the ground and tied with beams or profiles.
Installing a greenhouse on a foundation increases the service life of the greenhouse
During foundation preparation, it is important to control geometric accuracy. It is enough to make a mistake by a millimeter, and the structure will not survive the winter. All diagonals must be the same and equal.
Laying out the frame and preparing the arches
When the foundation work is completed and the piping is ready, you can start breaking down the frame. To avoid confusion, experienced builders recommend drawing on the harness where each part should be located. It is important at the initial stage of construction to indicate where the arched structure, doorway and other elements will be located.
Preparing arches is not an easy task. They should all be the same. First, a template arc is made, after which the entire geometry is checked. If the dimensions and bend are met, all other arched parts are completed. In cases where it was not possible to make all the arches absolutely identical in size, you should not be upset. You can always correct them by squeezing them.
Holes are drilled in each arc for fastening parts. The elements are connected using bolts.
Greenhouse assembly technology
It is important that all arcs are the same
When assembling an arched greenhouse from a profile, it is important not to make a mistake in installing the first arch and strengthening it. It is to this that all subsequent elements of the arch will be attached. Even a millimeter shift is unacceptable. The frame is assembled in stages:
- fasten the parts of the first arc with bolts, strengthen them with braces, and also be sure to check for verticality;
- then assemble all the arcs;
- using straight profiles, connect the arched elements to each other;
- when all the parts of the arch are mounted, it is necessary to attach an additional metal profile from below to each arc of the greenhouse to make the structure higher;
- add horizontal elements that will increase strength;
- assemble the front and rear parts of the structure and attach them to the frame at the very end; at the same stage, install doors and windows;
- move the assembled frame to the desired location, check for stability (if necessary, strengthen it with additional horizontal inserts), secure the legs and sheathe them.
Scheme of an arched greenhouse with dimensions
As you can see, it is quite possible to build a good greenhouse using metal profiles with your own hands. Such a greenhouse will turn out to be much cheaper than a purchased one, and will be in no way inferior in quality. It is important to correctly draw up the project and, having manufactured all the parts, carry out the assembly accurately.
Does a greenhouse need a foundation?
Most small greenhouses that are used only during the warmer months do not have a foundation. This has its advantages: the construction of such a greenhouse is cheap, but at the same time it quite successfully copes with its main functions. But for those who live in a region with strong winds, this option is not suitable. Greenhouses without a foundation have increased windage, so strong air currents can overturn the structure.
If the greenhouse will be used not only in summer, but also in winter, the foundation should become a mandatory stage of construction. As a rule, a strip base is built, to which the vertical frame supports are later welded.
You can grow vegetables and herbs at your dacha not only in open ground, but also in a greenhouse. The choice of design itself plays a key role in obtaining a rich harvest. Greenhouses made of polycarbonate are recognized as the most practical and functional, but before purchasing, you need to study the criteria by which the design is selected.
Polycarbonate greenhouse
The most practical solution for covering a greenhouse is two-layer single- or double-chamber plastic sheets called “cellular polycarbonate”, which have parallel oriented stiffening ribs. This is a modern material with good characteristics. Actually, polycarbonate sheets are not “honeycomb”. But the honeycomb structure is much more suitable for greenhouses because:
- stiffening ribs in the “honeycomb” greatly strengthen the material;
- The honeycombs inside are filled with air, and as you know, air is the best heat insulator.
Cellular polycarbonate can be of different colors, but, of course, for greenhouses it is better to use transparent.
Transparent cellular polycarbonate is a suitable material for arranging a greenhouse
Material advantages
- Strength - compared not only to all types of films, but also compared to glass; polycarbonate will withstand large hail and an accidental hit from a ball or stone.
- High sunlight transmittance (92%).
- Less ultraviolet transmittance than glass due to light scattering in the combs - there is no need to protect delicate plant varieties during the hottest part of the day.
- High thermal insulation properties due to the honeycomb structure - more than glass or any films.
- It is resistant to temperature changes from -350C to +500C, and does not become brittle as a result, like films.
- Has dust-repellent properties.
- Lightweight, 15 times lighter than glass.
- It is flexible, so it can easily be placed on a frame of any shape.
- It is plastic when heated, so it easily fits onto a frame of a very bizarrely curved shape.
- When in contact with an open flame, it does not burn, but melts - without releasing harmful gases.
- Easy to cut and drill.
- Typically supplied in sheets of convenient sizes of 6 x 2.1 m, 3-4 sheets are required per greenhouse.
- Very beautiful.
- The main advantage is low cost with such impressive characteristics.
Flaws
- Relative fragility - polycarbonate “burns out” in a few years if the sun load is too high. However, in our latitudes it is not so great.
- Difficulties with heating a greenhouse in cold weather are due to the fusibility of polycarbonate, which necessitates a special approach to heating devices or the use of a greenhouse only in relatively warm seasons.
Heating a polycarbonate greenhouse with a heating boiler with hot water pipes
- The softness of polycarbonate - there is always a risk that an insufficiently strong frame with polycarbonate sheathing will collapse under the weight of snow.
A polycarbonate greenhouse bent under the weight of snow
It is necessary to carefully follow the rules for installing polycarbonate - you need to cover the ends of the sheets, otherwise moisture will get into the honeycombs and microorganisms will breed, which will worsen the transparency of the sheets and the appearance of the greenhouse.