A lot of people would dream of having a bathhouse at their dacha. So, these dreams are quite feasible, because you can build a bathhouse with your own hands! Where to begin? It is enough to have a desire, and we will now find out the next steps.
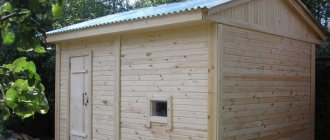
Do-it-yourself wooden bathhouse in the country
Bathhouse project at the dacha
Undoubtedly, the first step towards your goal will be the design of the bathhouse you would dream of. You will need to think about the place where to build and install it, as well as all other details related to dimensions, materials, etc.
Design of a bathhouse at a summer cottage Of course, a lot will depend on what kind of summer cottage you have. Considering the size of the dacha itself and the availability of free space for construction, it will already be possible to imagine the size of the bathhouse.
Among the practical tips that are worth considering at the first stage of preparing a country bathhouse project is fire safety. Also, you should not place it near your neighbors’ bathhouse. A very good option would be to install a sauna near a lake or river, if there are any nearby.
Types of foundations for a bathhouse
As a rule, when building a foundation, it is first necessary to take into account the properties of the soil on which the future bathhouse will stand. If the groundwater of the site runs deep, then it makes sense to make an ordinary strip foundation, which is the simplest and most reliable. However, when groundwater is close to the surface or when the soil is very rocky, a pile or pile-screw foundation is best (see Which foundation is best for a bathhouse).
Any of these types of foundations must be built taking into account the depth of freezing of the ground, and since each region has its own, it would be better to inquire about this information additionally. The foundation is poured below the freezing point of the soil by 10-15 cm, in order to avoid its further deformation during the cold season. In addition, it is recommended to make it wider than the base of the building by at least 10 cm and be sure to cover it with waterproofing material.
In favor of a pile or columnar foundation, it can be noted that it will cost slightly less than a strip foundation, since less material will be required to fill it. Another advantage is that it is quite suitable for building a bathhouse from timber, since its completed structure will have a relatively low weight. The main thing that needs to be taken into account when pouring piles is their location relative to each other, which should not exceed more than 2 m.
Selecting material for building a bathhouse
When an approximate image of the future building already exists, we move on to practical actions, namely the choice of material for construction.
In fact, various materials can be used. For example, the most economical in terms of costs will be blocks and bricks. Of course, this will have its own advantages and nuances. In terms of operation, care, and maintenance, this is a very good option. A significant disadvantage will be the retention of heat for a short period of time. It can also be confusing in terms of the atmosphere inside, because brick is still brick; not all bathhouse connoisseurs will like such an interior.
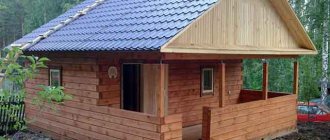
Wooden sauna with a brick stove Therefore, most people still prefer natural saunas, which are made of wood or logs. The material is environmentally friendly, practical, and even smells different (directly during the bath). By the way, this is a very important factor, because the aroma of wood resins has a positive and calming effect on the human body.
Wooden sauna in the country with a small veranda
Option No. 5 “Two-story beautiful bathhouse with barbecue”
Such a compact wooden bathhouse (86 sq.m.) is a real “center” of health and entertainment.
The first floor (50 sq.m.) with four rooms (relaxation room, locker room, steam room and washing room) is reserved for standard bath procedures, but on the second, attic floor (36 sq.m.) there is a spacious billiard room and a guest room.
The layout of the building is very successful, all the extra square meters are allocated for the living room, and the work areas are extremely functional.
The drawing of the bathhouse opens up to a barbecue terrace hidden under a massive gable canopy, where everything is provided for a great, fun holiday.
Return to content
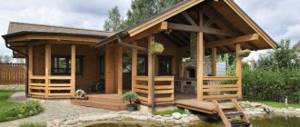
Option No. 6 “Two-story miracle bathhouse + rest house”
This project of a wooden two-story bathhouse (51.3 sq.m.) is practical and convenient.
The compact building is divided into two zones: “relaxation” and “residential building”.
On the ground floor (26 sq.m.) you will enjoy all the delights of the spa
(vestibule, rest room, locker room, washing room and steam room),
on the second (25.3 sq.m.) – comfortably accommodate your family in two spacious bedrooms.
The bathhouse takes up little space on the site, but combines two functions,
Therefore, this hybrid version of the “steam room/house” for today
is the most popular summer cottage project.
Return to content
Some useful tips for building a bathhouse in your country house
Building a bathhouse in a country house is quite a laudable and good goal. But there are several things to consider, and the most important of them is a clear action plan step by step.
Here are the approximate steps you will need to take to achieve your goal:
- The first step is laying the foundation.
- Next comes the construction of walls.
- If the bathhouse has several floors, we build an interfloor ceiling.
- Roofing work.
- Insulation of floors and walls.
- Exterior finishing.
- Installation of the stove and chimney.
- Equip a shower.
- Interior work.
- Furniture and accessories.
Stages of construction of a bathhouse Each of the stages is important in its own way, and if you follow each one in turn, then after a little time it will be possible to invite friends and relatives to the grand opening.
Bath floor
The problem area during construction is the floors. How to build a bathhouse? What are floors made of? The floors in the bathhouses are made of wood and concrete.
Wooden floors are trending. Concrete floors are durable and can last 30-40 years. Making a concrete floor under facing tiles is a good option. The tiles are glued with a slope to drain water into the tray. The best materials for wooden floors are larch and oak.
Points to consider when choosing a place for a bathhouse in a summer cottage
Since quite a few people have already built a bathhouse in their country house on their own, and some of them made mistakes, let’s take a little look at the nuances in choosing a suitable place for construction.
- Some believe that it is best to build a bathhouse near a pond when it is close to the dacha.
On the one hand, this is not bad, because after a good steaming after a bathhouse, jumping into a pond, rather than taking a shower or a bucket of water, will be an incredible pleasure. On the other hand, there is a danger of a flood or flood, which can damage or even destroy our building. If you still want to build near water, calculate the safe distance and some kind of protection. - There are recommendations that it is better to make the bathhouse an extension to the main house. This will not only significantly reduce the use of materials, but will also save on electricity.
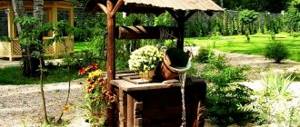
- The best place to choose is somewhere in the backyard, where there are no drafts. You can beautifully decorate this area by planting trees or flower beds.
- Be sure to consider the aspects of waterproofing, vapor barrier and ventilation. These points should be thought through in the early stages of planning and drawing up a plan. Otherwise, it may result in unpleasant odors and malfunctions in the future.
- You should not build a bathhouse somewhere near a road or field. Dust may get in there, which no one wants.
- Fire safety issues must be clearly thought out.
- The south side is the best for building.
- Another point is, of course, the neighborhood. It is highly not recommended to build in close proximity to neighbors and their property. This threatens with envious glances and slander, as well as possible scandals over the loud reception of guests or the aroma of the bathhouse.
- It is strictly forbidden to build a bathhouse near a well or water well. According to the rules, you will need to move at least 15-20 meters away from the object.
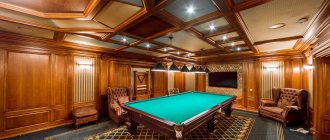
Interior design of a bathhouse in the country
SONY DSC
We build a bathhouse at the dacha with our own hands
So, we have already drawn up a plan, selected the necessary material, found a place for a bathhouse and took into account all the important points. Now you can safely get to work.
We build a bathhouse on a summer cottage with our own hands
Foundation for a country bath
First of all, a trench is dug and the foundation of the room is made. It comes in different types, for example, there are columnar, pile and strip. Which one to choose will depend on what materials you will use during construction.
Mostly they use a strip foundation, which is considered the most durable and reliable.
Progress:
- The bottom of the trench must be covered with wet sand and compacted thoroughly.
- Next, fill it with 20 centimeters of crushed stone, strengthen it all with reinforcement and completely fill it with concrete.
- After everything has hardened, a waterproofing layer is laid from a material specially designed for such work. Then brick in 5 rows, not forgetting to leave the required number of holes for ventilation.
- You can use wooden log houses, but they will be less reliable, unless they are reinforced with a brick wall, which consists of one row.
Construction of bath walls
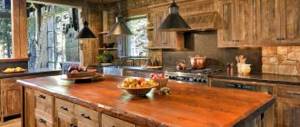
It is best to make walls from wood, because it retains heat well, and is even said to calm the nervous system.
Construction of bathhouse walls at the dacha However, in the modern world, natural stone and brick have begun to be in demand. By the way, not bad options in terms of fire safety. Still, let's consider the classic version of building walls using wood.
Progress:
- The thickest logs are placed on top of the foundation, and the upper part must be treated with mastic and antiseptic. This will protect against pests and provide moisture resistance.
- There are two options for laying in the corners - “in the paw” or “in the bowl”. The essence of the first option is to give the edges of the logs the shape of a swallow's tail. And the second is when the ends of the log extend beyond the perimeter (protects against the ingress of water and the formation of drafts).
Roof for a bathhouse in the country
And so, when the walls are ready, we move on to finishing the outer room - installing the roof. First you will need to assemble a solid roof structure by installing rafters there. If the chimney is located in the roof, it is necessary to leave a hole for it.
The final stage will be the roof. Various materials can be used for it, including slate and tiles.
Floor inside a bathhouse in a garden plot
The main task for the floor will be its proper insulation. In order for it to remain dry and warm, you need to insulate the base inside. This is done using waterproofing and insulating mineral wool. Next, dry backfill in the form of expanded clay is used, and a layer of vapor barrier and insulation is laid. Only then will they finally lay down the board.
Floor
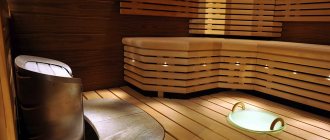
Installing a steam room in a bathhouse
The size of the steam room will depend on the number of people that can fit maximum.
Installing a steam room in a wooden bath
The size of the oven itself and the type of shelf will also be important. It can be different, and depends on whether you can only sit in the bathhouse, or also lie down. The estimated length of the shelf when sitting is from 50 cm, while lying down – no more than 180 cm. It can be flat or with special equipment for the head.
Small-sized timber bathhouse - selecting building materials
It should be of such a size that all visitors feel comfortable.
Modern baths are divided into 2 types:
- Dry, in which the temperature varies from 60 to 120 degrees Celsius. Humidity ranges from 5 to 25%. The name of this design is Finnish sauna.
- Raw ones, in which the temperature is lower (50–70 degrees Celsius), but the humidity is higher (from 80 to 100%). This building is called a Russian bathhouse.
The last type is a wooden building, which has a warm dressing room, a washing room and a steam room with a stove and shelves.
The Finnish sauna consists of a steam room where essential oil or herbal infusion is dripped onto the stones. The healing vapors of these substances have a beneficial effect on humans.
The Finnish sauna is characterized by low humidity.
And although the function of these two types of baths is the same, the appearance and size may differ significantly.
It is the Russian bathhouse that is most often built on private plots. This building has three rooms:
- locker room and rest room at the same time;
- washing;
- steam room
It is also worth providing a dressing room and a place to store firewood.
This option is suitable for people who prefer to spend time alone in the steam room, as well as for small families. It can be made not as a separate structure, but as an extension to a residential building. In this case, a waiting room is not needed. All bathhouse premises should be as small as possible without losing ease of use.
Before building a bathhouse, you must draw up a project
The washing room is only needed for washing. Therefore, its area can be about 1 m2.
The size of the steam room depends on the position in which the owner prefers to spend time here. For sitting shelves, you can allocate a room of 1 m2. However, remember that since the distance from the owner to the stove will be minimal, there is a risk of getting burned from the steam. This can be avoided by positioning the stove in such a way that the steam is directed in the opposite direction from the vacationer.
It is best to do it separately. In this case, the presence of a waiting room is mandatory. Thanks to it, winds and frosts will not be scary in the interior. In addition, this is a great place for drying brooms and storing firewood.
The size of the locker room should be such that each family member has at least 1 m2 of space. The sink area should be a little larger, especially if you have children. Find a place for a wide bench (180x60 cm).
In a bathhouse for several people there must be a waiting room
The height of the ceiling and the size of the shelves in the steam room are determined depending on the height of the tallest family member. His head should not rest against the ceiling when sitting on the highest shelf, but lying on the benches should be as comfortable as possible. The following parameters are considered sufficient for a bench:
- length 180–200 cm;
- width 60–65 cm.
We invite you to familiarize yourself with the chimney in the bathhouse through the wall
It is better to place the shelves in it in two rows along all the walls. The lower shelves are suitable for those who prefer to sit. A 40cm width will be sufficient. And the upper shelves are for bed-ridden procedures.
Remember that it will be difficult to heat a bath that is too large
The lounge room should have enough space for guests. The size depends on how many people you are going to invite. It can be combined with a dressing room and equipped with wardrobes.
Finnish sauna
This bathhouse is heated using an electric stove. Otherwise, it is very similar to its Russian counterpart. Unless the sauna air dries wet wooden elements faster and prevents them from deteriorating from moisture.
The internal appearance of a Finnish sauna is very different from the Russian one we are used to
Design of a bathhouse at the dacha with photo
Unusual design of a bathhouse in the country
The final stage will be finishing work (inside and outside). You can decorate it using various decorative elements, as well as from improvised means that are available at the dacha. Among them, broken glass or non-ferrous metal are often used. The design of a bathhouse in a country house is usually not particularly inventive. Because they build it out of wood, but simply leave the wooden walls unfinished, and add furniture to the interior, also made of wood. Tables and benches made from logs and tree trunks are popular here, as they look more unusual and stylish than ordinary furniture made from boards. But what can we say, let’s look at a photo of the design of bathhouses in the country:
Guy in the bathhouse: interior decoration - photo
And a few more words about the design of a steam room in a bathhouse. Here it is better not to come up with something new, but to use proven solutions and ready-made schemes. These are wooden walls, floor and ceiling, the chambers are also made of wood, most often in two tiers, so that those who like it hotter sit higher, and the rest - on the lower step. Here is a photo of a steam room in a bathhouse - this is roughly what they look like in all dacha projects.
Summing up, we can safely say that it will not be so difficult to make a bathhouse in the country on your own.
It is possible to use economic materials, or vice versa. In any case, the outcome of the goal must be unsurpassed. And this means not only the building itself, but also the health that the bathhouse will bring. It has long been proven that if you take it at least once every one or two weeks, the body and skin are cleansed, and stress disappears, and instead a smile from the heart appears. Did you like the article? Share on social networks!
Bathhouse Construction Guide
So, the construction of a bathhouse begins with the first crown, which is called the strapping. It should be of a slightly larger cross-section and usually a 20x20 cm beam is used for these purposes. It is recommended to lay it on a substrate made of transverse slats on top of the foundation, 1.5 cm thick and with a pitch of about 30 cm, and the gaps between them must be filled with insulation. The connection of the strapping crowns is carried out in the floor of the tree, and in order to prevent them from moving, a secret tenon is made.
Next, insulation is laid on this crown and the construction of walls begins. For insulation, it is considered more convenient and practical to use flax-jute fabric, which is sold in the form of rolls and, after laying it, the walls do not require additional caulking. When connecting beams at corners, methods such as cutting with and without remainder are used, which in turn are:
- The floor of the tree is a simple bowl.
- In the fat tail.
- In "ohryap".
Cutting without residue:
- On the root thorn.
- On an insert tenon in the wood floor.
- On an insert tenon.
- In the paw.
The most commonly used connection is the claw connection. A special template is made for it, according to which all other ends are sawed. Also, such a connection is additionally reinforced with special wooden, or less often iron, dowels, which are driven into pre-drilled holes. Before hammering in the dowel, the connection must be laid with insulation to prevent blowing through the corner.
Using the same dowels, the beams are also connected along the walls, thereby holding them in a vertical position and eliminating deformation during shrinkage. Basically, such joints are made at a distance of one or one and a half meters, as well as at each corner and 15-20 cm before the door or window opening. In order to make such a connection, it is necessary to drill a through hole in the upper and the next beam, as well as half the thickness of the lowest one - the third one. Then drive the dowel in there so that it goes to a depth of 5 cm of the top beam. This is done to ensure uniform shrinkage of the future structure.
After the walls are ready, you need to build a temporary roof, and when the structure gives final shrinkage, make it permanent.
This process must be taken as seriously as possible. Beauty, convenience and safety depend on this stage.
The best choice for finishing work will be natural wood.
For a steam room, it is best to use lining made of linden or larch. Linden retains its original appearance for a long time, does not darken or crack. And larch is not afraid of fungus, mold and rot. Pine is perfect for finishing a dressing room.
The work consists of several stages:
- Install sheathing on the walls and ceiling. The distance between the beams should be several centimeters less than the width of the insulation.
- Place steam and heat insulating material between the beams.
- Then attach the cladding.
Rolled insulation is laid between the beams