You can hardly find private property owners who would not like to have a sauna near (or in) their house. Due to the high cost of such construction, for many of them this dream remains a dream forever. Ordering the construction of a sauna from a construction company or hiring a team for this is quite expensive. You can save on construction, but if you build a sauna in your home or near it with your own hands. This is not so easy to do, but the result will be worth all the effort and expense.
First of all, you need to decide where the sauna will be located relative to your place of residence. If the house was built a long time ago or purchased ready-made, it is quite natural that the sauna building will have to be built separately. If construction is just underway and the project involves the construction of a fairly large building, a place for a sauna can be provided inside the house. Some owners of ordinary apartments are not at a loss either: they build themselves a small sauna on the site of a former bathroom or even on the balcony (video).
Design
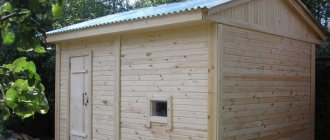
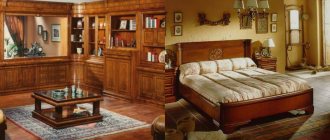
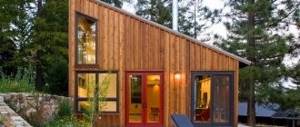
Depending on the existing conditions, sauna projects are also being developed (photos 1-4).
Photo 1.
Any construction project begins with design. If you create a sauna with your own hands in an existing room at home, then it will require simple re-equipment.
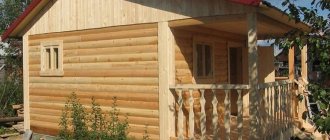
Photo 2.
When building a free-standing sauna, you will have to start from the foundation itself. The sauna can be made one- or two-story. For small one-story buildings, the projects shown in photos 1 or 2 are suitable. If the budget allows, the sauna near the house can be made two-story.
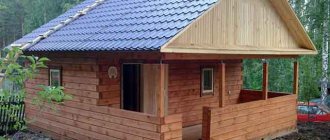
Photo 3.
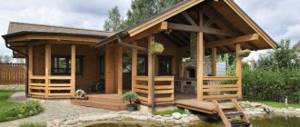
On the ground floor it is worth placing the sauna itself, a washing room (or bathroom), a locker room, a swimming pool, a toilet, and a boiler room (photo 3). On the second floor you can make a recreation room or, for example, a billiard room (photo 4).
Photo 4.
Interesting projects are offered by some craftsmen who built a sauna in their private home with their own hands (video).
Choosing a place to build a bathhouse
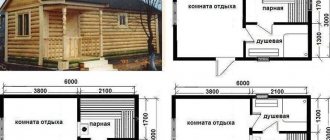
Construction of a village bathhouse will not take much effort and time if you strictly follow the instructions given here and carry out the construction of the bathhouse in stages. Let us briefly list all the stages of preparation and construction of village baths, here they are:
- choosing a place for a bathhouse (usually such a place is a flat “platform” near an open reservoir or in an area next to the owner’s house, not adjacent to it, which reduces the risk of a fire);
- choice of material (usually natural coniferous wood is chosen for baths);
- creating an initial design for a future bathhouse (in which it is necessary to take into account all the features of the structure being built: material, size of buildings, installation of electricity and sewerage);
- preparation of tools (the full list of tools necessary for construction includes: an angle grinder, a router, a grinder, a circular saw, an axe, a plane, a hacksaw, a hammer, a chisel, an electric drill, a sledgehammer, a screwdriver, scissors, a knife, a plumb line, a construction level and a tape measure);
- creating a foundation (its type is determined depending on the dimensions of the bathhouse being built and can be either a concrete strip or a column);
- laying a log house or timber (with or without insulation);
- construction of a roof (single or gable);
- installation of communications (it involves supplying electricity to the bathhouse and installing a water supply with a drainage system);
- insulation of the walls, roof and floor of the future bathhouse (the selection of specific materials for insulation depends both on the construction budget and on the features of the village bathhouse structure being built);
- interior decoration (insulation, waterproofing).
The construction of a village bathhouse, like any other house construction, begins with the creation of a foundation. Most often, such a foundation has a strip structure and is installed using a concrete solution (which consists of 1 part concrete, 5 parts crushed stone and 3 parts sand). Its depth is about 70 cm, its height above ground level is no more than 15-20 cm, and its width is calculated depending on the thickness of the future walls made of logs or timber (20 cm thicker than the wall).
To build the walls of village baths, they use felled trees of deciduous or coniferous species with a diameter of 20 to 40 cm. Before laying, the logs are processed with a plane, giving them an even cylindrical shape and a smooth surface. A longitudinal groove is cut out in each log, due to which the logs are stacked one above the other.
Most often, a lean-to type of roof is used for village baths. When installing such a roof, a mauerlat is fixed under the top crown of the log house, onto which the roofing rafters are subsequently laid. A sheathing with insulation is laid over the rafters. The roof is covered with slate or metal tiles on top of the insulation. When insulating, the spaces between the wall logs are filled with moss or tow, and the ceiling is covered with fiberglass or mineral wool.
To supply electricity to the bathhouse, special underground channels are dug, in which a cable is laid or an “overhead line” is installed. Similar channels are dug for laying water pipes. Drainage is ensured by a drain pipe, one end of which goes to a collection gutter on the floor of the steam room, and the other to a storage well.
One of the most important points is the choice of location for the future building. The location must satisfy both existing legislation and ease of use. Basic recommendations that can help you make your choice:
- if there is a body of water nearby, you should not place the bathhouse too close to it, as the building will be in danger of flooding;
- it is necessary to decide how the bathhouse will be located relative to the house: a separate building or will it be attached to it, since each option has its own positive and negative sides;
- it is believed that it is better to build a bathhouse in the backyard, in relative privacy;
- It is necessary to provide for mandatory ventilation during construction, as well as to provide for wastewater disposal;
- It is highly not recommended to determine the location next to a nearby road;
- when placing a building, it is necessary to take into account the cardinal directions and the direction of the wind: the best place is the southern part of the site, protected from the wind so that it does not disturb vacationers, it is better to have windows facing west;
- It is desirable that the bathhouse be located at some distance from other buildings, and if it is an extension to the house, it is imperative that during construction it is necessary to comply with fire safety rules, as, indeed, when constructing a separate building;
- when determining the location of the bathhouse and its size, it is necessary to observe the distances established by the rules from the boundaries of the site, so that the neighbors do not experience discomfort in the future and do not make claims to the owner;
- It is recommended to maintain a distance to the water intake (well or borehole) of no more than 20 meters.
a) timber 150x150 mm, although it is possible to use timber with a cross-section of 100 mm or 200 mm;
b) floorboard (edged board 150x50 mm 4 meters long is excellent);
c) hardwood boards for ceiling construction (usually lining with a width of 100 mm and a thickness of 20 mm or more is used);
d) material for wall decoration (as a rule, the same lining is used);
e) material for vapor barrier (an excellent option would be to use a vapor barrier film);
e) waterproofing (it is advisable to use penofol, although polyethylene film is suitable);
g) ceiling insulation (mineral wool materials are a good option);
h) sheet asbestos for insulating wooden structures from temperature influences, including for walls near the stove and elements located next to the chimney;
i) cement, sand and crushed stone for foundation construction (recommendation - cement should be purchased before starting construction);
j) roofing material for the roof, which can be selected based on personal preferences and the main thing is that it fits seamlessly into the surrounding roofs of other buildings;
We suggest you familiarize yourself with How to attach a cable to a concrete wall?
Thatched roof is comfortable unusual and cheap
l) insulation for the inter-crown space (it is better to use jute, although moss or tow are perfect).
The best time to start construction is spring, since after completion of the main construction work it is necessary for the timber to dry and shrink. This requires at least 6 months.
Having understood the features of the projects, you can think about materials suitable for building a bathhouse. One of the most attractive solutions of recent times is the use of SIP panels, which are increasingly in demand in low-rise buildings.
These structures are a pair of oriented strand panels, the gap between which is filled with polystyrene foam. Thanks to the lightness of the structure, you can do without a heavy, complex foundation and complete all the work quickly. At the same time, the level of thermal insulation of the walls is very high, it far exceeds both bricks and cinder blocks.
The bad thing about sandwich panels is that you won’t be able to do the work with them yourself. The frame should be made only by trained specialists using proven technology.
Another important point is that the internal walls will need to be covered with a waterproofing material, preferably plastic. You should use foil and leave an air gap between it and the walls. You can build a sauna house entirely from wood yourself.
This is a deeply traditional material that has been used in the construction of baths for centuries. But wood comes in at least a few key varieties. Timber made from coniferous logs is used most often. It retains its shape, holds heat well - and at the same time often suffers from shrinkage. The external surface must be sheathed inside and out to achieve the most aesthetic appearance.
The cold is not allowed inside, and the walls get wet less if you use this material. As for the problems, you will have to wait until the prepared raw materials dry out; even after construction you have to wait for it to settle down.
In some cases, baths are built from boards, bricks, aerated concrete blocks and a number of other materials.
Start by choosing a suitable location for the building. The following recommendations will help you with this:
- the bathhouse should not be located too close to the reservoir - with such a location, flooding may occur;
- The bathhouse can be attached to the house or made into an independent building. Each option has its pros and cons, so in this regard the owner must make his own decision;
- the best place to build a bathhouse is the back yard;
- appropriate conditions must be created in the bathhouse to ensure effective ventilation and waste disposal;
- It is not recommended to choose a place near the road to build a bathhouse;
- It is best to build a bathhouse on the south side of the land. With this arrangement, the area of the building will be sufficiently illuminated by the sun's rays, and the wind will not disturb vacationers;
- If possible, the bathhouse should be built at a sufficient distance from other buildings on the site. If a bathhouse is attached to a house, this must be done in compliance with the relevant fire safety requirements;
- It is best to build a bathhouse at a sufficient distance from adjacent areas so as not to cause inconvenience to neighbors during their vacation;
- It is better that the bathhouse windows face the western side of the site;
- the bathhouse should be built at a distance of no more than 20 m from the nearest well or well. Do-it-yourself bathhouse in the country
The work is carried out in stages - from preparing the construction site to equipping the bathhouse with various accessories.
Clear the construction site of all kinds of debris, bushes, large roots and, in general, anything that could interfere with the foundation stage.
Site preparation
Types of saunas
Just 15-20 years ago, owners built standard bathhouses with a basic set of premises (steam room, wash room, small rest room and vestibule) on their plots with their own hands. There is now exceptional diversity in this regard. If you want to build something similar with your own hands, first choose the most convenient and attractive option for yourself. There are the following types of saunas:
1. Russian bath. The temperature in it is quite moderate (about +70°C), but the air humidity is very high. In this type of bathhouse, all existing electrical appliances and communications should be thoroughly insulated, since a large amount of wet steam increases the chance of electrical wiring faults, short circuits, etc.
2. Turkish hammam. Suitable for those who need very mild external conditions (hypertension, people with pulmonary diseases, etc.). The humidity in the hammam is high, but the temperature is very comfortable - about +40°C. You can stay in this mode for a long time, perform all kinds of SPA procedures and generally relax.
3. Directly Finnish sauna. It is characterized by very dry steam and high temperatures. Air humidity usually does not exceed the threshold of 10%, but sauna fans raise the temperature to +130°C.
To create such conditions, the doors in the sauna must be hermetically closed. This requires a special ventilation system and, of course, constant temperature control (for this, a special thermometer for extreme conditions is hung in the sauna).
One of the desirable conditions for a sauna is the presence of a swimming pool. Of course, if a room in an already rebuilt house is converted into a sauna with your own hands, the pool can only be built on the street. In a free-standing sauna building, this part should be planned and included in the project in advance.
Interior of a shower room in a Russian bath
The style of the wash room should correspond to the idea of a Russian bath. Comfortable and modern shower cabins can be installed here, but it is better to disguise them - hang a curtain or lay tiles with an ornament.
Huge tubs of water, which are installed on top, look more harmonious in the interior of a Russian bathhouse. The height of the containers must exceed the height of the person. To take a “shower”, just pull the rope - an invigorating waterfall is guaranteed.
In the shower room you can install shelves and cabinets where bath towels, sheets, felt caps, brooms and other steam room attributes will be stored.
The walls inside the shower can be made of wood, but tiles will be more functional. Ceramics are resistant to moisture, easy to clean, and prevent the appearance of fungus and mold. Lovers of everything natural can use pine boards in the shower - they are not afraid of moisture and fungus, and only pine exudes that unique pine aroma that fills the baths.
Foundation
If you decide to make a sauna separate from the house, you will have to start with the foundation. Most often, a columnar foundation is created for such a building (photo).
It is relatively inexpensive, and it doesn’t take much time to work. First you need to drill holes at the corners and load-bearing walls of the building (depth = 1.5-1.7 m). Load-bearing columns are installed in them. The so-called rand beams are laid on top of the pillars, after which you can begin installing the subfloor. A columnar foundation is quite easy to make with your own hands. He's quite reliable. Neither subsidence of the soil nor its heaving are dangerous for a building on such a foundation. But if the sauna near the house is two-story, with many rooms, then it is better to equip it with a strip or slab foundation. These structures can withstand heavy loads.
Walls and communications
After the foundation of the sauna is covered with a layer of waterproofing, we begin building the walls. You can build them with your own hands from galvanized logs, timber, bricks, foam blocks and other materials. The inside of the sauna walls are always finished with natural wood. Timber, boards or lining made from coniferous wood (fir, spruce, cedar, pine) are ideal, but if you don’t have it, you can also purchase it from deciduous wood (birch, oak). During the construction of a sauna in a house, you need to approach communications especially carefully. First of all, this concerns electrical wiring. Cables must be laid in dry pipe sleeves. In brick or block walls, special grooves are drilled for them. In wooden buildings, the wiring is hidden in pipes under the lining. Do not forget: the wiring must be arranged in such a way that in case of a malfunction it can be easily accessed. This is a mandatory fire safety requirement both in the house and in the sauna.
The walls of the sauna must be covered with a layer of hydro- and vapor barrier. Bituminous paper, glassine and materials of similar quality are suitable for this (photo above). The joints between the sheets must be glued with construction tape and covered with lathing (beams measuring 50x30 mm). You can insulate the walls using heat-resistant mineral wool, which is placed in the gaps of the sheathing. We do not recommend using polystyrene foam to insulate sauna walls. It does not tolerate high temperatures well and releases harmful chemical compounds.
After this, the ceilings and floors of the sauna are covered with wooden paneling. It is attached with self-tapping screws. In humid and hot rooms, the lining is not varnished! This also applies to saunas. After finishing with clapboard, you can fix the wooden shelves. They are mounted to the walls on wooden dowels. In general, in a sauna, where the temperature rises to +130°C, it is better to use natural wood as much as possible without any chemical impregnations (video). This material will provide maximum comfort during bath procedures.
Sauna stove
In the sauna, you can build a stove from fireclay (fireproof) bricks or install a ready-made stove-heater.
Do not forget that in a regular bath the steam is wet, so it uses stoves with open containers for stones (photo). Those who are steaming pour water on them, thanks to which they get wet and hot steam. In a Swedish sauna, it is better to use a closed heater (photo). It will give off dry heat.
Doors
Like the walls, all doors in the sauna, together with handles, are made only of wood. They need to be insulated (for this purpose the doors are made with two chambers). The door frame is sealed around the perimeter so that the door leaf fits as tightly as possible and does not allow cold air into the room. You can hang a so-called “canopy” on the top jamb. This is a piece of dense fabric such as felt or tarpaulin, which will additionally prevent the cooling of the sauna interior. These are the main points of construction and internal arrangement of a Swedish sauna. Examples of projects can be seen in the photo, and unclear points can be clarified in the video. With proper attention to detail, you will be able to independently build a real Swedish sauna near your home.
Photos of projects
Interior design features
Study the interiors of Russian bathhouses , photos that will be useful both for those who want to order the design of a bathhouse, and for those who will do the interior design themselves.
For decoration, you need to choose the right type of wood, as well as the type of coating and impregnation of the timber. The ability of wood to withstand frost, wind and water will depend on this.
In order for the interior to be not only harmonious and beautiful, but also safe, you should choose natural materials from durable and environmentally friendly raw materials. Therefore, the use of plastic in room decoration is significantly inferior in properties to wood, although it costs much less.