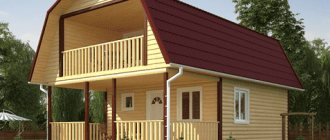
How to build a bathhouse yourself?
Building a bathhouse with your own hands is a difficult task and its implementation will require a certain amount of knowledge, which you will soon learn about.
To build a bathhouse with your own hands, you will need to familiarize yourself with the action plan:
- Design a bathhouse;
- Understand the stages of construction;
- Get building materials;
- Connect communications;
- Arrange the bathhouse from the inside.
After familiarizing yourself with the stages of construction, you need to decide on the place where the bathhouse will be located, since a lot also depends on the location.
The best option would be if:
- the bathhouse will be located on a hill, this will significantly simplify the installation of a water drain;
- there will be a river or pond next to the bathhouse;
- The window in the bathhouse will be located opposite the house, which will allow you to observe its firebox.
Next, it is necessary to take into account fire safety measures and distance requirements from the neighboring site.
For a garden house, the distance will be no more than 3 meters, and for buildings such as a bathhouse, this distance should not exceed 1 meter.
Next you need to start designing the bathhouse. It is important to pay attention to what material the bathhouse will be built from. According to the type of structure, the bathhouse can be frame, wooden, or made of stone and blocks.
It is best to order the design and drawings of the bathhouse from local designers; this will cost about 5,000 rubles. You can also search for ready-made sketches and photos of bathhouses on the Internet that best suit your preferences.
In the basement
If there is no suitable room in the house, you can consider the option of installing a sauna in the basement. However, it is very important to observe a number of conventions, namely:
- The basement must be at least 12 m2. Otherwise, being in the steam room will be uncomfortable.
- You won’t be able to organize a pool, since the project will be too expensive. Therefore, it is better to do it outside.
- As an alternative to the pool, you can make a shower. It takes up little space and also requires little cost to manufacture, unlike a swimming pool.
- The shower stall should be located in close proximity to the steam room.
- It is important to organize the supply of water, as well as the disposal of wastewater.
Organization of isolation
The basement is a finished building, so there is no need to think about building a foundation, walls and ceiling. It is important to pay special attention to the insulation of this room, namely waterproofing and sound insulation.
Considering that the sauna will be located at the base of the house, all work should be carried out efficiently and good material should be used. Otherwise, you can easily cause irreparable damage to the entire building.
Please note an important nuance: it is best to install a sauna in the basement close to the outer wall. This will allow you to organize ventilation of the room without any problems. Let us separately discuss the intricacies of insulation manufacturing:
- Waterproofing. The waterproofing material can be either coating or in the form of a sheet, for example, a rolled sheet. It is overlapped. As for the coating material, a layer is created on the surface that prevents the penetration of moisture.
- Noise insulation. In order not to create discomfort for people living above, it is important to take care of high-quality sound insulation. In this case, we are talking only about the ceiling. Today there are many materials that can be used to soundproof a basement.
Details
We all understand that the success of the final result depends entirely on the details. Therefore, be sure to consider the following nuances:
- Are the materials used flammable and is it possible to replace them?
- Is there access to utilities such as water supply and sewerage?
- Is there wiring in the basement and what quality is it? Please note that if exposed to high temperatures, it will quickly fail; worst of all, it can end in a short circuit.
- Is there a good ventilation system? Most likely, forced ventilation will be required.
- What is the height of the basement? It should be comfortable to stay in. Based on this, it is worth considering which floor is best to equip in this room. It is desirable that it eats up the height as little as possible.
Having thought through everything to the smallest detail, you can begin the process of making a steam room in the basement.
We are building
First of all, do a project. On it indicate the location of each individual element. Also indicate the dimensions of the sauna. As already mentioned, it is advisable that the chosen location be near the outer wall. Otherwise, you will have to spend money on creating a ventilation system that will consist of special channels. This will entail large expenses, for this reason, immediately allocate an appropriate place.
The first thing that needs to be done is waterproofing. You can use liquid rubber or roofing felt. Be sure to treat the walls up to a height of 200 mm from the floor. This is in case the floor screed is already ready.
If there is no screed yet, then first fill in the screed, and then mount the wall frame. For the frame, use wooden blocks. Their installation is carried out in a vertical direction, provided that the lining is fastened horizontally. There should be a pitch of 600–700 mm between the bars.
Additionally, strengthen those areas of the walls where you plan to attach shelves and other objects. For this purpose, additional bars of larger cross-section are installed.
When the wall frame is ready, you can begin wiring electricity to install switches, sockets and lighting fixtures. Afterwards the walls are insulated. Fix the insulation between the sheathing bars. It is covered with a vapor barrier film on top. It is attached to the bars using a stapler. Finally, the lining is installed.
When performing installation work, be sure to leave openings for ventilation. As for the installation location of the stove, it should be finished with non-combustible materials and be slightly elevated from the general floor level. The best option is to lay tiles in the area where the stove is installed.
If the heater is installed on wood, then immediately organize a chimney. From the outside, the chimney pipe must be routed to the ridge of the roof.
The next stage of construction is finishing the floor. If the floor is wooden, then the work is performed in this order:
- The subfloor is treated with waterproofing material.
- Then install the logs in increments of up to 600 mm.
- Next, insulation is laid between the joists, which is covered with a vapor barrier film.
- Finally, the floorboard and baseboard are attached.
The ceiling is finished according to a similar scheme. Attach wooden sheathing, insulation and vapor barrier film. Afterwards the ceiling is covered with clapboard.
Special attention should be paid to the installation of doors. They must be airtight enough so that when taking bath procedures, steam does not escape through them.
As you can see, it is possible to make a steam room in the basement. The main thing is to follow the sequence and technological process of installation work.
Bathhouse made of brick, stone or blocks
As materials for a brick bath, you can use brick, stone or blocks directly.
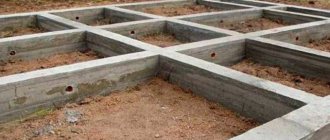
To build a bathhouse, you need to dig a pit and fill it with 20 cm of sand, then fill it with water to compact it.
The second step is to lay crushed stone on top of 10 cm thick sand, which then needs to be covered with sand again.
Next, the formwork is laid, a frame of reinforcement is installed, and the whole thing is filled with cement mortar. After which you need to lay a vapor barrier; it consists of two layers of roofing felt.
The last step will be to install a system for drainage and drainage of the building.
In a private house
Having a sauna in a private home is affordable. Moreover, you can equip and do it yourself, without the involvement of specialists. In any case, you should start by choosing a suitable location. The main guideline for choosing a location should be the ability to connect the necessary communications to the sauna, such as water supply and sewerage. There are several types of saunas that can be organized in the house:
- IR.
- Prefabricated.
- Built-in.
For example, built-in ones are made according to an individual project.
It is important to take the installation of a sauna in your home seriously. If the equipment is installed incorrectly, this can cause an electrical short circuit and, as a result, a fire.
As for prefabricated saunas, they can be of different shapes, sizes and with different types of finishes. This type of sauna is most suitable for self-construction. It is made on the basis of panels (ready-made sections for the ceiling and walls) or bars.
An infrared sauna has its positive aspects. Details about its installation will be discussed further.
So, let's look at the features of the steam room construction:
- It is very important to provide high-quality insulation of walls against the formation of condensation. For this purpose, the walls are covered with waterproofing.
- Next, you should make a frame from wood or a metal profile.
- At the next stage, the electrical wiring for the sauna is installed.
- Now you can begin thermal insulation and finishing cladding of the walls and ceiling.
For wall/ceiling cladding, the main types of wood chosen are: pine, linden, and aspen. Cedar or abashi wood is used less frequently due to the high price of this lumber.
As for the arrangement of the floor, it can be made of tiles or wood; the subfloor is previously covered with waterproofing. If you want to make a more durable coating, then it is better to use ceramic tiles for finishing the floor. As you can see, the principle of setting up a sauna in your home is simple.
It is best to arrange such a room as a separate room, preferably on the ground floor. Be sure to provide it with high-quality insulation and ventilation.
Materials for insulation and vapor barrier
It is worth insulating a bathhouse from the outside only if there is heating in the building.
For a wooden bath it is necessary to make a grate that will be inserted into the insulation. The work will require mineral wool with a layer width of 50 mm.
Infrared sauna
Before understanding the principle of making an infrared sauna, let’s consider its advantages:
- The temperature in the IR sauna does not exceed 50°C. This makes it possible to remove the restriction for older people for whom thermal procedures at high temperatures are contraindicated. IR radiation acts gently and smoothly warms the human body.
- Penetrating, infrared rays accelerate metabolic processes and enrich body tissues with oxygen. This significantly increases blood flow. All this together has a beneficial effect on the human cardiovascular system.
- According to calculations, one session of an infrared sauna can burn up to 2500 kcal. All kinds of toxins and waste are also removed through the skin.
- An infrared sauna helps improve the functioning of the immune system. As a result, the body copes more easily with viral infectious diseases.
If you lead a sedentary lifestyle, then such a sauna can replace visiting the gym.
Another advantage that cannot be ignored is the space required for its installation. Modern saunas do not take up much space, for example, there are ready-made structures with dimensions of 100x100x195 cm. However, if space allows, it can be built in a larger size so that several people can freely stay in it.
Modern models are equipped with a control system, thanks to which you can adjust the acoustic system, turn on a color therapy unit or an air ionizer.
Principle of operation
How does this installation work and is it harmful to health? This question worries a lot of people. To dispel all doubts, it is worth familiarizing yourself in more detail with the operating principle of an infrared sauna. Thus, the radiation spectrum of the heater is as close as possible to the natural radiation spectrum of the human body. Waves passing through the air penetrate deep into the body. Due to this, a good effect of “warming up the bones” occurs.
As a result, fluid outflow accelerates and blood circulation increases. And this, in turn, improves metabolism, and body tissues receive the necessary oxygen. Conclusions can be drawn about the usefulness of such a sauna based on the fact that visits to the infrared cabin are prescribed to athletes to prepare for competitions, as well as for their rehabilitation.
How to make an infrared sauna
You can purchase such a structure ready-made. However, the obvious disadvantage is the high price. Advantage: installation takes approximately one hour. After commissioning, the temperature will be approximately 40°C within 10 minutes. As for electricity consumption, the figure can be compared with the consumption of a household iron. And the power consumption will be in the range of 1800–2000 W.
If your funds do not allow you to buy a ready-made infrared sauna, then you can make it yourself. Often it is made for one or two people, measuring 110–213 cm. All work is carried out in several successive steps:
- Electricity supply. First of all, you should ensure high-quality electrical wiring. To do this, it is recommended to use double insulated wire. The wire must be designed for a current of at least 15 A, so the cross-section of the copper wire must be at least 1.5 mm2. Considering that many manufacturers deliberately and unjustifiably inflate this figure, it is better to purchase a wire with a cross-section of 2 mm2.
- Ventilation. When arranging this communication, there is no need to build a special ventilation system. You can ventilate the sauna by simply opening the doors. The only condition is the arrangement of the walls, which must be hollow. This will allow hot air to rise freely and be removed from the room.
- Installation of the IR emitter. Buy IR emitters in a specialized store. They are mounted in a vertical position, as they usually sit in such a sauna. If the cabin is single, then five heaters are enough. The important condition is that they create a single radiation field. Accordingly, their installation is carried out as follows: 2 on the back wall, 2 in the front in the corners and 1 on the floor in a horizontal position to warm the feet.
- Finishing inside. There is no need to organize thermal insulation of such a room, since infrared rays are directed only to the human body. Both outside and inside the premises, the walls are usually covered with wood from linden, pine, etc. As for arranging the shelves, there are no special requirements. Doors can be glass.
This is the sequence in which you can make an infrared sauna in a living room.
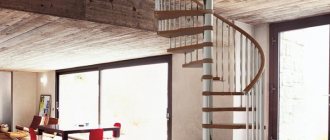
DIY bath photo
Mini sauna
The advantage of this installation is its compact size. Even if the area of an apartment or house is relatively small, a mini-sauna is an excellent option, since it can take up to 1 m2. Moreover, assembling the structure will not take much time. The temperature in the mini-sauna ranges from 50–80°C with a humidity level of up to 30%. The heating elements have a power of up to 2 kW, and the connection is powered from a 220 V network.
Additionally, the mini-sauna is equipped with a control panel, equipment for spraying aromatic oils and a thermometer.
Home saunas can also have different configurations:
- Benches and sealed doors.
- Availability of hydromassage.
- In the shape of a cedar barrel, which is equipped with a steam generator. In this case, the head is located outside the cabin, thereby eliminating the damage from hot steam and high temperatures.
Where to install
The best installation option is a bathroom or kitchen. Why? All necessary communications are available here. If you have a spare closet, you can install it there too. But for this it is necessary to organize high-quality ventilation, sewerage and water supply.
Some people decide to install a mini-sauna on a balcony or loggia. In this case, all necessary communications should also be provided.
In this video, you can clearly see the process of making a mini-sauna:
So, we examined with you the features of manufacturing different types of saunas, which are built in a private house, basement, as well as in the kitchen, loggia or bathroom. If you have experience in this kind of construction, then leave comments on this article.
Roof
There are three types of roof for a bathhouse:
- Single-pitch.
- Gable.
- Complex - consisting of four or more slopes.
Related article: Do-it-yourself lattice for a gazebo: making it from wood
Usually the first two options are used for a bath. Let's look at the option of a gable roof covered with metal tiles:
The manufacture of the roof begins with the installation of the Mauerlat. In the case of frame walls, the role of the Mauerlat is performed by the upper outline.
- Place the uprights on the bench.
- Connect the posts using purlins and ties.
- Install the rafter legs by attaching them to the mauerlat, purlin and connecting the upper ends together. The distance between the rafters should be 50-60 centimeters.
- Install sheets of metal tiles.
- Cover the gables with wooden slats or sheet metal.
For a more visual understanding of the roof fastening, here is a drawing:
All dimensions of roof elements are given in the list:
Please note that the less you slope the roof, the more snow load it will bear in winter. Also, a small roof slope can lead to poor water drainage and leaks.
Preparing for construction
When drawing up a bathhouse design, you should not forget that the steam room and washing room will be used by several people at once. Therefore, the area and dimensions of the bath should be determined without making serious mistakes.
The second version of the bath differs in the arrangement of the shower.
In order for each user to be comfortable in the bath room, he needs to allocate at least 1.8 m² in the dressing room and 1.5 m² in the steam room. The average total usable area of a bathhouse for a family is 10 m². In this case, the most space should be in the dressing room, and less in the steam room and washing department.
So that people of any height can wash in Russian, the ceiling should be built at a height of 2.4 meters.
When determining the height of the ceiling, it is taken into account that the building will soon settle
At the construction planning stage, it is necessary to reflect in the drawing the area for arranging the vestibule. This room may be needed as a place to block the path of cold air from the street.
For a vestibule, 2.32 square meters is enough. m
In a small area you can build a small bathhouse that can comfortably fit three to four people.
Selecting a location
If the area is small, then you don’t have much choice. But if it is spacious, then there is an opportunity to use all possible advantages.
You can limit yourself to the simplest and cheapest foundation if the site has good hard soil and deep groundwater. The bathhouse should not be located close to the well, as it is considered a source of pollution, the house (so that moisture from the drain does not damage the foundation), the toilet and the compost pit (so as not to wash away their contents).
It is recommended to locate the bathhouse away from all buildings
Although a bathhouse can now be built from anything, for example, from brick, polystyrene concrete, aerated concrete, expanded clay or foam blocks, there are physical laws that confirm the appropriateness of the conservative practices of our ancestors. And all due to the fact that it heats up very much and then cools down, high humidity is created in it, and after ventilation the rooms dry out quickly. Blocks and bricks in this mode must have a special multi-layer cladding.
Wall cladding made of polystyrene concrete must be thermally and moisture insulated
The tree may not have any cladding. In addition, it is this material that, when heated, gives an exceptionally healthy and beneficial heat. Therefore, for aesthetic and practical reasons, it is recommended to dwell on it.