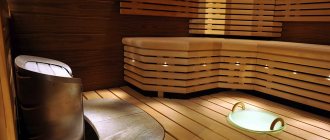
Having spent the whole day fruitfully at your summer cottage, it is appropriate to start your relaxation with a visit to the bathhouse, where you can take a steam bath and in this way relieve accumulated fatigue. It is unnecessary to talk about the benefits of such procedures for the human body; this has long been a proven fact. The only thing left to do is to determine where the bathhouse should be located in the dacha and build it with your own hands. You will learn how to do this correctly from our article with step-by-step instructions for the construction of this popular structure.
Construction stages
To make a sauna yourself, you need to outline a clear procedure:
- Choose a suitable location for construction.
- Design a bathhouse building and determine its dimensions in accordance with needs, wishes and capabilities.
- Select building materials and calculate their quantity according to the developed project.
- Prepare the site and make the foundation.
- Build walls, partitions and roofing.
- Carry out the interior arrangement - install communications, install a sauna stove and organize ventilation.
The best option for a bathhouse is a separate building, an extension to the house - it is economical, but inconvenient. There are no strict requirements for the placement of the building, except for one thing - compliance with fire safety standards. Based on them and taking into account the common wishes of dacha owners, we will give the following recommendations for choosing a location:
- plan the construction site somewhere in the backyard, in a quiet place and as far away from neighbors as possible;
- the optimal distance to a country house is 8-10 m;
- excellent location - next to the home pool or on the shore of a pond;
- think over the question of how to inexpensively connect water supply, sewerage and electricity to the bathhouse;
- outbuildings from which unpleasant odors can be heard (garage, barn, stable) should be as far as possible from the designed building.
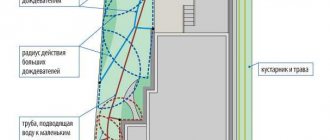
Site plan with the location of the bathhouse
Note. If you decide to start building a bathhouse near a pond, then you need to foresee the possibility of flooding and take measures in advance, for example, raising the level of the clean floor higher.
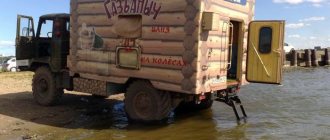
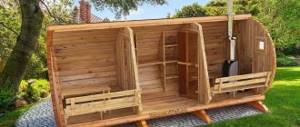
Mobile sauna for a summer residence
The fastest way is to bring a mobile sauna to your dacha, ready and finished on a turnkey basis. Offers of this kind are now widely represented on the market: there are cabin saunas (of a rectangular classic shape, usually the width of the truck body is no more than two meters, the length varies from three to six meters), there are barrel saunas (about the same dimensions as for the previous type of ready-made baths). The main advantage is the ability to immediately begin operating the facility. The main disadvantage is caused, funny as it may seem, primarily by consumers: trying to maintain an attractive appearance and reduce cost, manufacturers often use not the highest quality components and not in the amount required. For example, the insulation is laid at 50 mm, although according to GOST standards for the climatic conditions of Moscow and St. Petersburg, 150 mm is required for year-round use. Well, the dimensions, as we have already indicated above, should fit into 2 m width and 6 m length. In addition, access for a crane must be ensured to the unloading site, which is not always possible in small summer cottages, especially those already built up and with fruit trees.
Stage two - selection of materials
In general, bathhouses are usually made from various building materials - bricks, blocks and even sandwich panels. But the best option is a tree and here's why:
- wood is a natural, eco-friendly material;
- it is easy to process with a minimum of tools;
- lumber is affordable;
- wooden structures are lightweight and do not require a powerful foundation (with the exception of log houses).
Bathhouse built using frame technology
When constructing a bathhouse, the environmental cleanliness of the constituent elements plays a special role. It's all about the high temperature, due to which building materials that are harmless under normal conditions begin to release compounds that negatively affect the health of those washing. Therefore, it is extremely undesirable to use any artificial insulation - mineral wool and polymers - in a bath house. What to use:
- dried timber with a section of 15 x 15 or 10 x 15 cm;
- edged boards 150 x 50 or 150 x 40 mm;
- finishing lining;
- materials for caulking – jute, moss, flax;
- natural insulation materials - expanded clay, sawdust, clay and so on.
Log bathhouse
Note. For vapor and waterproofing, it is allowed to use polyethylene films and special membranes that allow moisture to pass in one direction.
A few words about how best to build a bathhouse from lumber, or more precisely, about the design of the walls. There are 3 methods to choose from:
- Installation using frame technology.
- Prefabricated timber structure.
- Walls made of logs (log house).
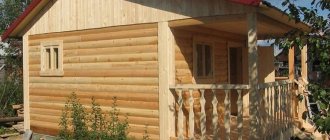
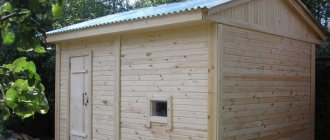
The preferred option is a bathhouse built with your own hands from timber, shown in the photo below. It meets all the requirements and is relatively inexpensive. Yes, a frame building is cheaper, but it uses basalt wool for insulation, which releases carcinogenic substances when heated. A log house is environmentally friendly, but requires a strip foundation, and this increases the cost of the project. In addition, the logs must be able to be connected correctly to make the structure beautiful and warm.
Advice. If you want your bathhouse to look like a log house, nothing prevents you from building it from timber, and then finishing it with a block house that imitates a log.
Brick bathhouse
The least fire hazardous option is considered to be a brick building. A brick bathhouse can withstand constant loads and has a long service life.
The disadvantage is high thermal conductivity, as a result of which more time is spent heating the steam room.
The thermal conductivity of brick walls inside a built bathhouse can be reduced by using a thick layer of thermal insulation between the brick and the cladding.
Which cladding is best to use? The ideal option would be eurolining, against which bath accessories look good.
A foundation for a brick building is required if the floor does not have load-bearing capacity. To fill the foundation, a trench is dug in the ground with a depth of at least 0.3 m and a width of 0.25 m.
Brick ligation can be performed using one of the following systems:
- single-row - the masonry is strong, but more labor-intensive,
- 3-row – used for pillars and narrow partitions,
- multi-row - allows you to use bricks more efficiently.
At the dacha, for a brick bathhouse, it is better to use lightweight 0.4 m masonry. For insulation, the gap between the walls is filled with a mixture of light slag, sawdust and lime.
Additionally, you can attach tile insulation to the inside of the bathhouse, leaving an air gap between them.
The walls of a bathhouse built of brick should not come into contact with the ground, otherwise they will become saturated with moisture.
To do this, you need to organize waterproofing: coating with bitumen mastic or gluing roll-type material.
For plastering brick walls, a solution consisting of cement and lime interspersed with light aggregate material (pumice, fine slag, expanded clay) is used.
We are building a turnkey country bathhouse
Before starting construction work, it is necessary to prepare the selected site. Remove unnecessary objects, stones and vegetation from it in order to calmly begin marking. If the site has a slight slope, then it is advisable to level the site.
Using pegs, rope and measuring instruments, make markings to outline the contours of the future building. Make sure that the setbacks from other buildings correspond to your calculations, and then mark the installation points for the foundation supports. Usually they are placed like this: 4 corner posts, and between them there are intermediate supports with an interval of no more than 1.5 m. For the installation of internal partitions and logs in the middle, several more rows of posts are planned.
Base structure
We took the columnar type foundation as the basis as it is the simplest and cheapest to implement. There is no point in pouring a concrete strip under a small country bathhouse, unless it is built from a log and therefore has a decent weight. The work algorithm is as follows:
- In the places marked with pegs, dig holes 0.7-1.2 m deep, depending on the location of the stable soil layer. Make the dimensions of the recesses 20 cm larger than the dimensions of the future columns so that they can be conveniently laid out.
- Compact the bases and sprinkle them with sand to a height of 10-15 cm, and on top make a so-called footing 40 mm thick from cement-sand mortar.
- Lay out brick or cinder block posts to the required height. Inside each, insert reinforcing bars with a diameter of 12-14 mm to secure the beams.
- After the solution has hardened, treat the masonry with bitumen mastic, which provides waterproofing, and lay regular roofing felt on top (2 layers are needed).
- Fill the depressions around the supports with soil and compact it.
If the soil at the dacha is oversaturated with moisture and subject to frost heaving, then the columnar and strip foundations will not last long. In winter, the freezing soil will push it out and the structure will warp. Since the depth of the unstable horizon sometimes reaches 3 m, the pile-screw foundation shown in the photograph will serve as a reliable foundation here. Laying so much concrete is simply unrealistic and pointless.
The essence of the idea is to screw piles with blades into the ground to the required depth so that they reach dense soil that does not allow subsidence. The wet soil will not be able to push them back - the blades will get in the way. The construction of a pile-screw foundation is described in detail in the video:
Construction Guide
The crucial moment is the installation of the first crown. The beams are laid on supports, aligned horizontally and at the corners, and then secured. If you need to connect 2 beams to increase the length, then the joining is performed on one of the foundation pillars by cutting into half a tree.
Attention! Before erecting wooden bath structures, all elements should be impregnated with an antiseptic.
Connect the bars at the corners in the simplest way - “in the paw”. To speed up the process, make a template for cutting the ends, shown in the diagram:
Before combining the sawn beams, lay the joint with caulk - jute or flax fiber. Repeat the same action before laying subsequent crowns so that there are no gaps between the elements. Connect every 3 rows of bars with steel staples - dowels, as prescribed in the diagram:
To cut internal partitions into external walls, it is necessary to saw out each beam to obtain a half-wood connection, as shown in the figure. Other cutting methods are also shown there, but they are more difficult for a novice carpenter to implement.
Note. Using the presented connection diagram, you can assemble walls with crosscuts, as is done in log houses. But keep in mind that the consumption of timber will increase.
During the installation process, check the vertical position and, if necessary, adjust the position of the elements before installing the dowel. Having reached the design height, lay the boards around the perimeter (in technical language - Mauerlat) and proceed to assembling the rafter system of the gable roof, whose design is reflected in the photo:
The installation procedure is as follows:
- Attach transverse beams to the Mauerlat in increments of 0.5-0.6 mm.
- Place a vertical post in the center of each crossbar. Rafters are attached to it, resting the other end on the mauerlat.
- To support the rafters, place 2 slanting lintels on each beam. Nail the sheathing boards on top.
- Cover the sheathing with diffusion membrane sheets and nail it with strips. Install a roof covering made of slate, corrugated sheets or metal tiles.
- Support the ceiling beams from below with clapboard. Sew up the gables with the same material.
Thermal insulation of ceilings with sawdust
To prevent heat from escaping through the roof, be sure to insulate the ceiling. Use sawdust mixed with clay, vermiculite or expanded clay. Do not lay the floors until you have installed communications into the building - water supply and sewerage. The construction of a bathhouse from timber is described in great detail and in an accessible way in the video:
Interior arrangement
The organization of water supply and wastewater disposal begins at the stage of foundation construction. While the mortar of the brickwork of the pillars is hardening, trenches for communications should be dug, as was done in the example in the diagram:
To fully equip a bathhouse in your country house, you need to complete the following work:
- Lay water and sewer pipes along the trenches (the former should lie higher than the latter) with outlets at the designated points. At the entrance to the building, insulate these communications.
- Place at least 30 cm of expanded clay on the ground so that it forms a trench under the steam room and washing room. Place the sewer pipe into the gutter and fill it with cement screed, as shown in the diagram below. After this, you can sew up the floors with boards.
- Install plumbing fixtures and connect them to the supply pipes. Install sinks and siphons.
- Make lighting by connecting it to the mains via an RCD. Use lamps and switches that are not afraid of moisture, and hide the wires inside special corrugated sleeves.
- Organize ventilation by installing adjustable wood dampers in the outer walls.
- Build wooden shelves and place them in the steam room.
Installation of an inclined subfloor in a steam room
A separate issue is the installation of a sauna stove. There is no need to build a brick one, it is too time-consuming and expensive. It is better to install a metal one (you can make it homemade) with a firebox placed in the dressing room. The recommendation for installing a chimney is this: take insulated sandwich pipes and try to immediately lead the duct to the street so that you don’t have to go through the attic and roof. The wooden walls of the steam room must be protected from the stove with steel sheets - this is a fire safety requirement.
Installation of a sauna stove and crossing wooden floors with a chimney
Options for country baths
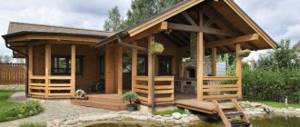
You can build a small bathhouse for your dacha, and if the site allows, you can build a larger structure, but first you need to decide on the choice of location:
- Place separately . The purchased separate bathhouse is very popular. Such buildings are prestigious and can be small for one person or entire complexes with swimming pools. In addition, they can be installed near a water source.
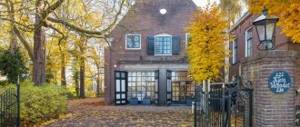
- Attach to the house . This type of bathhouse is good because it allows you to connect both parts of the building, for example, with a completed winter terrace. This reduces heating costs.
- Arrange inside the house . This is a good economical option for a bathhouse in the country, since you don’t have to spend money on communications and heating.
What type of sauna is most suitable for a summer residence? Each owner of a summer cottage must make a choice based on his material capabilities and needs.