SHARE ON SOCIAL NETWORKS
FacebookTwitterOkGoogle+PinterestVk
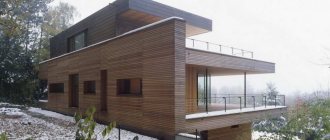
When planning construction, you need to take into account many different factors, including how convenient the structure will be to use. This rule applies not only to the construction of residential buildings, but also to bathhouses. And since you will need a place to relax in any case, let’s consider projects of a bathhouse with a gazebo under one roof. This article contains information about how convenient and profitable this option is, as well as several projects as examples.
A bathhouse with a gazebo under one roof is a functional and convenient building for any site
Saunas with a gazebo: what is it? What features does this structure have?
From the point of view of architects, a bathhouse with a gazebo under one roof is a combination of two separate objects that differ not only in purpose, but also in the capitality of the structure. Since the gazebo is predominantly a lightweight structure in which the load-bearing function is performed by vertical posts.
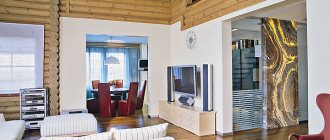
A gazebo combined with a bathhouse makes your stay pleasant and comfortable
Typically, a gazebo is built in the shape of a rectangle or hexagon. A slightly less common option is a round gazebo. In this case, the size of the gazebo can be any, and the walls can be left completely open or partially covered with decorative grilles.
When it comes to a gazebo combined with a bathhouse, this formulation cannot be called correct. It would be more accurate to talk about a terrace or veranda, however, this is rarely paid attention to, so on the Internet you can find a large number of photos of bathhouses with gazebos, as well as instructions and recommendations for construction.
Basic principles
The days of the owners of country houses are scheduled minute by minute: in the morning - work in the garden, in the afternoon - around the house, in the evening - in the garden.
After some time, it becomes clear that you need to come up with something that will help you relax and relieve the stress that accumulates from daily worries. The best solution is to build a bathhouse.
This object serves for relaxation after hard work, rest from everyday worries and solitude (if necessary). Its construction can only begin if you have the appropriate skills and knowledge. Otherwise, the project is doomed to failure due to the fact that the building will either be non-functional or pose a danger to life.
Since a bathhouse is a space equipped for warm bathing of a person with the simultaneous action of water and hot air, it is necessary to think through at least two rooms. However, for complete comfort, it is advisable to supplement them with a bathroom.
When developing a project for a bathhouse with a gazebo, it is necessary to pay special attention to the organization of wiring. The wires and cables used must be grounded and protected from moisture.
In general, experts recommend entrusting the electrification of this facility to professional electricians - this way you can be confident in the quality of the work.
Having decided to build a bathhouse on a summer cottage, first of all you need to start designing. Here it is necessary to take into account every function that this structure performs.
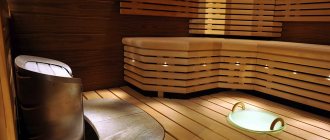
A steam room is required to allow the body to spend some time under the influence of high temperatures, a contrast shower is required to freshen up and invigorate the body.
Well, a gazebo is needed for relaxing with friends. To ensure that the relaxation process is not interrupted, the room for it should be located either in the building of the bathhouse itself or nearby.
A bathhouse with a gazebo under one roof is a combination of convenience and utility. This architectural solution:
- makes construction work much easier;
- allows free movement between zones.
By properly planning the gazebo and equipping it with a barbecue and barbecue, you can have a tasty meal after your bath procedures and fully restore your strength. Moreover, if you plan to spend significant time in it, you should take care of its lighting and furniture.
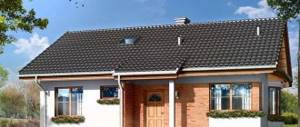
A metal roof is a popular and practical material for arranging the roof of a house (photo + video)
Combined houses - on the way to economy, beauty and practicality, the main advantages and disadvantages of combined structures
- Glazing the facade of a house - fashionable and modern trends in modern housing construction
An alternative to a gazebo as an extension can be a canopy over the summer dining area located near the bathhouse. Wicker furniture and original shaped lamps would look appropriate here.
Bathhouse projects with a gazebo under one roof: the advantages of such a solution
It is not by chance that an extension to a bathhouse in the form of a gazebo has gained popularity. This solution has a lot of advantages that attract owners who want to start construction on their site. Let's consider what advantages the implementation of such a project has:
- The gazebo provides an opportunity to leave the bathhouse to get some fresh air. In this case, you don’t have to just stand in the yard, but you can sit comfortably at the table;
By building a bathhouse together with a gazebo under one roof, you can save space on the site
- everything related to laying communications for the gazebo is greatly simplified. The lighting issue can be solved by installing an additional cable, since it is possible to use one distribution board and power cable;
- combining objects such as a bathhouse and a gazebo allows you to save space on the site, which is especially important if the area is small. But even if there is enough space, this arrangement of the gazebo will be much more convenient;
- the construction of such a facility helps reduce costs by about 30% than if you build the same thing, but separately.
To all these advantages it is worth adding the fact that combining two objects allows you to save time and effort. Having carried out all the necessary work in one period of time, it is easy to be convinced of the advantages of this method of construction.
Bathhouse with veranda under one roof
We propose to introduce the following division: first, let's talk about the terraces, which fit into the quadrangular plan of the bathhouse at the design stage, and then move on to extensions, which can have different shapes and be more or less connected to the main structure.
So, the terrace included in the plan is most often located in front of the entrance, occupying the entire space along the width of the front part of the building, but there may be other options for its location depending on the designer’s imagination.
The roof over such a terrace can either be a continuation of the bathhouse roof (most often), but it can also be a separate canopy . Unfortunately, calculating rafters is not such a simple task that you can devote a couple of paragraphs of text to it.
IMPORTANT! The roof must be calculated and installed by a professional. Read books on roof calculations and see for yourself. Those who would still like to try their hand can start with a lean-to over a barn, for example.
The veranda can be positioned either on the pediment side , in this case we will be talking about extending the ridge and rafter system beyond the walls, supported by pillars.
The second option is along the roof ridge . In this case, the length of the rafters increases, a long overhang is made, also supported by pillars.
Bathhouse with terrace. Photo by Uraekodom
There is also a third option, when for the veranda, located perpendicular to the ridge, its own roof , which fits into the rafter system of the bathhouse using undercut rafters.
We have already talked about the foundation - the cheapest way to make it is columnar, but other types of foundations are also suitable . And since we are talking about a veranda inscribed in a rectangular plan, you can make a single strip for the entire structure or in the form of a solid slab (when a floating one is needed).
ADVICE! The depth of depth for the foundations of the bathhouse and terrace should be the same.
One way or another, an open veranda consists of a roof, floor, support pillars and light fencing. There's nothing else there. If, of course, it is open.
With glazed
A bathhouse with a glass veranda under one roof is already a room in which you can stay even in the cold season. This means that it provides thermal insulation, which was not mentioned above. And the heat source itself for heating must also be provided.
Glass is not the best heat insulator, so you need to install either double-glazed windows suitable for your climate, or not use this room in winter.
In general, construction companies offer two glazing options - summer (cold) and winter (insulated). Accordingly, the customer only needs to decide whether he will spend winter evenings on this veranda or not.
Red brick bathhouse with a workshop, garage, boiler room, open and closed (glazed) terrace. Teplokrepost Photos
The most beautiful – frameless – design is at the same time the most expensive and not suitable for winter.
If you choose aluminum, which , by the way, is also cold, it will be offered in two versions - hinged and sliding. It is also the cheapest.
Warm glazing is possible, as already mentioned, with double-glazed windows. That is, metal-plastic. It is an order of magnitude more expensive than aluminum. Suitable metal-plastic doors will be offered to you there.
In addition to the hinged metal-plastic version, there is a sliding version, but it is extremely cold, and this is a product of companies specially designed for it. We do not advertise anything, so we suggest you search on the Internet yourself if you want a sliding type of glazing.
Bathhouse with a glass veranda: pros and cons
Briefly about the advantages and disadvantages of baths with glazed verandas.
The cold type of glazing will probably be good where summer is often cold and rainy. In general, verandas act as a transition from home to nature, a “buffer zone” where you can sit comfortably under the roof, the air is fresh, and nature is not behind glass. So, with glazing it will be behind glass. Even behind sliding panels.
The insulated version is prettier and more expensive. You can generally combine a relaxation room with a fireplace and such a veranda - you will get a large room, but if the view behind the glass is not particularly impressive, then it is unnecessary to spend money on such a pleasure.
Bathhouse with a closed (glazed) terrace and summer kitchen. Teplokrepost Photos
In general, a glassed-in porch is good where there is something to look at.
In addition, the question arises with the doors - what kind should they be made of? In principle, a door made of metal-plastic can be quite reliable, they are even installed for residential buildings, but where to place it is up to you. If the terrace is equipped as a warm rest room, then it is better to enter from the street; if the glazing is cold, then it is better to place the entrance door on the interior premises. We also recommend reading our material about entrance doors for bathhouses.
The best materials for building a bathhouse and gazebo under one roof
Natural wood is considered a traditional material, ideal for both the construction of a bathhouse and the arrangement of a gazebo. This material is quite accessible, easy to process and relatively inexpensive compared to others.
Traditionally, natural wood is used to build a bathhouse.
Initially, solid logs were most often used to build a bathhouse. Subsequently, other wood derivatives appeared on the market and were used in construction. With their help, it became possible to significantly reduce the construction budget without losing quality. Let's look at a few of the most common ones:
- rounded log is a natural material, which is primarily characterized by its versatility. It is characterized by a high degree of unification, since initially each element corresponds to ideally specified parameters. It is easy to work with this material, and the cost is consistent with all the available characteristics;
- wooden beam is a material for which wood is also the basis. To make it, one of two methods can be used: processing a solid log or using the glue method. This material is excellent for building a bathhouse, versatile and convenient in the process.
For the construction of baths, not only wood and its derivatives are used. Today, foam blocks or bricks are increasingly used for this purpose. These materials differ in cost and installation method, so each owner can choose the right one for himself, focusing on his own capabilities and desires.
The cost of building from wood is significantly lower than from stone or brick
Bathhouse projects with a gazebo: a review of the best options for construction
A gazebo attached to a bathhouse can greatly change the appearance of the building. In addition, this will also affect the functionality of the room. Therefore, before starting construction, it is worth considering several of the most popular options, each of which has its own advantages.
Bathhouse with an attached gazebo and covered walkway.
A covered passage between a bathhouse and a gazebo is especially relevant when the bathhouse has already been built and there is a need to attach a gazebo to it. This solution will allow combining both buildings without compromising the integrity of the bathhouse structure. In order for the structure as a whole to last longer, the covered passage is built on a shallow reinforced foundation.
The difficulty of implementing such a project is that it is necessary to equip a multi-level roof. Therefore, special attention will need to be paid to the quality of the rafter system. Otherwise, roof leakage may be a problem.
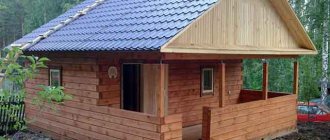
Project of a log bathhouse with a covered passage leading to a gazebo
Otherwise, this project deserves attention, since the bathhouse, connected to the gazebo by a covered passage, is a beautiful and functional option that provides the owners with a fairly large amount of free space.
Hexagonal gazebo attached to the bathhouse: photo project
This option, more than any other, confirms the fact that when talking about a gazebo, they actually mean a veranda. Despite the apparent complexity, this project is quite simple to implement. A gazebo frame is used as a support for the roof of such a structure. Thus, the building looks like a single composition.
Note! In this case, decorative wood grilles decorated with carvings will look extremely impressive. They are light, perfectly transmit light and create comfort inside the gazebo.
Compared to the previous project, this option has certain advantages. Thus, the consumption of building materials is significantly reduced due to the absence of a separate transition from one part to another.
Project of a bathhouse with an attached hexagonal gazebo
Extended gable roof to combine a bathhouse and a gazebo
Due to the fact that the design of a building of this type does not provide for complex shapes, it is advisable to use rounded logs for construction. Working with such material is not difficult, so you can create a functional and beautiful building in a short time. Separate vertical posts are used to hold the roof over the gazebo.
This is also an ideal option if the owners want to have a sauna with a gazebo and a barbecue, since installing everything necessary for cooking in the summer is quite simple.
Interesting! In the warm season, a gazebo-extension to the bathhouse can serve as a summer kitchen. For this purpose, you can install a stone stove in it.
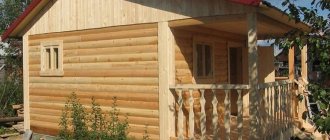
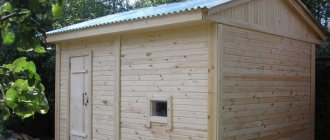
Bathhouse with a gazebo under a pitched roof
For those who do not want to spend time and effort on complex and intricate projects, there is a simpler option. The roof in this case is pitched, which significantly simplifies the construction procedure and saves money. Even if the size of the building does not exceed 2.6x2.0 m, this will allow you to place everything you need, including a grill or barbecue.
The size of the terrace should be designed in such a way that it is possible to install everything necessary there
Looking at the photo of a bathhouse with a gazebo under a common roof, you can see that there are not so few design options, and the most demanding site owners have plenty to choose from. Based on how much money will be required for construction, as well as which project will look best on the existing territory, it will not be difficult to choose the best option.
Construction materials
Today, the following materials are used for the construction of baths:
- beam;
- log;
- brick;
- foam block.
The construction of a bathhouse from timber is considered the simplest and most inexpensive. This bathhouse looks very stylish and colorful.
If you prefer the classics, then without a doubt you should go for the log version. It is highly environmentally friendly.
Lovers of reliability need to take a closer look at brick projects. They may be expensive to implement, but they are durable.
Foam block has now become in demand. It involves the construction of a lean-to bathhouse.
Even though such buildings do not have a long service life, and they do not heat up very well, but for a dacha that is visited on weekends, this is a good choice.
The project of combining two buildings under one roof is a solution to several problems at the same time. It allows you not only to save free space, but also to save on certain types of work, for example, on electrification.
In addition, combined construction automatically removes the question of where household members will gather after bathing procedures.
Therefore, if you equally value both a good rest and rationality, be sure to place a bathhouse with a gazebo in your dacha.
This article does not discuss all possible options for such buildings. Your building may be completely different - corner, two-story, etc.
The main thing is that it reflects your preferences and tastes, and is also as convenient to use as possible.
Features of the construction of a common roof for a bathhouse and a gazebo for some projects
First of all, it is worth paying attention to the consideration of the features of the most popular project - a bathhouse with a gazebo under an elongated gable roof. The gazebo in this version rests on the walls of the building and vertical supports. In this case, experts recommend paying special attention to the process of building the foundation, since it is best to use different types of foundations.
Usually, a reinforced strip foundation is laid directly under the building, which copes well with heavy loads. But under the gazebo it is best to make a columnar one. However, they will not be interconnected and each of them will function on its own.
It is also worth paying attention to the fact that the gable roof in this case will have quite large dimensions. Its length just above the gazebo will be about 4 m. And this is a serious load on the supports and, therefore, the risk of displacement of the rafter system. It is important to understand that even minor, at first glance, distortions (3-4 cm) can have a serious impact on the condition of the structure. Therefore, even at the stage of laying the foundation, it is worth trying to eliminate such risks.
Before building a roof, it is necessary to carefully carry out all calculations and prepare materials
Helpful advice! Both strip and column foundations will be more reliable if they are laid below the freezing level of the soil in winter. At the same time, it is recommended to use bored piles for a columnar foundation.
Despite all the recommendations, some owners still prefer shallow foundations. In this case, it is important to strictly adhere to all building codes:
- the thickness of the sand cushion should be at least 20 cm;
- the depth of the tape cannot be lower than 80 cm;
- the diameter of the construction reinforcement that will be used to reinforce the tape should not be less than 10 mm;
- It is important to allow the finished foundation to settle to avoid settling after the building is built.
Do not forget that for a columnar foundation it is necessary to have anchors that will allow you to fix vertical posts, the width of which will be at least 40x40 cm.
Laying the foundation for a bathhouse is a very important stage of construction.
In addition, it is important to understand that almost any material undergoes shrinkage and wood is no exception. In some cases, this figure reaches 0.7 cm per 1 m of height. But the racks that hold the roof over the gazebo will not shrink. Therefore, it is best to give the entire building time to shrink. As a rule, this period is one year, but it is better to take more time to avoid troubles in the future.
How to build a rafter system over a bathhouse and a gazebo: recommendations for work
The first step towards creating a rafter system is the selection and acquisition of all the necessary materials. This will require timber measuring 150x150 mm, as well as boards 50x100 and 50x150 mm, from which rafters and other elements will be made.
If construction of such complexity is being carried out for the first time, it is best to give preference to a simple scheme that includes crossbars and tie rods. And in order to increase the strength of the structure, it is advisable to pay attention to the struts, headstocks and ridge beams. There is an opinion that the presence of all these elements is not necessary, but in fact they take on part of the load, which avoids deformation of the entire rafter system.
Related article:
Construction of a bathhouse at the dacha: video instructions and tips for creating a building Video review of the technology for creating a structure with your own hands, the main stages of constructing a building, requirements and tips. Common types of baths.
After this, you need to move on to measurements and calculations. First of all, you need to decide on the number of rafters. It should be taken into account that in the regions of the middle zone the normal level of slope is considered to be 20°, while for colder and snowy regions this figure will increase.
Scheme of fastening the rafters of the bathhouse roof
Important! All materials must be purchased with a reserve of approximately 5-10%. Although a lot depends on construction experience, since if such a project is being implemented for the first time, the consumption of materials will be greater.
Another important factor is the quality of the boards purchased for construction. Ideally, they should be of exceptional quality and the presence of any defects, including cracks, rotten areas and natural blemishes, is unacceptable.
In order to purchase truly high-quality wood for construction, when purchasing, pay attention to its storage conditions. We often have to deal with the fact that improperly stacked stacks cause the boards in the batch to become distorted. Therefore, before purchasing, it is advisable to inspect each board edge-to-edge and make sure that there is no surface deformation.
Given the fact that the standard length of the boards is 6 m, most likely you will have to cut them to the required length. However, there is no need to rush to throw the remaining pieces into waste. They are suitable for creating a puff if you connect them together. Even ordinary joints are quite capable of withstanding the serious loads that come with tightening, so this method of selling leftover wood is quite acceptable.
Bathhouse with a small veranda under a pitched roof
Flexible bitumen shingles are suitable as a covering material. It is easy to work with this material, and its technical characteristics meet the requirements for this type of building. It is important to prepare a continuous sheathing for this, which can be made of OSB boards or moisture-resistant plywood. You will also need boards, which can be the cheapest and unedged.
How to install and secure power plates yourself
In order to make a Mauerlat, you will need a beam measuring 150x150 mm, which will be attached to the upper rims using metal dowels. In this case, it is important that the distance between the fastening elements does not exceed 1 m, and one dowel holds at least two crowns of the frame.
Before proceeding with the installation of the Mauerlat, it is necessary to check the height of all vertical supports located around the perimeter of the gazebo. It is extremely important that all ends are strictly in the same position and in the same horizontal plane. It is most convenient to use a laser level or hydraulic level for this purpose. And if deviations were identified at this stage, they need to be eliminated.
Vertical supports are connected to a columnar foundation using anchors, for which pieces of wire rod or reinforcement rods can be used. It is important that each anchor is concreted into the foundation to a depth of at least 15 cm, since otherwise the structure will not be reliable enough.
Installation diagram of rafters on mauerlats
The mauerlats must be laid starting from the side of the gazebo. In this case, the beams can only be connected along their length directly above the bathhouse itself. It is easier to make connections by sawing half a tree, and for additional fixation use self-tapping screws, metal staples or nails.
Important! During work, it is necessary to constantly monitor the distance between the opposite Mauerlats, as well as the location in the horizontal plane. The reliability of the rafter system depends on how accurately these elements are laid. In addition, this will eliminate the risk of having to redo everything in the future and reduce work time.
It is very convenient to use a template to check the distance between the rafter legs. To do this, you need to lift the workpiece onto the bathhouse and walk it along the entire length of the building, noting where the distance can be increased and where it can be decreased. After this, you can display the average value, which will become a guideline in the future. Moreover, precise adjustment will be performed directly while fixing the elements.
The process is greatly simplified by the fact that the straight roof of the bathhouse does not have any fractures or changes in the angle of inclination. That is, all rafters are the same size, which allows them to be prepared using a template that can be made from the most ordinary boards. However, it is important to carefully approach the production of the template, since one mistake at this stage may require redoing the entire work again.
Connection of rafters at the ridge part
Additional measures to increase the strength and stability of the structure
In addition to everything that was discussed in the step-by-step instructions for construction, there is one more extremely important aspect that it is advisable to take into account during the work process. This knowledge will allow you to avoid mistakes and have a positive impact on the service life of the structure.
This applies to vertical supports, the distance between which is usually about 2-4 m. With such a distance between the holding elements, the structure cannot be reliable. Therefore, it is recommended to take additional measures to increase its rigidity and strength.
To do this, you can use 50x100 mm boards. But before you start fastening, you need to prepare them as follows: pass them through a thicknesser, sand them with sandpaper, and then coat them with varnish, which has a high level of resistance to precipitation and other external factors.
You can reliably connect the supports of the gazebo and the boards together using special bolts for wood, preferably galvanized. It is advisable to recess the heads and seal the holes with putty. This will give the structure a cohesive appearance and make it more attractive.
Plan for building a two-story bathhouse with a terrace
In some cases, these measures are not enough, and after carrying out all the previously proposed measures, the structure remains insufficiently stable. Then, as a solution to the problem, you can also try installing inclined corner supports. In the future, they can become an excellent basis for securing a decorative fence for the gazebo.
Interesting ideas for creating your own sauna project with a gazebo under one roof
Despite the availability of a large variety of projects that can satisfy any requirement, it is not necessary to strictly adhere to a given layout. It is permissible to show your own imagination and, taking into account the available data, develop an individual project. Here are some interesting ideas for this:
- a bathhouse with a gazebo can be combined with additional buildings located on the site. For example, a small guest house looks great, which in the summer will become an autonomous area suitable for visiting friends or relatives;
- the gazebo can be divided into two zones, each of which can perform its own role. One half of the space can be equipped as a dining room, and the second can be used as a woodpile. Of course, this layout option is suitable if the area allocated for the gazebo is large enough;
- It is not at all necessary to install a barbecue directly in the gazebo itself. For this purpose, you can attach another small area, over which there will be a canopy. This way, everything you need will be located nearby, while saving space.
Bathhouse with glass gazebo
By showing imagination, you can achieve much greater results in creating a project that is ideally suited to the existing conditions. Not always standard projects can correspond to individual wishes and characteristics of the territory on which the building will be located.
Note! If you equip a gazebo adjacent to the stove, this will allow you to comfortably use all the available space even in the cold season. However, in this case it is worth considering in advance the location of all objects relative to each other.
Bathhouse project with terrace
A terrace attached to a bathhouse is convenient and simple.
Most often, this area is used for relaxation after taking procedures in the steam room. But, as a rule, structures that come out from under the common foundation can cause a lot of problems in the future. Often terraces and verandas suffer from roof deformation, uneven shrinkage, etc. An accurate, detailed design of a bathhouse with a terrace, thought out by an experienced specialist, will help you avoid such troubles. If you are just planning to build a steam room on your site, we recommend that you immediately think about the design of a bathhouse with an attic and a terrace. If the building has already been erected, it is better to contact a specialist for an extension project.
In fact, creating a project is not a very difficult task. But it requires knowledge and practical application of many different rules and principles:
- In order for three people to be in the steam room at the same time (without losing the proper level of comfort), the area of the room must reach 10 m2. In this case, its height cannot be less than 2 m.
- Almost all windows and doors are recommended to be located on the south side. This move will help reduce heat loss. Moreover, in the cold season, it is from the south that less accumulation of snow masses forms.
- It is extremely important to have natural water drainage. The subfloor must be made at a certain angle.
- Any cables, lamps, lampshades, etc. that could cause an accident when in contact with steam cannot be used in any way for arranging a bathhouse. Only special materials that have nothing to do with savings are allowed.
These are just a few of the nuances that are difficult for the average person to remember and follow. It is better to leave the project of a bathhouse with a terrace and a relaxation room to a certified expert. In this case, nothing will threaten the safety of all visitors to the future bathhouse.