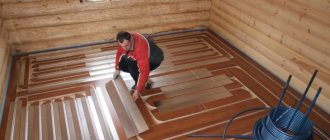
Building a sauna in your home is not as easy as it might seem. This is a rather complex structure that requires compliance with engineering, fire, electrical standards and some design nuances. For a sauna in a private house, you will need suitable premises for a steam room, dressing room and shower. You can also build a sauna as a separate structure on the area adjacent to the house.
Check out what a sauna looks like in your home; photos of various options can easily be found on the Internet. There you can also find projects of houses with a sauna with the necessary calculations and dimensions. For one person, 2.5 - 3 m3 in the steam room is enough, and the relaxation room can be equipped with a compact shower.
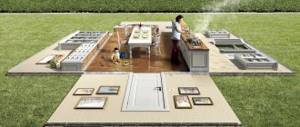
Projects of houses with a sauna
Before you start building a home sauna, you need to decide on its location. Any room that will provide reliable ventilation and supply of all communications is suitable for this.
Home saunas are divided into three types:
- built-in,
- prefabricated,
- infrared.
Built-in home saunas, in most cases, are made according to individual designs from wood of various species. During installation work, remember that incorrectly installed equipment can cause a short circuit in the network and, as a result, a fire.
Built-in home sauna
In the manufacture of the former, ceiling and wall sections are used, and in the manufacture of the latter, wood is used, which is a completely environmentally friendly material.
Design of a prefabricated panel sauna
Infrared steam rooms are structures in which the body is heated by infrared waves. As a rule, they are decorated with wood on the outside and equipped with infrared ceramic heaters on the inside.
Infrared sauna
Today, home saunas are becoming more and more popular, finding their application both in private cottages and in city apartments. According to experts, a Finnish bath can be installed right in the bathroom, if the space of the room allows it.
One of the most convenient places for a steam room is
, but in this case it is necessary to ensure reliable heat and waterproofing.
Ideally, a separate room with good insulation and ventilation should be allocated for the arrangement of a sauna, preferably on the ground floor. The area should be about 10-12 square meters, which is quite enough for comfort. In addition, it is recommended to place the Finnish sauna as close as possible to the external walls, which will ensure even more effective ventilation. One of the main conditions for the quality functioning of a bathhouse is a well-coordinated sewerage system.
An example of the layout of a one-story house with a sauna
The layout of a home sauna includes a washing room, a steam room and a toilet. The steam room occupies approximately 4-6 square meters. m. These dimensions are optimal for high-quality heat retention, so there is no need to use additional measures to heat the room. If the sauna room is heated using a wood-burning stove, it will require additional space and a chimney (this is why electric stoves are most often used).
Sauna layout 5x6 m
A dressing room for a sauna, which is located with a house under a common roof, is in most cases not needed. The entrance is traditionally located in the living room, sometimes from the terrace. In this case, the doors must have reliable thermal insulation and sealing.
An example of the layout of a small simple sauna in a house measuring 3x4 m
When installing the cabin, additional precautions should be taken, which include providing additional ventilated space between the cabin and the wall of the house. A prerequisite is the creation of high-quality sewerage, ventilation, heat and vapor barrier systems, as well as strict compliance with all fire safety rules.
The greatest attention is paid to the issues of electrical wiring, since rooms with high humidity pose some danger in this regard. For this reason, it is better to entrust installation work to a specialist.
For a small family, a house project with a basement floor, the total area of which is 364 square meters, is ideal. m. The area of the building itself is 145 sq. m. m, and the living area is 151 sq. m. m.
Project of a house with a sauna in the basement
The layout of the basement includes a vestibule that leads to a dressing room. Nearby there is a relaxation room, sauna, shower and gym.
Ground floor plan
The main entrance leads into a corridor, from where you can access the hallway, and from there - all the other rooms on the first floor.
First floor plan of the house
On the second floor there is a kitchen-dining room, three bedrooms, a living room and a bathroom. In the central part of the floor there is a hall that unites these rooms.
Second floor plan of the house
The layout of a two-story house with a sauna involves placing a sauna, a place to relax, a toilet and a shower on the ground floor.
On the second floor there is a kitchen, dining area, bedroom, and one utility room.
If you are going to build a three-story house, then on the ground floor it is advisable to place a room with an indoor pool with a sauna, from where there is additional access to the garden. On the second floor there are bathrooms and bedrooms, and on the top floor there is a living room, kitchen, and guest toilet.
It is advisable to have a bathroom in each bedroom. You can set up a barbecue on the terrace.
All concerns about arranging a sauna in the house are resolved by clear project planning and high-quality installation work.
Everyone knows about the healing properties of the sauna. Taking into account the peculiarities of the Russian climate, a steam room is necessary in every home. It will be the best prevention of blues and colds in the autumn and winter. Nowadays, house designs with saunas are considered the most fashionable, and their price is also pleasing. By placing the steam room in the building, you can provide access to it at any time, regardless of the weather.
Before selecting a project for a house with a comfortable sauna, you should first decide on the location of the steam room and look at photos of interesting models. To design a steam room, any room that provides high-quality ventilation and the presence of all types of communications is suitable.
If you have already decided on the area, you should decide how many people can accommodate there. For a married couple, a miniature-sized cabin will be enough, but to receive guests, you will have to provide, in addition to the steam room, an additional room for relaxation.
Built-in sauna
This type of steam room requires little space in the house. It is convenient because there is no need to go anywhere, since it is located on the first floor of the building. The built-in bathhouse project is compact and its price is inexpensive. The heating system is based on heaters, electric or gas furnace. A prerequisite for a built-in model is good thermal insulation and ventilation. In other characteristics, the owner is given freedom of choice.
Prefabricated sauna
A very convenient solution for arranging the first floor of a building. According to the design, the structure is mobile and easy to assemble. This is an excellent quality for those who prefer to change the layout of their home frequently. This type of design could be:
- Shield - involves the assembly of panels for walls and ceilings.
- Bruskov - involves assembly from special beams, so the bathhouse turns out to be environmentally friendly. Assembly from wood materials is inexpensive, and the price can save your budget.
The prefabricated type of sauna according to the project, photos of which are presented on the Internet, reflects the simplicity and beauty of the Russian steam room. This type of sauna is suitable for houses with a small area, where every square meter is valued.
Infrared sauna
Infrared sauna designs are suitable for decorating houses, regardless of floor, and for apartments. This small cabin is designed for several people. and its price is suitable for people with average earnings. There is no high temperature in this home steam room, and the body is heated by infrared radiation. Thus, the skin heats up by 5 cm, and not by 1 cm, as in a regular sauna.
The design of a house with an infrared sauna involves placing it on any floor, since it does not take up much space and does not require special technical conditions.
This model has no effect on breathing or vision because it does not contain steam. In addition, the absence of pressure surges has a beneficial effect on the body. In one session you can actually lose up to a kilogram of weight. If the procedures are carried out regularly, women can get rid of cellulite and tighten their skin.
We invite you to familiarize yourself with the Sauna in Art Nouveau style
The project of a house with an infrared sauna can be viewed on the Internet, where with the help of photos you can clearly see the comfort and beauty of the interior. There are single and multi-person options available. In the first case, the steam room can be placed on the floor in a spacious bathroom or on a glazed loggia.
Infrared saunas, which are affordable, can be either portable or built-in. They do not require specialized care or forced ventilation.
The construction of houses with a steam room requires a very careful approach to the issue. The main factor when choosing a house project is its price. Of course, the work will be cheaper if you do it yourself. To save on price, it is worth choosing a standard house design with one or several floors.
The cheapest option for the project is a mini-sauna, which is built into the bathroom. To do this, the walls are first insulated with glass wool according to the design. To ensure quick heating of the sauna and less energy consumption, the optimal insulation thickness is 50-100 mm. For the same purpose, the height of the sauna room in the house according to the project should not be more than 2 meters. The inside of the steam room is covered with a vapor-proof, heat-resistant film.
The wooden lining of the inside of the steam room in the house according to the project can be made of lining. To preserve its visual appeal, it is covered with a heat-resistant special coating. The outer frame of the steam room should be covered with plasterboard, tile material, ceramic tiles or plastic panels.
The most popular are building projects with one floor and a steam room, since they can quickly be used to build a country cottage. They are convenient for spending weekends with family and friends or living permanently. The design of such buildings is mainly based on natural shades.
The advantage of such houses with one floor is considered to be that they require a small area. A competent project successfully accommodates a sufficient number of rooms and a sauna. A home steam room can be located right next to the living room or terrace. so that when you get out you can plunge into the pool.
Terrace to the bathhouse: features of the extension
Very often, in order to save useful area of the site, a bathhouse is not built separately, but as an extension to a residential building. This approach has many positive aspects. In addition to saving space, adding a bathhouse to the house allows you to reduce the amount of construction work. But this operation requires compliance with a number of rules regarding the construction of this kind of buildings.
How to position?
The bathhouse as an extension to the house can be located in different ways. Only one wall may be common; the building may be in contact with the wall of the cottage, or it may be located at a distance from it, but connected to it by a vestibule. In the first option, you can build a bathhouse much faster, since only 3 walls are required.
In the second option, the construction of a full-fledged log house will be required, which will be in contact with the wall of the residential building. And in some houses, the bathhouse is connected to it by a vestibule - this allows you to prevent steam from entering the living area, and to use the extension with maximum convenience, without going outside.
The project of adding a bathhouse to a house is most often developed separately from the building, so many little details must be taken into account. During design, the size of the building and its area are considered, depending on how many people will visit it at the same time. The project displays information about construction technology and materials used, the presence of an attic, terrace or balcony and other important points.
Main works
After the main features of future construction have been determined, work begins on preparing the area and installing the foundation. The project for adding a bathhouse to a house involves the following work:
- the area adjacent to the house is being cleared;
- a foundation is marked on the site, which must be structurally identical to the foundation of a residential building.
The most suitable for constructing a bathhouse is a strip foundation of a lightweight structure, which easily connects the new building with the main building. The depth of the foundation should be set with a margin so that there are no distortions compared to the foundation of the house due to shrinkage of the extension. The finished foundation base must be treated with bitumen mastic and covered with roofing felt, preferably in several layers.
There is one rule for joining the foundation to the base of the house: they must be joined as tightly as possible, without gaps. To ensure rigidity and unity of the structure, you can use pieces of reinforcement to connect the main and auxiliary bases.
Preparing the log house
The extension of a bathhouse to a wooden house is most often made of timber or logs - this way a single harmonious architecture and composition will be achieved. According to the simplest scheme, a log house is created on an already laid foundation, but first a waterproofing layer is laid. Then the first bottom row of the log house is laid, and you need to select the type of corner connection of the beam.
The fit of the crowns in the roofing system plays an important role. If the roof of the extension is in the form of a continuation of the roof of the main building, then the walls will have to be raised to the level of the main building. If the bathhouse has a separate roof, then you will need to lower the walls of the building a couple of crowns lower. If there is no rigid connection between the wooden building and the main structure, the easiest way is to make a separate roof.
The main thing is that all deformation gaps are sealed with plastic materials of low thermal conductivity.
Any extension to the house - boiler room, bathhouse, garage and terrace - requires a careful approach. Most often it is made from wood, since it is cheaper, simpler, and faster. But not everyone appreciates the unique performance properties of the material, using more interesting solutions. But an extension to a house made of brick or foam blocks has its own characteristics, which relate, first of all, to the combination of materials of different textures - we are talking about brick (foam block) and wood.
We invite you to familiarize yourself with Spruce broom: how to steam, health benefits
The main feature of adding a bathhouse to a brick house is the movable joint, to compensate for which the deformation of the seams is used. It is needed to ensure that the extension and the main building made of various materials do not develop defects and cracks during operation. Even the close adhesion of materials to each other is not a guarantee that the structure will be strong and durable.
It is also important to consider protecting the ends of the wood from condensation, which will form, since the materials have different temperature balances and regimes.
The material of the extension depends on the financial capabilities and wishes of the individual home owners. If you want to save money but use modern solutions, it is best to use frame technology. It is not only economical, but also allows you to quickly carry out the construction process due to the interlocking connections and the width of the panels.
The construction of the extension must be carried out on the basis of the project, especially if the plan will be joined from different materials. You need to choose the type of foundation depending on the size and architecture of the new building.
Most often, a shallow strip foundation or pile foundation is sufficient. If the bathhouse and the house are connected by a through entrance, the extension should be placed against the wall where there is a window opening, since it is easier to convert it into a doorway. A brick wall must be insulated from wood with lathing, and then with insulation and vapor barrier material. This approach will allow you to carefully treat the timber.
To fill the joints, polyurethane foam or liquid polyurethane is used, which creates an expansion joint. It is best to build an extension under the main roof; firstly, it will reduce the load on the existing facility, and secondly, it will make the appearance of the building more presentable.
When building a bathhouse, you should remember that this room is too humid, and therefore it is important to observe several nuances:
- high-quality drainage and communications must be thought out;
- the ventilation system must be powerful, since stagnant moisture can cause mold and rot;
- insulation and waterproofing must be thought out to the smallest detail, especially in the case of building a bathhouse - waterproofing
When adding a bathhouse to a house made of foam blocks, you need to think about the foundation; it may not be massive, since foam blocks are a lightweight and easy-to-work material. Otherwise, the process of its construction is approximately the same in technology. When installing a roof, you need to disassemble part of the rafter system and make a single system, which must be insulated and covered with roofing material. Anything can be used in this capacity - from slate and metal tiles to flat soft roofing.
Thus, an extension to a house in the form of a bathhouse can be created from different materials, which must be taken into account when designing. But the most important thing is to understand how it will be built - under the same roof as the main building or next to it, but with a separate roof. The calculation of the required amount of materials depends on this.
After a bath, there is often a desire to have a snack or drink tea in the fresh air. But not everyone likes wet soil after rain or the sweltering rays of the sun. A terrace successfully attached to a bathhouse can solve these problems. Today our article is devoted to the features of its design. A terrace is an open area with a light fence around its perimeter.
A bathhouse with a terrace will look harmonious if the dimensions correspond to certain proportions. So, for example, a combined building measuring 6x6 m should have a main structure of 6x4 m and a terrace of 2x4 m. Such an area will make it easy to place a table, benches or several chairs outdoors under a canopy for complete relaxation.
Quite often, a bathhouse with a terrace has an attic floor. This makes it possible to organize leisure time after taking bath procedures in any weather and time of year.
Exit to the terrace is made from the rest room or dressing room. If the local climate is favorable and the site is of sufficient size, the terraces attached to the bathhouse are equipped with sun loungers, outdoor pools and plunge pools.
Modern terraces for baths have several varieties, which differ from each other in their design features:
- One type of extension has a sliding wall. A structure with such a partition can easily be transformed from a terrace to a veranda and vice versa. The material for the partition can be glass, plastic, metal or stretched fabric. This type of terrace with a sliding wall is used in frame bathhouse projects.
- When building a two-story bathhouse, the terrace can be located on the top floor. In this case, the support for it will be the upper frame of the racks or the load-bearing ceiling.
- Terraces with swimming pools built at the floor level of the platforms have gained great popularity. This arrangement of an artificial reservoir has undeniable advantages. The water in the pool is clean and cool due to the absence of yard dirt on the terrace and the presence of a canopy that covers the reservoir from direct sunlight. The flooring of the terrace with a swimming pool must be made of moisture-resistant material.
- Multi-level terraces are another type of platform that is used for complex terrain of the site. Support pillars of such structures can be installed on the slopes of hills. Such buildings can simultaneously combine the functions of a gazebo and a balcony. A large terrace allows you to build barbecue ovens on it. This will require a separate foundation and a separate chimney.
Before building a terrace, you need to decide on its location relative to the bathhouse; there are three options:
- Directly in front of the entrance. This solution is classic. It allows you to divide the space of the entire building into four zones: a steam room, a washing area, a dressing room and a terrace as a relaxation area. They are all next to each other. The dimensions of such areas can be up to 6 m2 and more than 12 m2.
- Terrace as a separate building. This option is rarer. The platform is located near the pool, this makes it possible to exit the water onto the terrace flooring without getting your feet dirty.
- Location of the site around the perimeter of the bathhouse. In this option, the railings act as a fence for the terrace, and the roof of the bathhouse serves as a canopy. The location of the terrace on the south side will provide a lot of sun and a good opportunity to sunbathe; the north side of the site will be cooler and protect you from the summer heat. The terrace located under the same roof as the bathhouse will allow you to alternately move to comfortable areas during the day and enjoy all the recreational opportunities.
We invite you to familiarize yourself with DIY bath clothes
Advantages
Layout and types of saunas
Infrared sauna
Infrared sauna
3D project of a sauna with a veranda
Design and layout of a sauna with a swimming pool
For example, a locker room, a plunge pool or shower, a relaxation room, and a gym will perfectly complement the steam room. It would be nice to take into account the pool in the design of the Russian bathhouse. In this case, a project or drawing will definitely be necessary, therefore, construction costs will increase, but it is worth it.
The dimensions of the sauna are selected based on the number of people who will be in it at the same time. Basically, steam rooms accommodate from two to six people.
You can, of course, make a sauna for one, but this is hardly advisable. Most likely, visiting the bathhouse will lose all its meaning, because without the company of friends and family, this ritual will lose its attractiveness.
The sauna plan should provide for a certain minimum volume for each visitor. Usually this is about three cubic meters. This means that a sauna for two can fit on 3 square meters if its height is two meters.
Original project of a sauna with a gym
The optimal size of a steam room is considered to be 2x1.8 meters, since a sun lounger can be installed near any wall. If the steam room area is larger, it is advisable to install L-shaped and U-shaped shelves.
It is not recommended to design a sauna that is too large, since such a room will take a long time to warm up, and in order to maintain this heat you will need a lot of energy.
Types of saunas in the house
When you have decided on the area for your home steam room, you need to decide what the maximum number of people it should accommodate. For two people, a small sauna cabin will be enough; for family relaxation, a large area will be needed, and to receive guests, in addition to the steam room, it will be necessary to provide an additional room for relaxation.
How to build a Russian bathhouse
The first stage in the construction of a Russian bathhouse is laying the foundation for the stove. But a monolithic and separate base is only necessary for brick heaters, since they: firstly, have a lot of weight, and secondly, they get very hot and can damage neighboring bathhouse structures.
The modern range of bath equipment allows you to purchase both metal stoves and electric steam units. Such structures are cheaper, easy to install, and do not require an additional foundation. In addition, metal stoves warm up the air in the bath faster and maintain the same temperature in the room.
But still, it is the red brick stove that looks more colorful in the bathhouse. Conservators will have to work hard to build a foundation for it, call a specialist to lay bricks and think through a smoke exhaust system in the bathhouse.
Important! If the bathhouse is heated with wood rather than electricity, then another room will be needed for storing and drying firewood. The woodshed should be small and well ventilated; moist air from the bathhouse and street dampness should not penetrate there.
A separate topic is the door for the steam room in the bathhouse. It must be airtight so that warm steam does not escape from the room. It is better to install a door that opens outward so that it does not obscure the small space of the bathhouse.
An indispensable attribute of a Russian bathhouse are shelves. They must be installed no higher than 120 cm from the ceiling of the bathhouse, so as not to get burned by too hot air. Often shelves in a bathhouse are made multi-tiered, installing them in two or three levels.
To make shelves, certain types of wood are used: linden, larch or cedar. Cedar is considered the most suitable material for a bathhouse, but it is very expensive. Linden shelves are also of quite high quality; with proper maintenance, they will last in the bathhouse for more than 10 years. To allow moist air to circulate freely, the shelves are made of lattice, and a distance of 3-5 cm is left between the boards.
The floors and walls in the bathhouse can also be made of wood. For this purpose, planed boards, lining or other lumber are used. Tiled floors in a bathhouse are quite convenient - they are easier to clean, do not rot from constant contact with water, and last a long time. You just need to choose non-slip tiles. And in order not to get burned on hot ceramics, you can install wooden floorboards or grates in the bathhouse.
Advice! All wooden structures in the bathhouse must be treated with protective agents. It is prohibited to use conventional fungicidal and antiseptic solutions in steam rooms, or to coat wood with varnish - when heated, these materials release toxic substances that can poison a person.
To prevent those steaming in the bath from accidentally getting burned, it is better to fence off the stove with a stone or brick fence, or a non-metallic fence.
The design of a Russian bathhouse must take into account that its size cannot be less than 3x3 meters. After all, there should be enough space for shelves, and for waving brooms, and for a safe distance from hot stones.
Construction of a sauna in the house
First of all, it is necessary to determine the volume of the sauna, on which the power of the stove and the size of the steam room will depend. In addition, the issue of heating (electric or wood stove) should be resolved.
Do not forget about high-quality insulation of the room, and the materials used must be environmentally friendly. To solve the issue of providing ventilation, you can make an exhaust hole in the ceiling, and an inlet hole on the floor. To prevent warm air from escaping from the room, a system is needed to close the valves.
Scheme of the ventilation device in the sauna
Then you should think about finishing the walls, floor and ceiling of the room. You can make sauna furniture yourself or order it from a store (only wooden furniture will do). When finishing walls, as a rule, wooden lining is used. If the electrical wiring is not able to withstand heavy loads, you need to contact a specialist who will solve this issue.
Bathhouse made of timber
Attaching a bathhouse made of timber to a house is allowed if the entire dwelling is built of wood. To implement your plans, you will need to choose the right building material. It is recommended to use timber with a section of 150 x 150 mm. It can be made of linden, larch, cedar. It is not recommended to use coniferous trees, as they can release a certain amount of resin when heated.
The beam can be of the following types:
- Profiled sheets are convenient to use during installation; in this case, the canvas is smooth and without gaps. The disadvantages of the material include the need for additional thermal insulation cladding after some time of operation of the building.
- Glued laminated timber is often used in finished bathhouse projects. It ensures quick installation, and the foundation can be lightweight. The disadvantage is the fact that in some cases the glue may contain formaldehyde.
- Conventional timber has a relatively low cost, but can shrink and become deformed when drying.
When purchasing material, it is important to take a little as a reserve, since some part of the beams will definitely deteriorate during the construction process.
How to attach a bathhouse to a wooden house? To do this, you can use the following instructions:
- a lightweight foundation is suitable for construction - strip or pile-screw;
- mastic and two layers of roofing material are used as waterproofing of the base;
- to lay floors, it is necessary to first assemble the logs;
- building walls is not difficult, especially if you use profiled or laminated timber, in which case the materials are simply stacked on top of each other;
- doors and windows are cut out after complete shrinkage of the timber, which may take several months;
- Before the end of shrinkage, a rough roof is made; after the allotted period, it is replaced with a permanent one made of metal tiles.
Safety rules in a cottage with a steam room
If you want to redevelop one of your home premises into a steam room, you must strictly monitor compliance with fire safety rules:
- It will need to provide a one-time air exchange using the method of organizing supply and exhaust ventilation.
- If you create a steam room of fire resistance types 1, 2 and 3, you will have to separate the room with fire-resistant partitions of high fire resistance.
- You cannot install a steam room in a building that can accommodate more than 10 people.
- The minimum distance from the wall to the electric oven is 20 cm.
- The oven for heating the steam room must be equipped with an automatic shut-off.
Where to place the sauna
Fundamentally, there is no difference in which place in the apartment or house to build a sauna. The only thing that needs to be provided is the ability to arrange ventilation and power supply. Also, the room must match the size of the planned sauna. Electric heaters can allow you to place the steam room anywhere, because there is no need to start a fire and provide a chimney system.
Consequently, a sauna can appear in the basement of the house. and in the attic there are baths. and even on the balcony in a high-rise building. Many will say that it is very dangerous to build steam rooms in a house because of the humidity. In fact, a sauna is a very dry room, so no special measures are needed to install waterproofing.
Detailed layout of the sauna with kitchen and living room
Also, a sauna can be built separately from a residential building. Brick and a sauna made of profiled timber can be used for construction. frame structures. This will lead to significant costs, since you will need to draw up a plan for the sauna and make a drawing of a bathhouse with a toilet and shower. but the developer will have a free hand in matters of planning. It will be great if the sauna is located near a body of water, even an artificial one.
The opportunity to plunge into cool water between gatherings in the steam room will bring a lot of pleasure. In cases where it is possible to make a sauna as an extension to the house, you can significantly save on laying water supply, electrical wiring and sewerage.
Is it possible to build a bathhouse combined with a house?
Just a couple of decades ago, building a bathhouse in a residential building or adjacent to it in our country was strictly prohibited due to fire safety regulations. However, everything has changed, and thanks to new technologies and materials, it has become possible to build attached baths that meet all the requirements of PPB. So now the bathhouse can be located inside the house legally.
What is needed to obtain permission to build a bathhouse in a house?
In order to attach a bathhouse to a house or place it inside it, you must obtain a construction permit from the BTI of your area. To do this, you must present the following documents:
- a certificate of ownership of a land plot or a long-term lease agreement with permission to build on it;
- standard or individual design of a house and bathhouse;
- site plan before construction and after completion of construction;
- statement from the owner of the house or his authorized representative.
The design of the bathhouse is of primary importance, since it is there that all building materials are indicated. It is their choice that determines whether you get permission or not.
What kind of bathhouse can be built in a house?
The most common question is: is it possible to build a sauna inside a house if it is wooden? Yes it is possible. The main condition is that the internal walls that connect the bathhouse and the residential building must be made of non-combustible building materials
Non-combustible material can be used both to build a wall and as a spacer between walls. Non-combustible building materials include:
- bricks;
- gas blocks and foam blocks;
- expanded clay brick;
- and concrete.
Asbestos-cement sheets or plasterboard can also be used as a spacer between wooden walls.
Arrangement of bath floors
The construction of the steam room must begin with upgrading the floor. When purchasing materials for finishing, it makes no sense to overpay for their thermal insulation properties, because this will not affect the performance characteristics.
insulation of floors in the sauna
In the sauna you can find not only wooden floors. Granite or other artificial materials are often used for finishing. Often, in order to save money, the floor in the sauna is finished with ceramic tiles with a rough surface to prevent slipping. Another option for sauna flooring is Thermowood. It withstands high temperatures and also has an “anti-slip” surface.
A wooden floor requires a backing for the joists. It is best to use well-treated boards, about forty millimeters thick. They are fastened with self-tapping screws, hiding the caps flush, and covering these places with plugs.
Steam room power supply
Work with the bathhouse frame begins with the installation of the ceiling structure and its cladding. Then they begin to install all the walls one by one. This method is widely used, as it allows you to achieve reliability and rigidity of the corners of the steam room, and is also less complicated.
We invite you to familiarize yourself with Sauna stoves for brick lining - choosing a stove and materials, rules for lining
Before installing the frame, you need to measure the diagonals of the room. If they are not equal, then the room is not rectangular and needs to be adjusted. You can achieve the result using the same frame bars. If you do not correct the unevenness of the room, you can end up with a sloppy looking lining.
The frame is usually made of 50x50 pine timber. How the beams will be mounted on the wall (horizontally or vertically) depends on the planned location of the lining. A distance equal to the width of the thermal insulation layer must be removed from the wall.
Example of wall decoration in a sauna
They begin to mount the frame from the outermost beams along the perimeter. They are fastened through with long self-tapping screws or anchor bolts, and then intermediate elements are installed. For convenience and accuracy of installation, you can stretch the thread between the main beams. It is worth taking care of the mounting of the stone stove in advance. Since the stove is mounted on a finished wall, it is necessary to provide embedded parts for this in accordance with its mounting holes. In order not to get lost during the installation process, you can prepare a primitive drawing of the frame in advance.
The sauna is considered a fire hazardous room, so special requirements are imposed on the electrical wiring. The wires must have heat-resistant insulation that can withstand temperatures up to 180 degrees. The use of metal hoses, corrugations and various cable channels is excluded. Also, according to the rules, it is not allowed to connect wires or install electrical fittings (switches and sockets) inside the bathhouse.
For lighting, it is necessary to provide heat-resistant lamps placed at a distance of no closer than thirty centimeters to the ceiling. Lamps installed under shelves can create a special atmosphere. Fiber optic lighting for saunas is becoming increasingly popular. In such systems, cable lines conduct light radiation rather than electrically charged particles, which makes them safer.
sauna power supply diagram
All electrical receivers must be connected through high-quality switching protection devices that protect the power supply system from short circuits and overvoltage. To protect people in the sauna from electric shock, it is necessary to provide residual current devices, simply RCDs. All circuit breakers and RCDs should be located in a separate panel located outside the sauna room.
It is very important to properly insulate the bathhouse, because this determines how quickly it will heat up and how much electricity it will require. The insulation is placed into the frame in such a way that there are no gaps between the individual parts.
thermal insulation diagram in the steam room
You should pay close attention to the thermal insulation of the ceiling, because heat loss is most likely in this place.
A layer of foil paper must be laid on top of the insulation. The joints of its individual parts are glued with aluminum adhesive tape. Thanks to the use of foil, better heat retention is achieved; the sauna reaches the required temperature faster and cools down longer.
Potential Difficulties
Adding a bathhouse to a house is a completely solvable task. However, it requires special attention and responsibility. Otherwise, there is a possibility of structural damage and a decrease in its strength characteristics.
We suggest you read: Is it possible to go to the bathhouse with sinusitis?
The first thing a builder may encounter is the particular difficulty of organizing a tight connection between two walls. In this regard, most projects involve the installation of a small connecting insert between two structures, which should hide the contrast of the junction.
The second thing you should pay close attention to is the quality of the bathhouse foundation. Its depth must necessarily correspond to the depth of the foundation of the house. This is necessary in order to reduce the likelihood of the extension being torn off during shrinkage and operation.
Third, is the need to organize a separate pipe and sewerage system. Draining water into the general system is very unwise, as this will significantly increase the load.
When creating a bathhouse, you need to take care of its fire safety. It must be said that it is the likelihood of fire that stops many developers from adding a steam room to a residential building.
The foundation of the extension must be made the same as that of the house.
- First of all, the difficulty of combining two walls. Most projects include a connecting insert between structures; it hides the junction.
- The second difficulty is the quality of the foundation. To prevent detachment during possible shrinkage, a foundation is made that matches the main brick building.
- The third criterion is the presence of a separate pipe and sewer pit, so as not to overload the general sewer system. You should also think about fire safety and good ventilation, because a fire in the steam room is transferred to housing.
Sauna ventilation system
During the installation of the bathhouse frame, it is necessary to lay all the necessary communications: electrical wiring, ventilation. For a comfortable stay in the sauna, the ventilation system is subject to fairly stringent requirements. Near the stove it is necessary to provide a hole for the supply of fresh air, and opposite the stove there is an exhaust hole through which the air will enter the main ventilation system, or directly to the street.
It is worth noting that the location of the sauna in relation to the external walls, as well as its design features, may not allow natural circulation of air flow.
In such cases, forced ventilation must be provided.
For laying ventilation ducts, a 100-mm ventilation corrugation made of foil is used. To combine individual parts of such corrugation, there are special fitting connectors and clamps.
Ventilation hole in steam room
According to building codes, passages through main walls are lined, and only then a ventilation duct is laid.
The ventilation hole through which air enters the sauna is closed with a grille, and the exhaust holes are cut off with a valve. During the test run, it is necessary to adjust the supply and exhaust, determining the optimal ventilation mode.
Ventilation must be provided in the sauna, since ventilation through the walls cannot be due to their heat and vapor insulation. For every 1 m3 of steam room volume, a ventilation hole with an area of 24 cm2 is required.
The arrangement of vents for ventilation involves installing a window 30 cm from the floor near the stove to provide draft. On the opposite wall, a ventilation hatch is cut 30 cm from the ceiling.
Cold air enters through the lower passage, which, passing through the stones, gradually warms up and rises. The upper ventilation window allows fresh air inside, which displaces the stagnant air in the upper part of the sauna. Forced air ventilation is not recommended so as not to cause thermal burns on the skin.
Sauna structure
As a rule, setting up a sauna does not require very large premises, unlike a Russian bath. If the sauna is designed for 3-4 people, it can occupy an area of 3.3 m2. For a number of visitors of 5-6 people, 4.5 m2 of space is enough. In terms of dimensions, such a sauna will have 2.1 m in height, 2 m in width and 2.4 m in length, and two tiers of shelves are installed along the wall. If desired, you can even equip a very small single-person sauna, the dimensions of which will be 2.1 m in height and 0.8 m2 in area.
Note that when building a sauna bath in a country house, it is very important to adhere to the height parameters of 210 cm in order to build in a standard 190 cm door, and the length of the wall opposite the entrance to 200 cm. This will create the necessary circulation of air flows in the steam room, as well as create optimal temperature and humidity on the top shelf.
When using a sauna, it must maintain an optimal temperature and humidity ratio. The air should not move due to strong changes, otherwise a person may receive thermal burns. This happens because in the sauna the skin is heated to the maximum permissible 45-50 ºС, and any movement of hot air leads to the fact that sweat does not have time to cool the skin. Therefore, in order to prevent hot drafts, ceilings should not exceed 210 cm in height.
The presence of a window in the sauna steam room is not at all necessary if it is located in an apartment or house. But in some buildings it is better to provide a window with double glazing.
As a rule, there is no need to connect the water supply directly to the steam room, since the shower is installed in a separate room, where a font can also be installed with your own hands. To clean the steam room, a simple rinse with water pressure from an extended hose is sufficient. At the same time, it is imperative to provide a drainage system so that excess water can be disposed of.
Materials for the floor, walls and ceiling of the sauna
The optimal solution would be to install a sauna in a wooden house, since this will achieve the most acceptable microclimate in the steam room. However, it is allowed to install saunas in buildings made of brick or concrete. It’s just that such buildings need to be additionally sheathed on the inside with wooden clapboard.
The construction of walls in a sauna requires mandatory insulation. It is placed between the outer wall and the inner lining, covered on the steam room side with a layer of vapor barrier. The best insulation is considered to be stone wool in slabs or rolls. However, it needs vapor barrier protection, since it absorbs moisture and does not release it.
Wood is considered one of the best materials for walls in a sauna, since in this case the insulation will be able to freely pass steam from the steam room, while remaining dry. But when interacting with cold stone walls, cotton wool is not able to release moisture, so it breaks down quite quickly.
We invite you to find out which lamps for saunas and baths are the most practical and safe
When laying insulation in several layers, it is worth remembering that each subsequent type of material, in the direction of the external walls, must have greater vapor permeability.
Conditions for arranging a steam room complex
Of course, the requirements for your building from regulatory authorities will be quite stringent. Therefore, exact compliance of all the necessary parameters will guarantee the absence of possible troubles. The best choice for you will be a separate room. Of course, sometimes options for renting space located even in residential buildings are acceptable. However, then it will be necessary to equip a separate entrance and fire exit, as well as to ensure that the building is insulated from steam, moisture and noise.
Ensuring all fire safety requirements and equipping steam rooms with an irrigation system and smoke alarm is one of the main conditions
In addition, you should try to avoid using flammable materials in the decoration of the building. When installing windows, ensure that they open normally. You will also need to equip the steam room with a smoke response system and a fire alarm. According to safety rules, the use of upholstered furniture and various textile accessories is prohibited directly in the steam room. Please note that the dimensions of the sauna should be 8–24 m³. In this case, the ceiling is located at a height of at least 1.9 m from the floor. Reconstruction and finishing will require approximately 1,500,000 rubles.
Doorways and windows in the sauna
For ventilation and lighting of the sauna, a window is provided in a separate building. It is best to make it small, approximately 70x50 cm, to prevent large heat losses. And if it is dull, that is, will not be used for ventilation, double frosted glazing is performed.
A prerequisite for proper operation of the sauna is its thorough ventilation. The frame of the ventilation window must be adjusted to the frame and sealed with felt or foam rubber.
The glass is inserted into the frame using a rubber seal and casein lubricant, and glazing beads are added for additional strength.
Since wood can become deformed, dry out or swell due to exposure to high humidity and contrasting temperatures, it should not be used to make a sauna door. The optimal material would be tempered glass, which always retains its shape, fits well on the hinges, fits easily into the door frame and does not heat up too much.
Design
The design of an attached bathhouse has certain features. This stage should be carried out very thoughtfully, since the comfort and practicality of the future structure depends on it.
The first thing you need to decide is the shape of the building and its location. Will the bathhouse have a common wall with the house, or will the 2 buildings be separated by a small vestibule?
We suggest you read: Vapor barrier for ceilings in wooden floors: which one to choose
Finished projects
If the owner’s plans do not include the construction of a non-standard structure, then a factory-made structure can be installed in a separate room. It does not require wood fuel, but is heated by an electric boiler.
Drawing up a project yourself requires a thorough study of construction technology. These norms cannot be violated even in an effort to increase comfort.
It is recommended to take into account the specific construction conditions, plan the number and size of premises, their location and the transition between buildings. The design of the base depends on how exactly the extension will be made.
Types and characteristics of sauna stoves
A fully functional sauna structure and equipment is impossible without installing a high-quality stove. As a rule, solid fuel stoves are used in saunas, mainly wood, gas and electric. True, gas devices have hardly been used lately, so we will not dwell on them in detail.
The advantages of wood stoves are:
- high speed of temperature rise;
- lower cost of fuel for operation;
- independence from external energy sources;
- the ability to heat up stones faster in heater stoves, which affects the microclimate inside the sauna - dryer, soft steam is obtained.
We also note a number of disadvantages of wood-burning stoves:
- Wood stoves themselves give off heat much worse than electric ones;
- due to the presence of an open flame, the risk of fire is increased, so the safety standards of such devices must be observed;
- A prerequisite for installing a wood-burning stove is the presence of a chimney, the construction costs of which may exceed those of the stove itself. If there is no chimney, use electrical installations.
If we are talking about an apartment or a private country house, then for a sauna you need to buy exclusively electric stoves, since they are easier to operate and safer. Control is simplified due to built-in electronics, which allows you to set a certain temperature, humidity and not worry that the oven will overheat.
When calculating the power of the electrical network, it should be taken into account that for every 1 m3, about 1 kW of energy will be required. So, to power a sauna with a volume of 10-12 m3, you will need a power of 9 kW and a three-phase network. If it is not possible to provide a sauna with energy reserves in the apartment, it is better to opt for either infrared cabins or solid fuel stoves.
Sauna stones
It is very important to choose the right stones for laying in the stove. Not every mineral is suitable for this, since simple stones can be quite fragile. It is optimal to use soapstone, gabbro-diabase or jadeite, the evaporations from which are beneficial for the human body.
For stoves, stones with a rough surface are used, on which water is retained, gradually boils and evaporates. Do not use stones with cracks or defects - they will quickly crack from overheating.
Periodically you need to sort through the stones to remove damaged ones and replace them with new ones. The frequency of this procedure is once a year, subject to weekly use of the sauna. When heating the sauna twice a week, the stones should be inspected once every ½ year. That is, the more often you use the steam room, the more often you need to check the condition of the stones.
The electric furnace is tightly laid with stones in the spaces between the heating elements, but air must pass freely through the masonry.
Wood burning stoves are filled with stones on top of the firebox, so only a few are needed. If the stones are heated by a metal casing, the stove must be heated during the entire time the sauna is used so that the stones do not cool down. Although these stoves heat up faster, they produce denser heat that is harder to tolerate.
Sauna in a private house – projects, photos, interiors, best ideas
By equipping a steam room in your own home, you will have the opportunity to visit it at any time convenient for you. In addition, the construction of a home bath will significantly save space on your plot of land.
As a rule, two tiers are built inside the sauna for sitting and lying areas. Right angles between the walls and benches allow you to fully utilize the steam room area. All benches are made exclusively from wood. Spaces of 1.5-2 cm are left between the boards to ensure ventilation of hot and cold air in the sauna.
The width of the top shelf should be at least 50 cm so that a person can lie on it comfortably. Additionally, the front of the bench is equipped with a stand on which you can rest your feet. A distance of 70 cm should be left between tiers.
100-105 cm are left from the top bench to the ceiling so that a person can feel the maximum effect of the sauna. If the size of the room allows you to place shelves in only one tier, it should be taken into account that a very tall person, when sitting on a bench, should not reach the ceiling.
How to attach a bathhouse to your house: methods and methods
When presenting an extension, not everyone understands that the design can be different. Depending on the features of installation to the main house, a bathhouse extension can be:
- An extension with three full walls and one shared with the house.
- A full-fledged log house, which is located close to the house.
- The bathhouse is located at a distance of 1-1.5 m from the frame of the house. The structures are united by a warm heated vestibule corridor. It is often used as a dressing room or rest room.
The first two options can be located under a common roof with the house, the latter has a common or separate roof.
It is necessary to choose the design of the bathhouse extension at the planning stage. The choice will determine what the foundation will be.
Choosing a foundation
You can make the foundation for a bathhouse extension yourself. It is poured separately or the tape is tied to the main one under the house. The first option is preferable, since the shrinkage will be more uniform.
Columnar foundation for a bathhouse extension on a summer cottage.
You should not choose a foundation different from the main one. The most suitable option is lightweight tape. The connection to the main foundation can be done using metal brackets, and to avoid the formation of hold bridges, the joints are additionally foamed and insulated with polystyrene foam.
For a bathhouse extension to a country house, you can use pieces of reinforced concrete piles or slabs as the foundation. Since the bathhouse attached to a country house has minimal dimensions.
The transition between the bathhouse and the house, which is better?
It is important to think about what the transition between the bathhouse and the house will be like. The easiest option is to do it through the door, when the door directly from the house leads to the dressing room or rest room. The main advantage of the internal transition design is less heat loss.
When crossing through a separate vestibule, additional insulation is provided. The vestibule is used as an additional room or dressing room. In the vestibule you can place benches and a clothes hanger.
Features of communications
Communications to the attached bathhouse are carried out directly from the house. You can run pipes and electrical wiring through a common wall or under the bathhouse through the foundation. Wiring throughout the bathhouse is carried out in any convenient way. You can supply water to the bathhouse separately; you can dig a well or make a borehole in your garden or summer cottage.