A wicker product using the macrame technique creates an atmosphere of warmth and comfort in a bedroom or children's room.
Macrame, photos and patterns of weaving panels, which can be easily found in needlework magazines, involves the creation of beautiful knotted installations from dense knitting. It is believed that the pioneers of this artistic technique were the ancient Egyptians, who used this method to decorate the mansions of the pharaohs. But historians have discovered similar decorations among the Greeks, Assyria, Peru, and China. That is, it is impossible to say exactly who was the first to use macrame to create an artistic plexus and decorate the interior and facade. However, now they even create panels from it.
History of macrame panels
Weaving panels in the style of macrame is a subtype of textile art. It is suitable for both beginning craftsmen and experienced hand-made representatives. It is believed that such crafts first began to be made in the early 60s in England, but this is not an entirely correct statement.
What are compositions made of?
The main materials for creating macrame panels are:
- Hemp rope;
- Linen rope;
- Paper rope;
- Cotton;
- Flat braid
- Sisal.
Naturally, the use of other fabrics and strands is also allowed, but it must be taken into account that the main thing in the technique is the creation of loops. That is, the material is selected such that it will be convenient for the master to work with, taking into account his knitting skills.
Macrame in the interior: photos and patterns of weaving Macrame panels on the wall with your own hands
It’s easy to get confused in the huge amount of information on how to weave a Macrame panel on a wall with your own hands. We will help you systematize this knowledge, teach you how to read Macrame weaving patterns and create a panel sketch yourself. We will introduce you to several master classes on making panels for beginners and not only, and also show examples of using Macrame in the interior.
Examples of Macrame panels on the wall
There are many examples of the use of wicker panels in interiors. Notice how beautiful and modern they look.
Panel with an antique twist
Pretentious and delicate baroque
Strict modern
Very often there are panels not only rectangular, square, but also round in shape.
Weaving panels in the Macrame style is one of the areas of textile weaving.
Panels can and should be not only aesthetic, but also functional. The prototype of ancient military banners is a panel with a pentagon-shaped pocket. This is the simplest option, but sometimes more complex products are found. This panel can be used to decorate the kitchen, and the pocket can be used to store spices and seasonings.
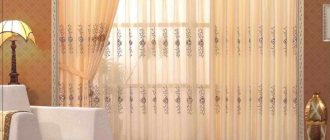
In the bedroom, an original decoration will be a panel on the wall near the bed, which will add zest to the interior of the room.
A very popular panel is still the beloved owl, as a symbol of wisdom and good luck.
What material is needed to weave panels using the Macrame technique? Everything that is used for weaving and other products using this technique, and this is:
- hemp, linen, paper ropes;
- flat braid;
- cotton threads.
The material is selected so that it is convenient for the master to work and the knots are clear and beautiful.
It’s worth mentioning right away that there are no patterns for weaving Macrame panels as such. The main thing in this product is the primary sketch. As a basis for it, you can take not only a painting, an image, but also a mosaic, an ornament, or simply a certain theme.
To create a sketch, a simple selection of a beautiful combination of weaving knots will do.
You can also use photographs of already created panels to navigate them and create your own.
A Christmas tree and a snowflake are the theme of New Year's macrame, and flowers are the theme of summer. In the fall, a herbarium of beautiful leaves will inspire creativity.
To make a sketch, you can learn to use graphic editors such as Photoshop, Corel Draw, GIMP. You can create a unique panel design on paper using imagination and simple Macrame knots.
Whatever pattern you choose, you must strictly observe the sequence of weaving and the accuracy of all Macrame knots. After all, a product made clearly and slowly will become a decoration of the home and the pride of the one who created it.
An example of one of the patterns applicable for weaving panels is a border of rhombuses made with grosgrain knots:
In what interior styles will Macrame panels be relevant? Since this art came to us from the ancient East, the decor will be most harmonious in oriental interior styles.
It will look no less successful in a room decorated in Boho style.
Boho style panel
One more thing
In romantic interiors:
Tender romance
Brighter decor
And white and beige products will look great in the Scandinavian style.
Snow-white minimalism
Scandinavian eco-style
Peace and freedom
And perhaps, over time, Macrame will become a profitable business for you, because now panels using the Macrame technique are successfully sold at various fairs and online sites for selling hand-made goods.
Look how diverse and beautiful the world of Macrame is!
We will introduce you to the sequence of making a simple Macrame panel on the wall with your own hands. The work is easy, and the result is amazing.
We will need 60 m of clothesline and several wooden beads to decorate the product.
We fix the holder for the panel.
We cut the rope into 16 pieces of 3.5 m each. We fold it in the middle and tie it to the bar, securing the rope with a knot in front. Don’t forget to tie one short rope to the bar for hanging. She will not take part in the weaving.
The first row is fixing. Attach the thread to the bar.
The horizontal brid is ready.
Then, starting from the left side, we knit the bridge diagonally with grosgrain knots.
Sometimes we add beads as desired by stringing them onto ropes.
Next, we tie 4 ropes with these knots.
Knot knitting pattern
Complete series
Repeat 2 more times.
And again we knit knots diagonally, but from right to left.
At the end of the work we weave simple double flat knots on 4 threads, gradually increasing their number.
To make the panel look brighter, add a little paint!
A little color...
...never hurts!
The work is done. We make a mount and hang our Macrame panel on the wall. And we admire the result!
Macrame panel owl (step-by-step master class)
(Translation by Diana Silantieva)
Starting this work, you must learn how to perform the following Macrame knots:
Material for work
- 10 m of regular cotton thread No. 10;
- two beads for eyes;
- two small wooden sticks;
- brush and wood-colored paint for painting;
- PVA glue;
- electrical tape for attaching the work to the work surface.
First stage. Attaching the thread
Cut the thread into 10 pieces of 1 m each. Attach with a knot on the front side of the work to a stick. Secure the ends of the stick to the work surface with electrical tape.
Second phase. Weaving the top of the head
We weave a “chessboard” of double flat knots on 8 middle threads, grabbing a pair of threads from the outermost knot of the previous row on each side.
Working with the first two strands, using them as a warp, make loop knots, alternately working each of the next 8 strands.
It is necessary that the “bulge” of the knot is on the front side of the product.
Repeat exactly the same on the right side of the owl. The nodes should be a mirror image of the left side.
Third stage. Beak weaving
The owl's beak is made on four central threads. We weave a chain of 4 flat knots. Next, you need to apply glue to the tips of the fourth threads on both sides. When the glue has dried, trim the ends of the threads at a slight angle. String one bead on each of these two strands.
Bend the chain of double flat knots so that it bends forward. Then make a berry knot. The beak is ready.
To prevent the owl from sagging on the sides, be careful when weaving further.
We continue working from the center, using threads No. 9 and No. 10 (previously used for the beak) as warp threads, we make loop knots, alternately working with threads from the left. Make loop knots so that the “bulge” of the knots is located on the wrong side of the product. Do the same on the other side, only in a mirror image, using threads No. 11 and No. 12 as main threads.
It is important! Be sure to adjust the thread tension so that they do not sag. This will make the owl's head look neat.
Then we weave a “chessboard” of double flat knots, adding two threads on each side in each subsequent row. The owl's head is ready.
Fifth stage. We weave the wings of an owl
We form a chain of 6 double flat knots on the outermost 4 threads on the left. Do the same on the four outermost threads on the right.
We weave a “checkerboard” of double flat knots on 12 medium threads. Repeat weaving 3 times (6 rows of chess in total).
Connect the owl's wings to the body by tying one row of double flat knots, grabbing pairs of threads from the two chains of knots that make up the wings. We weave another row of chess.
In the center of the owl’s body, using threads Nos. 7–10 and threads Nos. 11–14, we make two double flat knots.
Next, we make knots near the second stick, using threads Nos. 6, 5, 4, 3. Repeat the same action using threads Nos. 15, 16, 17, 18. These loop knots form claws, and the stick will serve as a pole.
Using all 20 strands, tie a row of double flat knots.
Seventh stage. Knitting an owl's tail
We weave the tail with a checkerboard pattern of double flat knots, grabbing one pair of threads on each side as we weave.
Eighth stage. Owl decoration
When you're done, steam the owl. Paint the sticks if desired, moving the owl to the side. Cut the threads parallel to the tail at an angle.
You can also weave large round eyes separately, paint them emerald and sew them to the main fabric. And instead of pupils you can use black buttons.
Svetlana Dvornikova shows the entire process of weaving the “Owl” panel in 2 parts:
To further help you understand how to weave Macrame panels with your own hands, we would like to introduce you to some video tutorials on this topic.
Boho style panels are woven by Lyubov Lopantseva:
Simple stylish decoration from Marusya DIY:
Asya Woo shares small and affordable ideas for wall decor and a master class on creating panels in a decorative ring:
So, to make panels using the Macrame technique you need attention, imagination, patience and strict adherence to instructions for weaving knots. Compliance with these conditions is a guarantee of excellent results! Good luck!
Author of the article: Lyudmila Sontseva
YOU WOULD BE INTERESTED
Flower pots using Macrame technique: weaving patterns and master classes for beginners
SHARE! "Cross" will not give bad advice! 
nacrestike.ru
Macrame for beginners: patterns for weaving panels
It’s worth mentioning right away that there are no schemes or algorithms for creating macrame under panels as such. The main thing in the work is the primary sketch. To create it, both a simple cutting pattern and a contour pattern are suitable. You can even use photos of already created panels posted on the World Wide Web and navigate by them.
If you plan to create volumetric macrame, then it is generally recommended to use a foam base. If lampshades are needed, you can add simple metal rings to the final product, which will hold the basic shape of the macrame. And the knots are made in any convenient way.
That is, you can use any knitting technology, including:
- Through the hook;
- Patchwork (where the loops are connected diagonally);
- Bachmann knot.
These are the main methods that are most often used, but it is allowed to include any others in macrame.
Making macrame: photos and patterns of weaving panels
A variety of weaving and knitting techniques have long been very popular among needlewomen. Today, the art of creating amazing images using macrame will allow you to decorate your home in an original and beautiful way, bringing a special atmosphere to it.
What is the macrame technique?
Knotted weaving, which replaced the usual knotless weaving, is commonly called macrame. Translated from Arabic, this term means “fringe”, as well as “lace”.
Modern needlewomen, using a special pattern, weave interesting details for clothes with their own hands or create comfortable and unique covers for household items. Such decorative items can be woven using different materials. Linen ropes, regular threads or decorated with gold threads, as well as floss and silk are well suited for this.
However, for high-quality jewelry making, the macrame knots must be tight, this allows you to create a clear, correct relief and pattern.
The macrame technique has found its admirers due to its ease of use. Such weaving will not be an insurmountable problem even for beginners. It is enough to strictly follow the MK (master class) and an excellent result is guaranteed.
Macrame training course (video)
Master class: macrame panels for beginners
Having decided to try macrame weaving, you should initially pay attention to the selection of materials. This kind of creativity is distinguished by the fact that improvised materials are suitable for creating the product, and the main tool will be your own hands.
Having selected the necessary pattern, all that remains is to select threads or ropes (they can be anything - silk, wool or some other), after which it is important to follow the instructions step by step, this will ensure the successful creation of the panel.
When weaving panels, beginners should remember that for the correct macrame technology, it is necessary to attach the main thread to the working surface; it will not participate in weaving, but instead, all working threads must subsequently be attached to it.
There are several knots that you need to remember to master the macrame technique:
- Flat right-handed knot. Here two threads are attached to the bar to make 4 ends. The warp will be 2 and 3 threads, the workers 1 and 4. The fourth thread must be placed on the warp, and the first one is passed under the warp and pulled from below into a loop.
- Flat left-handed knot. Here the weaving technique is similar to the previous type, but instead of 4 threads, you need to start working with the first one.
- Square knot. It is considered the main knot in macrame. To create it you need to weave both of the above knots. You should start with the right side.
- "Chameleon". In this weaving technique, the working threads are constantly changing. Having weaved a square knot, you need to swap the main threads with the working ones and make another square knot.
- “Tatting.” It is woven from 2 or 4 threads. Using two threads - the first is placed on the base, which is wrapped with 3 threads from top to bottom and pulled into the resulting loop. Then the first thread is brought under the warp and pulled into the loop from bottom to top. If 4 threads are used, 1 and 4 will be working threads, and the rest will be the warp. First, a knot is woven using 4 threads, and then changed to the first one. You need to weave a chain constantly changing the threads. This round weave will create the desired look.
Options for macrame panels: weaving patterns
Today there are many options for making panels. Moreover, all the diagrams explain in detail how to create an interesting product.
A self-created panel with a pocket will be an excellent decoration for the kitchen or living room. This macrame is not only an interesting interior detail, but will be an excellent solution for storing all sorts of small items. Using the pattern for making such pockets, you can quickly and beautifully weave a unique panel.
For those who want to update their interior and decorate, for example, paintings, a wicker panel “Forget-me-nots” would be a good solution.
Special diagrams will help you correctly make the frame and the flowers themselves.
Many needlewomen prefer to make New Year's gifts themselves. An interesting and beautiful solution would be a wicker New Year's panel in the shape of a Christmas tree, or other souvenirs of a similar theme.
In addition to the panel options described above, products depicting birds, animals or flowers are very popular. This can be macrame, which depicts an owl, fish and various wall products.
Whatever option of macrame is chosen, the main condition for correct weaving is the strict execution of all instructions for the chosen pattern of the product. Careful and unhurried work will help you create an excellent panel that will decorate the room and be the pride of the needlewoman.
How to make a panel for a wall clock
Using a special pattern, you can independently create an interesting panel to decorate a wall clock. This will help update and decorate even out-of-fashion items.
You will need a bar 5 cm wider than the clock and a cotton rope. To begin with, 20 threads (each approximately 5 m) are cut, which are attached to the bar. You need to make 2 zigzag horizontal bridges (bases).
The pattern is made on 16 threads (on the left), counting 8 threads for the warp, 7 threads are tied onto it with rep knots. Another brid - 9th thread on the left, weaving is done with rep knots to form the top of a rhombus. Underneath it, 14 threads are woven into a flat double knot. And the lower part of the diamond is formed.
On another brid (2) 5 threads from the brid described above are tied. To the 3rd base 4 knots are imposed, to 4 - already 3, and so on until 6, where there should be 1 knot. The 6th and 7th basics are performed in a similar way. After this, you should separate 2 threads in different directions in the middle, 7 threads are woven onto each. The same pattern is made on the right side.
In the middle of the macrame weave, where there are 8 free threads, you can make two chains of 11 cm each.
To prepare a place for fastening the watch, you need to distribute 4 threads on 2 horizontal bridges. Their length is 15 cm and they are woven in a checkerboard pattern with double flat knots. Each outer thread is tilted towards the middle and 19 threads are woven there.
You need to make chains from the 2 outer threads on each side. The length of the first should be 11 cm, the next one is shortened to 8 cm, then 6 cm. After creating the last chain, two threads are left free, and the length of the next one will be 4 cm.
All 40 threads are woven into the additional thread (horizontal) using rep knots. Then they should be divided into 10 chains (4 threads each) and make 3 double flat knots in each. All that remains is to decorate the side parts of the panel with hemstitching, and tie their ends into one bundle, and then beautifully attach it to the brids.
Macrame: pattern for panels (video)
So, to make a macrame panel you need a little patience, attention and strict adherence to all weaving instructions. Compliance with these conditions guarantees an excellent result, which will become the pride of the needlewoman.
Examples of macrame panels (photo)
Attention, TODAY only!
kitchenremont.ru
Functionality in the interior: macrame wall panel with pockets
Macrame wall panels with pockets are a kind of prototype of old military banners. This means that a similar shape is given by a broken 5-gon. This is the simplest option, but exceptions are allowed. Such a panel can be hung on the wall, and the pocket itself can be used, for example, to store spices and jars of seasonings in the kitchen or any other small items that should always be at hand.
To create this macrame you will need:
- Clamps (to create the original shape);
- Rope;
- The simplest scheme;
- Knitting needles (professionals can do without them, but for beginners this is not an option).
At the top of such a panel, a fastening is made for a regular nail. A kind of “handle” of 1-3 twists of the rope.
Panel for wall clock
Using a special pattern, you can create a panel to decorate a wall clock.
You will need a bar 5cm wider than the clock and some cotton rope.
Step-by-step execution of actions:
- Cut about 20 ropes, each 5 m long, which are attached to the bar.
- Make two zigzag horizontal bridges.
- The pattern is made on the left 16 yarns, count 8 yarns for the warp and tie 7 yarns onto it with rep knots, thus creating the top of the diamond.
- Weave the 14 threads underneath into a flat double knot and form the lower part of the diamond.
- Tie 5 ropes onto the second bridge.
- Tie 4 bundles to base 3.
- To 4 - 3 knots, and so on until 6, to make 1.
- Perform bridges 6 and 7 in the same way.
- Then spread 2 ropes in the middle in different directions, braid 7 threads on each.
- Make the same pattern on the right side.
- Make macrame in the middle of the weave, where there are 8 free chain ropes left, each 11 cm long.
- Distribute 4 ropes on two bases to prepare a place for attaching the clock. Their length is 15 cm, weave them in double flat bundles in a checkerboard pattern.
- Tilt each outer rope towards the middle, attach 19 threads there.
- Make chains on each side from the 2 outer threads. The length of the first is 11 cm, the second is 8 cm, and after that is 6 cm.
- After creating the last chain, leave two yarns free, and the length of the next one will be 4 cm.
- Weave all 40 threads to the horizontal thread using rep knots.
- Divide them into 10 chains, making 3 double flat starts in each.
- Decorate the side parts of the panel with hemstitching and tie their ends into one bun.
The panel is ready! All that remains is to hang it on the wall.
Decor and macrame: panels for wall clocks and paintings
Macrame panels can also be made specifically for watches. That is, a knitted product is created that is attached to a watch. It is not necessary to create pockets, just like a frame.
In this case, it is advisable to make macrame round (although you can also start from the shape of the clock). By the way, it is believed that the best way for this case is to use Josephine knots from a thick strand.
Since the panel will be placed behind the clock, it will have the style of lambrequins, that is, a beautiful flowing lampshade.
You can add such a panel using:
- Garter;
- Longitudinal weaving;
- Woven folds (through which, like a web, ropes are laid).
Options for macrame panels: weaving patterns
Today there are many options for making panels. Moreover, all the diagrams explain in detail how to create an interesting product.
A self-created panel with a pocket will be an excellent decoration for the kitchen or living room. This macrame is not only an interesting interior detail, but will be an excellent solution for storing all sorts of small items. Using the pattern for making such pockets, you can quickly and beautifully weave a unique panel.
A panel made using the macrame technique is perfect for a living room or kitchen
For those who want to update their interior and decorate, for example, paintings, a wicker panel “Forget-me-nots” would be a good solution.
Special diagrams will help you correctly make the frame and the flowers themselves.
Many needlewomen prefer to make New Year's gifts themselves. An interesting and beautiful solution would be a wicker New Year's panel in the shape of a Christmas tree, or other souvenirs of a similar theme.
In addition to the panel options described above, products depicting birds, animals or flowers are very popular. This can be macrame, which depicts an owl, fish and various wall products.
Whatever option of macrame is chosen, the main condition for correct weaving is the strict execution of all instructions for the chosen pattern of the product. Careful and unhurried work will help you create an excellent panel that will decorate the room and be the pride of the needlewoman.
Panel “owl”, macrame: master class step by step
The owl represents wisdom and calm. Accordingly, when creating such macrame, you should choose simple, calm tones. The ideal choice is beige and brown. The owl itself should be woven from the middle. The head, wings, legs - all this is done separately and then connected with diagonal knots (if the weaving was done from the center).
Step by step it looks like this:
- Knitting the base (the body of the future owl);
- Creation of other elements;
- Adding eyes, ears (just loose rope);
- Compound.
Of course, many can show a master class and create such a panel from one element, but this is no longer for beginners - it will be too difficult and the product can be damaged by improperly tightening even one knot, which will result in an arrow.
Sketch for a macrame panel: tutorial on how to create
Yes, the most difficult thing in creating macrame is the sketch. But you can take as a basis not only some painting or image, but also abstraction, ornament, mosaic and just patchwork - a patchwork connection. You can focus on a specific topic. For example, New Year's macrame is the same snowman or snowflakes, summer - some flowers or forget-me-nots. And in the fall, you can even use a herbarium of leaves as a sketch.
When planning a product you need to consider:
- It is allowed to use jewelry, beads and even coins (you get something like a mandala);
- Knitting can be done not from ropes, but from lace belts. These, by the way, are sold in textile stores;
- It is better to starch the finished product made of fine textiles.
Macrame products (photo)
- Author: admin
Rate this article:
- 5
- 4
- 3
- 2
- 1
(13 votes, average: 5 out of 5)
Share with your friends!