Why choose plastic finishing?
If you don’t plan to spend a lot of money on renovations, an excellent option is finishing the toilet with plastic panels, photos, designs and examples of which can be found in the gallery. PVC cladding has a number of undeniable advantages:
- you can handle the installation yourself, it’s simple and convenient;
- enormous savings on materials and tools (compared to tiles, the price difference can be very large);
- you can quickly update the interior without resorting to precise alignment of old walls, this also saves effort and money;
- The moisture resistance of the materials is high; there is no need to be afraid of damaging the surface with water. When using waterproofing, you don’t have to worry about dampness;
- Washing the walls is very simple and quick - just a damp sponge is enough;
- the service life is quite long, operation is simple, the products are resistant to various chemical compounds that are used in everyday life.
Repair of a toilet lined with PVC panels
With all the positive qualities of such cladding, it also has disadvantages. They prevent the widespread use of PVC panels when renovating bathrooms. Main disadvantages:
- Plastic is flammable, nothing can be done about it. Production is being improved, self-extinguishing models are being developed, but this does not eliminate smoldering in the event of a fire. The most unpleasant feature is the release of harmful substances during combustion;
- Some skills will still be needed, you need to choose the right model and apply it carefully;
- During installation, the area of the room changes, of course, to a smaller extent. The new one will be a few centimeters away from each wall. The distance increases as the curvature of the original walls increases. If leveling is not expected, then there is a possibility that you will end up with a smaller room. In this regard, problems may arise with the installation of equipment and with hanging doors.
It is most convenient to use this type of finishing on the ceiling, however, wall cladding with plastic is also gaining popularity.
How to cover a toilet with plastic panels. Photo
To understand how to properly line toilet surfaces with plastic products, you can look at the proposed photo and video instructions. The installation process itself and does not require much effort. You can build a frame and install panels in just a couple of days.
Preparatory stage
Before starting surface finishing work, you should purchase and prepare the materials and tools that will be needed during installation.
- Plastic panels.
- PVC profiles.
- Wooden bars.
- Assembly knife.
- Hacksaw for metal.
- Set of self-tapping screws.
- Nails.
- Construction stapler.
- Screwdriver.
- Jigsaw.
- Bulgarian.
- Hammer.
- Drill.
- Building level.
- Pliers.
- Marker.
- Roulette.
- Ladder.
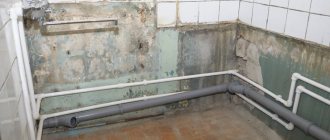
Before starting the construction of the frame, it is necessary to lay tiles on the floor and install the toilet.
The walls are cleaned of debris, old plaster and treated with bactericidal and antifungal compounds. Before starting work, the surface must dry thoroughly.
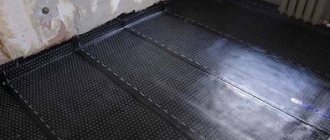
It is recommended to install sound insulation between the wall and the sheathing, which will protect the rest of the room from sounds coming from the toilet. To do this, you can use special materials or improvised means in the form of cages for storing eggs.
The slatted wooden base should be treated with a compound against rotting and the spread of fungus. The entire surface of the product, except the ends, is lubricated with the solution.
Frame installation
When making sheathing, it is necessary to consider a system for sewing water supply and sewerage pipes . For free access to them, you will need to organize a hatch or technological opening.
The best option for a toilet is a frame made of plastic profiles.
- It is recommended to start installation from the corner to the door opening.
- When covering a toilet, it is most rational to choose a vertical arrangement of profiles.
- The slats should be fastened in increments of fifty centimeters.
- They are fixed to the ceiling or walls with self-tapping screws using a screwdriver.
- The side racks are installed first. To do this, four slats are attached strictly in a plumb line to the corners of the toilet. They should not touch the ceiling or floor.
- Bars are attached to the side posts along the upper and lower perimeter of the room. To ensure that the slats engage securely, the mounting screws must be tightened at an angle of forty-five degrees.
- Using long self-tapping screws, the sheathing is additionally attached to the wall.
- Once the base of the frame is ready, you can begin installing the racks, which are nailed to the base of the sheathing.
- Before installation, the plastic slats are cut at an angle of forty-five degrees.
- The pitch between nails should be about thirty centimeters.
- If PVC fittings lag behind the wall, then a piece of plastic is first placed under it, and only then a nail is driven in.
- To avoid damaging the lath, the final blow with a hammer should be made not directly on the nail, but on the auxiliary nozzle.
Installation of panels
To attach plastic products to toilet surfaces, special clips or screws are used.
- The main installation of the lining begins with attaching special finishing guides in one of the corners of the room.
- Each product has two mounting shelves - wide and narrow. The wide shelf is intended for attaching the panel to the sheathing, and the narrow one is inserted into the groove of the previous part.
- The narrow shelf of the first lining is inserted into the guide angle attached to the wall.
- A free wide shelf is attached to the frame using self-tapping screws.
- All toilet trim elements are installed in a similar manner. During work, you must ensure that the panels fit snugly against each other.
- Special finishing elements are attached at the junctions with doorways and in the corners of the room. They will give the finish of the toilet neatness and a beautiful appearance.
to leave a small gap under the ceiling or near the floor during installation .
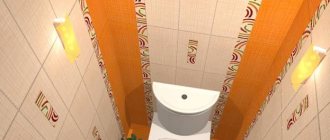
Covering a toilet with plastic panels is the simplest, most affordable and budget-friendly design option. With their help, you can design the room in accordance with the taste and imagination of the owner. Finding stylish and original solutions for individual toilet interiors using plastic lining is quite simple. You can look at photo examples of finishing and choose the appropriate option.
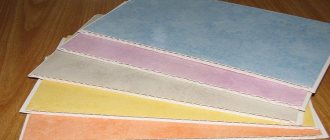
Several toilet finishing options
What to choose for work
Repairing bathtubs and toilets with PVC panels begins with choosing quality materials. A good owner will never choose based on design (no matter how cute the colors may seem). Bathroom walls will be exposed to several types of elements, so it is important to prevent them from becoming distorted or damaged. The most important thing to pay attention to is the strength characteristics. They are responsible for the reliability of hung shelves and hooks. The tougher the selected panels, the stronger and better the coating will be. In this case, the frame does not need to be made as often as in the case of thin plastic. It will be easier to dismantle such cladding.
PVC panels for toilet finishing
After density, you need to choose the appropriate width. The height of all elements is the same - they are all three meters high, but the width ranges from 12 to 25 centimeters. Don't think that the wider the better. This option is not suitable for beginners or people with little experience. It is better for them to stick to products 15 centimeters wide.
The fittings seem to be a minor detail only at first glance. It is best to buy it immediately, at the time of choosing polyvinyl chloride. It is the little things that provide the appearance that the renovated room will have. You need to buy auxiliary parts with a reserve, because later it will be more difficult to purchase what is missing. Corners and endings must be of high quality.
The polyvinyl chloride is attached to the frame, which also needs to be made. It will require a set of slats (30x30 mm). When choosing, you need to ensure the evenness of the products; good ones are usually found among those stacked. Crooked parts will never produce a high-quality and even frame. To attach the slats to the wall, you need to purchase self-tapping screws. You will also need nails with low heads.
The final touch is the choice of antiseptic. Wooden slats are susceptible to dampness, so they must be protected.
Do-it-yourself bath and toilet repair using PVC panels
Plastic for the bathroom - choose quality material
It is impossible to make good repairs from low-quality materials, so you should know the basic criteria for choosing building materials. In this case, the basic rules for choosing plastic panels for cladding walls or ceilings in toilets and bathrooms.
PVC panels for walls
To begin with, it is worth noting that PVC panels are a fairly durable and strong material that is not afraid of dampness, temperature differences, and is not susceptible to the development of pathogenic infections (mold, mildew). The strength of PVC panels depends on the number of stiffeners - the more ribs, the higher the strength of the panel, and you should carefully ensure that the stiffeners have the correct shape and are not subject to deformation.
A high-quality PVC panel should have a thickness of at least 1 cm.
Advice! When purchasing, it is important to check the plastic panels for defects: the front surface must be uniform in color and free from mechanical damage (cracks, dents, worn areas). Particular attention should be paid to the joints - deformed panels will not fit tightly, which will compromise the quality of the coating.
It is first necessary to calculate the area of the walls, which will subsequently be finished with panels. It is best to take the amount of required material with a reserve - this need is caused by the possible risk of damage to the material during cutting.
The seller is obliged, at your request, to provide certificates certifying the quality of the goods. The geometric dimensions of panels purchased in one batch must be the same in length, width and thickness. The surface of all panels must be painted in the same tone.
How to mount the frame
Repairing a toilet with plastic panels with your own hands (photo in the gallery) needs to start with the floor covering. Floors must be level and strong. After installing the toilet, you can begin working with wooden slats.
- Antiseptic treatment . This step is required for those who are ready to make high-quality coating that will last for years. The tree must be protected from rotting and the influence of fungus, so the planks will last much longer. Antiseptic compounds are harmful, so treatment is carried out in an open, ventilated space. All sides of the slats are processed, only the ends remain “clean”. It is better to perform this procedure a few days before the installation begins.
- Installation of side racks . The correct assembly of the entire frame will depend on the quality of this stage. Four wooden slats are attached to the corners of the room so that they do not touch the floor or ceiling. In practice, a piece of plastic is first installed under the bar, which is then removed. The slats are fastened with self-tapping screws, for which holes are prepared in the wall. Before the screws, plastic plugs are inserted into them.
- Lathing corner strips . The next stage is attaching slats for corners around the perimeter of the room. To ensure a strong and reliable connection, the bolts are fastened at an angle of 45 degrees. The remaining slats are attached to the walls using self-tapping screws. After completing the work around the perimeter, the intermediate strips are fastened. They are placed horizontally or vertically, maintaining a maximum distance of half a meter. Increasing the take-off run can lead to loss of structural stability.
- The final stage . When the frame is ready, you need to attach the fittings. Its corners are cut at an angle of 45 degrees. In this case, you will need all the accessories. If the fit to the wall is incomplete, then the cracks are filled with plastic tabs and then nailed down. The distance between the fastenings is about 30 cm. The crossbars and racks must be adjacent to the wall. Nails should be chosen with wide heads, but if they are not available in the store, you can use any. To save on tabs, you can cut pieces of the required size from bottles. To ensure that no unsightly marks are left on the coating, a special attachment is used when hammering.
Do-it-yourself lining of toilets and bathtubs with plastic panels
Wall repair
The principle of working with walls is similar to the process on the ceiling. First, we assemble a metal frame from profiles, taking into account all levels. And don’t forget to make a vertical partition, which will increase the rigidity of the structure. To join the strips at the corners, an internal corner is used. As in the case of the ceiling, we start installing plastic from the side with the best view. The outer corner is used in the process of joining plastic, when repairing a toilet with plastic panels, to cover the sewer pipes. The upper skirting boards or baguettes are fastened with silicone glue, but the lower ones can be fixed with dowel nails.
Features of the design of a bathroom and toilet when facing with PVC panels
It is difficult to argue when the owner of the premises chooses building materials with decors according to his own taste. However, there are rules that help you make the right choice and improve the room.
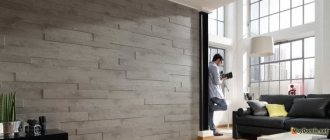
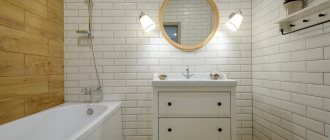
Matte PVC panel with wood pattern
The toilet and bathroom are small and quite dark rooms, so a visual increase in the volume of the room will have a beneficial effect on the overall interior design. Preference should be given to panels of light, muted colors, with small, discreet patterns, textured like wood or natural stone. Panels with large, bright, ornate patterns, especially catchy abstractions, look absolutely inappropriate in a small toilet room.
An excellent effect can be achieved by combining wide and narrow panels, as well as smooth and patterned ones.
The photo gallery will help you decide on the design of PVC panels for your bathroom or toilet.