Triangular buildings: photos of huts, their advantages and disadvantages
For the construction of country houses, most owners select traditional designs with a standard layout. However, having your own plot of land, you can consider alternative options for buildings with an unusual design. Pictures of huts in the forest that can be found on the Internet clearly reflect how attractive and natural the design of an A-frame house can be.
A hut house can be called one large attic, which can have two or three levels - as long as the roof height allows
Features of hut houses: photos and design nuances
The design of the hut is made in the shape of a triangle. This house has two facades. There are no walls; their function is performed by the roof slopes. In general terms, the building consists of a frame base, which is made of several triangular frames. The gable roof is lowered to the foundation itself. In some photos of country houses you can see other design options, where the roof starts with a low base.
In a hut-type house there are no walls; they are replaced by an enlarged roof, under which the living rooms are located
Such buildings are successfully used both as temporary and permanent housing. Depending on the project, the house may have one or two passages, and even a balcony.
Helpful advice! The end-to-end placement of passages will make it possible to rationally organize the movement of residents from one side of the yard to the other through the interior space of the house. In addition, this arrangement will provide additional coolness in the summer due to the draft.
By spending a minimum of time, effort and money, you can build an excellent house for seasonal or even year-round use.
Triangular structures are quite easy to assemble, so owners of summer cottages can implement beautiful frame house projects with their own hands without the help of specialists.
For construction you can use:
- wooden boards;
- lining;
- beam;
To make the hut house comfortable in winter, the roof must be carefully insulated
- dry board.
Since there is not much internal space in triangular buildings, in order to save usable space, the fireplace and stove pipe are moved outside the building. In the photo, houses in the forest with this design look very impressive. Although this approach also has disadvantages, since a significant part of the heat will go outside.
Option to build a hut house with a chimney placed outside
Hut house and beneficial advantages of such projects
The popularity of huts is due to a large number of advantages. Such buildings are characterized by a simple installation system. Construction does not require the help of specialists, since the owner of the land plot can assemble the structure of a modular house with his own hands. You will have to tinker with the frame structure a little longer, but it will not cause serious problems.
An important advantage of a hut house is the space saving, thanks to the triangular type of construction, which, moreover, will not block the sun from plants
The building has no walls, so its construction will take less time. There is no need for masonry work or pouring formwork structures. The ease of installation also explains the low price of buildings in the form of a hut. The estimate does not include the costs of performing masonry work, as well as purchasing mortar for them. In addition, the design does not require a heavy and massive foundation, so construction costs are significantly reduced.
The relative simplicity of constructing the structure and the high pace of construction, due to the absence of walls, are important advantages of the hut house
Triangular-shaped buildings allow you to save free space on small plots of land. On the Internet you can find many ready-made house designs on 6 acres with compact dimensions, which are ideal for temporary residence in the country. Due to their configuration, structures in the form of a hut provide a minimum of shade, which is an advantage if light-loving plants are grown on the site.
A gable roof reaching all the way to the foundation or plinth is the most suitable option for regions with a humid climate
A house made from natural materials will fit perfectly into any landscape, be it a hut in the forest or a triangular building in the countryside. The design will look equally good in an open space, next to other buildings or surrounded by tall trees and mountains.
The original appearance of the hut-type house is in perfect harmony with the countryside
A roof with two slopes will be the best option if the construction of a house is carried out in an area with humid climatic conditions, where there is prolonged rain in the fall and heavy snowfall in winter. Thanks to its low placement, the roof protects the foundation and other areas of the building from getting wet and collapsing.
Related article:
Modular houses for year-round use: modern affordable housing
Basic principles and stages of construction. Advantages, disadvantages and features of modular buildings. Individual design.
What are the disadvantages associated with the construction of triangle houses?
The function of the main enclosing structures is performed by the roof, which is not capable of providing a high level of protection from the cold. To create comfortable conditions for living in winter, you will have to additionally insulate the building with high-quality thermal insulation materials.
If you do not take care of special skylights, the rooms may be too dark
Forming the side walls of the building, the roof slopes gradually narrow upward. Because of this, housing loses a significant part of the internal space that could be used as rooms. If the house project with your own hands involves the construction of two floors, you will have to build a staircase structure inside. It is not only difficult to implement, but also leads to additional loss of usable space.
In summer, a gable roof, due to its considerable size, is subject to strong heating. As a result, heat is transferred to the interior, so installing an air conditioning system will not be superfluous. In addition, steep slopes complicate the process of installing roofing material.
The gable roof of a hut house gets very hot in the summer due to its significant size
The large slope of the roof imposes other restrictions, so for construction you will have to buy elongated rafters of non-standard size. Such products are made exclusively to order. For this, high-quality wood is used. The same difficulties arise with panoramic glazing. Most often it is used in the end parts of the house, occupying most of the facade. Panoramic windows, like special double-glazed windows, will have to be purchased to order. Moreover, cleaning such large glasses in the future will not be an easy task.
Sloping walls require a special approach to the interior. You will have to carefully select pieces of furniture or even make them to order, since standard designs can hide useful centimeters in rooms with an unusual configuration.
Sloping walls may not appeal to everyone, because arranging furniture in such a room is not an easy task.
Making buildings
While hiking, the question may arise about how to build a hut in the forest. Therefore, it is better to understand this matter as early as possible.
Each type of hut has certain assembly stages that should not be disturbed so that it does not fall apart too quickly. To begin with, you can try to assemble a lean-to structure, since this is the simplest structure that can be erected within a few hours.
Lean hut
For assembly, use various branches that can be found nearby. Usually such huts are built in the forest. What the assembly looks like:
- First you need to find a high, dry place. The structure should stand at a distance of several meters from a thick tree with strong branches.
- A strong pole approximately 2.5 m long should be cut down. It will be laid on the branches of the tree so that the height from the ground surface is about 1.5 m.
- Using strips of bark, roots or tape, it is necessary to tie the ramp poles, which will rest against the ground, to the made crossbar.
- The resulting frame should be tightly covered with thin branches, foliage, and then spruce branches.
- At the ends of the hut it is necessary to hammer the pegs well, and then lay the branches tightly.
- In order not to lie on the cold ground, you need to build a warm floor using spruce branches or ordinary grass. The insulation layer should be approximately 30 cm so that the person does not freeze.
This is interesting: Gas masks: filtering and insulating
To prevent it from being cold inside the canopy, it is necessary to light a fire near the entrance, behind which a reflector is installed - a fence made of stakes driven into the ground, as well as branches intertwined with each other. Thanks to this structure, heat will pass inside the structure.
Gable structure
This option can also be made during a forest hike. But it will require collecting a significant amount of available materials. First you need to select a suitable site and clear it of debris and stones. It is worth noting that you should never install a hut near anthills or animal burrows.
It is advisable to build a hut under large trees. If it starts to rain, they will serve as additional protection against moisture penetration. To make a frame, you need to find two straight sticks that have branches in their upper part. The lower ends need to be sharpened well, and then driven into the ground at a distance equal to the length of the building.
A long pole is installed on the resulting base, which can be tied using tape or threads that you have with you. You can also use tree bark or weave a rope from roots or grass. Poles made of thick branches are tied on both sides of the structure. They need to be fixed at the base with driven pegs. At the top, fixation is made using tape or tree bark.
The design will resemble the gable roof of an ordinary private house. This entire building needs to be very well covered with branches on all sides except for the entrance. At the final stage, it is necessary to cover the hut with straw. If the laying is dense enough, then even snow and rain will not get inside the structure, and therefore it will always be comfortable and dry there.
If there is such a possibility, then it is advisable to stretch a film or any tarpaulin over the structure. But it is worth noting that with this method you need to make fires very carefully, since any spark can lead to a fire. To prevent the hut from flooding during rain, it is necessary to make small ditches around the perimeter that will drain water to the side.
Winter hut in the ground
There are not only ground-based ones, but also types of huts that are located below ground level. Such a house will be warm not only in summer, but also in winter.
- First you need to choose a dry place that will be located away from large trees. It is best to make such structures on hills or hills.
- The pit needs to be dug so wide that several people can fit in it. Each person should have one meter of free space.
- The depth should be one and a half or two meters.
- It is better to keep the dug up soil close to the pit: it will also be useful for filling the roof of the dugout.
- On one side, you should dig an additional trench to enter the home.
- It is necessary to drive pegs along the walls. The distance between them and the walls should be equal to the thickness of the boards that will be used as cladding.
- The floor of the dugout should be very well insulated using leaves, boards or sawdust.
- To build a roof, you need to drive several support pillars along the central axis. Two of them will be located near the walls, the remaining ones will be in the center.
- The upper parts of the pillars are securely secured using a longitudinal pole.
- The resulting structure must be covered with earth.
- The entrance will be a previously dug trench adjacent to the pit. It is advisable to take care of steps or build a ladder from branches so that the ground does not collapse.
The entrance must be closed with a wooden shield. To prevent the structure from rotting due to weather conditions, it must be treated with a special solution.
Indian wigwam
A wigwam is a circular hut. It can be built outdoors or inside your own yard to delight children. It is always fun for kids to play in such a children's hut.
It is necessary to build a cone or pyramidal shape from strong sticks. If the wigwam will be assembled in an open area, then the sticks must be driven into the ground. To do this you need to sharpen them very well.
If the hut is made of fabric, then first you need to make a cover that has ties with which everything will be attached to the base. It is worth noting that the cover should cover most of the structure.
This is interesting: Why does the compass needle always point north?
There is no need to cover only the entrance to the structure. The “door” can be made from two curtains that cover the hut. A good, thick blanket should be placed on the floor to prevent the children from getting cold.
Development of a hut house project: dimensions and photos, construction technology
Before you seriously think about building housing in the form of a hut, you should first look through photos of country houses and select the most suitable project.
Mistakes made at this stage are very difficult and sometimes impossible to correct. Therefore, it is necessary to carefully select the design of the building, its dimensions and develop a site plan. This data will help you correctly determine the location for the construction site. This issue is especially relevant for small areas.
It is difficult to find a ready-made standard tent house project, since this construction option is not very popular and widespread
Important! When choosing a place to build a house, you should pay attention to the plants that are on the site. The building should not interfere with the growth of trees or shade plantings that need sun.
If you have no experience in construction, you can order a ready-made project for an A-shaped house. In this case, professionals will select the optimal location and calculate all parameters and dimensions.
In most cases, a standard project involves the following types of work:
- foundation production;
Variant of the hut house scheme
- creating a frame and partitions;
- roof construction;
- installation of windows, stairs and door structures, as well as floor formation;
- insulation and finishing.
Each company offers its own list of standard work. Before ordering the execution of the project, it is advisable to clarify this point.
How to create an optimal design for a hut house
Due to the steep slope of the roof slopes, the building loses a significant amount of internal space. That is why many developers prefer spacious and low bungalow houses. To reduce these losses to a minimum when selecting the proportions of the structure, it is advisable to choose an option consisting of two triangles of the correct shape. In this case, the shapes will have the following angle sizes: 30°, 90° and 60°.
Essentially, a hut house consists of repeating structures, namely wooden frames that resemble the letter “A”
If the roof slope angle is 28°, then a person with a height of 1.8-1.9 m will be able to stand at a distance of 1 m from the inclined surface of the wall. The area under the slopes, which is lower than a person’s height, can be divided using vertical partitions and storage rooms or cabinets for storing things can be arranged in this area. If people will live in the house year-round, the walls used for vertical zoning must be insulated.
The space below the height of a person under the inclined walls of the hut can be separated by vertical partitions
Corrugated sheeting or metal tiles are most often used as roofing materials. These coverings have a smooth surface, so the snow load on the roof is minimal. Precipitation does not linger on the roof, sliding down steep slopes. For this reason, building a hut house with your own hands will be the best option for areas located in mountainous areas or regions with snowy winters.
Important! Do not forget that a high roof creates windage, which is why the building is subject to significant wind loads. When choosing a place for construction, you should definitely take into account the wind rose. It is better to give preference to a reliable base and high-quality strapping of the frame part.
The high roof of the hut house causes a significant wind load on its foundation
The initial stage of building a house: photo and description of the process of creating the foundation
The selected construction site should be leveled and cleared of stones, debris, and stumps. Then, using pegs and cords, the basic axes of the future foundation are marked. Taking into account the developed site plan, a trench is dug. Its size should slightly exceed the parameters indicated in the project.
Typical dimensions and design of a monolithic base
A sand and gravel cushion is formed at the bottom of the trench. In this case, the pebbles are laid down, and sand is poured on top to the lower marking level. Each layer of material should be thoroughly compacted. It is necessary to install formwork panels along each trench. The upper part of this structure is connected using boards. This must be done so that a distance of 0.3 m is formed between the walls.
Laying a strip foundation for building a hut house
Next, rubble stone is laid. Large cobblestones are used for the first row. They are laid dry and compacted. Only after this can you fill it with a bud. For this it is better to use the M100 brand. The next rows are formed so that the stones are slightly recessed in the mortar covering the previous masonry.
Rubble foundations for houses are environmentally friendly and perfectly resist the effects of soil water
When performing operations such as laying material and pouring concrete, you should focus on the design mark - 0.230. The installation of load-bearing purlins depends on how well and correctly these elements are installed. Before lowering the metal pins into the solution, you need to apply appropriate markings to them to indicate the offset from the base and parallel axes. This segment is 2.5 cm. In those places where embedded parts are mounted, it is advisable to use small-sized filler.
Sectional diagram of a strip foundation
The finished foundation is kept in the formwork structure for 3 days. All this time, the base must be regularly moistened with water. After dismantling the formwork, the resulting voids should be filled with sand, and a blind area 0.7 m wide should be built around the perimeter of the building. The optimal design of the blind area consists of a layer of sand (0.1-0.15 m) and crushed stone (0.1 m ), as well as concrete or asphalt pavement.
Wooden removable formwork for strip foundations
Helpful advice! It is advisable that the covering of the blind area be positioned at a slight slope so that rainwater flows down. Thanks to this, the foundation will not become damp and will last much longer.
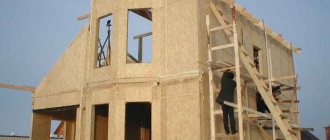
How to make a hut house: construction of the frame part of the building
The frame part of the building is constructed on a ready-made foundation. Since it is made of wood, it is important to protect the material from moisture. This is especially true for those elements that are in the ground. They should be treated with an antiseptic and covered with waterproofing material, for example, roofing felt. Parts that rise above the foundation must be passed through slots in this protective coating, after which they are filled with hot bitumen. After this, load-bearing purlins are mounted on the waterproofing.
Scheme of construction of the frame part of a hut-type house
To simplify the work when creating a frame country house with your own hands, this operation can be divided into several small stages. The rafter legs must be placed on the ground, taking into account the configuration of the roof. After this, the ends of the beams are connected using ridge caps. You can tighten them a little using M10 bolts. Then, after checking the segment between the free ends, the floor beams are fixed in the required position. Only after this are the ridge assembly bolts fully tightened.
The A-shaped rafters of the hut house are assembled on the finished insulated floor of the first floor according to a template and raised to the design position
When further assembling the rafters, it is advisable to build some kind of slipway, focusing on the first installed parts. At this stage, the assembled structure is fixed on a flat surface using pegs. They are clogged so that in the future all elements can be removed. Then the following parts are placed in its place, assembled in the same way.
Assembling A-shaped frame elements for a hut house
The procedure for installing the frame on the load-bearing purlins:
- Installation of the outer rafters, which are part of the façade pediment.
- Checking verticality using a plumb line.
- Fixing the rafters with supports and fastening the lower corners with metal plates and M12 bolts.
- Marking the frame fixation area on the ridge board.
- Installation of frames using nails.
- Installation of rafters under the ridge.
A problem may arise with the length of the roof beams; they may have to be spliced to achieve the desired height
After the above work is completed, wind ties need to be attached to the upper part of the frame. They are fixed to the rafter legs. Then you can remove the temporary supports. All three frames are connected at each edge in a similar manner.
For all its simplicity, the triangular building has an original appearance, laconic forms, and the break in the upper wall emphasizes the originality and comfort
How to build a hut house: laying roofing material
Slate sheets will be used as roofing material. Work on its installation begins with the installation of the lathing structure. To do this, take beams with a medium cross-sectional size and secure them to the rafters. These wooden elements are installed in increments of 0.5 m. After this, the beams should be released beyond the frames located on the edge by about 50 cm. Roofing material must be spread over the resulting sheathing, laid and secured with nails.
Important! To fix the sheets, be sure to use rubber gaskets. Slate is very fragile and can be damaged during installation.
All roofing installation work is best done from bottom to top. In this case, the sheets will overlap each other, preventing moisture from entering under the roof. The horse also needs protection. To do this, you can use a strip of roofing metal, bent accordingly.
The slate is installed with an overlap along the edge in one or two waves
Finishing work in a hut house for year-round use
At the first stage of finishing work, the floor is formed. To do this, wooden logs are laid along the load-bearing purlins of the rafter frames. These elements are placed in increments of 50 cm. It is advisable to use nails to fix them.
Installation of the lower floor of a hut-type frame house
Then it is necessary to form the finishing floor. For this, high-quality and durable boards are used. They are placed perpendicular to the joists. The boards can be replaced with special slats designed for the floor. Their thickness is 2.8 cm. The advantage of the slats is the presence of tongues and grooves. Thanks to these design features, the floor covering is durable and reliable, and assembly is carried out according to the same principle as laying laminate flooring. There is no need to adjust the parts and control the size of the gap between them.
Boards can be used for exterior decoration of the building. They should be placed horizontally. For these purposes, you can use ordinary material that is nailed with an overlap. The use of boards with quarters is allowed.
Wood cladding has high strength and exceptional insulating properties
How to do the interior decoration of an A-frame house
Interior walls need good insulation. Fiberboards with a soft structure are perfect for these purposes. The optimal thickness is 2.5 cm. Solid versions of the material, for example, hardboard, are also used for insulation. In this case, the material should be thin - no more than 4 mm.
The use of insulating material such as fiberboard with a soft structure is safe even for people prone to allergies
If sheet material is used as finishing, special bars should be secured to the supporting structure for its installation. They are installed along the frame at a distance of 2.5 cm from the front edge. Installation of hardboard is carried out on top of soft insulation. You can use baseboards to mask corners. The slats will cover the joints.
When the interior finishing is completed, all that remains is to install the door and window units. Openings are prepared in advance for them. To ensure the drainage of rainwater, you can install a metal drain. The design of such a house is very simple to implement. Arranging a terrace and veranda will expand the space. Projects with outbuildings, large-scale glazing and carvings look interesting.