The tile perfectly withstands the effects of high humidity and direct ingress of water, is resistant to contamination and its service life is calculated in years if the technological process was followed during installation - these characteristics often influence its choice as a material for finishing work in the kitchen. All that remains is to figure out how to put an apron in the kitchen in order to achieve an excellent and high-quality result, because you can do it yourself, while saving expenses from the family budget.
Choosing material
Before you begin the process of laying tiles, you need to correctly select the cladding material itself:
- Visual effect - the color should look organically with the rest of the room’s decoration and furniture elements;
- Linear dimensions - in this case they do not play a particularly important role, so it can be either majolica with elements measuring 2 cm or less, or large, large-sized tiles. It all depends entirely on your preference;
- The surface of the apron elements - here it is necessary to pay attention to the smooth surface of the tile, since it will be much easier to wash it from greasy drops and dirt, which are common in the kitchen, while a rough, embossed texture will complicate the cleaning process significantly;
- Stock - you should calculate the required amount of material and purchase it with a small margin, which on average is about 10% (in the case of diagonal laying - 15%) - this is taken taking into account waste, possible defects or damage during cutting of tiles.
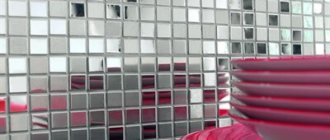
Apron for the kitchen, photo
We hope this article helped you understand how to install a backsplash in the kitchen. Finally, here are some stylish design solutions.
We prepare the necessary tools and material
To carry out cladding work you will need the following tools and materials:
- The tile itself;
- Tile adhesive - a ready-made mixture must be purchased of high quality, since this will be the main condition for high-quality work and long-term use of the surface;
- The grout for the joints must also be of high quality and must be waterproof. Please note that there are ready-made options with different colors - choose something that will harmoniously fit into the design of the kitchen; in relation to the tiles, the grout can either match the color or contrast;
- A primer for the base is a mandatory element that will provide the base with sufficient strength and adhesion for subsequent finishing;
- Distance crosses - will help maintain an equal gap between the tiles when laying; A spatula with serrated edges is used for applying the adhesive solution, and it is also with its help that it is easiest to achieve an even layer of the mixture when installing tiles; Smooth-edged spatula - This is the easiest way to apply the adhesive mixture to a spatula with a serrated edge;
- Rubber spatula - it makes it easier to grout the seams of laid tiles; Drill with a mixer attachment – used to stir the mixture to a homogeneous consistency;
- Tape measure and pencil – marking and measuring the surface;
- Level - with its help, the basic verification of the horizontal and verticality of the laid tiles is done;
- Clean rags and a sponge - they will be used to clean the tile surface from excess glue and grout;
- Tool for cutting tiles;
- Roller and brush for applying primer;
- A hammer drill with a spatula attachment or a chisel and a hammer - used to dismantle old tiles or other decorative wall decoration.
We carry out preparatory work
Before laying out the apron in the kitchen, it is necessary to correctly and efficiently prepare the surface of the walls:
- The old finish must be dismantled: The tiles are removed using a spatula attachment and a hammer drill or a hammer and chisel.
- In order to remove old wallpaper, you need to moisten it with warm water, after which it is easily scraped off with a spatula; if the surface of the wallpaper is moisture-resistant, then you can make cuts on it.
- It is easier to remove old oil paint using a torch or a hair dryer - heat the area until the coating begins to bubble and scrape it off with a spatula.
Preparatory moments
An apron in the kitchen improves performance characteristics, and with the right color and design, it decorates and completes the interior of the room. With its help, you can visually enlarge the space, emphasize the advantages of the kitchen unit, and hide the disadvantages of the layout. The variety of finishing materials makes it possible to bring the most original ideas to life. But the construction of anything should begin with the layout.
Apron design
The first step is to decide on the design of the apron - choose the shape and color scheme. The coating should be combined not only with the kitchen set, but also with other elements - accessories, fittings, floor, wall, and ceiling finishes. When renovating a kitchen, many people focus on choosing wallpaper or flooring, completely forgetting about the apron, which is what gives the interior its integrity.
How to choose the color of the apron:
- If the kitchen is dominated by neutral pastel shades, but the walls and furniture contrast with each other, they must be harmoniously combined into a single image. To do this, choose an apron that is as close as possible to the color of the set, making it match the cabinets or countertops.
- If you plan to make the kitchen completely white, then the white apron will be “lost” in such a monotonous interior, so it should be made contrasting and bright. Use “juicy” colors that evoke appetite. It has been proven that not only “acid” shades (light green, yellow, orange), but also blue tones, ranging from deep blue to azure or indigo, are capable of this. It is recommended to “support” such a bright apron with various accessories - shelves painted to match, cabinet handles, colorful vases or figurines. It is very important not to overdo it, so that the refined interior does not turn into tacky bad taste.
- If the situation is exactly the opposite, and a colored set is installed in the kitchen, then the apron should support it not only with color, but also with texture. So, a contrasting dark apron made of granite or artificial stone will look good under beige furniture. The apron looks very harmonious, identical in texture and color to the tabletop.
- The blue set looks good with an asphalt gray apron. You can also use warmer shades (light coffee, beige or creme brulee), then the warm tone will “soften” the cold blue notes of the set and make the atmosphere more comfortable. For a green set, you can choose a green apron, but with a lighter or darker shade, so that the kitchen does not merge into one spot.
- Backsplashes in discreet tones, bordered at the countertop with bright patterns or made from tiles of different tones of the same color scheme, look very original.
- Light colors of aprons are also good because when you get bored with them, you can apply a painting on top or stick an interior vinyl sticker.
In most cases, aprons are made from tiles, since this is the most affordable and suitable finishing material on the market, but if you are not constrained by funds, you can make the interior more stylish and original by building a stone or glass apron for the kitchen.
Apron materials
Let's take a closer look at each of the materials used to create kitchen aprons. The choice is determined not only by the color category, but also by the complexity of installation and performance characteristics. So, if even an inexperienced person can handle laying tiles or artificial stone, then with glass panels the situation is much more complicated.
How to make a kitchen apron with your own hands:
- Tile – among all the finishing materials for the kitchen, tile remains a favorite and is not going to lose ground. It is inexpensive, quite easy to install, does not require special care, and the choice of colors allows you to realize any design whim. A ceramic apron for the kitchen is resistant to household chemicals, minor mechanical stress, temperature changes and, most importantly, humidity. This coating will last flawlessly for more than 10 years.
And if in Soviet times the choice of tiles was, to put it mildly, poor, today you can have fun and create real masterpieces of interior art. So, you can combine large elements with small mosaics, monotonous tiles with bright painted inserts, create patterns and ornaments. One of the most notable examples is Metlakh tiles. This is a very durable finishing material, characterized not only by durability, but also by absolutely stunning textures and colors. - Stone - if you have always wanted a truly luxurious kitchen, your path lies in the department of finishing materials made of natural and artificial stone. Make a countertop and backsplash from this material, and your kitchen will instantly be transformed. Mostly marble, granite or basalt are used for laying the apron. When choosing natural cladding, the physical characteristics of the stone should be taken into account. Thus, granite has a very dense structure, practically does not allow moisture to pass through and will last for several decades. Marble is a more demanding breed and requires constant care. It has a rather porous structure, so if you spill red wine or hot tomato sauce on white marble, it may leave a permanent stain. Therefore, after installation, the marble apron should be coated with a moisture-repellent protective agent.
Aprons made of artificial stone are much cheaper and in many cases much more practical. Such materials are made on the basis of mineral filler (stone dust), acrylic resin and various pigments, giving them the appearance of natural stones. The advantages of such cladding are that it is very dense and has no pores, therefore it is not able to absorb moisture and leave memories of splashed borscht in the form of scarlet spots. Lithoceramics are as easy to install as regular tiles, and are even glued with the same glue.
- MDF - such an apron will look ideal only if the adjacent tabletop is made of MDF board. This material allows you not only to create an original interior, but also to level the surface of the wall. At the same time, it is mounted on ordinary liquid nails and clamps, and the surface does not require preliminary preparation.
- Stainless steel is a very original and stylish solution that will appeal to high-tech lovers. This material is used quite rarely, and completely in vain - it is absolutely fireproof, not susceptible to corrosion, environmentally friendly and extremely durable. If you decide to install a stainless steel apron, support it with elements made of wood, glass or glossy plastic.
Styling tools
Since in this article we will tell you how to lay a kitchen apron with tiles, we will select tools and materials in accordance with the installation technique. Before going to the store, take measurements and calculate the required amount of tiles. Buy with a reserve so that you can leave a few tiles in case of repairs.
Required materials and equipment:
- tile;
- tile adhesive (recommended Ceresit CM11;
- deep penetration primer;
- grout for joints (to match the tile);
- building level, plumb line;
- tile cutter;
- rubber spatula;
- notched spatula;
- foam sponge;
- plastic crosses for tiles.
You will need skills with a tile cutter. For thin wall tiles, you can use the most common manual mechanism.
How to lay out your own apron in the kitchen
The average width of the apron is about 60-80 cm, but keep in mind that it must be placed 10-15 cm under the tabletop. Also, do not forget about the hood, since it is in this place that you will get a kind of “tongue”, the size of which will be dictated installation height.
The marking of the wall is carried out already on the previously prepared surface of the walls: First, you should draw the lower and upper boundaries of the apron, and be sure to take into account the location of the furniture elements.
The height of the apron is adjusted in such a way that there is no need to trim, and we place the excess part just under the tabletop (in the article we already wrote that the tiles should be placed behind the tabletop at 10-15 cm in height).
A guide strip is installed along the lower horizontal line, which will provide the tile with reliable support and the tile will not slide down under its own weight, disturbing the horizontality of the masonry.
For the convenience of vertical verification, you can first apply vertical lines to the surface - this will make it easier to navigate.
When preparing a solution of tile adhesive, strictly follow the instructions from the manufacturer, since it is this proportion that will provide the solution with guaranteed properties. The required amount of water is poured into the prepared container, after which the dry mixture is poured into it, using a special attachment on a drill, the solution is brought to a homogeneous consistency and allowed to brew for about 15 minutes, after which it is mixed again and you can begin laying.
Important! You should dilute exactly as much solution as you can use in a couple of hours of work, since after this the mixture will begin to set and lose its properties, so if you are not sure that you can lay out the entire volume at once during this time, then dilute the glue in portions.
The process of laying out a kitchen apron can be imagined this way:
- Laying should begin from an open corner or from the center to the sides, depending on the layout of the elements, since to ensure symmetry of the pattern, it may be necessary to trim the tiles from both corners.
- Using a spatula with a serrated edge, apply the solution to the wall so that grooves are formed.
- A thin layer of glue should also be applied to the back of the tile, after which it is pressed against the wall, the lower edge should rest on the guide profile. Using a level, we check that the tiles are installed correctly vertically and horizontally. If necessary, press it, you can also use a rubber hammer for these purposes, however, the most important thing is not to overdo it with blows, as you can damage the tile.
- The next tile is installed side by side, so that the seam is the same everywhere, spacer crosses are inserted between the installed tiles. The horizontality and verticality of the installed element are again verified, and now it is also necessary to check that the surface of the laid tiles are in the same plane, parallel to the plane of the wall.
- After about 10 pieces have been installed, you can go back and use a sponge or a damp cloth to wipe off the excess adhesive from the surface of the tile, since it will be much more difficult to do this when the mixture dries completely.
- Laying the next row in the apron should be started only after the solution of the bottom row has “set” and gained some strength.
- Laying is carried out in this way until the entire planned surface is covered.
- After 24 hours, it is necessary to remove the spaced crosses and clean the seams, preparing them for subsequent grouting.
Surface preparation
Laying tiles on an apron is a complex of planning, selection of materials, tools and surfaces. After you have purchased everything you need, start preparing the wall.
Please note that according to the rules, the entire process is carried out before the furniture is installed.
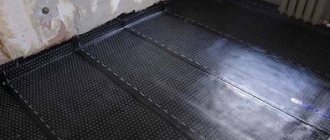
First of all, remove the old cladding. After this, do all the rough work: replace the wiring, remove sockets and switches, if necessary. Next, start leveling the surface. The wall is primed and plastered. If the unevenness is significant, in addition to the starting and finishing putty, moisture-resistant drywall is used. The corners are formed using metal corners and mesh.
Facing requires preparation and surface treatment
Next, start marking the apron. First, the lower limit is determined, its position depends on the height of the tabletop, but 70 cm from the floor is considered the standard. The top line is drawn 70 cm above the first mark. At the location of the hob and hood, you need to measure approximately 80 cm up and add 5 cm on the sides. All lines must be level. Before tiling, the wall must be additionally treated with antiseptic impregnation and primed.
Tile cutting
The vertical apron in the kitchen is laid out from whole tiles, however, trimming is often required in the corners, especially if symmetrical installation is performed. You can cut tiles using a variety of tools, each of which has its own advantages and disadvantages.
If you cut just a little, you can use a roller glass cutter, however, now not all tiles will “succumb” to this tool and making a high-quality cut in this case is almost impossible.
A manual tile cutter is an excellent solution in terms of price-quality ratio. The tile is installed on the frame, and it is necessary to align the mark along which the cut will be made with the direction of movement of the cutting roller. The cutting disc is brought to the line using the tool lever and placed on the edge. When applying pressure, move the carriage along the cut line only once; you should not move the carriage along the cut line several times, as the glaze will break off and the edge will end up with jagged edges. Using special paws, press the lever and break the tile along the cut line.
An electric tile cutter is a more professional tool that can provide the highest quality cut. The tool is quite expensive, so taking it to cut several tiles is completely impractical. It is equipped with a special disk for cutting ceramics, while water is supplied to the cutting edge, which prevents overheating of the disk itself, ensures a high-quality cut and there is absolutely no dust.
Using a grinder and a special disk, you can also cope with this task. A mark is made on the tile where the cut will be made. The grinder turns on and you should wait until the disc picks up speed, after which you make a slot 3-5 mm deep along the line. After this, the tile is placed on a table or workbench, aligning the slot line with the edge and breaking it along this line with a sharp movement. Most often, such a cut will require additional processing.
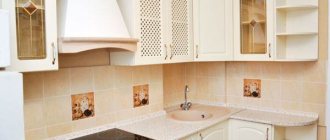
Furniture and kitchen backsplash tiles
So, a kitchen apron is part of the wall between the floor and wall cabinets in the kitchen, as well as behind the stove or hob. Ceramic tiles remain the classic option for finishing an apron.
The pattern of laying tiles on the kitchen apron plays an important role in finishing the apron. Let me explain why.
1 Firstly, the tiles should fill the entire space between the floor and wall cabinets in the kitchen. And this is possible if you know exactly what kind of kitchen you will have. Every kitchen is different, and even standard kitchen cabinet sizes may not help with precise tile installation.
It is especially difficult to think through the laying of tiles behind the stove (hob). At this point, when laying tiles, the tiles are raised to the level of the hood or the level of the mezzanine cabinet.
You also need to provide for extended tiling behind the washing machine (if it will be in the kitchen), dishwasher and in the sink area. It is better to protect all parts of the walls in these wet areas from moisture with tiles.
2 Secondly, ceramic tiles are thick and when laid, a threshold of up to 10 mm is formed. Hence the nuance that needs to be thought through. When hanging kitchen cabinets, if you rest the bottom edge of the cabinet on the tile, the cabinets will hang at an angle to the wall. The angle is not large, but it will be there. This slope is almost invisible if all the wall cabinets rest on the tiles. Then they will have a single level and can be fastened together.
Related article: Laying mosaics on a wall apron with your own hands
If the layout of the tiles on the kitchen backsplash is not drawn up correctly, a situation is quite likely when, say, a mezzanine cabinet above the stove will not rest on the tiles and will disrupt the uniform façade of the wall cabinets.
The layout of the tiles on the kitchen backsplash is even more important if you plan to hang cabinets without supporting them on the tiles. In this case, the installation scheme must exactly match the size of the assembled kitchen.
Conclusion: For the best result, the layout of the tiles on the kitchen apron should be drawn after or during the purchase (order) of kitchen furniture.
This will greatly facilitate the work of assembling and hanging kitchen furniture and will not create assembly issues with assemblers.
Grouting joints
After the apron in the kitchen is finished and a day has passed, you can start grouting the seams. To do this you need to prepare the following:
- Rubber spatula;
- Any container for diluting the mixture;
- Dry rags and sponge;
- A piece of cable is for sewing seams.
The work is carried out as follows:
- To begin with, be sure to remove all spaced crosses - if they fit very tightly between the tiles, then you can use a stationery knife - this will significantly simplify the task.
- The seams are cleaned of dust and moistened with water using a spray bottle or sponge. Dilute the dry mixture or use a ready-made mixture for grouting. Add color if necessary.
- Using a rubber spatula, apply the mortar to the seams and press it firmly into place so that all cavities are filled with mortar.
- After this, press a piece of cable along the entire length, pressing it into the seams - the excess grout will be squeezed out, making the filling of the seams uniform, which will certainly give a more aesthetic appearance.
- Wait until the grout sets a little (usually a couple of hours is enough), then wipe the tiles clean with a sponge, rinsing off any remaining grout. Wipe everything clean with a dry rag and the final shine can be achieved using flannel, rubbing the entire tile until it shines.
Installation instructions
How to lay tiles in the kitchen correctly to create a smooth, neat backsplash:
- Start editing from the bottom corner that catches your eye the most.
- Measure the approximate position of the reference tiles and make appropriate marks.
- Prepare glue or cement mortar. It must be applied to the wall, leveling it in a layer of approximately 8-12 mm using a notched trowel. Do not use a lot of mixture at once, as it hardens quickly.
- Begin laying the tiles according to the chosen pattern. The gaps between the elements should be 2-4 mm. To ensure that they are uniform over the entire area of the apron, use cross fasteners.
- First, whole fragments are laid. Keep an eye on the level.
- To seal the clutch, tap the tile with a rubber mallet.
The installation of a tile apron is made using traditional technology