A pallet sofa is an interesting piece of furniture. In any furniture showroom, the assortment is provided taking into account the interests of even the most sophisticated buyer. But an item purchased in a store soon becomes boring, begins to irritate us, and we rush to replace it. It’s a completely different matter when products appear in the house into which soul, patience and love have been invested.
Photo: postroika.bis
Country house construction on level ground
Often, dacha construction begins not only out of the blue, but also with a zero initial balance. The cash was spent on purchasing a plot of land, and it is no longer affordable to buy a set of materials for the arrangement. But, as practice shows, a way out can be found here too. Namely, to use for work, for example, used pallets, that is, commodity pallets, which many organizations and companies involved in transportation sometimes throw in a landfill or give away for literally pennies.
At the same time, clean, high-quality boards are used to make pallets. They are not very long, but people with “hands” can easily use them as building material. Of course, you cannot build a modern cottage from such material, but a utility block, garage, toilet, shower room, greenhouse and even a small garden house will turn out excellent. You just need to disassemble the pallet, which is sometimes not easy: the nails that hold them together are bent so that it is not easy to pull them out. But here you need to choose what is more important for you: to suffer with disassembly and save money or to look for funds to go to a construction supermarket?
Before you start building, for example, a house from pallets with your own hands, it is advisable to make a design drawing on graph paper or squared paper, drawing in detail all the nodes and connections.
See what a house made of pallets can be like - the photo shows different designs:
Roof and roofing
For the exterior finishing of a frame bath, we can recommend the following materials:
- Wooden blockhouse.
- Metal tiles or corrugated sheets.
- Plastic siding.
- Cement particle board (CSB).
- OSB board.
- Flat slate.
Photo No. 12 A simple, but at the same time very nice option for exterior finishing of a bathhouse using unedged boards
It is best to use ecowool as insulation. It does not accumulate moisture, does not rot and does not burn. If ecowool is not available in your region, then you can buy ordinary mineral insulation in the form of a semi-rigid slab. It is easily and simply placed in the spaces between the frame posts.
To protect mineral wool from water vapor and reduce heat loss, the walls are lined with sheets of foil polyethylene. After this, a frame of slats is attached to them and trimmed with wood: alder, linden or pine clapboard (photo No. 13).
Photo No. 13 Steam and heat insulation of the walls of a country bathhouse built from any material
We do not recommend installing OSB board indoors. This material releases toxic gases when exposed to high temperatures.
Options for steam and thermal insulation of walls of a frame structure, as well as a bathhouse built from blocks or logs, are presented in Figure No. 1.
Building a simple bathhouse with your own hands includes sewerage. It can be made from standard plastic pipes led into a cesspool or drainage well.
The water intake funnel is placed in the center or in the corner of the room, and the floor is made in the form of expanded clay concrete screed with a slope towards the drain. Before concreting, you need to compact the soil and cover it with several layers of waterproofing. Wooden flooring is an excellent option, but in a bathhouse it quickly rots and requires replacement.
The design of the bath ceiling is standard. First, a vapor barrier film is “attached” to the rafters and counter-battens (3x4 cm) are stuffed. A clapboard cladding is attached to them. The gaps between the rafters are filled with insulation and covered with under-roofing film. It protects it from weathering and atmospheric moisture (Fig. No. 2).
Fig No. 2 Ceiling structure of a country bathhouse
A counter-lattice is placed on the film, creating a ventilated gap between the roof and the insulation. The work on installing the ceiling and roof is completed by installing the main sheathing and laying the roofing material (slate or metal tiles).
The main “detail” of any country bathhouse is the stove. It should provide rapid heating of the air and maintain a high temperature. A metal stove heats up the fastest.
To accumulate heat and create steam, it must be equipped with a compartment for stones. There are many options for stoves for simple baths, so we will not dwell on them in detail. Let's just say that the easiest way to make a heat generator is from a large-diameter steel pipe, an old gas cylinder or barrel (photo No. 15). Another easy-to-use material is a steel sheet 3-5 mm thick (photo No. 16).
Photo No. 15-16 A simple stove made of a pipe and a stove made of ferrous metal
Knowing the simplest welding techniques, you can assemble such a structure without outside help.
Avoiding the use of coniferous trees, alder, aspen, linden, and, less often, larch and cedar wood are used to decorate the interior of the bathhouse.
Aspen is an almost ideal answer to the question of material for interior decoration.
The ceiling in a log, brick, or panel bathhouse is done the same way. A distinctive feature of the ceiling for a chopped log bathhouse is that it can be made of boards. This will give the structure a natural look. It turns out to be a “antique” frame bathhouse, but there is also a practical meaning: the roof provides air circulation with good thermal insulation.
To build a ceiling for a bathhouse, you need wood that has low thermal conductivity, tolerates changes in humidity and temperature well, and has a low resin content.
The temperature under the ceiling of the bathhouse is the highest and if the boards contain a lot of resin, then it will drip down as it heats up. Therefore, for arranging the ceiling and interior decoration of the steam room, you should use only hardwood.
The roof and roofing is a system that includes a truss, sheathing and the roof itself.
- A rafter truss is a rigid bundle of beams that serves to distribute and absorb the loads that arise in the system. Rafters are the main massive parts of this structure, onto which the weight of the entire roof is distributed. Additional elements directly to them serve to strengthen, unload and secure these beams.
- The sheathing is a horizontal base of timber piled on top of the rafters to securely fasten the roof.
We invite you to familiarize yourself with the installation of floors in the bathhouse - All about the bathhouse
An important design of the roof truss system, which in some cases cannot be avoided, is the Mauerlat. This is a wooden beam placed on top of the finished walls and used to connect the rafters to the “body” of the building.
If the walls of the bathhouse are built of brick or blocks, then before installing it, the surface is carefully waterproofed.
Wood-burning stoves are divided into brick and metal.
A metal batch oven without a container for heating water is very compact.
In an iron box with doors, grates with a stove are placed on metal shelves, which make up the bottom of the combustion chamber.
Bricks are laid along the entire perimeter of the firebox, which form a screen to reduce thermal radiation.
Metal gratings are placed on top of the bricks to hold the bricks upright and serve as a tray for backfilling the stones. When the stove is operating, gases enter the chimney pipe, passing through the stone backfill.
The firebox is built from fire-resistant red brick.
The stove is equipped with chimneys consisting of downwells and a prefabricated chimney. The rock chamber has two doors, but chimneys are often installed to allow flue gases to enter the bottom of the rock chamber from the space around the duct.
The construction of a brick heater begins with the construction of its foundation. To prevent the stove from sagging or tilting due to soil freezing or moisture, the foundation must be buried half a meter. The transverse dimensions of the foundation should be one brick larger than that of the stove.
The foundation for the furnace does not need to be made uniform with the general foundation for the walls. The distance from the stove foundation to the wall foundation is at least 5 centimeters.
The best foundation is rubble concrete or concrete. In dry soil it can be built from bricks using cement lime or lime-cement mortar.
The surface of the foundation must be filled with cement-sand mortar, leveled with a lath and covered with waterproofing. Usually this is roofing felt or roofing felt, which is laid in 2 layers (item 4 in the diagram below).
- sole
- underground part
- top cut
- waterproofing agent
- stove masonry
The building material for the construction of the furnace is ordinary solid brick. Under no circumstances should silicate or hollow bricks be used for masonry.
In modern baths, air up to 100°C is most often heated with an electric heater with a built-in automatic control device. The device turns off the electric heater when the temperature of the walls exceeds the permissible norm, as well as if the flame in the firebox goes out, or if, for example, a towel gets on the stove.
An electric heater in a bathhouse must be equipped with a temperature limiter that turns off the heating element, and a time relay that turns off the electric heater after a certain operating time (up to 5 hours). Today there are many different modifications offered on the market.
And finally, useful tips for bathhouse attendants.
- Dry birch firewood is ideal for heating a stove in a bathhouse. Don't do unnecessary experiments
- For a novice bathhouse attendant, the time spent in the steam room should not exceed 5 minutes. For experienced bathhouse attendants, the average time can be much longer – 25-30 minutes.
- The musty spirit in the bathhouse can be eliminated by adding a few drops of ammonia to a ladle and splashing it on the stones. Don't forget to ventilate the steam room afterwards.
- Don't go to the sauna on a full stomach! But on the contrary, a couple of cloves of garlic should be eaten. Garlic is good at removing toxins through sweat.
- Contrary to popular belief, you should not take beer, much less strong alcohol, with you to the bathhouse. Treat your body with tea or decoction of rose hips and raspberries.
- Choose the best place for the bathhouse. The courage of decisions is rewarded with double pleasure from the process!
And finally - enjoy your steam!
Site navigation
If old used pallets are used for our construction, we need to pay attention to their condition. If the products are used incorrectly, the wood could accumulate excess moisture, unpleasant odors from spoiled products, and become saturated with harmful chemicals used to process vegetables and fruits. The boards could rot and begin to crumble.
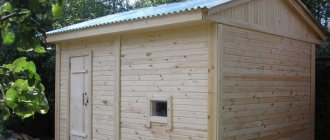
Therefore, pallets must be thoroughly checked for suitability for construction work and sorted. After this, our materials must be cleaned of various contaminants and disassembled into pallets using a nail puller. The finished elements will be used for sheathing the shed, so it is advisable to clean them with a sanding machine and treat them with special products that improve the durability of the wood. After the preparatory stage, we will consider the following questions about how to build a shed from pallets.
Blocks for building walls
It is convenient to erect small buildings from blocks, each of which consists of two boards from 1 to 2 m long. Short trimmings (liners) are nailed between the boards, which are always available in abundance during any construction. The length of these liners does not matter.
For blocks intended for the construction of walls, liners are installed on one side just above the edges of the boards. They form protrusions, a kind of ridge. On the other side of the block, the liners are recessed relative to the edges. The ridge of one block, inserted into the groove of another, forms a reliable connection, similar to the connection of tongue and groove boards. The same principle is used when constructing the corner and intermediate posts of the frame.
To save on expensive long materials with a large cross-section, they make a kind of “sandwich”. Blocks from pallets are installed on the inside, and long boards are placed on the outside, strengthening the structure. Before building a house from pallets, you should prepare the required number of such wall elements.
In particular, this is done when installing the lower and upper trim or rafter system.
Look at the house you built from pallets with your own hands - the photo illustrates all the stages of its assembly:
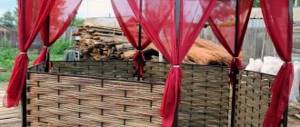
Pallet woodshed
The usual masonry for firewood is not very convenient to use, so the author decided to make a more comfortable structure from pallets, such as a mini shed for firewood. This makes it much more convenient to sort logs and provide better access for loading fresh firewood. When you look at the step-by-step photos, keep in mind that the shed was built by an amateur.
To create a double stack you will need 10 pallets, wooden planks, 14 metal openings, galvanized nails, a saw, 6 hinges, 2 hooks, a roll of felt, work gloves, time and good weather.
See the step-by-step photos for the assembly procedure. Perhaps the stages are not shown in great detail; if something is not clear, a description of the process can be read on the website, you will find the link under the photo gallery.
Technology and time saving
Working using this technology, the builder saves a lot of time, since he can implement a wide variety of connections in one way, and it turns out much faster than choosing grooves or forming ridges from solid wood. It is also convenient to work with such blocks because they are lightweight - even one person can stack them at a considerable height.
When there is a large volume of work with identically manufactured elements, it is advisable to make templates for their connections.
Before you build a house out of pallets with your own hands, you need to know that the quality of construction will noticeably improve if you select quarters from the boards using an electric planer, a circular saw, or using a woodworking machine. This is additional work, but in this way you will not only get a more durable structure, but also protect the interior from blowing through the wind.
The following shows a house made from pallets with your own hands - in the photo you can see the options for finishing:
So, for small outbuildings it is not at all necessary to purchase expensive long lumber - you can get by with minimal costs. And you don’t even have to look for pallets. Using the above method, wooden building blocks can be made from almost any non-grade board, for example, left over after dismantling an old house, large packaging, etc. As with any type of activity of a home craftsman, a creative approach to the matter is most important here.
Watch how to build houses from pallets - the video shows the simple technology available:
Bathhouse project
To complete a finished bathhouse at your dacha, you need to follow a certain sequence of actions. First of all, they decide on the project. This step can be left to professionals.
Photos of bathhouses in the country are very diverse and will help you choose the appropriate design.
The choice of the type of modern bathhouse is influenced by your desires, finances and the availability of free territory on the site. According to safety regulations, it is not recommended to place a bathhouse near a house or neighboring buildings.
The 4*5 meter bathhouse consists of a relaxation room, shower and steam room.
A bathhouse with a terrace is similar to the previous option, but is performed with a terrace. It provides an opportunity to have a great rest with the whole family.
A bathhouse with a dressing room presupposes the presence of a dressing room, to which you can, for example, stack firewood.
Please repost
2
A garden shed is an urgent need for every gardener, because storing tools and equipment in the open air or constantly carrying them from home is not an option. You can hire builders and build a luxury storage shed, or you can make your own, like the pallet shed featured here. It's a great material for structures like this, it's easy to modify - it'll make it much easier for you to add useful items like windows and shelving, and because they're easier to adapt, they're also suitable for wider use. In this structure, almost everything is made from disassembled pallets - wooden posts, planks, floor and roof frames.
How to make a garden shed from pallets
- First level the ground to create a level and solid base. The concrete slabs will be the foundation, so they need to be adjusted to create a level surface.
- Install a wood floor on as balanced a base as possible to ensure a solid foundation. This is the very first and most important step of building a shed and must be done exactly!
- Raise the wall around the base of the floor so you can secure the beams to which the walls will be attached.
- Install lattice wood frames for the walls, additionally reinforced with cross supports and brackets for greater stability!
- Make openings for windows.
- Don't forget to provide an angle of inclination for the roof.
- Finally, cover the wall frames with boards from disassembled pallets.
- First cover the roof frame with felt and then cover it with roofing felt.
- Install the finished structure onto the frame.