For many people, the word concrete is associated with something gray and shapeless. However, progress does not stand still, and old technologies take on a completely different look. This also affected the familiar concrete - it became decorative.
This building material can be called differently: decorative, printed, pressed or stamped, but this does not change the essence. It is an excellent alternative to concrete paths or paving slabs.
Due to the fact that stamps made of metal or polyurethane are used in its production, the standard and smooth surface of the paths can imitate paving stones, wooden boards, stone, animal skins and much more. Using printed concrete, you can make paths that match the overall style of the building.
Features of the technological process
The technology for manufacturing artificial tiles is suitable for both public places and private areas, such as garden paths. When using this method, a reliable, durable and durable coating is produced.
It is possible to use different dyes, shapes and patterns, thereby creating a unique masterpiece.
A coating made using this technology is a concrete screed coated with a hardener that protects the surface from abrasion. The top is also painted with acrylic varnish, which not only gives an attractive appearance, but also protects the coating from aggressive atmospheric environments.
For the manufacture of garden surfaces, high-grade concrete is used, at least grade 300, with the addition of fiberglass.
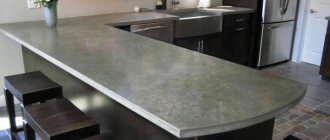
Sidewalk covering for paving stones made of cement-sand mixture
Peculiarities
Any interior solution needs a detailed description. Therefore, our instructions will consider in detail the features of the material mentioned above.
Short description
It is a super-compacted concrete that has a surface with a special decorative imprint. It is rubbed with mineral pigments, which saturate the surface with color and make it stronger. It is also coated with a deep penetration polymer protector, which significantly increases service life.
It is used in almost all areas of renovation: from finishing bathrooms to cladding facades. High aesthetic possibilities allow us to constantly find new functions.
Advantages
In this photo you can see how the facade of a building can be covered with tiles
When describing any product, it is simply necessary to voice its main advantages.
This is exactly what we will do:
- The opportunity to create decorative concrete products with your own hands . At the same time, the wealth of shapes, shades and textures of this material is truly inexhaustible. This property frees up the hands of designers, allowing them to create magnificent compositions.
- Resistance to major aggressive substances (acids, alkalis, petroleum products, fats, etc.).
Advice: despite such impressive resistance, it is not advisable to use abrasive cleaning agents. They can disrupt its structure.
- Calmly withstands both high (up to +55 degrees) and low (down to –40) temperatures.
- Highest resistance to compression, abrasion and bending.
- Very high strength . Thus, only cutting reinforced concrete with diamond wheels allows you to adjust the product. Simple cutting methods will not cope with this task.
- Excellent frost resistance . In particular, it can withstand more than 300 freezing and thawing cycles.
- He is not at all afraid of exposure to ultraviolet radiation (sun rays).
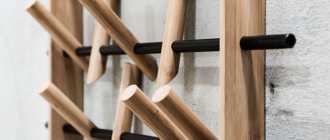
Even in the manufacture of furniture you can find a place for this technology
- If we are talking about tiles, then they will not be pressed individually (this happens quite often).
Flaws
There is always a fly in the ointment in our lives, even in the most attractive ointment.
So, decorative concrete also has its disadvantages:
- Needs constant care. In particular, it is necessary to regularly (at least once a year) treat products with special water-repellent substances.
Important! If you do not pay due attention to this procedure, the surface will deteriorate significantly.
- Relatively high price. Often it is this factor that pushes people away from purchasing this material. So, many people prefer to buy, for example, paving slabs, which are several times cheaper.
- Difficult installation. It will be quite difficult for an inexperienced person to finish with such material. In this regard, it becomes necessary to invite a specialist, which entails additional costs.
Despite all the above disadvantages, we can confidently say that this is a very attractive and practical material.
Manufacturing technology
The technology for manufacturing a coating with imitation paving slabs consists of several stages, which contain their own sequence.
Screed
- The first thing that needs to be done is to prepare the base for the concrete solution, which consists of a sand and crushed stone cushion.
- Next, the formwork is installed and a cement mixture with fiberglass is poured.
Important! If there is no fiberglass, it is necessary to reinforce the screed so that the track is strong and can withstand heavy loads.
- Having well leveled the future base, you can proceed to painting and decorating it.
Cement mortar screed
Coloring
- The dye (dry) is evenly applied to the concrete solution.
- Using a special mop with a flat tip, reminiscent of a large trowel, the dye and hardener are rubbed in until a uniform color is obtained.
- A special separating powder is applied to the resulting colored surface, preventing the patterned mats from sticking to the solution and giving the coating an attractive shade. The dry separator mixture should be applied evenly.
Creating a Pattern
- Mats with the required pattern are placed on the prepared surface, pressed down well and carefully removed.
- After the surface has dried thoroughly, it is necessary to remove as much of the layer of release powder as possible.
- The final stage is the application of acrylic varnish.
Distributing dry separator mixture and laying mats
Printed concrete preparation technology
It is half filled with sealant. Tiles with a decorative pattern are carefully lubricated with grease. Then the front side of it needs to be pressed into the silicone. Excess formed on the surface is removed. On the fourth day, the concrete stamping mold is ready for use. The form is carefully pressed into an uncured concrete surface, previously coated with colored pigment, moisture-resistant additives and a fixative. After the surface hardens, the stamps are removed and the concrete is coated with a protective impregnation.
For the production of decorative concrete, cement M or M is used. Fiber fiber is added to give strength to the material. For the manufacture of tiles and small-sized products, fine aggregate is used. Volumetric concrete parts are made with the addition of larger fillers. A pronounced structure of concrete is obtained by adding marble, basalt, limestone, granite, anthracite, fragments of ceramics and colored glass.
To enhance the texture, special mixtures are used that slow down the hardening of the surface. At this time, the concrete is treated with special tools or hydrochloric acid. To obtain bright and pure colors, white Portland cement is used. Dark and light sand allows you to achieve the desired decorative effect. When making it yourself, the composition of decorative concrete can be changed at your discretion by adding or removing any components.
As an alternative to decorative paving slabs, you can purchase or make printed concrete yourself. The technology for producing printed concrete allows you to create a decorative surface for a garden path that imitates stone, wooden flooring, paving stones or even animal skins. Thus, stamped concrete provides a unique opportunity to combine the flooring pattern with the overall architectural design of the building. Various concretes developed for decorative purposes appeared in the United States in the middle of the last century. Initially, this development was intended for the design and arrangement of runways of military airfields.
Decorative concrete has a fairly wide range of applications, and quite often it can be found in the form of platforms, paths, driveways, and parking lots. Printed concrete does not slip, withstands temperature changes and therefore is so often used when landscaping the yard around the house. To cover the yard with decorative concrete with your own hands, you need to choose a suitable site.
If concrete is made in the yard, its production is carried out immediately at a permanent place where it will be located in the future. To make a garden path or improve any area of the yard, you need to take grade M cement and plasticizers.
You need to work at above-zero temperatures. The mixture is stirred. Poured into molds.
A walk through the garden is one of the main pleasures of country life. Therefore, garden paths should be both comfortable and beautiful. Paving slabs for dachas are traditionally used for paving paths, but we invite you to take a look at how amazingly beautiful such paving slabs can be.
A vibrating plate is used for compaction. The roller smoothes and compacts the concrete surface. Cement M, sand, crushed stone and fiberglass are used to make the mortar.
So, having considered the most common technologies for making paving concrete pavement, with imitation tiles, it becomes clear that the process is not simple and takes a lot of time.
The essence and possibilities of using this technology
Stamped concrete is ordinary concrete, onto the surface of which decorative embossing is applied using special stamps. The relief pattern can imitate any material: brick, paving stones, boards, animal skins, weathered stone, cracked earth. You can choose stamps with leaf patterns, dinosaur footprints, and animal figures.
Stamped concrete is especially popular when decorating terraces, patios, areas near swimming pools, garden paths, sidewalks, gazebos, floors in restaurants and exhibition halls. This technology becomes indispensable for complex restoration work. For example, when it is necessary to recreate a destroyed part of an ancient pavement. It is often not possible to find exactly the same materials that have aged naturally. And with the help of stamped concrete technology, exact copies of existing old brick or half-erased stone can be easily created.
Read also: How to get rid of weeds in your garden forever
Variety of stamps for printed concrete
The first stamps for stamped concrete were made of cast aluminum and were massive molds equipped with handles. Such matrices are well suited for simulating ordinary brick or stone patterns. But they are unable to copy complex textures. Modern polyurethane stamps are a completely different matter. They are cast on real materials, the texture of which must be copied. As a result, incredibly authentic textural effects can be achieved using polyurethane molds.
Ready-made stamps can be purchased at many construction stores or centers. When choosing, you should pay attention to the degree of rigidity of the shape. The denser the stamp, the easier it is to create a clearly visible design. Forms that are too soft and pliable are more difficult to work with and require more effort during the printing process.
Self-production technology
The technology of stamped concrete is quite simple, but you should only take it on if you already have some skills in working with concrete. Otherwise, the result may not be what you expected. Problems may arise for the following reasons:
- concrete hardens quickly, after which the use of stamps does not produce clear embossing on the surface;
- To perform embossing using stamps, you need to apply physical force;
- errors in embossing a concrete surface are difficult to correct;
- stamped concrete technology requires the worker to be able to use special tools to form and smooth the surface.
Once you are confident that you can handle the potential problems, you can begin creating the concrete pad and performing the stamping work.
Step 1. Preparing the concrete site
The basis for stamping is a regular concrete platform with reinforcement, made of concrete grade M350 and higher.
Technology for creating such a platform:
- using pegs and a cord, mark the boundaries of the area where stamping will be carried out;
- remove the top layer of soil (depth 15-20 cm), compact the soil bottom;
- pour a crushed stone cushion (10-15 cm thick) onto the bottom of the excavation and tamp it down;
- formwork made of boards is installed along the border of the site;
- lay a reinforcing mesh in the formwork, raising it above the ground level by at least 3-5 cm (by placing stones and bricks under the mesh);
- concrete is mixed manually, using a concrete mixer, or ordered ready-made;
- concrete is poured into the formwork, a metal rule is used to obtain the required level of the site;
- compact the concrete with a vibrating screed;
- The top layer of concrete is smoothed with a trowel, achieving a smooth and uniform surface.
Step #2. Application of color hardener
A colored hardener is applied to still fresh concrete, which simultaneously colors the surface and increases its strength. A colored hardener is a powder that contains coloring pigments, a binder filler and ground particles of granite and quartz sand. Due to the dispersion of the mixture, its particles penetrate into the pores of concrete and fill them. The concrete surface becomes more dense and durable. At the same time, the particles give the concrete a lasting color (about 30 tones to choose from).
Work on applying a colored hardener begins after the initial setting of the concrete surface. You can focus on the moment when all the water that appears from the surface has evaporated.
Colored hardener powder is scattered over the concrete surface manually, from the center of the site to the edges. At the same time, they perform movements similar to throwing a bowling ball. Scoop up a portion of the powder, move your hand back and with a sharp movement throw the mixture forward from waist level. This principle of applying powder minimizes the number of particles flying through the air.
The first layer of hardener should be absorbed into the concrete, which takes 5-10 minutes. During this time, the surface of the concrete is smoothed by rubbing the dye into it using a magnesium smoother. Corners are also processed using corner smoothers to make them curved and neat.
Then a second layer of colored hardener is applied. It is necessary to paint the surface more evenly and compact it. The powder is applied in exactly the same way as in the first case. After application, the surface is leveled with a steel trowel.
Step #3. Application of the release agent
The release ink prevents the concrete from sticking to the dies during the printing process. In addition, it additionally colors the surface of the concrete, giving it subtle shades of color. The release agent is available in the form of a dry powder or liquid. Most often, powder is used, applying it to the surface of the concrete with a wide brush (brush).
The brush is immersed in a bucket with a separating component so that the bristles are evenly covered with powder. Then, holding the brush at waist level, throw your hand forward and “spray” the powder over the surface of the concrete.
After painting, the corners of the area are treated with textured sandpaper.
Step #4. Surface stamping
Before you start stamping, you need to make sure that the concrete has acquired the required degree of plasticity and has become similar in consistency to plasticine. If you start stamping too early, the concrete surface will not be able to support the weight of the workers and maintain the print lines. If you are late, you will have to put more effort into the stamps to print clearly. In addition, the texture of the stamps may not be imprinted at all on concrete that is too dense, especially at the end of the job.
Read also Dish with fire on the table
To determine the degree of density, just press your finger on the concrete surface at several points on the site. If there are prints left with a depth of 4-6 mm, then stamping can begin. You can also check it another way: place a stamp on a concrete surface (at the edge of the site) and step on it. The stamp must support the weight of the worker, not sink into the concrete, and not slide across the surface.
If all tests pass successfully, you can begin stamping. The stamps are laid out on the concrete surface, one after another. Manufacturers often number the stamps (1, 2, 3... or A, B, C...) to indicate the desired sequence of their placement in the printed design.
To imprint the texture of the stamps into the concrete, you can often simply step on them. Sometimes light hand tampers are used for this.
After the prints are made, the concrete surface is left to cure for 12-24 hours.
Step #5. Elimination of defects
On the concrete surface, where the dies meet, a slight displacement of the cement mortar often occurs. Sometimes, due to insufficient compaction, the seams of the printed pattern may appear blurry and indistinct. To correct surface defects, a hand roller is used along the seams and joints, and uneven surfaces are smoothed out with textured sandpaper.
Step #6. Cutting shrink joints
Several cut seams in the slab provide stress relief and prevent cracks. Such joints can be made in still fresh concrete using a special cutter. Or cut the seams with a grinder after the concrete has dried.
Step #7. Surface washing
The next day, wash the surface. Use a hose to wash off excess release agent. Afterwards, an acid wash (with hydrochloric acid) is performed to obtain the desired effect of a combination of two colors on the surface. During this process, the pores of the concrete also open, which promotes better interaction of its surface with the sealant.
Step #8. Applying sealant
The next day, a sealant varnish is applied to the concrete. It performs a number of functions:
- protects the surface from abrasion and wear, as well as from the penetration of oils and chemicals;
- gives the surface a shine of varying saturation (from barely noticeable satin to rich varnish);
- enhances the color saturation of concrete;
- simplifies the care of the treated surface.
The sealant is applied with a roller, rolling it over the surface. But, if the stamped texture has deep imprints, when applying sealant it is advisable to combine rolling with a roller with additional processing with a brush. Typically 2-3 coats of sealant are required.
After the sealant has dried, the stamped surface will be completely ready for use.
In what cases may imitation concrete be needed?
At first glance, decorative plaster for concrete cannot be in demand at all - they say, why, after all, you can simply remove the old repairs to bare walls and be happy if you really want to stand out. But it’s not so simple - unlike a real concrete wall, a concrete finish leaves room for creativity - for example, it can be given a certain pattern, texture, and so on. It can be softened a little, or, conversely, made emphatically rough.
Moreover, in some cases it is really appropriate. Let's imagine for a second that it is necessary to carry out repairs in the office of a construction company - it is possible that not every potential customer will appreciate it, but some will certainly be delighted. Another example is a public institution that imitates a kind of bunker. Again, this will be an amateur establishment, but any establishment has a specific target audience. Finally, this solution also fits into ordinary housing - industrial and loft styles are becoming more and more relevant, so there is nothing to be surprised about.
Decorative concrete-like plaster will perfectly emphasize the industrial features of the loft style
Remember! All interior details, not just the walls, should serve the final result, so roughness and emphasized negligence should be present even in furniture design.
The finished result is very reminiscent of an untreated wall with all the delights of such a solution - here you have small cracks, protruding stones, and inclusions of air bubbles. In general, for lovers of the brutal, this is exactly what you need.
A few tips for quality stamping
I would like to note a few points:
- If you are using a stamp for the first time and have no idea what the stamp will look like on concrete, do a test stamp on compacted sand.
- Avoid repeating the printed pattern on the surface, especially if the stamps imitate natural materials (stone, wood, etc.). Random compositions will look more realistic.
- To achieve an antique effect on the surface, apply a small amount of dry release agent (in powder form) to the still liquid concrete. Spray a liquid release agent over it. The liquid will dissolve a light layer of powder, after which color accents will remain on the surface, similar to scuff marks.
- Make sure that the release agent particles are well pressed into the concrete when printing. Otherwise, it will simply be washed away with water when washing the surface.
- Make sure that the person walking on the dies while compacting wears clean shoes free of traces of construction debris and dust. Inevitably, these contaminants will transfer to the fresh concrete and disrupt the desired texture of the stamped surface.
That's all the secrets of stamped concrete technology! But, before you start stamping yourself, we suggest you watch a short educational video. It demonstrated the main stages of the technology: painting concrete, applying a release agent and creating a surface texture using stamps.
Imitating a surface with relief imprints of familiar textures such as paving slabs, stone, paving stones, bricks and even some pictures is a technology for creating stamped concrete.
It is also called printed, pressed, decorative and even top coat. Making your own solution for this material and pouring it is quite simple, especially for those who already have some skills in such work. And you don’t need much experience to apply stencil forms to the surface.
Basic properties of plaster for concrete
The downside to a real concrete wall is its coldness and inability to isolate the room from anything. Even if the customer likes the severity of its appearance, he is unlikely to like being in an eternally cold room with a characteristic echo - he is not a prisoner here, but the owner. Decorative plaster to look like concrete is popular, among other things, because, although it is externally similar to its original, it is in many ways superior to it.
Unlike the original, concrete plaster has many advantages
Briefly, the following main advantages can be highlighted:
- If the customer not only likes visual poverty and unpretentiousness, but is also not actually ready to shell out a large amount of money for repairs, he need not worry - he cannot expect significant costs for such material.
- Unlike synthetics that are common these days, including those that are harmful to human health, plaster is environmentally friendly and does not emit any components or fumes into the atmosphere of the room. This is how it compares favorably, for example, with plastic.
- If the owner of the premises wants to give it an original look, then finding something even more original will not be easy. Of course, there is a certain amount of eccentricity in such a decision, but who said that this is a minus?
- Plaster, like natural concrete, does not burn in fire, so it not only does not increase the likelihood of a fire, but, in a sense, is also capable of stopping its further spread.
- Moisture is also not a direct threat to such coating. Of course, it all depends on the amount of water that gets on the surface of the wall, but no one bothers to specifically protect the latter. For this purpose, a thin layer of wax is usually applied on top of the dried plaster.
- Any plaster is traditionally considered a good soundproofing material, so the already harsh interior will be complemented by maximum detachment from the sounds of the outside world.
- Where plaster is definitely better than concrete is its thermal insulation properties - it is noted that its use even helps to achieve much greater heating efficiency in the room.
- It would seem that you can’t come up with an assortment for such a product, but the manufacturers’ imagination works great, so there is plenty to choose from here too - different options differ in composition, properties, shade, and so on.
This is how a nondescript material turns out to be a very useful thing for creating comfort in a room.
Short description
This technology attracts the attention of restorers who recreate destroyed elements of ancient buildings. Having a small sample, you can make an identical stencil, which will allow you to make a copy of an ancient brick or some artifact.
Pressed concrete is no less popular among finishers and designers, especially landscapers. It is valued for its decorativeness and ability to decorate any boring design with a variety of colors and unique textures.
People like to lay stamped concrete:
- on patios and terraces;
- on garden and park paths, outdoor cafe areas;
- on walls and ceilings imitating stucco, wood and other finishing materials.
Read also Why does a woman dream about a flowering tree?
The advantages are explained by physical properties and manufacturing technology.
- The final varnish coating prevents precipitation from getting inside the structure and protects against ultraviolet radiation. Therefore, the characteristics of the resulting monolith are not associated with such concepts as deformation, cracks and peeling. The resistance to heavy pressure of pressed concrete is 3 times higher than that of road tiles.
- Plasticizing and air-entraining additives not only help create special elasticity of concrete, but also increase its frost resistance, which is characterized by 300 freezing cycles in the range from minus 50 to plus 50°C.
- The speed of production and simple installation is explained by the lack of preliminary preparation, except for formwork, and special leveling work.
- Since the end result is a monolithic slab with an ideal plane, protected by varnish, water and dust do not collect on it, and difficult to remove traces of petroleum products and oils do not remain. It does not burden its owners with special care and does not have a slippery surface, and is not afraid of shocks or rust.
It has an affordable price compared to other materials of the same exterior and purpose. There are no harmful ingredients in the composition.
This technology is a few years old, but manufacturers are actively improving print patterns. The molds themselves are available in 2 types: hard and soft.
The first ones are intended for strict geometric prints. Previously, they were made from a large-sized solid aluminum stencil. More modern stamps are made from hard plastic that is resistant to low temperatures.
Soft, innovative stencils are made from silicone by infusing the real material with polyurethane in a liquid state. These clichés are used to create complex relief structures. Good flexibility allows you to easily remove the stamps after receiving the impression.
Hard molds are inferior in performance to soft ones:
- they do not have such a long service life;
- they need preliminary unmolding and processing before use;
- they do not have the ability to impart a matte or glossy surface;
- their plates do not show fine embossing details.
There are technologies that allow you to create stamps with your own hands. The easiest way to make hard stencils. And interesting surfaces with patterns are obtained from special polymer forms.
Self-stamping technology
The initial stage of making concrete with your own hands is the same as the traditional one. Let's consider this using the example of a sidewalk path:
- formwork is pre-made and the base base for the mixture is compacted;
- a reinforced mesh is laid 2 cm from the ground;
- The formwork is filled with ready-made concrete (homemade or ordered) of a grade no lower than M200, and then compacted with a vibrating lath and smoothed with a trowel.
After this, the creative process of creating stamping begins.
1. After about half an hour (depending on the weather and the brand of the solution), when the surface is slightly moistened and not wet, the mixture will begin to set. Its consistency becomes soft and viscous like clay, ready for modeling.
At this time, the colored hardener is applied 2 times, with an interval of 5–10 minutes, in small portions, covering the surface in an even layer. Its ingredients: coloring pigments (read about their varieties here), astringent modifiers, ground granite, quartz or pure river sand. Thanks to them, concrete acquires color, hardness, and grips better.
2. After leveling with a steel trowel, a special granular or liquid substance is applied by shaking with a wide brush. These release agents prevent the stamps from sticking and provide an additional coloring effect.
Sometimes these components are neglected; they are replaced by spraying the back surface of the stencil with machine oil from a spray bottle, which allows the pressing mold to come off easily. But this is only possible for rigid concrete dies.
3. The plasticity of the solution is checked. If it does not stick to the palms, but is pressed to a depth of 5–6 cm, the forms are laid out alternately and compaction begins with your feet. They must support the person's weight and not sink into the mixture.
4. The next day, the defects are corrected with a roller or spatula, and shrink seams are made with a grinder. The plane is washed with water and then with hydrochloric acid to form streaks. This treatment allows the pores to open, which is very important for subsequent coating with varnish or sealant in two layers after 24 hours.
Sometimes silicate impregnation is used, which has hydrophobic properties. It protects stamped concrete from the negative influence of the environment, promotes better color saturation of the surface and gives it additional shine.
When buying forms, you need to choose a cliche depending on the orientation in space, the horizontal or vertical location of the plane being processed. And also for large areas it is better to have several forms: both hard and soft. This promotes high-quality embossing and reduces the time required to create a design. Price of sets according to Moscow:
| Types | Number of cliches included | Rigidity | Area to be processed | Cost of 1 cliche, rubles | Price of the set, rubles |
| Simulation of wild stone for the vertical plane | 3 | 80 | 0,33 | 4 800 | 12 000 |
| Italian stone | 1 | 0,2 | 7 000 | ||
| Imitation brick on the walls | 85 | 0,203 | 3 500 | ||
| Modeling old granite on vertical and horizontal surfaces | 1 | 1,5 | 18 000 | ||
| Imitation of slate. Stamps are equipped with handles | 2 | 80 | 0,36 | 6 900 | 12 000 |
Manufacturers also have a rental service.
Fashionable design solutions
The possibilities of decorative plaster for concrete will satisfy the most sophisticated taste. The following popular effects are considered bold and original solutions today:
- rust,
- hi-tech style.
An unusual pseudo-concrete wall with a visual imitation of metal corrosion fits perfectly into both the Art Nouveau style and other interior trends. The combination of antique furniture or heavy curtains with concrete walls, “corroded by rust” in some places (seen in the photo), looks exclusive and also stylish.
High-tech style involves a minimum of objects in the room. Walls treated to look like concrete fit perfectly into the ultra-modern design. Art concrete attracts all attention to itself. Unusual wall decor, executed in seeming carelessness or chaos, leaves the impression that the owner of the house is an eccentric artist or a bohemian who deliberately left the walls “bare.”
However, unlike real concrete, decorative plaster creates the necessary comfort for living indoors:
- sound barrier;
- heat retention;
- protection against mold and dust.
An interesting option is to use plaster with metallic inclusions, for example, to give a more intense rock atmosphere. But such an aggressive finish should be used sparingly. The best option is to partially zone the room with a metallic design, leaving most of it under plain concrete, as in the photo.
DIY concrete wall
The technology for applying the material is simple. Decorative plaster for concrete does not require any special manipulations or complex processes. Absolutely all the steps presented in the video can be done with your own hands:
- Preparing the walls. The surface on which the material will be applied must be clean, dry, free of grease stains or dust. If there are small cracks, it is not necessary to seal them, since the plaster finish usually masks all the imperfections.
- Padding. The composition of the intermediate material is deeply absorbed into the wall surface and serves as a fastening layer.
- Direct application of art concrete. There is nothing difficult at this stage. The mixture is sold ready-made. All you need to do is take a spatula and apply a layer of material of the required thickness.
- Artistic processing. Typically, decorating with pseudo-concrete implies minimalism. It is enough to simply leave the wall rough. But you can apply streaks and blurry circles using sticks, thick brushes, etc. If you were planning an intricate, complex design, then it would be better to invite a virtuoso master.
- Applying a protective layer. For better performance of the material, as well as to give the wall a glossy look, you can use wax or varnish.
There is no need to paint the wall, since the pseudo-concrete finish already has the required shade. But you can use acrylic paints to create additional effects. Decorative plaster for concrete is a granular material with high design properties and performance characteristics. A fairly simple technology for applying it to walls makes it possible to decorate a room in an ultra-modern style with your own hands. The unpretentiousness of the finishing makes the interior laconic and stylish.