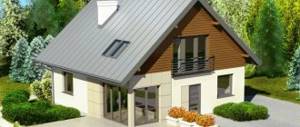
When to sheathe a wooden house
To begin with, it is worth highlighting those buildings that initially it does not make sense to sheathe the outside in any way, much less insulate them. Whatever finishing option you choose, it will not be cheap, and therefore is not practical for wooden houses for summer or periodic use. As for decorating the inside of a home, this is more a matter of design and the wishes of the homeowner than a necessity. After all, wooden walls made of timber or rounded logs always look attractive.
Now let's look at cases where wooden houses are sheathed from the outside:
- there is a good-quality and strong frame available, but it is quite old, which is why the appearance of the building leaves much to be desired;
- frame buildings made of wood must be clad in any case on both sides, this is their design;
- if a wooden house built from timber or logs needs additional protection and insulation of the walls.
It is not uncommon to find log houses that have stood for more than 50 years and are ready to serve for the same amount of time. Additional cladding from the street will not only change the appearance of the home for the better, but also protect the wood from precipitation and thus extend its service life. The same protection will not interfere with walls that need insulation. Since thermal insulation is usually carried out outside, and not inside, a wooden house, the insulation needs to be hidden behind a water barrier and covered, which will be discussed later.
Advice. Exterior finishing of a wooden house that has just been erected is carried out after 1 year. The shrinkage of buildings of this type is quite significant, as a result of which the external design of the finished walls may suffer and everything will have to be redone.
Cladding inside the house
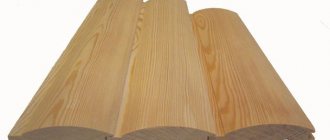
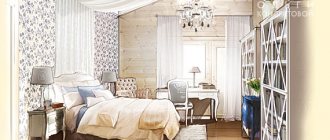
Lining is a leader among finishing materials. It is used both inside and outside the house, only with different treatments (impregnations and paints are used for external or internal work). It comes in different types. It's not just about different types of wood or different board widths. There are also different profiles: smooth, wavy, imitating timber or log house. There are several options in the photo below.
The most popular types of lining for interior decoration of a wooden house inside
The interior decoration of a wooden house can also be made from lining with a non-standard profile
To decorate the inside of the house, use thin lining: 1.5-2 cm is enough. It costs less and will perform its functions. The slats can be placed horizontally, vertically, or at an angle. From combinations of all these directions you can get amazingly beautiful panels, but this is a labor-intensive task.
When nailing the sheathing or planks, you need to remember about the shrinkage of the log house and the ability of the wood to swell and shrink. Near the floor and ceiling, do not nail the trim and sheathing tightly; leave 2-4 cm to compensate for these expansions.
Related article: Pouring a heated floor: step-by-step instructions
Both the walls and the ceiling are finished with lining. In both cases it looks more than decent, and such finishing is relatively inexpensive. It’s cheaper (and easier to do) to just cover it with plywood and stick wallpaper. This, by the way, is a popular option for decorating a country house inside an economy class home. With a sufficient level of execution, this method can be used to decorate premises not only in the dacha version. The only objection is the glue that is used to make plywood. But if you take it in emission class I (approved for use in children's institutions), then probably nothing terrible will happen.
Read how and with what to paint lining indoors here.
Mounting methods
Previously, they were not particularly worried and nailed the lining into the face (into the front surface) right through. At best, they used nails without heads or finishing nails (their heads are very small). Sometimes the caps were covered with wood putty and sanded, sometimes the screw holes were covered with pins. This is for the most fastidious and demanding of quality finishes.
Ways to fasten the lining
Today, even this method is considered not the most aesthetic: the traces can still be seen. To make sure nothing is visible, secret methods are used:
- nails or screws are driven at an angle into a tenon or groove;
- using clamps (clasps).
Both of these methods require patience and accuracy: thin, small nails are used, and they must be nailed in such a way as not to damage the front surface. To make it easier, you can hit not with nails, but with staples from a construction stapler. Staples are taken with a narrow back and long legs, made of stainless steel with sharpening. Although there are models of staplers that “shoot” nails with a very small head. For fastening the lining - just right. Self-tapping screws are also used. A comparison of the two methods is made in the video.
There is one caveat. If you bought the lining that was not chamber dried (its humidity is 7-8%), it will gradually dry out. Gaps will appear between the planks and you will either have to put up with them or re-nail all the planks. Sometimes two or three times. There is no way to avoid this. You can only choose a profile in which the cracks will be invisible (the “Softline” and “Standard” profiles in the figure in the previous section). In this regard, you need to think carefully about how best to secure the lining for the first time: it will have to be removed. Therefore, it is advisable to make it so that it is not difficult and so that it does not collapse. Here everyone decides for themselves: for some it is more convenient to work with self-tapping screws, for others with nails. Both methods are not ideal (it is difficult to pull out nails, and you need to drill a hole under the head of the screw), but both are acceptable.
Sometimes it becomes necessary to connect the lining to a wall made of logs. Difficulty may arise due to the fact that the wall has a non-linear shape. You can outline it using a small piece of lining, to which a simple pencil is attached. Having placed the plank and moving it along the wall with a piece of clapboard with a pencil, transfer the shape of the log onto the plank. By carefully cutting along the intended line, you can achieve an almost perfect match.
You might be interested in reading about how to lay laminate flooring.
Materials for external and internal finishing
Despite the wide selection of cladding materials, their list for wooden houses is somewhat limited due to various reasons. For example, it is relatively inexpensive to decorate a house using plaster, but this method is only suitable for frame buildings sheathed on the outside with OSB sheets, as shown in the diagram below. Plastering a log house or a dwelling made of timber will be problematic.
As can be seen in the diagram, the basic mineral wool insulation located inside the wall is supplemented by a layer of polystyrene foam or expanded polystyrene attached to sheets of OSB plywood sheathing. And only after that tinted decorative plaster is applied. But such facade decoration is rare for a wooden house; the following materials for external cladding are more common:
- vinyl siding;
- wood siding, the so-called block house;
- lining;
- complex system “ventilated facade”.
For reference. The cheapest and fastest way to cover the walls of a house is with painted corrugated sheets; this practice also takes place. But at the same time, the design of the building looks very cheap and resembles an industrial building. In addition, corrugated sheets quickly fade in the sun and lose color. Unless you buy expensive material coated with a pattern, as in the photo:
Vinyl siding is a very popular material, it is relatively inexpensive and retains its appearance for a long time, and with its help it is quite possible to sheathe a wooden house yourself. It will be more expensive to decorate the walls with other siding - imitation timber and rounded logs called “block house”.
This is a very attractive and pretty material, but it requires maintenance, just like regular wood paneling.
If we talk about what is the best way to cover a wooden house without reference to the cost of materials, then the “ventilated facade” system is beyond competition. It is a frame made of galvanized profiles, inside of which insulation is attached, and on the outside – finishing elements. Moreover, the latter can look like siding, brick or natural stone - your choice. True, the system can hardly be called cheap, and not every homeowner can handle the installation.
It is easier to solve the problem than to decorate the walls of a wooden house from the inside. For this purpose the following are most often used:
- regular and moisture-resistant drywall;
- OSB chip sheets;
- ordinary cladding boards - lining.
Drywall and OSB are an excellent basis for installing any finishing layer - various wallpapers, tiles and other materials. Moisture-resistant gypsum boards are perfect for interior cladding of a bathroom, and lining is ideal for a bathhouse built inside a house. OSB boards are not used as often inside buildings, since plasterboard is much more environmentally friendly.
A few words about the insulation materials used. It is well known that houses built of wood must “breathe”. This means that the wall material is transparent to vapor, due to which moisture from inside the premises is removed to the outside, passing through the wood. If a vapor-tight barrier is placed in their path, then moisture will begin to condense in front of it, which will lead to the gradual destruction of the fence. Therefore, the use of water-repellent polymers such as penoplex or penofol is not recommended.
The best solution for insulation when finishing a wooden house is mineral or basalt wool. It is vapor permeable and absolutely not subject to combustion.
An exception to the rule is a frame building, where a layer of mineral wool is part of the enclosing structure, but there is no main wall. Here the insulation is protected from the penetration of vapors by a film on one side and waterproofing on the other, as shown in the diagram:
Wooden house - interior finishing step by step
Before you begin interior finishing work, take care of the exterior decoration . The house must be protected from negative factors. This will extend its service life. Also, the exterior decoration of the building will increase its sound and heat insulation qualities and make the wood fireproof.
We recommend reading: Installing siding with insulation on a wooden house
Treat the wood with special antiseptics . This will extend the life of the material and protect it from the formation of fungi and mold; special products also slow down the process of wood rotting and prevent the appearance of harmful bacteria that contribute to the development of fungi.
We recommend: New dress for a wooden house: what and how to paint the walls inside and outside? Options and examples of painting in photos of wooden houses
And before you start treating wood with antiseptics, you need to carefully prepare all surfaces. They must be dry and free of dust and various contaminants. Antiseptics are applied using a brush, roller or spray.
Important : treating wood with antiseptics should be carried out in dry and sunny weather.
Caulking at home and features of this process
The next preparatory stage before starting interior finishing is caulking . At this stage, all cracks and joints are processed, both inside and outside the building.
Attention : sealing of cracks is carried out twice - after the construction of the house, and after its complete shrinkage.
To carry out caulking at home, you will need to prepare insulation. The selected material should be:
- resistant to sudden temperature changes;
- moisture resistant;
- environmentally friendly;
- hygroscopic;
- resistant to fungi and mold;
- have breathability.
The ideal material for insulating a wooden house is moss . It has such positive characteristics as antibacterial, antiseptic qualities and the ability to purify indoor air. This material has a very long service life.
When caulking at home, you can use
flax tow, jute or felt made from natural materials.
For this technological process you will need to prepare the following tools:
- type-setting spatula;
- crooked shoulder blade;
- road worker;
- breaking caulk;
- mallet.
Laying utilities in a wooden house
As for the laying of utilities, these include:
- heating;
- water supply;
- sewer system.
At the same time, you need to carefully consider how the pipes will be located in your house so that they do not interfere with the arrangement of household appliances and furniture and so that they do not spoil the interior of the premises.
As for the requirements for carrying out engineering communications, these works must be carried out by qualified specialists . Since an ill-designed water supply or sewer system can lead to damage and rotting of natural wood.
The same goes for electrical wiring. Incorrectly routed and connected wires can cause a house fire. Therefore, special requirements are placed on electrical wiring in such a house. All wires must be used only with the appropriate markings, and they must be laid in special metal or plastic tubes .
Materials for interior wall decoration
Below we will consider all the available options for finishing the walls of a wooden house from the inside and common materials for interior decoration.
Insulation
Insulating a wooden house involves laying a heat insulator in the space between the frame and the wall. Most often, people use mineral wool for such purposes. This material copes well with sudden temperature changes and high humidity.
But the use of this heat insulator implies the installation of a vapor barrier, since mineral wool is a synthetic material and does not allow air to pass through. After this, you can begin covering the walls with finishing materials .
Lining
Lining is a natural and safe material. It is customary to use it not only for interior, but also for exterior decoration of wooden buildings. Due to its versatility, lining is used for finishing ceilings, walls and floors . Its advantages include:
- environmental friendliness;
- high thermal insulation;
- strength and durability;
- ease of installation and further maintenance.
We recommend: How to choose the right designs for wooden one-story houses? DIY design and construction
With its help, you can perfectly level any surface without much effort. You can also hide all engineering communications under this material.
Wall panels
Panels for interior decoration are also in incredible demand. The types of wall panels are:
- rack and pinion;
- leafy;
- tiled.
Each individual option has its own characteristics, but they all have the same advantages:
- long service life;
- ease of care;
- wide variety;
- ease of installation;
- reasonable prices.
Attention : when choosing wall panels, pay attention to their fire resistance.
Drywall
Drywall is also a good option. With its help, you can level all surfaces by covering the walls in a wooden house. In order for the work to proceed correctly, it is necessary to make a reliable frame and evenly attach drywall to it. After this, carefully seal all the seams and you can begin applying the finishing coat.
Important : if there is high air humidity in the room, choose moisture-resistant drywall.
After installing plasterboard on the walls or ceiling, it can be covered with wallpaper, painted, plastered or ceramic tiles applied.
Plastic
Plastic is a material that is quite attractive and easy to work with. It has a favorable price and a wide range. In wooden houses, plastic is used in rooms such as kitchens, dining rooms, bathrooms, hallways .
Its advantages include:
- moisture resistance;
- practicality and durability;
- resistance to negative factors.
To cover the walls with plastic and improve your home, there is no need to resort to the services of professionals. This material is easy to install, is lightweight and, if necessary, can be easily cut and sawed with any hand or power tools.
How to finish the ceiling
All work on the interior decoration of a house begins with the ceiling surface. The development of modern technologies opens up endless possibilities for consumers. In modern interiors, ceilings can be improved using plasterboard, plastic , or you can make stylish stretch ceilings .
Plasterboard ceilings
Plasterboard ceilings are divided by type into:
- simple;
- stepped;
- complex.
Simple ceilings can have rounded or straight lines. According to the type of construction, they can be one- or two-level. This is the most common option for finishing the ceiling surface in private homes.
Stepped designs are also popular. With their help, you can create an original design in the interior of the premises, thanks to slanting and smooth lines.
And complex ceilings delight consumers with intricate and original patterns and ornaments. They are used in designer renovations.
note
If the height of the room does not allow you to remove 10-15 cm, then it is better to abandon multi-level ceiling structures. In this case, you can make a single-level ceiling, which can later be plastered, painted or wallpapered.
Plastic ceilings
Plastic ceilings differ:
- affordable price;
- easy installation method;
- a variety of textures and colors.
We recommend: Learn more about how to insulate a wooden house from the outside. Popular methods, choice of insulation, vapor barrier
With a competent approach to choosing plastic panels, they will not emit harmful and toxic substances. With their help you can make multi-level original designs . Modern plastic panels can imitate any natural materials. They are light in weight and elastic.
Ceiling plastic is used in rooms such as kitchens, bathrooms and hallways . They practically do not absorb odors, are easy to clean with various means, do not fade or fade, and are fireproof.
Tensile structures in interiors
Stretch ceilings deserve special attention. They differ:
- various materials of manufacture;
- impeccable appearance;
- long service life;
- originality and exclusivity.
The list of advantages of suspended ceilings can be endless. They will delight their owners with an impeccable appearance from 20 to 30 years .
Important!
Specialists should be involved in the installation of suspended ceilings. Since they have experience working with canvas, and special tools and equipment.
As for suspended ceiling designs, the most popular are:
- starry sky;
- photo printing;
- multi-level ceilings.
Their surface can be:
- varnish;
- matte;
- glossy;
- mother-of-pearl;
- satin.
It is up to the home owner to decide which option to choose. In this case, you can build on both personal beliefs and the overall design of the room.
Finishing the floor inside a wooden house
After the walls and ceilings in the house have undergone a rough finish, you can move on to arranging the floor .
This process is quite complex and time-consuming. Even before starting interior finishing work in the room, it is necessary to decide in advance on the type of floor construction. These can be either single or double floors . But for year-round living in the house, you need to choose the second option.
Such floors will have high thermal insulation qualities. Moreover, they should consist of the following layers:
- rough floor;
- vapor barrier;
- waterproofing;
- fine coating.
Floors in a wooden house can be concrete or wood. Wooden floors can be installed on the first and second floors. They differ:
- high performance;
- light weight;
- naturalness.
And concrete floors are made only on the first floors, since they are heavy and can bear additional load on the structure of the house. Using concrete, you can make a perfectly smooth and durable coating. Solid boards or piece parquet can be laid on a concrete floor.
Covering a wooden house with siding
This exterior finishing of the house can be done with or without insulation, as necessary. But in any case, it is necessary to provide an air gap between the vinyl siding and the wall for ventilation. Its task is to remove moisture entering from the outside onto the diffusion membrane, which plays the role of a hydro- and wind barrier. This is why vinyl siding sheets are not attached directly to walls, no matter how smooth they are. First, you need to assemble the sheathing from wooden beams, less often from galvanized profiles.
Advice. Before covering an old log house, you should thoroughly caulk the cracks between the logs, using natural materials - felt, tow or moss.
The width of the bars for sheathing when installing external finishing without insulation should be from 3 to 5 cm to ensure an air gap. The interval between the slats is 40-50 cm. But first of all, a diffusion membrane is laid; it is capable of passing vapors, but reflecting water. The membrane sheets are laid horizontally, starting from the bottom, with an overlap of 10 cm and taped at the joints. After this, it is pressed with bars or sheathing profiles installed vertically.
Note. If you plan to install vertical siding, then the beams should be mounted horizontally. They should first be treated with an antiseptic composition.
Also, all openings – windows and entrance doors – are framed with sheathing strips. In this case, it is better to nail wooden elements to the wall rather than screw them with self-tapping screws. The latter do not allow structures to move during shrinkage or thermal expansion. An important point: the surfaces of all bars must be strictly vertical and aligned in one plane. Now you can begin installing the siding, using the starting and other types of planks shown in the figure:
When adjusting the siding, it is important to take into account its thermal elongation, so the ends of the vinyl strips should not rest against the nests of the corner strips standing on the sides (meaning horizontal installation). The strips must be cut and inserted between the planks with a gap of 3-5 mm, and the nails must not be driven in all the way. This is why oval holes are made in the siding so that the strip can move a little. By the way, installation is carried out from the starting bar - from bottom to top.
When the length of 1 strip is not enough to cover the entire wall of a wooden house, then you need to install one or more connecting strips, placing them as aesthetically as possible. Although siding can be laid with an overlap (without a strip), such a connection looks unpleasant, and therefore it should be used as a last resort. Well, there are special vinyl planks for framing windows and doors.
If it is decided to combine the finishing process with insulation, then the work procedure also includes laying thermal insulation material. Considering its thickness (at least 100 mm, and in the northern regions up to 150 mm), it is necessary to take lathing bars of the appropriate width. Moreover, the membrane is not applied directly to the wall, but already on top of the insulation. It is secured by nailing 30 mm thick counter-lattice strips on top. Further work is carried out in the same way as described above.
Decorating a wooden house with a block house
In essence, a block house for cladding a house is the same siding, only made of wood, and the algorithm for carrying out the work is the same.
True, there are a number of differences that we will focus your attention on:
- There are no starting, corner or connecting strips here. All joints will have to be faced from the outside with shaped wooden elements;
- strips of block house are cut strictly to size, and when forming internal and external corners, the material is cut at an angle of 45° for joining;
- The panels are fastened from bottom to top using nails or special clamps. True, the latter tend to unbend and the stripes may fall out over time;
- When the boards are oriented horizontally, it is better to install them with the tenon up and the groove down.
One of the most difficult knots is the connection of the cladding in the form of an internal corner. Of course, you can ignore the resulting gap and sheathe the corner with a shaped element. But in order for the cladding of a wooden house with a block house, made by yourself, to be of high quality, it is worth cutting out an arched cutout in the adjacent part, as shown in the photo:
At the end, an antiseptic primer is applied to the finished surface, after which it is finished with several layers of varnish or paint.
Interior finishing with clapboard
This is one of the most popular methods of cladding the inside of private wooden houses, used in almost all rooms, and especially in the steam room. There are currently several types of lining available for sale:
- classical;
- block house;
- softline;
- landhouse;
- American.
The technology for covering walls inside the house is the same for all types, and work begins with installing a vapor-proof layer of film and installing the sheathing. The film is laid out with an overlap of 10 to 15 cm, after which the joints should be carefully taped with double-sided or regular tape. From above it is pressed against the wall with sheathing slats, whose thickness is 20 mm. The slats are nailed to the wall vertically (when installing the cladding horizontally) at intervals of 40-50 cm.
Important. All sheathing slats must be placed in one vertical plane using various pads or mounting wedges.
The first board is secured with self-tapping screws at a distance of 40-50 mm from the floor, taking into account the subsequent installation of the plinth. It is best to fasten all subsequent planks using metal elements - clamps, placed on the previous board and nailed to the sheathing bars with nails. It is not recommended to fasten the sheathing by driving nails into the grooves of the lining.
As with the exterior cladding of a block house, all joints and corners should be lined with shaped parts or wooden plinths. After this, all that remains is to treat the wood with an antiseptic and cover it with several layers of varnish. The finishing technology is shown in more detail in the video:
Wall panels for interior decoration
Decorating the inside of a wooden house with wall panels gives a completely different stylistic result. This finishing material is made from different materials with different textures:
- wood;
- bamboo;
- MDF (laminated and veneered);
- glass (smooth with photo printing, embossed, colored, transparent, matte);
- plastics and plastics;
- skin.
They come in typesetting or panel form. Stacked - long thin elements connected to each other according to the tongue-and-groove principle. Lining is essentially also wall panels. It’s just that it has long been used as an independent category of finishing materials. Panel wall panels differ in geometry - they have comparable length and width.
Related article: Products from Aliexpress for the home
Everything is usually assembled onto a sheathing (like lining), the bars of which are filled taking into account the dimensions of the chosen finish. This material is loved by designers: the materials, texture and color solutions allow you to realize a variety of ideas. Such interior decoration of a wooden house can be very expensive - made of leather - or cheap - MDF panels. But the appearance is quite decent.
If, according to the technology, wall panels must be laid with glue (gypsum, for example), then backing boards - plywood, gypsum fiber board, etc. - are attached to the sheathing (you remember that in a wooden house it needs to be made floating). The slabs are installed on this substrate with glue. An example is shown in the video.
Read about the interior design features of a wooden house here.
Interior finishing with plasterboard
Drywall is an excellent material for rough finishing of any internal surfaces of a wooden house, including the ceiling. Also, moisture-resistant plasterboard is indispensable in rooms with high humidity - in bathrooms and dressing rooms. Subsequently, you can lay tiles on it or apply liquid wallpaper. The technology here is simple: first, galvanized profiles are attached to the wall or ceiling so that their shelves are in the same plane. To strengthen the structure, jumpers made of the same profiles are placed between the vertical profiles.
Sheets of drywall are screwed to the shelves of the profiles with self-tapping screws so that their caps are flush with the surface of the plasterboard. The step between adjacent screws is 10-15 cm. Where it is impossible to screw a whole sheet, you need to accurately measure and cut off part of it. This is done with a sharpened knife or a specialized tool. When the wall is completely sewn up, the joints and heads of the screws need to be leveled with putty, which, after drying, should be rubbed with sandpaper. At this point, the surface is ready for further cladding.
What should be inside the house
Every modern person is accustomed to comfort and coziness. And even if he is on vacation in a country house, he still wants to enjoy all the benefits of civilization. That is why almost all wooden houses that are now being built have a bathroom and toilet.
It is worth noting that having a bathroom or shower is just as important as the opportunity to prepare breakfast in a comfortable kitchen or taste delicious tea on the summer veranda. The presence of all of the above premises is a huge advantage for a country house. But this is not the entire list of what should be in a comfortable home. If we are talking about two or more floors, then you need to make sure there is a convenient staircase in the building.
Most often, the staircase is also made of wood. Although there are options when this structure is made of glass or metal. In this case, it all depends on the style that can be seen in the interior design, and on the personal preferences of the owners of the house.
In order to understand which materials are best used to make a staircase in your home, you can study in advance the interior decoration projects of wooden houses, photos of which are quite accessible. And based on them, decide what is best to use for the task at hand.