Home / House / Porch
Back
Published: 08/15/2019
Reading time: 9 min
0
316
The space near the country house is the most sought-after part of the site. Here we park the car, place a terrace and even try to find a place for a summer kitchen. But in each of these cases you will need a canopy attached to the house. It can be designer, with elements of artistic forging and gilding, or made by hand, albeit simple, but functional.
Whatever we come up with regarding the design of the canopy, the important thing remains that it should create shade and protect the owners from the rain. But what to build this umbrella from, and how it can be done, we will tell you in our review today.
- 1 What to build a canopy from
- 2 Advantages of the material
- 3 Polycarbonate canopy adjacent to the house
Where to start
Any construction must be carried out according to a specific plan. Even if you just want to make a small polycarbonate canopy with your own hands, it will be better if you determine the sequence of actions in advance. This way you can avoid mistakes and omissions of mandatory steps, the need to redo an almost finished design and expenses for replacing damaged materials and unnecessary purchases.
photo: canopies made of polycarbonate, carports made of polycarbonate, country canopies made of polycarbonate.
Therefore, you need to take into account all the nuances - the planned size, shape, thickness, type of material, desired color, light transmittance and thermal insulation properties, prevailing weather and even the strength and direction of the wind!
And planning should begin with the sublimation of plans and ideas into a visual picture. That is, you need to make a drawing of a polycarbonate canopy, albeit approximate, but clear enough to understand for yourself what you want and how realistic and adequate the structure will be in this case.
Drawing up a drawing taking into account the specifics of the application
The popularity of this type of thermoplastic will play into your hands at this point. There are a huge number of drawings and photos on the Internet for do-it-yourself polycarbonate canopies. So you don’t need to graduate from an engineering and technology college, just open the gallery on request and choose the one that suits you. It is very good if at the same time you look not only at the form and purpose, but also compare the conditions for which the scheme was created with those on your site.
Sizing rules
If you're lucky, the diagram you find for a do-it-yourself polycarbonate canopy will be ready, and the resource will even provide technological calculations for the necessary materials. Otherwise, it will have to be adjusted, and here it is important to remember that the canopy usually does not have walls, that is, the covering cannot be made flush under the covered area. Here are some tips on how to properly make a polycarbonate canopy “with a margin”:
- If this is a hanging canopy, then its sides should protrude 30 centimeters beyond the area that needs to be covered
- If this is a structure on supports, for example, for a parking lot, then the same 30-40 cm should be left between all dimensions of the car and the racks
- If this is a swimming pool, flower garden, recreation area or “home production” such as outdoor carpentry, then it is better to make even more stock for the farms
You also need to remember about the height - the correct polycarbonate canopy at the lowest point should be no lower than 180 cm!
Lathing
The area of polycarbonate canopies varies from several tens of square centimeters to hundreds of meters. Naturally, such global projects should be dealt with by specialists, and calculations are their concern, but even for half a sheet, just supporting the perimeter is not enough. You will need lathing with the correct spacing. It depends on the thickness of the material and the estimated wind and weight load per square meter.
In those regions of the country where the manufacture and installation of polycarbonate canopies is technically and economically justified, you can use the following hint sign:
| Thickness and pitch (cm) Load (kg/m2) | 6 mm | 8 mm | ||
| width | length | width | length | |
| 100 | 105x79, 90x90, 82x103 | 120x90, 95x95, 90x110 | ||
| 150 | 88x66, 76x76, 70x86 | 100x75, 83x83, 75x90 | ||
| 200 | 80x60, 69x69, 62x78 | 85x65, 76x76, 65x85 | ||
Thicker varieties were not included as they are used for large areas and the 4mm sheet is too weak for such applications.
Mold for polycarbonate canopies
The general configuration, “cut” according to the plan - square, rectangle, oval, circle or polyhedron, depend on the purpose and placement. But the shape of the frame of the covering part itself may be different. True, the design of a polycarbonate canopy here must also take into account the features of its purpose, type and placement:
- Single-pitched - chosen in cases where the water flow must be directed in a specific direction according to technical conditions or to complete the architectural composition
photo: polycarbonate canopies for summer cottages,
- Gable - better protects from precipitation and wind, usually has a larger slope angle, which means less snow accumulates on the surface in winter
photo of a polycarbonate carport in the yard
- Arched - similar in characteristics to a gable one, but does not have a central rib, but assembling a polycarbonate canopy of this type requires special equipment and skills in bending metal profiles or serious carpentry experience
polycarbonate canopy attached to the house
- Dome - round or oval, original, but requiring more labor, this type is preferred to be installed on gazebos and recreation areas
photo: polycarbonate canopies in the courtyard of a private house, dacha
- Cascade - a prefabricated multi-level structure, usually of an arched type, used for canopies adjacent to walls
polycarbonate canopies in the courtyard of a private house
If you have absolutely no idea how to make a canopy from polycarbonate and in general are just establishing friendship with the tool, we advise you to choose the simplest options possible - single-pitch or gable. Practice, and then you will be able to build something more complicated, including setting up a sliding polycarbonate canopy with your own hands, and this is already a level!
sliding polycarbonate canopies in the yard
Project development
If you have a desire to add an extension such as a canopy to your country house, then it will not hurt you to first familiarize yourself with the photo of this structure. In order not to make a mistake when choosing a canopy, you must consider the following parameters:
- The purpose and dimensions of the object that is planned to be built;
- The total area of the site on which the canopy will be created.
- The nature of the emerging wind and snow loads observed in the region.
- The total amount of precipitation falling in a year.
- Snow depth;
- Reliability of the walls and foundation of the building;
- House design;
- The ability to prepare the necessary materials, tools and fasteners, as well as the availability of construction experience if you plan to independently carry out the work of constructing a canopy.
After this, they begin to draw up a drawing of a polycarbonate canopy attached to the house; photos here will not be superfluous. It must display the actual dimensions: height, length and depth of the structure . Based on this information, the required amount of materials for the manufacture of the frame and roof will be calculated.
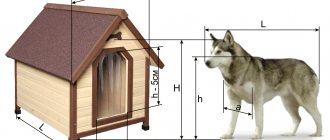
For example, to make a canopy for parking a car, the structure must have the following average dimensions:
Recent Entries
Chainsaw or electric saw - what to choose for the garden? 4 mistakes when growing tomatoes in pots that almost all housewives make Secrets of growing seedlings from the Japanese, who are very sensitive to the soil
- 250 x 500 cm - for vehicles whose length does not exceed 4 m.
- 350 x 660 cm - for SUVs and cars longer than 4 m.
When designing a canopy attached to a house, you need to have a photo on hand. But at the same time, you need to take into account that its dimensions should allow a car with a load to freely drive under the canopy. If the roof has a height of more than 230 cm, be prepared for the fact that precipitation will constantly fall on the transport. This problem can be solved in the following way: to do this you need to install the roof at a different angle.
Materials and tools
A plan and drawing are great, but you need to build something out of something and work with something - you will need materials for a polycarbonate canopy and tools for processing and fastening:
- Base and frame elements
- Covering material, connection details if necessary
- Construction knife (for thick sheets, a circular saw with undetected fine-toothed discs or a jigsaw)
- Grinder, drill (hammer) and screwdriver
- Tape measure and construction pencils (marker), level
- Sufficient fasteners
If excavation work is expected, you will need an entrenching tool; for concrete work, at least a trough and a trowel. Now let's talk about some points in more detail.
Metal or wood
It’s up to you to decide what to build a canopy from with your own hands – from metal and polycarbonate, or with a wooden frame. You need to take into account the availability and cost of metal and wood in your region, the availability of specialized tools and the desired style.
Metal structures have a more modern look, are stronger, but are more expensive and heavier. Wooden ones are good for areas designed in rustic (country) and similar styles; timber and boards are cheaper than metal, but do not forgive mistakes in processing and when installing a protective coating. Of course, metal is more durable, and metal buildings are not subject to shrinkage, but wood, with proper protection, can last 50 years or more without any problems!
photo of a polycarbonate canopy adjacent to the house
It is better to take a rectangular profile for a polycarbonate canopy - it is easier for a beginner to work with it, especially if welding will be used for fastenings!
Cellular or monolithic
"Polygal" produces both types of construction polycarbonate, so when choosing the type of coating, you must first remember their differences from each other. It will be cheaper to build a canopy from cellular polycarbonate with your own hands, since its price is lower. On the other hand, repair of such a coating is required more often, because it is easier to break through a thin layer than a monolith, and although the coating usually does not allow water to pass through, its visual appeal decreases.
Cellular, naturally, is lighter than monolithic, and although it has a greater light transmittance, due to multiple refraction of rays it provides better protection from ultraviolet radiation. But with insufficient experience, it can easily be damaged during installation, and errors made in calculations and fastening will quickly affect the integrity and reliability of the structure.
The materials are similar in terms of flexural strength and ductility. At the same time, multilayering gives better thermal insulation performance, so if you plan not just to build a polycarbonate canopy with your own hands, but to build a special structure such as a greenhouse, then it is better to refuse a monolithic one. When everything is selected and prepared, you can begin construction.
Canopies attached to a house made of polycarbonate over the porch - photo selection of the most successful options
Arched and gable canopies take up a lot of space and are often installed in large areas with swimming pools and areas reserved for recreation. The owners of small country houses prefer to install only a polycarbonate canopy over the porch. Such a shelter simultaneously performs two functions: protective and aesthetic. It protects from the destructive power of precipitation and icing, from an aesthetic point of view, it decorates the porch and exterior of a country mansion, adds zest, and is an element of the ensemble of architectural style.
A single-pitched canopy made of different types of polycarbonate is installed above the porch, according to the preference of the owners. The type of structure depends on the wishes of the owners: you can install a flat canvas at an acute angle, a half-arched type with a dome covering the porch space, a canopy attached to the house made of polycarbonate and located parallel to the ground.
The design of the porch canopy depends on the architectural features of the building and its exterior. Ornate and pretentious designs will add zest to the porch of a modern home built in the high-tech or modern art style. Restrained and laconic - will complement the configuration of the porch in a classic style. The stylistic decision, color scheme and type of frame are chosen to suit the overall exterior.
On a porch with a canopy it is convenient to leave bicycles, sleds, skis, crops collected in the garden or garden, where they will be protected from rain and wind. Canopies attached to a house made of polycarbonate create cool shade in the summer, protect from ultraviolet radiation, and in winter resist the accumulation of snow at the threshold and icing.
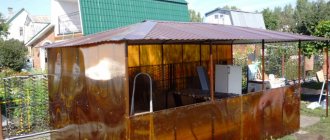
A country house with a porch combined with a terrace is equipped with a canopy not only above the entrance, but also above it. A gable or arched canopy is mounted on the porch, extending to the end of the terrace. Above the terrace itself, the type of construction is a lean-to, attached to the house.
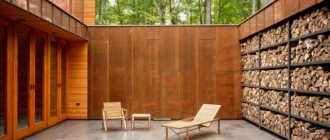
The polycarbonate used for covering over the porch is predominantly of the honeycomb type. Monolithic is used to construct a canopy for a summer residence, which is not attached to the wall of the house (for the safety of a car, for a greenhouse, gazebo).
Similar news:
- How to build a house from timber
- Do-it-yourself gazebo for your dacha: use your imagination and create it on your site...
- Organza – lightness and spaciousness
- Mini dressing room: things in their places
- Insulating the outside walls of a house yourself
- Do-it-yourself frame change house for a summer residence - step-by-step manufacturing instructions
Preparing the base
The easiest way to make polycarbonate canopies yourself is to use the wall and foundation of a finished building as the base. There is no need to create anything additional here, and the base trusses are attached to anchor bolts - a hole is drilled, a stand is attached, leveled and fixed. But this is not always possible, and preparing the foundation is the longest stage:
- We dig holes 30x30 cm about half a meter deep at the points where the supports will stand
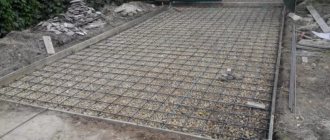
- We fill the holes with crushed stone or arrange a frame of reinforcement in them
- Prepare a cement-sand mixture in a ratio of 3 to 1 and fill the base
- We wait the allotted time until it completely hardens and gains strength (up to 2 weeks)
After this, you can drill holes for the anchors. Of course, you can immediately embed the racks into the foundation, but this method will not work a priori if you decide to build a polycarbonate canopy with your own hands using wooden supports. Plus, shrinkage of concrete can “pull” the truss to the side, violating the intended geometry, which is especially bad if there is a house wall nearby - straightening the shape and level only with crossbars will be almost impossible.
Single-pitch polycarbonate canopies
Having decided on the type of material, the next step is choosing a design. According to the structure, it can be: single-pitched, gable and arched. Sheds made of polycarbonate are attached to the wall of the house, installed using a hanging or support method, and precipitation in the form of snow does not linger on it, which is definitely a huge plus. A gable roof is 2 single-pitched roofs connected to each other.
It is mounted separately from the walls of the building or other structures; its main features are greater endurance, reliability and increased protection from gusts of wind.
The arched one is mounted on a flexible frame made of metal pipes. It can be designed separately from the home, or it can be an extension to the wall. It is characterized by high rigidity and resistance to powerful whirlwinds and snowstorms.
Frame assembly
The most important part of the work is the installation of support pillars. If it is done efficiently, then there will be no problems in the future. The accuracy of the placement and position of the main posts is especially important if the metal profile (beam) is already cut to pre-calculated dimensions.
We recommend! Do all cutting (bending) of attachment points as necessary. An error of a couple of millimeters on just a few elements can significantly complicate the installation of a polycarbonate canopy with your own hands, and increase the overall cost. Don't rush, it's better to spend minutes on additional checking than hours and days on redoing!
As you install the support posts, be sure to check that they are at the required vertical and/or horizontal level. This is a question not only of trouble-free further work, but of the aesthetics of the final result and the functionality of the design. If the fastening is welded, it is advisable to use transverse trusses along the entire length of the vector (connecting the extreme points).
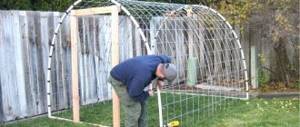
Alternatively, making a polycarbonate canopy with your own hands can be done partially on the ground. Select a level area and assemble the installation frame on it using a level. This way, making threaded connections and welding points is much easier and more convenient; you can do with a minimum of assistants and even without them at all. True, lifting the finished structure to the top is more difficult and, most likely, will require the use of a winch or crane. Next, building a polycarbonate canopy with your own hands involves sanding the seams and cuts, and coating with protective paint.
How to bend a profile
If you are a risky person, or you know how to make a regular canopy, you watched a good video on how to make a semicircular polycarbonate canopy with your own hands, and decided to take on such a design, then you will have to not only cut, but also bend the profile. There are special machines for this, but their cost makes purchasing only for home use impractical.
We reject the option of going to a construction site or a specialized enterprise for several reasons:
- they simply may not be around;
— as already mentioned, it is better to adjust the size during the process;
— we make a polycarbonate canopy with our own hands!
Therefore, let’s remember the old-fashioned ways to get a similar “cut”:
Undercuts
At the desired point, the pipe (profile) is cut to a depth of 6-8 mm, which breaks the rigidity and allows it to be bent in the direction opposite to the cut. After the stand has received the desired shape, it is advisable to “patch” all undercut areas using welding. An alternative is wedge-shaped undercuts and bending in their direction.
Heat
Another option is to heat the pipe and quickly bend it by hand using homemade supports or a vice. But there is a nuance! With this method, flattening often occurs at the bending point, and further installation of polycarbonate on the canopy with your own hands will be accompanied by gaps or a violation of the geometry of the sheets. Therefore, to maintain the shape of the section, first compact wet sand inside.